Difference between revisions of "IPCWebInterface"
| (39 intermediate revisions by one other user not shown) | |||
| Line 1: | Line 1: | ||
===IP Camera Web Interface=== | ===IP Camera Web Interface=== | ||
| + | ==Main Menu== | ||
There are four sections: | There are four sections: | ||
| + | |||
* Section 1: Encode setup bar | * Section 1: Encode setup bar | ||
* Section 2: System menu | * Section 2: System menu | ||
* Section 3: Window function option bar | * Section 3: Window function option bar | ||
* Section 4: Window adjust bar | * Section 4: Window adjust bar | ||
| − | [[file: | + | |
| + | [[file:IPCWebInterface2.jpg|none|800px]] | ||
| + | |||
| + | {| class="wikitable" width="529" | ||
| + | |- | ||
| + | | width="113"| | ||
| + | Parameter | ||
| + | |||
| + | | width="416"| | ||
| + | Function | ||
| + | |||
| + | |- | ||
| + | | width="113"| | ||
| + | Main stream | ||
| + | |||
| + | | width="416"| | ||
| + | Streaming media protocol connection, under main stream config, monitor video or not. Generally for storage and monitor. | ||
| + | |||
| + | |- | ||
| + | | width="113"| | ||
| + | Sub (Extra) stream 1 | ||
| + | |||
| + | | width="416"| | ||
| + | Streaming media protocol connection, under sub stream 1 config, monitor video or not. When network bandwidth is insufficient, it substitutes main stream for monitoring. | ||
| + | |||
| + | |- | ||
| + | | width="113"| | ||
| + | Sub (Extra) stream 2 | ||
| + | |||
| + | | width="416"| | ||
| + | Streaming media protocol connection, under sub stream 2 config, monitor video or not. When network bandwidth is insufficient, it substitutes main stream for monitoring. | ||
| + | |||
| + | |- | ||
| + | | width="113"| | ||
| + | Protocol | ||
| + | |||
| + | | width="416"| | ||
| + | You can select stream media protocol from the dropdown list. | ||
| + | |||
| + | There are three options: TCP/UDP/Multicast | ||
| + | |||
| + | |} | ||
| + | ==System Menu== | ||
| + | [[file:IPCSystemMenu.jpg]] | ||
| + | ==Video Window Function Menu== | ||
| + | [[file:IPCVideoWindowFunction.jpg]] | ||
| + | {|class="wikitable" width="545" | ||
| + | |- | ||
| + | | width="55"| | ||
| + | SN | ||
| + | |||
| + | | width="91"| | ||
| + | Parameter | ||
| + | |||
| + | | width="399"| | ||
| + | Function | ||
| + | |||
| + | |- | ||
| + | | width="55"| | ||
| + | 1 | ||
| + | |||
| + | | width="91"| | ||
| + | Alarm output | ||
| + | |||
| + | | width="399"| | ||
| + | It shows if there is any alarm output, status description is as follows: | ||
| + | |||
| + | * Red: means there is alarm output. | ||
| + | * Grey: means alarm is over. | ||
| + | |||
| + | Click on the button to force alarm to be on or off. | ||
| + | |||
| + | |- | ||
| + | | width="55"| | ||
| + | 2 | ||
| + | |||
| + | | width="91"| | ||
| + | Zoom in | ||
| + | |||
| + | | width="399"| | ||
| + | * When the video is in the original status, click it you can select any zone to zoom in. In the non-original status, you can drag the zoom-in zone in specified range. Right click mouse to restore previous status. | ||
| + | * Click it; you can use the middle button of the mouse to zoom in/out the video size. | ||
| + | |||
| + | |- | ||
| + | | width="55"| | ||
| + | 3 | ||
| + | |||
| + | | width="91"| | ||
| + | Snapshot | ||
| + | |||
| + | | width="399"| | ||
| + | Click on the button to snapshot, save picture to path in Ch 5.1.2.5. | ||
| + | |||
| + | |- | ||
| + | | width="55"| | ||
| + | 4 | ||
| + | |||
| + | | width="91"| | ||
| + | Triple snap | ||
| + | |||
| + | | width="399"| | ||
| + | Click it, system can snap at 1f/s. All images are saved to path in Ch 5.1.2.5. | ||
| + | |||
| + | |- | ||
| + | | width="55"| | ||
| + | 5 | ||
| + | |||
| + | | width="91"| | ||
| + | Record | ||
| + | |||
| + | | width="399"| | ||
| + | Click it, system can record. All images are saved to path in Ch 5.1.2.5. | ||
| + | |||
| + | |- | ||
| + | | width="55"| | ||
| + | 6 | ||
| + | |||
| + | | width="91"| | ||
| + | Easy focus | ||
| + | |||
| + | | width="399"| | ||
| + | Click it, you can see there are two parameters on the preview video:AF Peak and AF Max. | ||
| + | |||
| + | AF Peak: It is to display the video definition during the focus process. | ||
| + | |||
| + | AF Max: It is the most suitable value for the video definition. | ||
| + | |||
| + | The close the AF Peak and AF Max is, the better the focus effect is. | ||
| + | |||
| + | |- | ||
| + | | width="55"| | ||
| + | 7 | ||
| + | |||
| + | | width="91"| | ||
| + | Audio output | ||
| + | |||
| + | | width="399"| | ||
| + | Turn on or off audio when you are monitoring. | ||
| + | |||
| + | ''' ''' | ||
| + | |||
| + | |- | ||
| + | | width="55"| | ||
| + | 8 | ||
| + | |||
| + | | width="91"| | ||
| + | Bidirectional talk | ||
| + | |||
| + | | width="399"| | ||
| + | Click it to start or end bidirectional talk. | ||
| + | |||
| + | |- | ||
| + | | width="55"| | ||
| + | 9 | ||
| + | |||
| + | | width="91"| | ||
| + | Help | ||
| + | |||
| + | | width="399"| | ||
| + | Click it to open help file. | ||
| + | |||
| + | |} | ||
| + | ==Image Adjustment== | ||
| + | [[file:IPCImageAdjust.jpg]] | ||
| + | |||
| + | {| class="wikitable" width="527" | ||
| + | |- | ||
| + | | colspan="2" width="103"| | ||
| + | Parameter | ||
| + | |||
| + | | colspan="2" width="424"| | ||
| + | Function | ||
| + | |||
| + | |- | ||
| + | | rowspan="5" width="50"| | ||
| + | Video setup | ||
| + | |||
| + | | width="201"| | ||
| + | It is to adjust monitor video brightness. | ||
| + | |||
| + | | rowspan="5" width="223"| | ||
| + | Note: | ||
| + | |||
| + | * All the operations here apply to WEB end only. | ||
| + | * Please go to Setup->Camera->Conditions to adjust corresponding items. | ||
| + | |||
| + | |- | ||
| + | | width="201"| | ||
| + | It is to adjust monitor video contrastness. | ||
| + | |||
| + | |- | ||
| + | | width="201"| | ||
| + | It is to adjust monitor video hue. | ||
| + | |||
| + | |- | ||
| + | | width="201"| | ||
| + | It is to adjust monitor video saturation. | ||
| + | |||
| + | |- | ||
| + | | width="201"| | ||
| + | Reset | ||
| + | |||
| + | | width="201"| | ||
| + | Restore brightness, contrastness saturation and hue to system default setup. | ||
| + | |||
| + | |} | ||
| + | ==Video Window Setup== | ||
| + | [[file:IPCVideoWindow.jpg]] | ||
| + | {| class="wikitable" | ||
| + | |- | ||
| + | | Original Size | ||
| + | | Click this button to go to original size. It is to display the actual size of the video stream. It depends on the resolution of the bit stream. | ||
| + | |- | ||
| + | | Full Screen | ||
| + | | Click it to go to full-screen mode. Double click the mouse or click the Esc button to exit the full screen. | ||
| + | |- | ||
| + | | Width and Height Ratio | ||
| + | | Click it to restore original ratio or suitable window. | ||
| + | |- | ||
| + | | Fluency Adjustment | ||
| + | | There are three levels of fluency for you to select (real-time, normal, fluent). The default is normal. | ||
| + | |- | ||
| + | |Rules Info | ||
| + | |Click the button, preview image will display intelligent rules after enabling; it is “enable” by default. | ||
| + | |- | ||
| + | | Focus zoom | ||
| + | | Click this button and the focus zooming interface appears on the right of preview interface, click left mouse button to adjust focus zooming configuration. | ||
| + | Note: | ||
| + | • The product series which support motorized zoom, synchronous focus and back focus have this button. | ||
| + | • Auto-focus after zoom and focus adjustment. | ||
| + | |- | ||
| + | | Fisheye | ||
| + | | Click the button, installation mode and display mode interface will show up on the right of the preview interface, see Figure 2-8, single click to switch different installation mode and display mode, default is enable. | ||
| + | Note: Only supported by fisheye devices. | ||
| + | |} | ||
| + | |||
| + | |||
| + | [[Category:IP Camera]] | ||
| + | |||
| + | [[Category:Browser]] | ||
Latest revision as of 22:57, 11 August 2016
Contents
IP Camera Web Interface
Main Menu
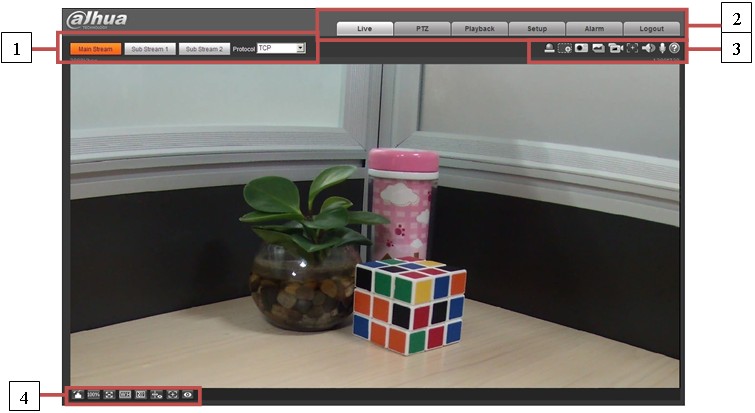
There are four sections:
- Section 1: Encode setup bar
- Section 2: System menu
- Section 3: Window function option bar
- Section 4: Window adjust bar
|
Parameter |
Function |
|
Main stream |
Streaming media protocol connection, under main stream config, monitor video or not. Generally for storage and monitor. |
|
Sub (Extra) stream 1 |
Streaming media protocol connection, under sub stream 1 config, monitor video or not. When network bandwidth is insufficient, it substitutes main stream for monitoring. |
|
Sub (Extra) stream 2 |
Streaming media protocol connection, under sub stream 2 config, monitor video or not. When network bandwidth is insufficient, it substitutes main stream for monitoring. |
|
Protocol |
You can select stream media protocol from the dropdown list. There are three options: TCP/UDP/Multicast |
System Menu
Video Window Function Menu
|
SN |
Parameter |
Function |
|
1 |
Alarm output |
It shows if there is any alarm output, status description is as follows:
Click on the button to force alarm to be on or off. |
|
2 |
Zoom in |
|
|
3 |
Snapshot |
Click on the button to snapshot, save picture to path in Ch 5.1.2.5. |
|
4 |
Triple snap |
Click it, system can snap at 1f/s. All images are saved to path in Ch 5.1.2.5. |
|
5 |
Record |
Click it, system can record. All images are saved to path in Ch 5.1.2.5. |
|
6 |
Easy focus |
Click it, you can see there are two parameters on the preview video:AF Peak and AF Max. AF Peak: It is to display the video definition during the focus process. AF Max: It is the most suitable value for the video definition. The close the AF Peak and AF Max is, the better the focus effect is. |
|
7 |
Audio output |
Turn on or off audio when you are monitoring.
|
|
8 |
Bidirectional talk |
Click it to start or end bidirectional talk. |
|
9 |
Help |
Click it to open help file. |
Image Adjustment
|
Parameter |
Function | ||
|
Video setup |
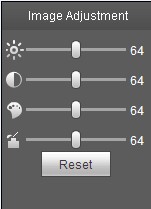
It is to adjust monitor video brightness. |
Note:
| |
|
It is to adjust monitor video contrastness. | |||
|
It is to adjust monitor video hue. | |||
|
It is to adjust monitor video saturation. | |||
|
Reset |
Restore brightness, contrastness saturation and hue to system default setup. | ||
Video Window Setup
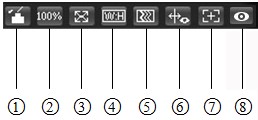
| Original Size | Click this button to go to original size. It is to display the actual size of the video stream. It depends on the resolution of the bit stream. |
| Full Screen | Click it to go to full-screen mode. Double click the mouse or click the Esc button to exit the full screen. |
| Width and Height Ratio | Click it to restore original ratio or suitable window. |
| Fluency Adjustment | There are three levels of fluency for you to select (real-time, normal, fluent). The default is normal. |
| Rules Info | Click the button, preview image will display intelligent rules after enabling; it is “enable” by default. |
| Focus zoom | Click this button and the focus zooming interface appears on the right of preview interface, click left mouse button to adjust focus zooming configuration.
Note: • The product series which support motorized zoom, synchronous focus and back focus have this button. • Auto-focus after zoom and focus adjustment. |
| Fisheye | Click the button, installation mode and display mode interface will show up on the right of the preview interface, see Figure 2-8, single click to switch different installation mode and display mode, default is enable.
Note: Only supported by fisheye devices. |


