Difference between revisions of "Template:Tripwire SystemUI NewGUI"
| (3 intermediate revisions by the same user not shown) | |||
| Line 1: | Line 1: | ||
| + | |||
===Video Instructions=== | ===Video Instructions=== | ||
<embedvideo service="youtube">https://youtu.be/S4MUxjh54Uc</embedvideo> | <embedvideo service="youtube">https://youtu.be/S4MUxjh54Uc</embedvideo> | ||
===Step by Step Instructions=== | ===Step by Step Instructions=== | ||
| − | 1. From the Main Menu | + | 1. From the Main Menu select '''AI''' |
[[File:How_To_Setup_Intrusion_-_NewUI_-_1.jpg|500px]] | [[File:How_To_Setup_Intrusion_-_NewUI_-_1.jpg|500px]] | ||
| − | 2. | + | 2. Select '''Parameters''' on the left. |
| + | |||
| + | Select '''Smart Plan'''. | ||
[[File:How_To_Setup_Intrusion_-_NewUI_-_2.jpg|500px]] | [[File:How_To_Setup_Intrusion_-_NewUI_-_2.jpg|500px]] | ||
| Line 15: | Line 18: | ||
[[File:How_To_Setup_Intrusion_-_NewUI_-_3.jpg|500px]] | [[File:How_To_Setup_Intrusion_-_NewUI_-_3.jpg|500px]] | ||
| − | 4. Click | + | 4. Click and highlight '''IVS''' (You may need to de-select any other options). |
[[File:How_To_Setup_Intrusion_-_NewUI_-_4.jpg|500px]] | [[File:How_To_Setup_Intrusion_-_NewUI_-_4.jpg|500px]] | ||
| Line 21: | Line 24: | ||
The icon will highlight when selected. | The icon will highlight when selected. | ||
| − | Click Apply | + | Click '''Apply''' |
[[File:How_To_Setup_Intrusion_-_NewUI_-_5.jpg|500px]] | [[File:How_To_Setup_Intrusion_-_NewUI_-_5.jpg|500px]] | ||
| Line 71: | Line 74: | ||
[[File:Tripwire_Setup_-_NewGUI_-_13.jpg|500px]] | [[File:Tripwire_Setup_-_NewGUI_-_13.jpg|500px]] | ||
| − | |||
| − | |||
| − | |||
| − | |||
| − | |||
| − | |||
| − | |||
| − | |||
| − | |||
| − | |||
| − | |||
| − | |||
| − | |||
| − | |||
| − | |||
| − | |||
| − | |||
| − | |||
| − | |||
| − | |||
| − | |||
| − | |||
| − | |||
| − | |||
| − | |||
| − | |||
| − | |||
| − | |||
| − | |||
| − | |||
| − | |||
| − | |||
| − | |||
| − | |||
| − | |||
| − | |||
| − | |||
| − | |||
| − | |||
| − | |||
| − | |||
| − | |||
| − | |||
| − | |||
| − | |||
| − | |||
| − | |||
| − | |||
| − | |||
| − | |||
| − | |||
| − | |||
| − | |||
| − | |||
| − | |||
| − | |||
| − | |||
| − | |||
| − | |||
| − | |||
| − | |||
[[Alarm_Config_Settings|> Configure Tripwire Response]] | [[Alarm_Config_Settings|> Configure Tripwire Response]] | ||
Click '''Apply''' to save the settings | Click '''Apply''' to save the settings | ||
Latest revision as of 17:55, 29 October 2020
Video Instructions
Step by Step Instructions
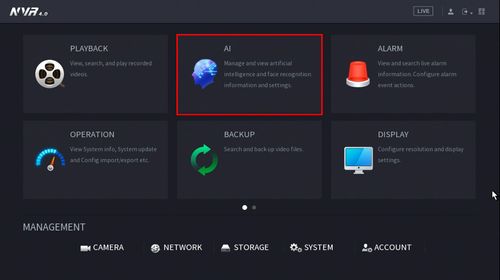
1. From the Main Menu select AI
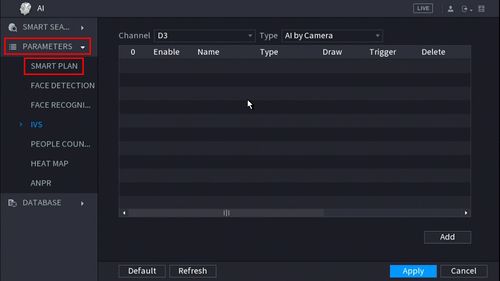
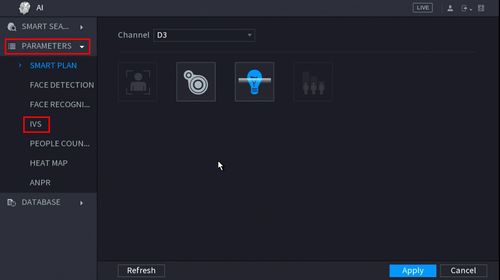
2. Select Parameters on the left.
Select Smart Plan.
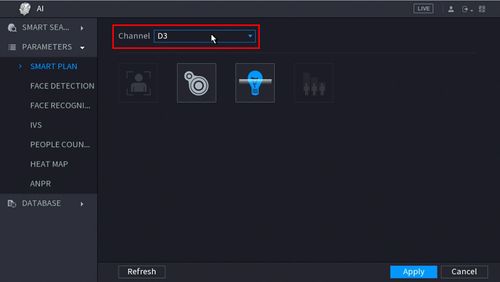
3. Use the drop down box to select the Channel
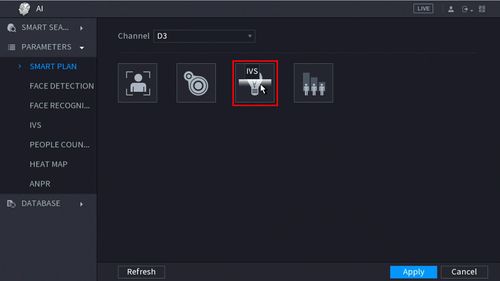
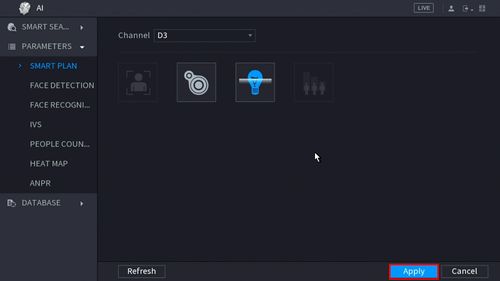
4. Click and highlight IVS (You may need to de-select any other options).
The icon will highlight when selected.
Click Apply
5. Click Parameters > IVS
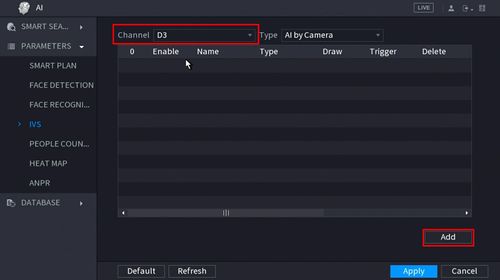
6. Use the drop-down box to select the Channel
Then click Add in the lower right side of the screen to Add an IVS rule
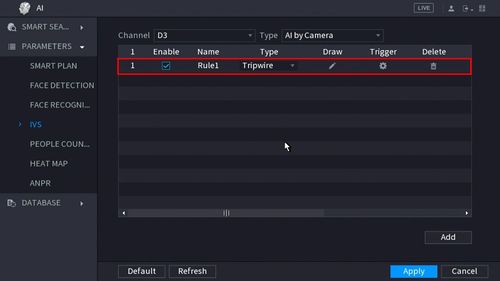
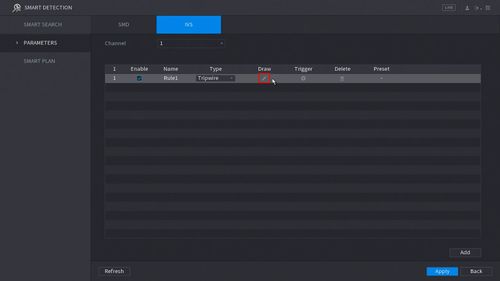
7. The created rule will appear in the list
9. Click the Pencil icon to draw the Tripwire rule
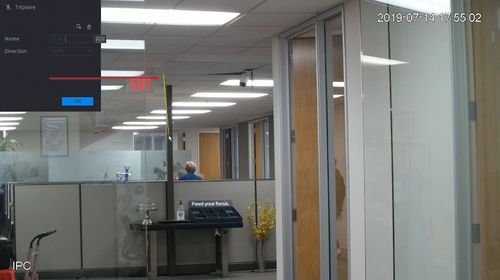
10. The Channel will fullscreen.
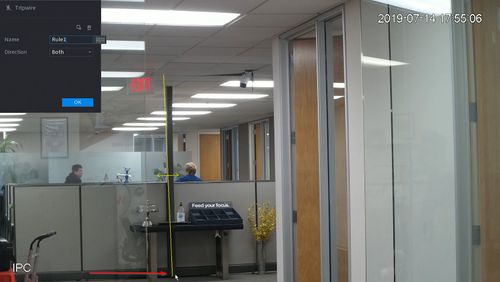
Left click anywhere inside the video frame to begin drawing the Trip line, then use the mouse to draw the trip line.
Right click to end drawing
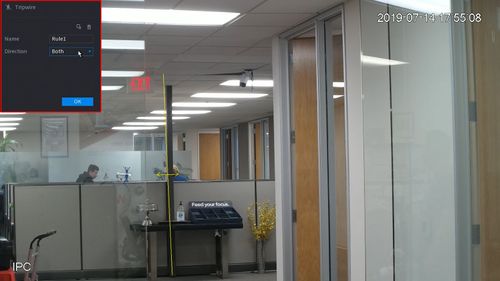
11. The Tripwire menu will appear
- Name: A name can be applied to the rule
- Direction: Both, A To B, B To A
Click ![]() icon to set the Target Filter (maximum and minimum size size for Objects to follow rule)
icon to set the Target Filter (maximum and minimum size size for Objects to follow rule)
Click ![]() icon to clear the current rule
icon to clear the current rule
Once the tripwire rule settings have been created click OK
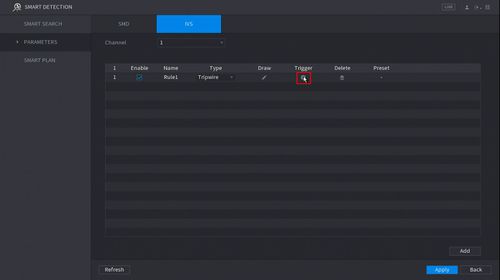
12. Click the ![]() icon to set the Trigger settings when the IVS Tripwire rule is engaged.
icon to set the Trigger settings when the IVS Tripwire rule is engaged.
Click Apply to save the settings
