Difference between revisions of "Template:Tripwire WebUI New"
(Created page with " ===Video Instructions=== <embedvideo service="youtube">https://youtu.be/nQcnVb1Uq_I</embedvideo> ===Step By Step Instructions=== 1. Navigate in a web browser to the IP addre...") |
(→Step By Step Instructions) |
||
| (2 intermediate revisions by the same user not shown) | |||
| Line 8: | Line 8: | ||
[[File:IVSTripwireWebUINew1.png|800px]] | [[File:IVSTripwireWebUINew1.png|800px]] | ||
| − | 2. From the Main Menu select | + | 2. From the Main Menu select '''AI''' |
[[File:IVSTripwireWebUINew2.png|800px]] | [[File:IVSTripwireWebUINew2.png|800px]] | ||
| − | 3. Select | + | 3. Select '''Parameters''' on the left. |
| − | <br>Then select | + | <br>Then select '''Smart Plan'''. |
<br>Select the camera channel at the top. | <br>Select the camera channel at the top. | ||
| − | <br>Select and highlight | + | <br>Select and highlight '''IVS''' (You may need to de-select any other options). |
| − | <br>Select | + | <br>Select '''OK''' |
[[File:IVSTripwireWebUINew3.png|800px]] | [[File:IVSTripwireWebUINew3.png|800px]] | ||
| − | 4. Select | + | 4. Select '''IVS''' on the left. |
<br>Then choose the channel number at the top right and if the IVS will be done by the camera or by the recorder, by selecting either "AI by Camera" or "AI by Device" below the channel number. | <br>Then choose the channel number at the top right and if the IVS will be done by the camera or by the recorder, by selecting either "AI by Camera" or "AI by Device" below the channel number. | ||
<br>Select the Plus button on the right to create a new IVS alarm rule | <br>Select the Plus button on the right to create a new IVS alarm rule | ||
| Line 26: | Line 26: | ||
[[File:IVSTripwireWebUINew4.png|800px]] | [[File:IVSTripwireWebUINew4.png|800px]] | ||
| − | 5. Double-click on the option under | + | 5. Double-click on the option under '''Type''' for the new rule you created and set it to '''Tripwire'''. |
| − | <br>Give this rule a name by double-clicking the text box under | + | <br>Give this rule a name by double-clicking the text box under '''Name''' and typing in a name. |
| − | <br>Select the | + | <br>Select the '''Draw Rule''' button on the left. |
<br>Left click anywhere on the camera view to start the tripwire line. | <br>Left click anywhere on the camera view to start the tripwire line. | ||
<br>Left click anywhere else on the camera view to complete the segment of the line. Continue moving your mouse and left clicking to continue making multiple segments of the tripwire line. | <br>Left click anywhere else on the camera view to complete the segment of the line. Continue moving your mouse and left clicking to continue making multiple segments of the tripwire line. | ||
| Line 35: | Line 35: | ||
[[File:IVSTripwireWebUINew5.png|800px]] | [[File:IVSTripwireWebUINew5.png|800px]] | ||
| − | 6. Select | + | 6. Select '''Draw Target'''. |
| − | <br>Then select | + | <br>Then select '''Max Size''' and adjust the size of the box on the camera view to the relative maximum size for a target that can trigger the tripwire. |
| − | <br>Select | + | <br>Select '''Min Size''' and adjust the size of the box on the camera view to the relative minimum size for a target that can trigger the tripwire |
[[File:IVSTripwireWebUINew6.png|800px]] | [[File:IVSTripwireWebUINew6.png|800px]] | ||
| − | 7. Select the drop-down menu next to | + | 7. Select the drop-down menu next to '''Direction''' to choose if the IVS alarm is triggered in both directions ("Both") or just one direction ("A To B" or "B To A"). |
| − | <br>Adjust the settings below | + | <br>Adjust the settings below '''Direction''' to configure what happens when the tripwire alarm is triggered: |
| − | + | ||
| − | + | [[Alarm_Config_Settings|> Configure Tripwire Response]] | |
| − | + | ||
| − | + | <br><br>Select '''OK''' to save the settings | |
| − | |||
| − | |||
| − | <br><br>Select | ||
| − | |||
| − | |||
| − | |||
| − | |||
[[File:IVSTripwireWebUINew7.png|800px]] | [[File:IVSTripwireWebUINew7.png|800px]] | ||
[[File:IVSTripwireWebUINew8.png|400px]] | [[File:IVSTripwireWebUINew8.png|400px]] | ||
| − | 8. Select | + | 8. Select '''OK''' to save the Tripwire IVS alarm settings |
[[File:IVSTripwireWebUINew9.png|800px]] | [[File:IVSTripwireWebUINew9.png|800px]] | ||
Latest revision as of 18:09, 29 October 2020
Video Instructions
Step By Step Instructions
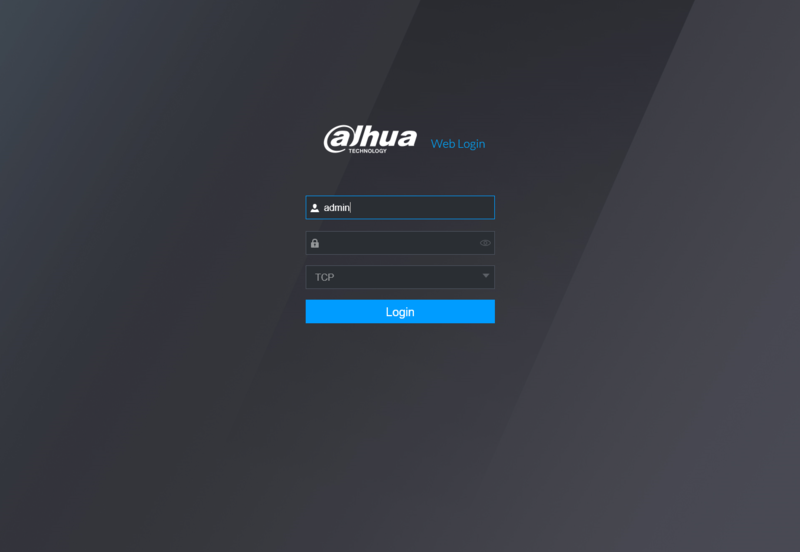
1. Navigate in a web browser to the IP address of the camera or recorder and log into the device
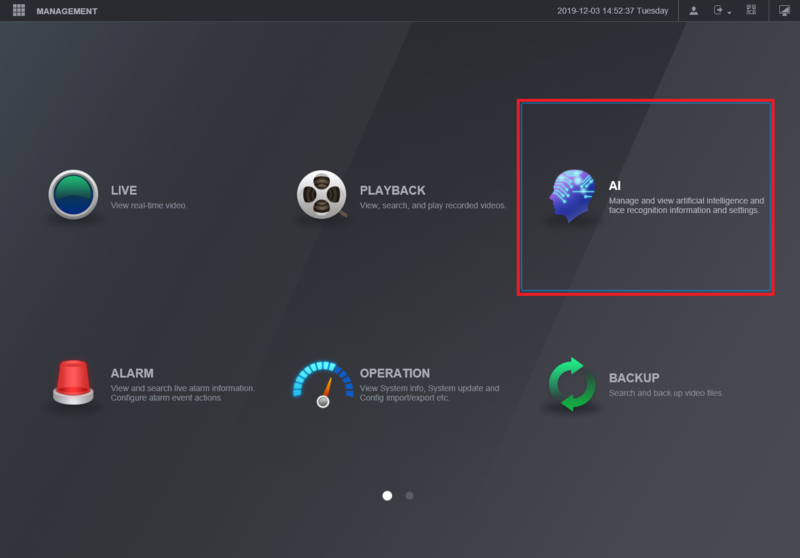
2. From the Main Menu select AI
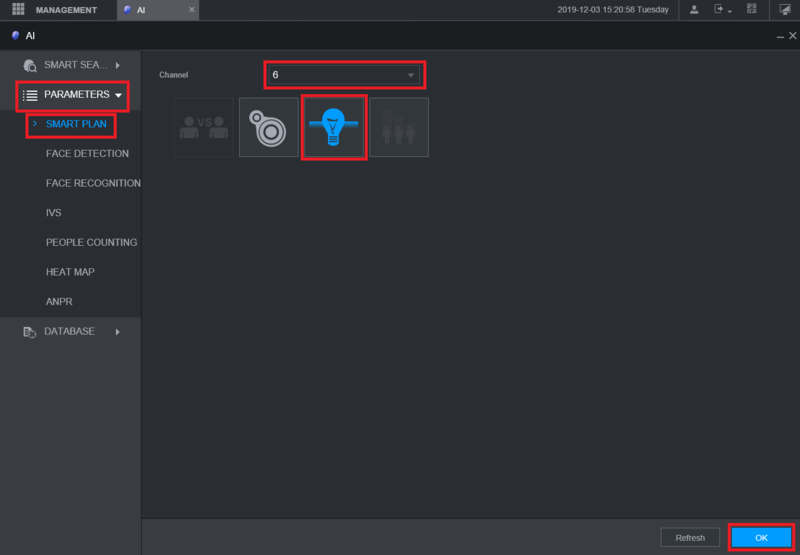
3. Select Parameters on the left.
Then select Smart Plan.
Select the camera channel at the top.
Select and highlight IVS (You may need to de-select any other options).
Select OK
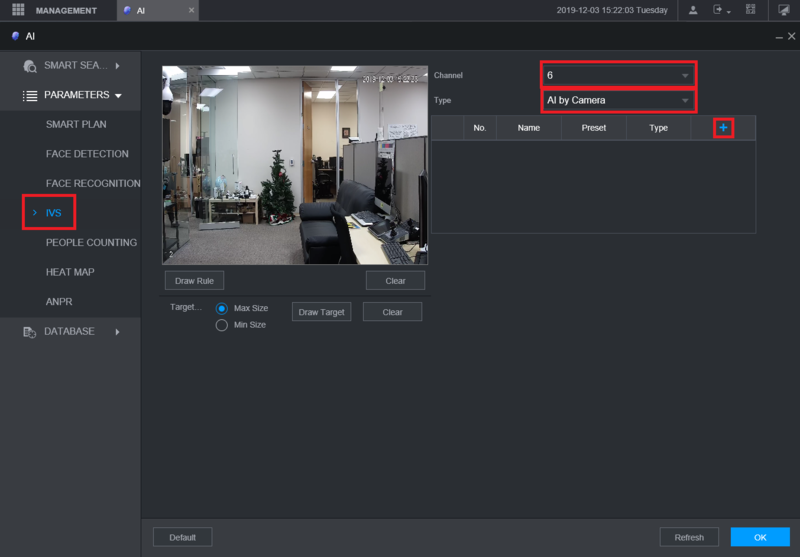
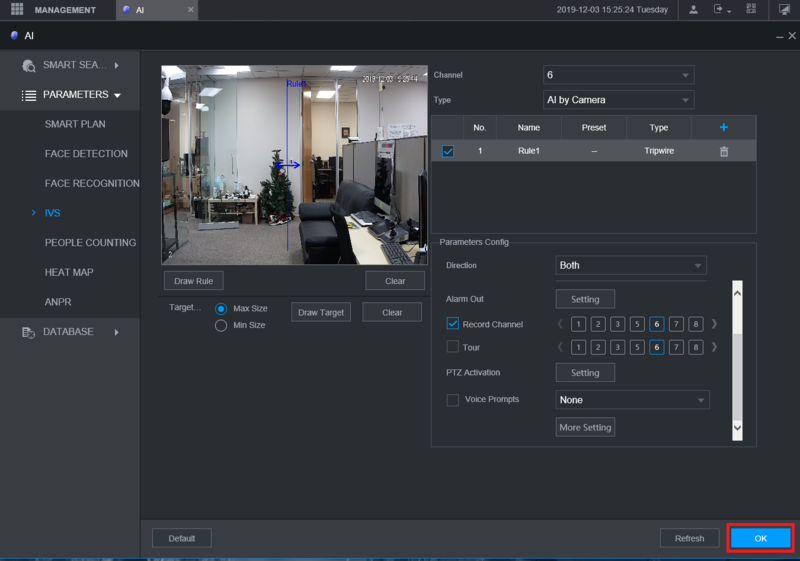
4. Select IVS on the left.
Then choose the channel number at the top right and if the IVS will be done by the camera or by the recorder, by selecting either "AI by Camera" or "AI by Device" below the channel number.
Select the Plus button on the right to create a new IVS alarm rule
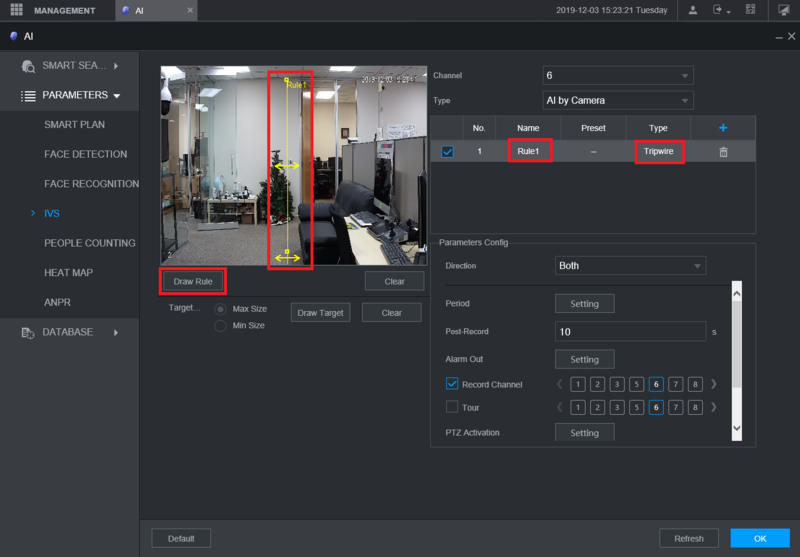
5. Double-click on the option under Type for the new rule you created and set it to Tripwire.
Give this rule a name by double-clicking the text box under Name and typing in a name.
Select the Draw Rule button on the left.
Left click anywhere on the camera view to start the tripwire line.
Left click anywhere else on the camera view to complete the segment of the line. Continue moving your mouse and left clicking to continue making multiple segments of the tripwire line.
When done drawing the line segments, right click to finish the line.
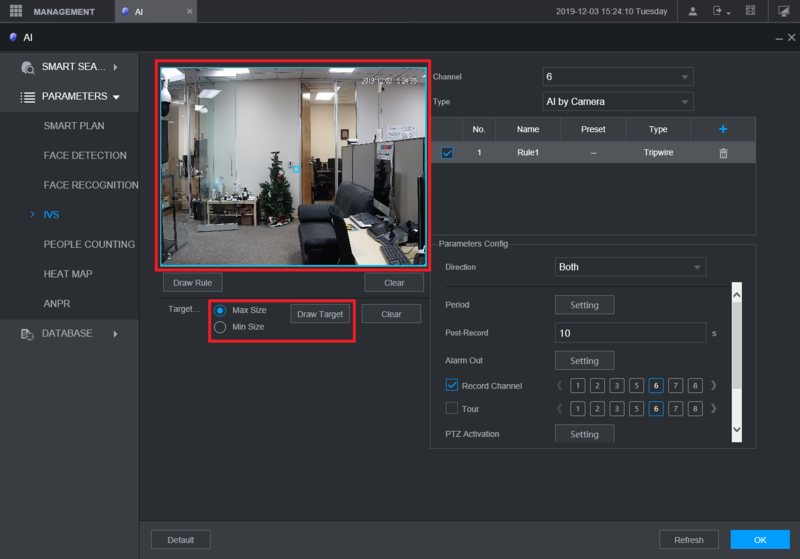
6. Select Draw Target.
Then select Max Size and adjust the size of the box on the camera view to the relative maximum size for a target that can trigger the tripwire.
Select Min Size and adjust the size of the box on the camera view to the relative minimum size for a target that can trigger the tripwire
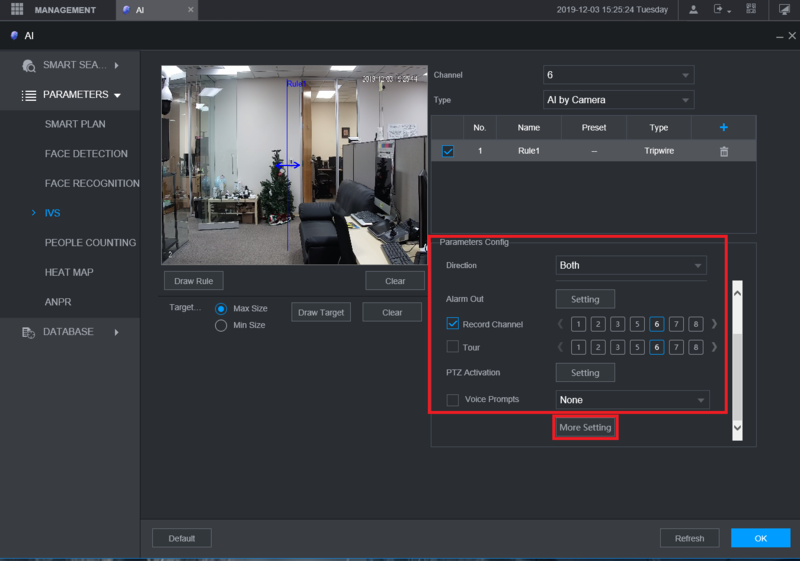
7. Select the drop-down menu next to Direction to choose if the IVS alarm is triggered in both directions ("Both") or just one direction ("A To B" or "B To A").
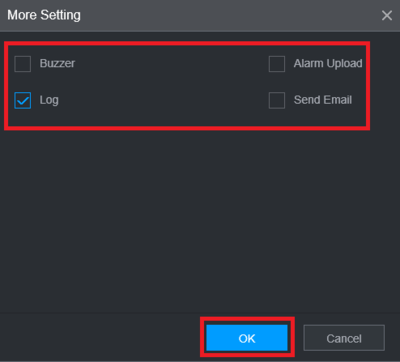
Adjust the settings below Direction to configure what happens when the tripwire alarm is triggered:
Select OK to save the settings
8. Select OK to save the Tripwire IVS alarm settings
