Difference between revisions of "Video Intercom/SIP 2.0/How To Call DMSS"
(Created page with "==Description== This article will explain how you can setup the DHI-VTO4202F to call our mobile app DMSS. '''IMPORTANT: You will require a customized license firmware in ord...") |
|||
| (2 intermediate revisions by the same user not shown) | |||
| Line 8: | Line 8: | ||
* Custom license Firmware flashed on to the unit | * Custom license Firmware flashed on to the unit | ||
* DMSS installed on mobile phone | * DMSS installed on mobile phone | ||
| + | |||
| + | ==Video Instructions== | ||
| + | <embedvideo service="youtube">https://youtu.be/KBkYb20mM_0</embedvideo> | ||
==Step by Step Instructions== | ==Step by Step Instructions== | ||
| − | 1. | + | 1. Login to the VTO's webui |
| + | |||
| + | [[File:How to make calls to DMSS-1.png|900px]] | ||
| + | |||
| + | 2. Go to the Network settings | ||
| + | |||
| + | [[File:How to make calls to DMSS-2.png|900px]] | ||
| + | |||
| + | 3. Be sure that P2P is enabled with the status of "Online" | ||
| + | |||
| + | [[File:How to make calls to DMSS-3.png|900px]] | ||
| + | |||
| + | 4. Now navigate over to '''Household Setting''' | ||
| + | |||
| + | [[File:How to make calls to DMSS-4.png|900px]] | ||
| + | |||
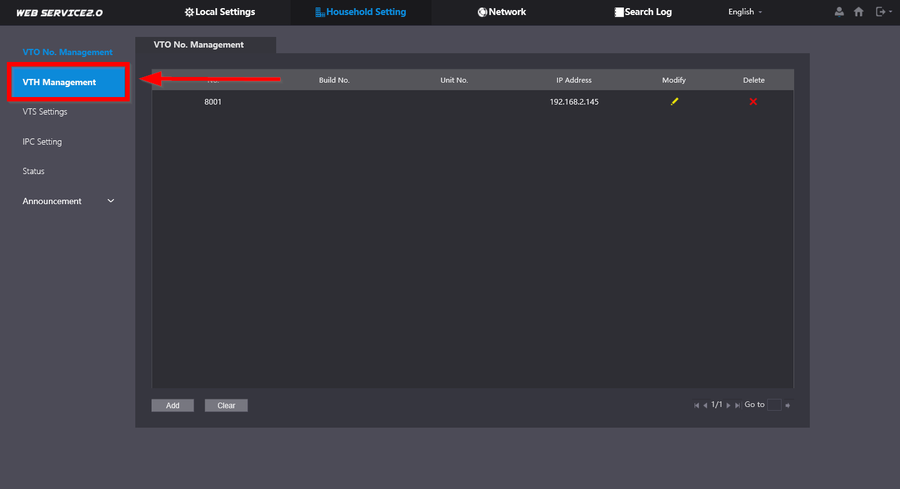
| + | 5. Go to '''VTH Management''' | ||
| + | |||
| + | [[File:How to make calls to DMSS-5.png|900px]] | ||
| + | |||
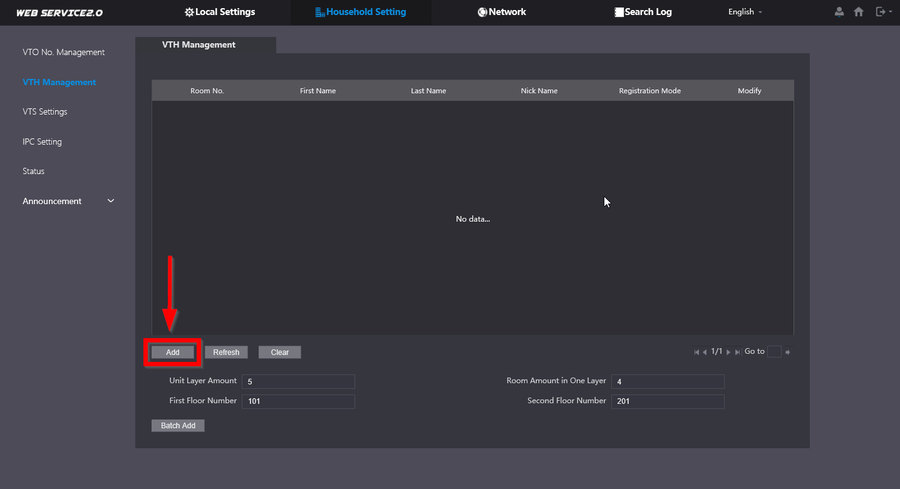
| + | 6. We will now be adding a Entry for a room. This will act as a medium to the DMSS. Whenever the room number is called it will also forward the call to DMSS. | ||
| + | |||
| + | [[File:How to make calls to DMSS-6.png|900px]] | ||
| + | |||
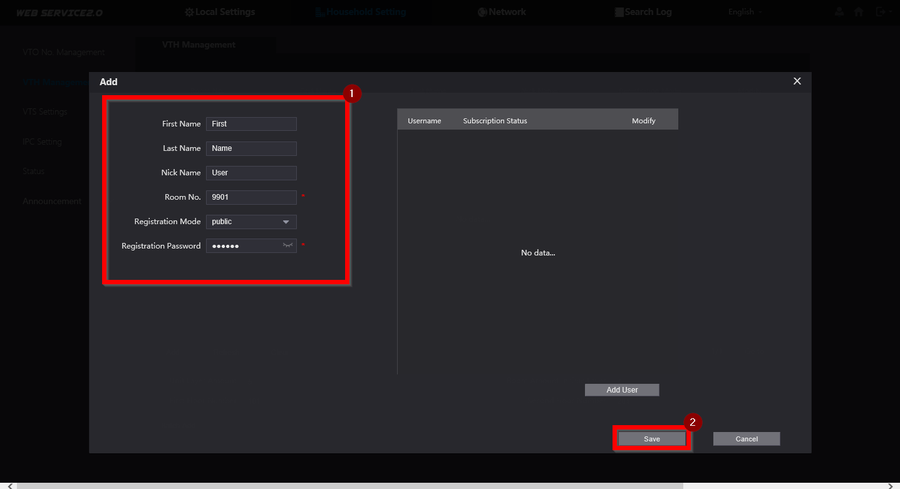
| + | 7. Assign it a room number and Name to customize the entry. Leave the Registration password defaulted. Click on '''Save''' when ready. | ||
| + | |||
| + | [[File:How to make calls to DMSS-7.png|900px]] | ||
| + | |||
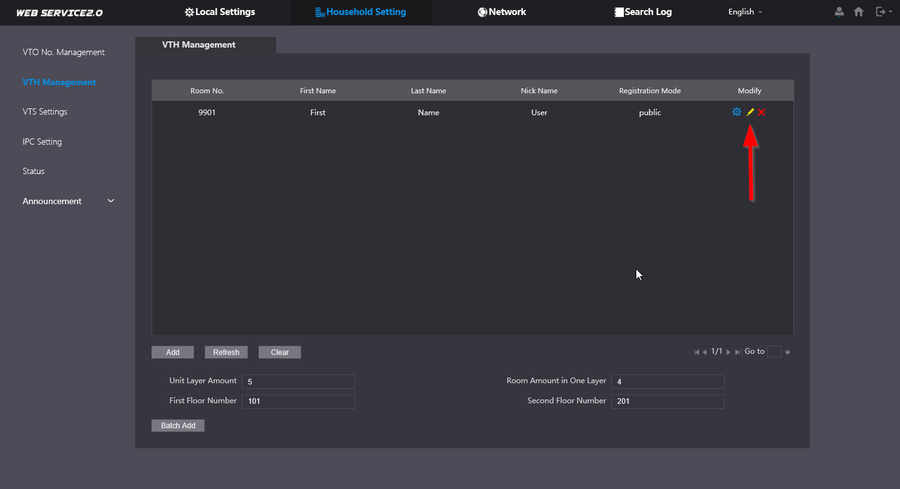
| + | 8. The Room entry is now created. We need to create a user so go to the Pencil icon. | ||
| + | |||
| + | [[File:How to make calls to DMSS-8.png|900px]] | ||
| + | |||
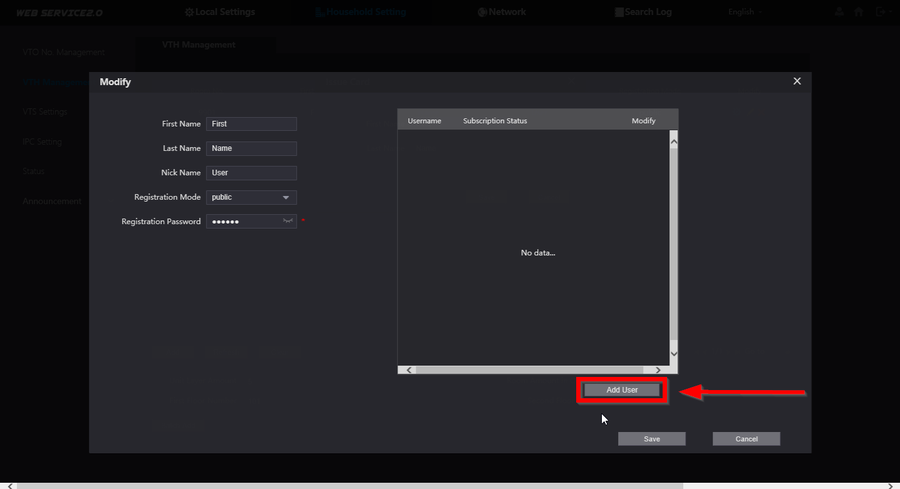
| + | 9. Click on '''Add User'''. This user will be the login information you will use to add to DMSS | ||
| + | |||
| + | [[File:How to make calls to DMSS-9.png|900px]] | ||
| + | |||
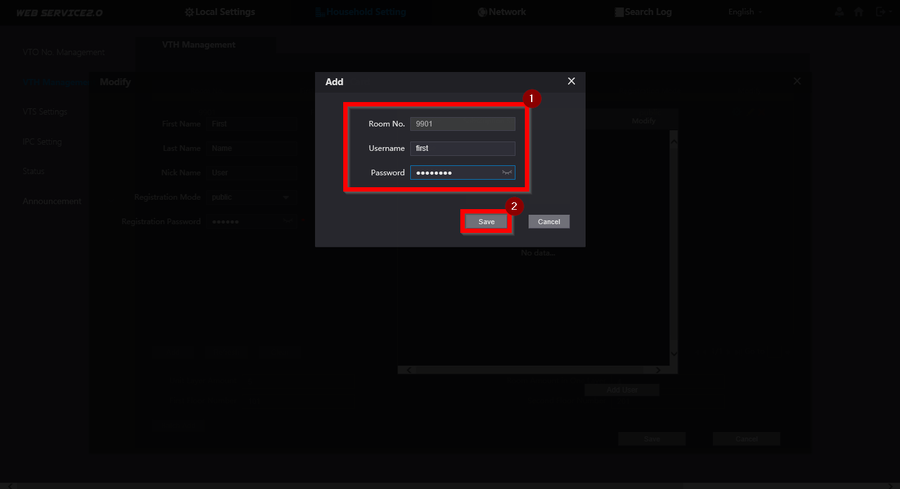
| + | 10. Enter a Username and Password that will be used to login to DMSS. | ||
| + | |||
| + | [[File:How to make calls to DMSS-10.png|900px]] | ||
| + | |||
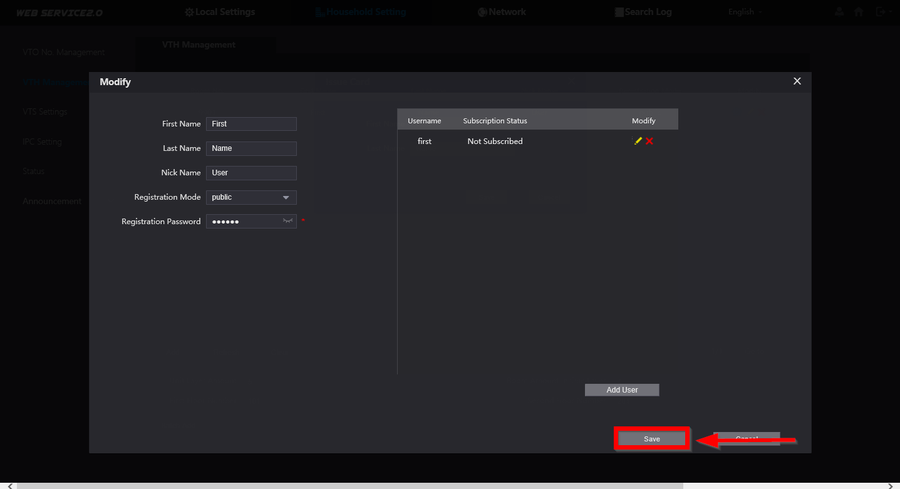
| + | 11. You will now see the user entry. Click on '''Save'''. | ||
| + | |||
| + | [[File:How to make calls to DMSS-11.png|900px]] | ||
| + | |||
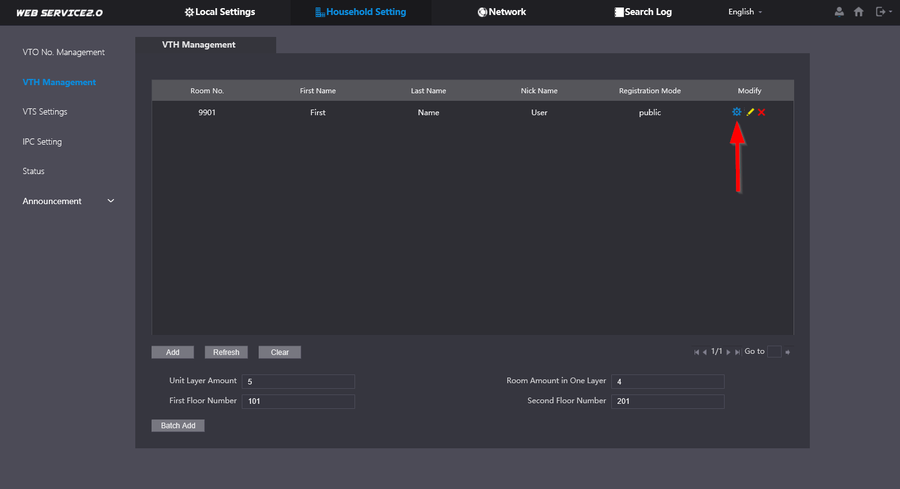
| + | 12. The user is now added. To add to the mobile app you will need to bring up a specialized QR code. This can be pulled by clicking on the Gear icon. | ||
| + | |||
| + | [[File:How to make calls to DMSS-12.png|900px]] | ||
| + | |||
| + | 13. Keep this specialized QR code on the screen because we will need to scan it on DMSS. | ||
| + | |||
| + | [[File:How to make calls to DMSS-13.png|900px]] | ||
| + | |||
| + | 14. Open DMSS and click on the plus icon on the top right. | ||
| + | |||
| + | [[File:How to call to DMSS-14.jpg|300px]] | ||
| + | |||
| + | 15. Select SN/Scan | ||
| + | |||
| + | [[File:How to call to DMSS-15.jpg|300px]] | ||
| + | |||
| + | 16. Allow any camera permissions on phone if needed then scan the specialized QR code we pulled up earlier. | ||
| + | |||
| + | [[File:How to call to DMSS-16.jpg|300px]] | ||
| + | |||
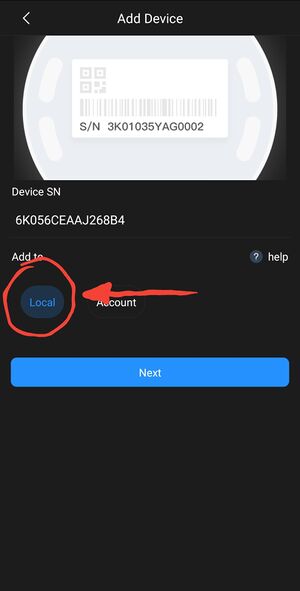
| + | 17. Be sure to add this device as '''Local''' if logged in to a DMSS account. You may encounter errors if added as an '''Account''' Device. | ||
| + | |||
| + | [[File:How to call to DMSS-17.jpg|300px]] | ||
| + | |||
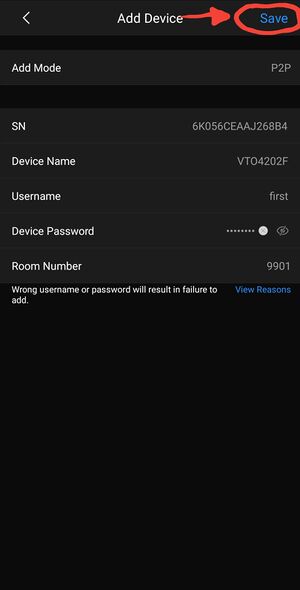
| + | 18. Enter the username and password that was created in the earlier steps. You should also see the Room Number populate on the bottom. Click on '''Save''' | ||
| + | |||
| + | [[File:How to call to DMSS-18.jpg|300px]] | ||
| + | |||
| + | 19. The device is now added but we need to Subscribe for notifications and Calls now. Go back to '''Home''' | ||
| + | |||
| + | [[File:How to call to DMSS-19.jpg|300px]] | ||
| + | |||
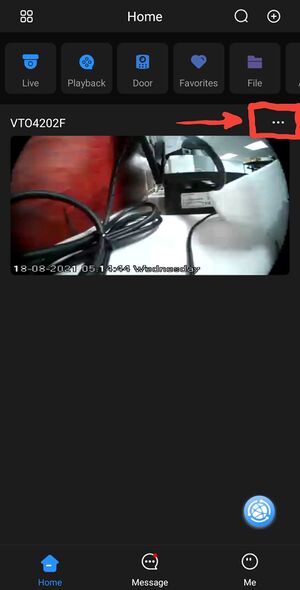
| + | 20. Select the three horizontal dots to enter the menu | ||
| + | |||
| + | [[File:How to call to DMSS-20.jpg|300px]] | ||
| + | |||
| + | 21. Go to '''Device Details''' | ||
| + | |||
| + | [[File:How to call to DMSS-21.jpg|300px]] | ||
| + | |||
| + | 22. The to '''Notification''' | ||
| + | |||
| + | [[File:How to call to DMSS-22.jpg|300px]] | ||
| + | |||
| + | 23. Toggle the Notification button to Onn and click on '''Save'''. You should get a '''Successfully Subscribed''' prompt. | ||
| + | |||
| + | [[File:How to call to DMSS-23.jpg|300px]] | ||
| + | |||
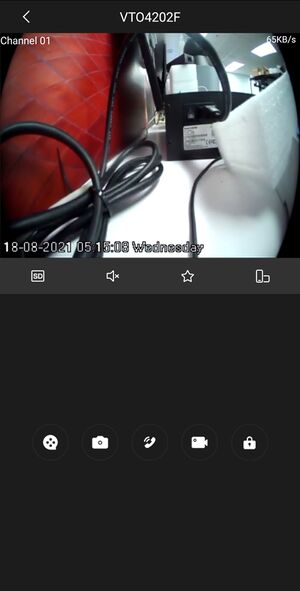
| + | 24. You can now receive calls on DMSS when the room number is called. | ||
| + | |||
| + | [[File:How to call to DMSS-24.jpg|300px]] | ||
Latest revision as of 16:21, 10 February 2022
Description
This article will explain how you can setup the DHI-VTO4202F to call our mobile app DMSS.
IMPORTANT: You will require a customized license firmware in order for this to work. The stock firmware will NOT be able to call DMSS. Please contact your sales representative for more information.
Prerequisites
- DHI-VTO4202F connected to the network and P2P online
- Custom license Firmware flashed on to the unit
- DMSS installed on mobile phone
Video Instructions
Step by Step Instructions
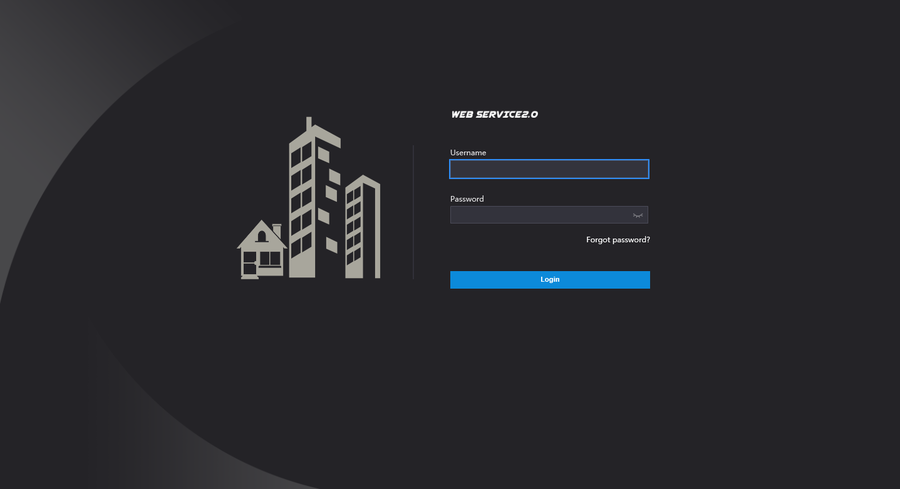
1. Login to the VTO's webui
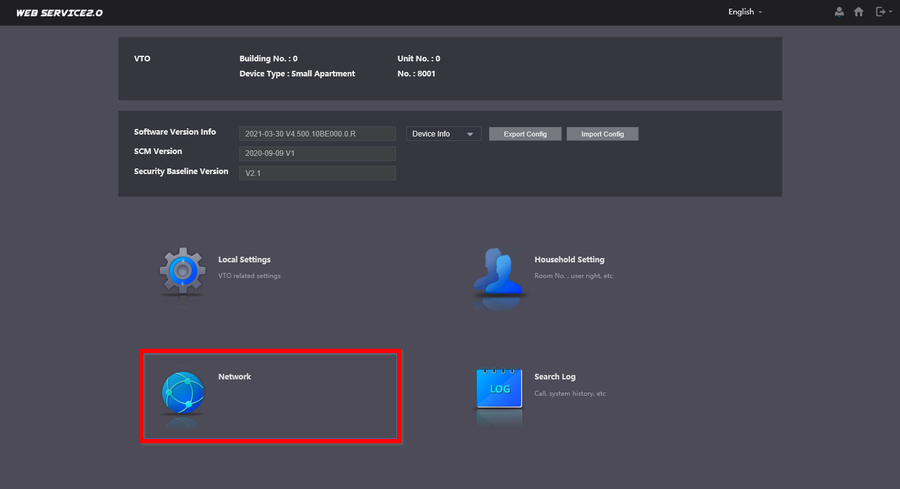
2. Go to the Network settings
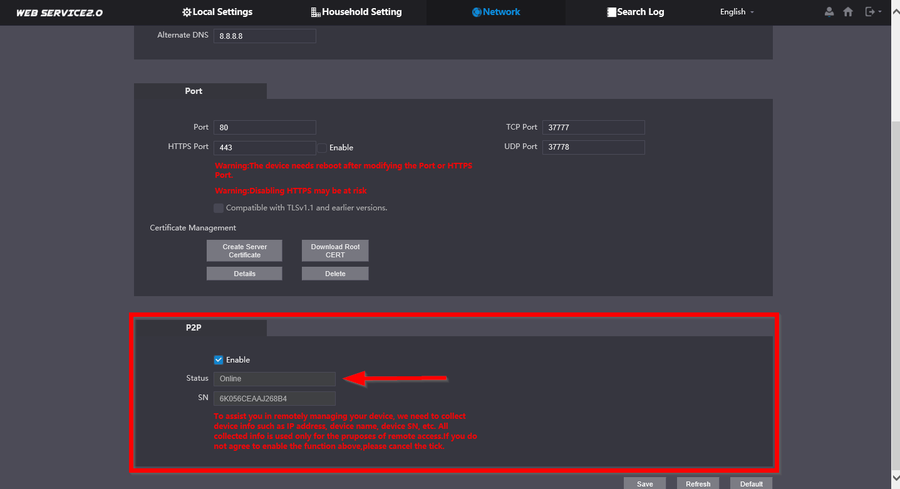
3. Be sure that P2P is enabled with the status of "Online"
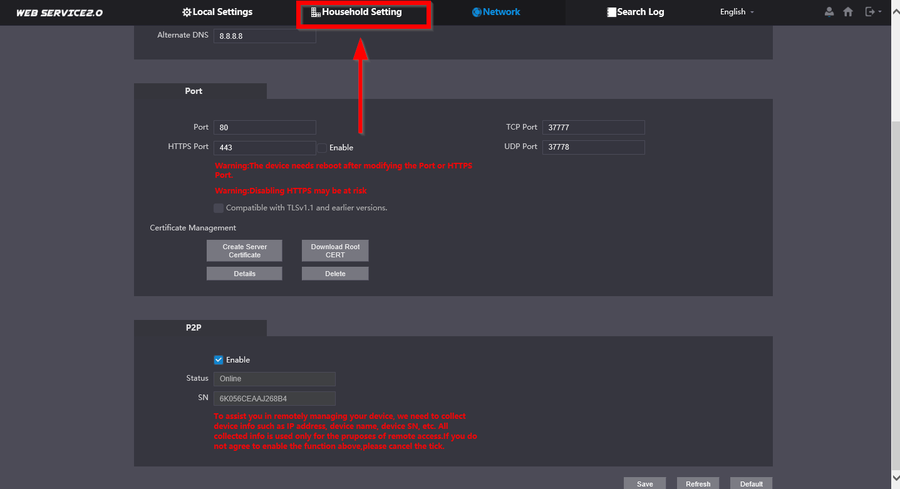
4. Now navigate over to Household Setting
5. Go to VTH Management
6. We will now be adding a Entry for a room. This will act as a medium to the DMSS. Whenever the room number is called it will also forward the call to DMSS.
7. Assign it a room number and Name to customize the entry. Leave the Registration password defaulted. Click on Save when ready.
8. The Room entry is now created. We need to create a user so go to the Pencil icon.
9. Click on Add User. This user will be the login information you will use to add to DMSS
10. Enter a Username and Password that will be used to login to DMSS.
11. You will now see the user entry. Click on Save.
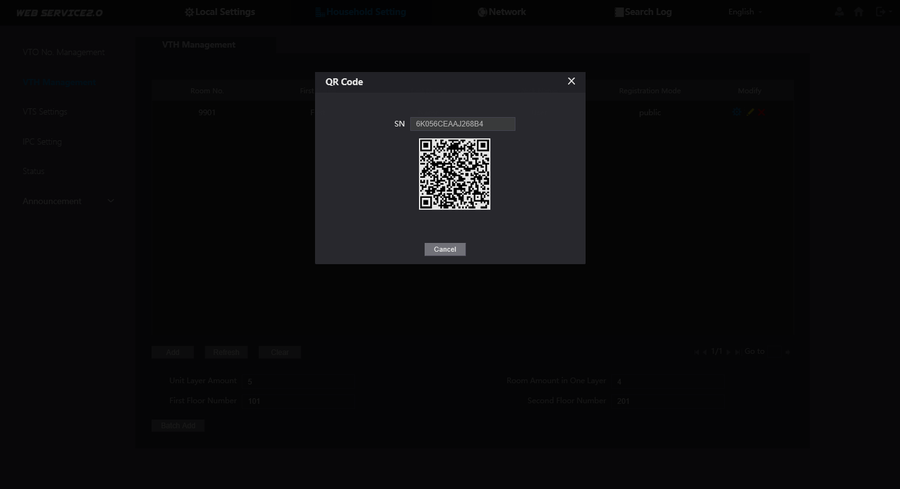
12. The user is now added. To add to the mobile app you will need to bring up a specialized QR code. This can be pulled by clicking on the Gear icon.
13. Keep this specialized QR code on the screen because we will need to scan it on DMSS.
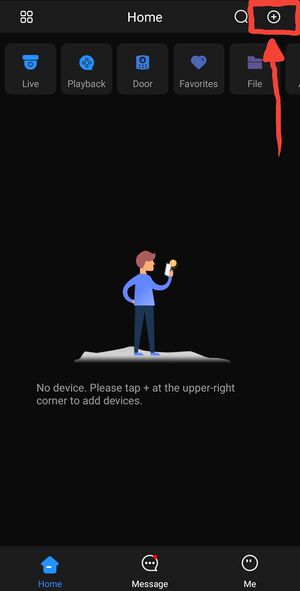
14. Open DMSS and click on the plus icon on the top right.
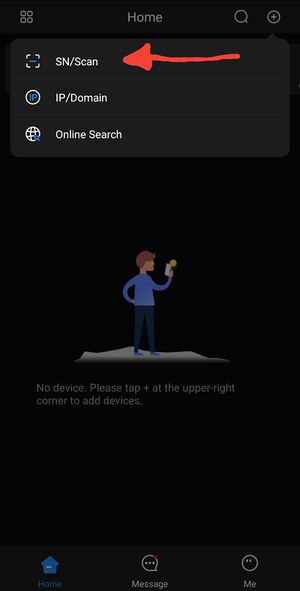
15. Select SN/Scan
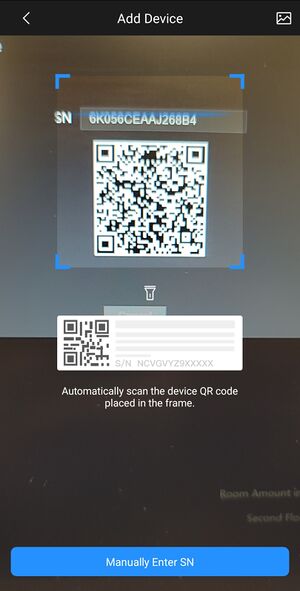
16. Allow any camera permissions on phone if needed then scan the specialized QR code we pulled up earlier.
17. Be sure to add this device as Local if logged in to a DMSS account. You may encounter errors if added as an Account Device.
18. Enter the username and password that was created in the earlier steps. You should also see the Room Number populate on the bottom. Click on Save
19. The device is now added but we need to Subscribe for notifications and Calls now. Go back to Home
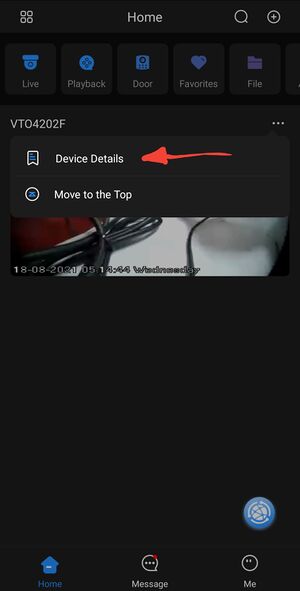
20. Select the three horizontal dots to enter the menu
21. Go to Device Details
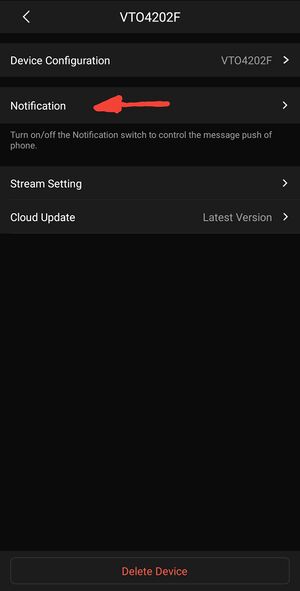
22. The to Notification
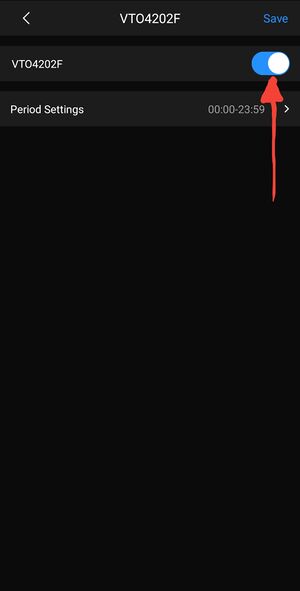
23. Toggle the Notification button to Onn and click on Save. You should get a Successfully Subscribed prompt.
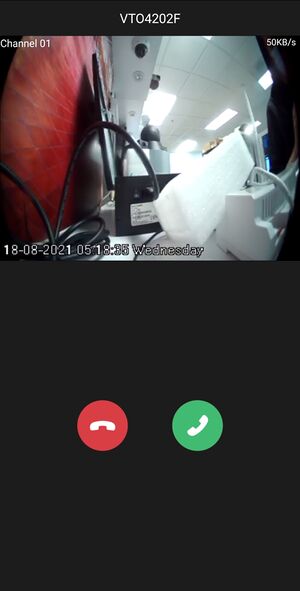
24. You can now receive calls on DMSS when the room number is called.
