Difference between revisions of "New GUI/AI/Heat Map Setup"
| Line 22: | Line 22: | ||
[[File:How_To_Setup_Heatmap_-_NewUI_-_1.jpg|500px]] | [[File:How_To_Setup_Heatmap_-_NewUI_-_1.jpg|500px]] | ||
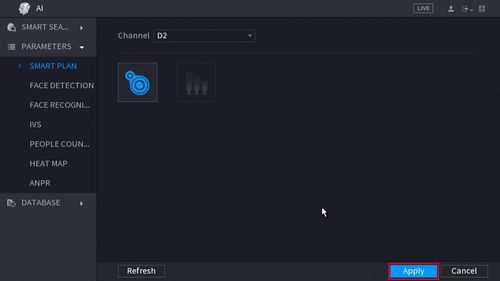
| − | 3. Click the Heat Map icon to enable | + | 3. Click the Heat Map icon to enable |
| − | |||
[[File:How_To_Setup_Heatmap_-_NewUI_-_2.jpg|500px]] | [[File:How_To_Setup_Heatmap_-_NewUI_-_2.jpg|500px]] | ||
| − | 4. | + | 4. The icon will turn blue when selected |
[[File:How_To_Setup_Heatmap_-_NewUI_-_3.jpg|500px]] | [[File:How_To_Setup_Heatmap_-_NewUI_-_3.jpg|500px]] | ||
| − | 5. | + | 5. Click Apply to Save |
[[File:How_To_Setup_Heatmap_-_NewUI_-_4.jpg|500px]] | [[File:How_To_Setup_Heatmap_-_NewUI_-_4.jpg|500px]] | ||
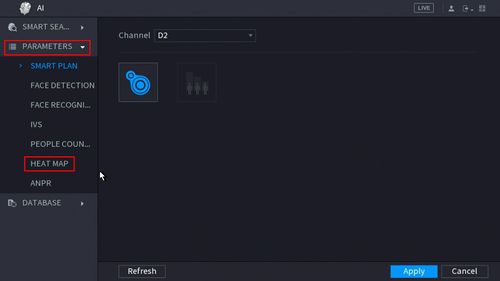
| − | 6. | + | 6. Click Parameters > Heat Map |
[[File:How_To_Setup_Heatmap_-_NewUI_-_5.jpg|500px]] | [[File:How_To_Setup_Heatmap_-_NewUI_-_5.jpg|500px]] | ||
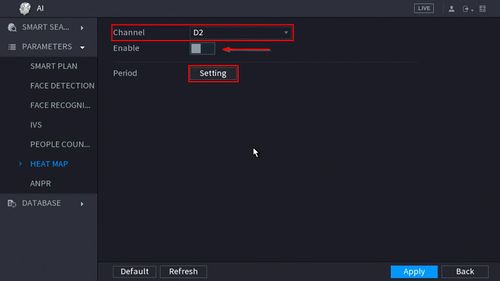
| − | 7. | + | 7. Use the drop-down box to select the channel |
| + | |||
| + | Click the toggle button to Enable | ||
| + | |||
| + | Click the Setting button to create a Schedule for the Heat Map | ||
[[File:How_To_Setup_Heatmap_-_NewUI_-_6.jpg|500px]] | [[File:How_To_Setup_Heatmap_-_NewUI_-_6.jpg|500px]] | ||
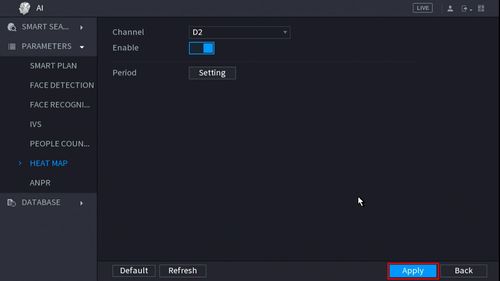
| − | 8. | + | 8. Click Apply to Save |
[[File:How_To_Setup_Heatmap_-_NewUI_-_7.jpg|500px]] | [[File:How_To_Setup_Heatmap_-_NewUI_-_7.jpg|500px]] | ||
| + | |||
| + | |||
| + | Heat Map is enabled | ||
Revision as of 19:02, 30 July 2019
Contents
How To Setup Heatmap
Description
This article will cover how to setup Heatmap in a Dahua recorder
Prerequisites
- A Dahua AI Recorder:
Video Instructions
Coming Soon
Step by Step Instructions
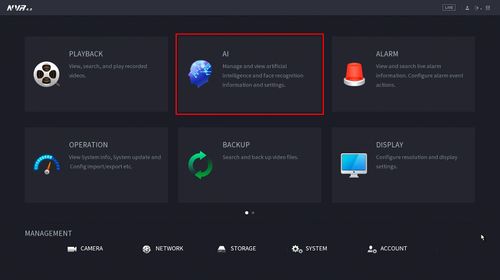
1. From the Main Menu click AI
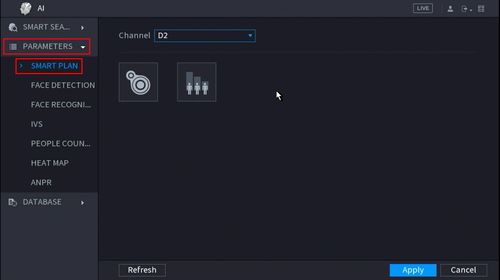
2. Click Parameters > Smart Plan
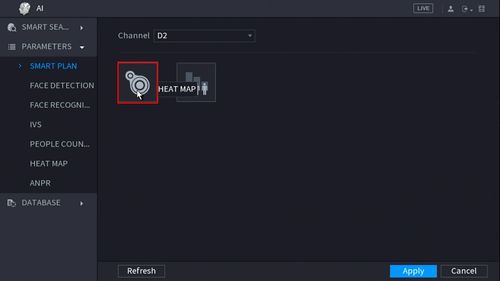
3. Click the Heat Map icon to enable
4. The icon will turn blue when selected
5. Click Apply to Save
6. Click Parameters > Heat Map
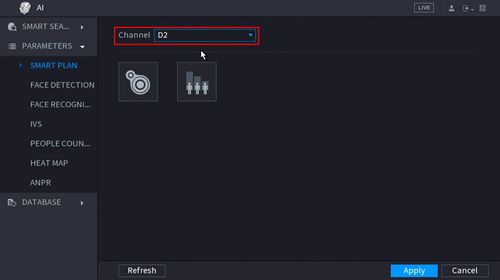
7. Use the drop-down box to select the channel
Click the toggle button to Enable
Click the Setting button to create a Schedule for the Heat Map
8. Click Apply to Save
Heat Map is enabled
