Difference between revisions of "DSS Windows/Express/Backup via Download Center"
(→Step by Step Instructions) |
(→Step by Step Instructions) |
||
| Line 15: | Line 15: | ||
[[File:How_To_Backup_-_Download_Center_-_DSS_Express_-_1.jpg|600px]] | [[File:How_To_Backup_-_Download_Center_-_DSS_Express_-_1.jpg|600px]] | ||
| + | 2. Use the device tree on the left to select the desired device / channel for playback/export | ||
[[File:How_To_Backup_-_Download_Center_-_DSS_Express_-_2.jpg|600px]] | [[File:How_To_Backup_-_Download_Center_-_DSS_Express_-_2.jpg|600px]] | ||
| + | |||
| + | 3. Enter a time range for the search by clicking the Calendar | ||
[[File:How_To_Backup_-_Download_Center_-_DSS_Express_-_3.jpg|600px]] | [[File:How_To_Backup_-_Download_Center_-_DSS_Express_-_3.jpg|600px]] | ||
| + | |||
| + | 4. Click Search | ||
[[File:How_To_Backup_-_Download_Center_-_DSS_Express_-_4.jpg|600px]] | [[File:How_To_Backup_-_Download_Center_-_DSS_Express_-_4.jpg|600px]] | ||
| + | |||
| + | 5. The footage will load in the timeline | ||
[[File:How_To_Backup_-_Download_Center_-_DSS_Express_-_5.jpg|600px]] | [[File:How_To_Backup_-_Download_Center_-_DSS_Express_-_5.jpg|600px]] | ||
| + | |||
| + | 6. To select a specific time range for backup | ||
| + | |||
| + | Left click inside the timeline to mark the starting time | ||
[[File:How_To_Backup_-_Download_Center_-_DSS_Express_-_6.jpg|600px]] | [[File:How_To_Backup_-_Download_Center_-_DSS_Express_-_6.jpg|600px]] | ||
| + | |||
| + | 7. Left click again inside the timeline to mark the end time | ||
[[File:How_To_Backup_-_Download_Center_-_DSS_Express_-_7.jpg|600px]] | [[File:How_To_Backup_-_Download_Center_-_DSS_Express_-_7.jpg|600px]] | ||
| + | |||
| + | 8. A window will appear | ||
| + | |||
| + | The Start / End Times can be adjusted | ||
| + | |||
| + | Click OK | ||
[[File:How_To_Backup_-_Download_Center_-_DSS_Express_-_8.jpg|600px]] | [[File:How_To_Backup_-_Download_Center_-_DSS_Express_-_8.jpg|600px]] | ||
| + | |||
| + | 9. The Download Center will automatically open and the requested backup will begin to process | ||
[[File:How_To_Backup_-_Download_Center_-_DSS_Express_-_9.jpg|600px]] | [[File:How_To_Backup_-_Download_Center_-_DSS_Express_-_9.jpg|600px]] | ||
| + | |||
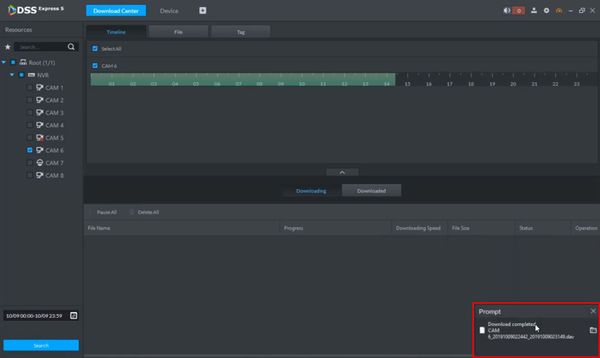
| + | 10. A prompt will appear in the lower portion of the screen when the backup is complete | ||
[[File:How_To_Backup_-_Download_Center_-_DSS_Express_-_10.jpg|600px]] | [[File:How_To_Backup_-_Download_Center_-_DSS_Express_-_10.jpg|600px]] | ||
| + | |||
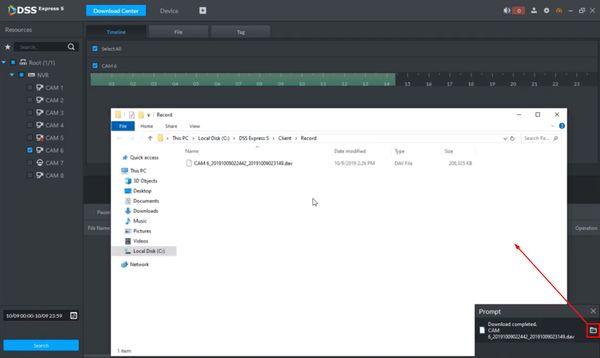
| + | 11. The folder icon in the prompt can be left clicked to open the file location in Windows Explorer | ||
[[File:How_To_Backup_-_Download_Center_-_DSS_Express_-_11.jpg|600px]] | [[File:How_To_Backup_-_Download_Center_-_DSS_Express_-_11.jpg|600px]] | ||
Revision as of 22:42, 9 October 2019
Contents
Backup via Download Center
Description
This guide will show how to backup video via the Download Center
Prerequisites
- Dahua Recorder Added to DSS Express S Server
- DSS Express S Server Installed
- DSS Express S Client Installed
Video Instructions
Step by Step Instructions
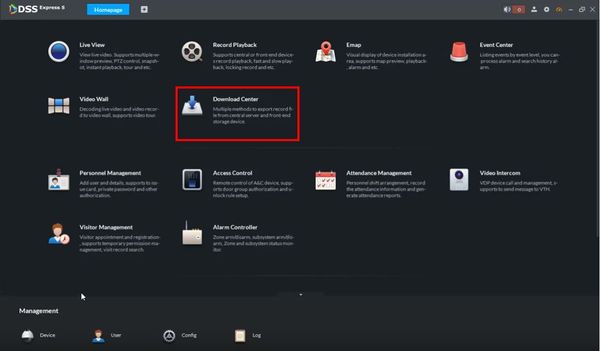
1. From the Homepage of DSS Express S click Download Center
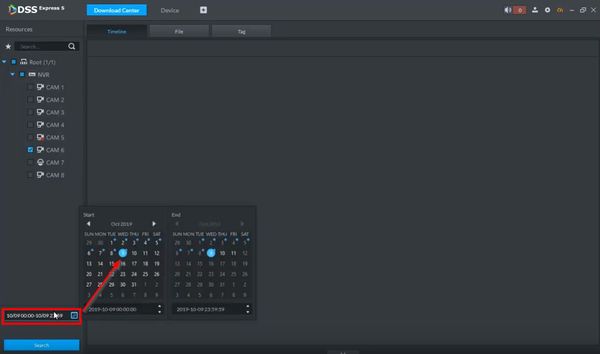
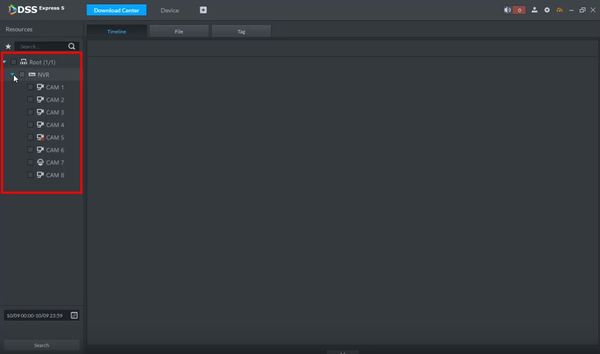
2. Use the device tree on the left to select the desired device / channel for playback/export
3. Enter a time range for the search by clicking the Calendar
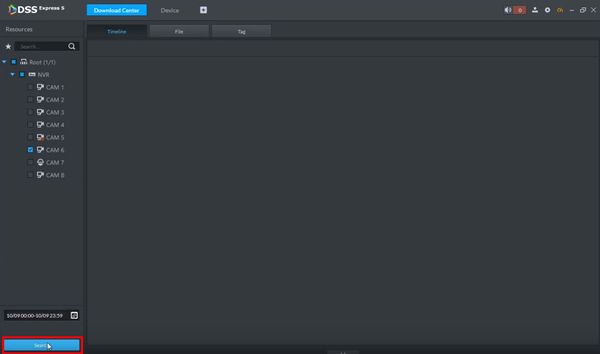
4. Click Search
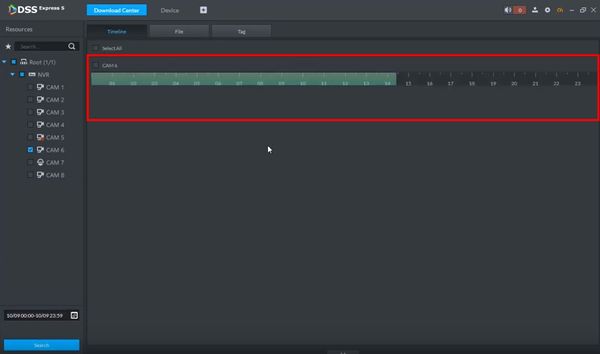
5. The footage will load in the timeline
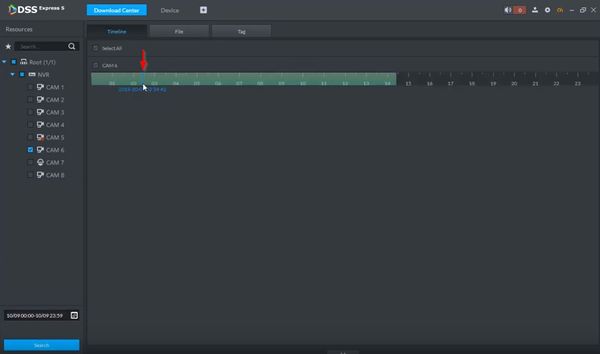
6. To select a specific time range for backup
Left click inside the timeline to mark the starting time
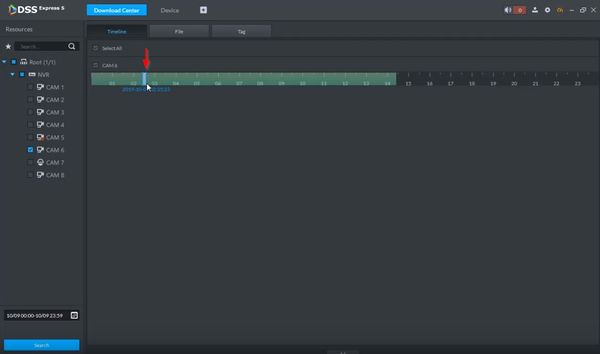
7. Left click again inside the timeline to mark the end time
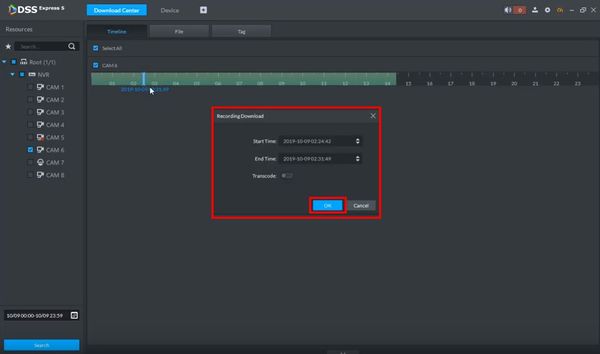
8. A window will appear
The Start / End Times can be adjusted
Click OK
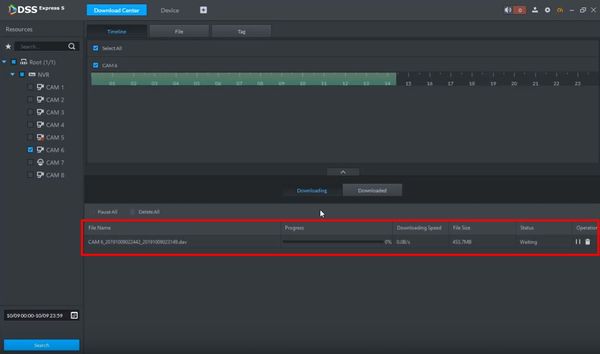
9. The Download Center will automatically open and the requested backup will begin to process
10. A prompt will appear in the lower portion of the screen when the backup is complete
11. The folder icon in the prompt can be left clicked to open the file location in Windows Explorer
