Difference between revisions of "Template:IVS Heatmap WebUI New"
(→Prerequisites) |
(→Step By Step Instructions) |
||
| Line 12: | Line 12: | ||
===Step By Step Instructions=== | ===Step By Step Instructions=== | ||
| + | |||
| + | 1. From the main page of the recorder web UI, select '''AI''' as shown in the image below, and choose '''Parameters''' in the left-hand menu. | ||
| + | <gallery> | ||
| + | File:HeatMap_NWGUI-1.PNG | ||
| + | File:HeatMap_NWGUI-2.PNG | ||
| + | </gallery> | ||
| + | |||
| + | |||
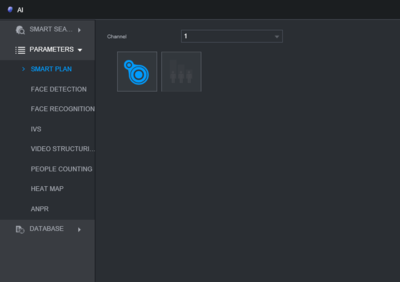
| + | 2. From Parameters, Select '''Smart Plan''' and select the channel which Heat Mapping will be set for and make sure the Heat Mapping icon is Highlighted as in the image below. | ||
| + | |||
| + | [[File:HeatMap_NWGUI-3.PNG|400px]] | ||
| + | |||
| + | |||
| + | 3. Next choose the '''Heat Map''' option under the Parameters menu and again select the channel that Heat Mapping will be applied to. Check the box for '''Enable''' and if a sch | ||
Revision as of 20:12, 5 December 2019
Description
This article will cover the setup of Heat Mapping on an N52B3P and will apply to any device using this UI that supports the Heat Mapping function.
Prerequisites
- An NVR that supports Heat Mapping
- A camera that supports Heat Mapping
- A Windows PC on the same local network as the NVR
Video Instructions
Step By Step Instructions
1. From the main page of the recorder web UI, select AI as shown in the image below, and choose Parameters in the left-hand menu.
2. From Parameters, Select Smart Plan and select the channel which Heat Mapping will be set for and make sure the Heat Mapping icon is Highlighted as in the image below.
3. Next choose the Heat Map option under the Parameters menu and again select the channel that Heat Mapping will be applied to. Check the box for Enable and if a sch

