Difference between revisions of "Template:Schedule Record MobileUI DMSS"
(Created page with " ==Description== The tutorial shows how to schedule recordings via iDMSS or gDMSS. ==Prerequisites== * iDMSS or gDMSS Plus ==Video Instructions== <embedvideo service="youtub...") |
|||
| Line 12: | Line 12: | ||
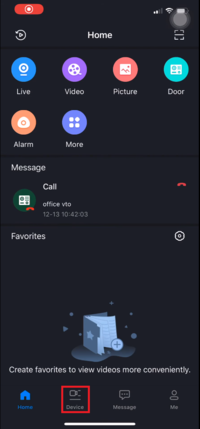
1. Select "Device" to go to the device list. | 1. Select "Device" to go to the device list. | ||
<br> | <br> | ||
| − | [[File:1._Device_-_Schedule_Record_DMSS.PNG| | + | [[File:1._Device_-_Schedule_Record_DMSS.PNG|200px]] |
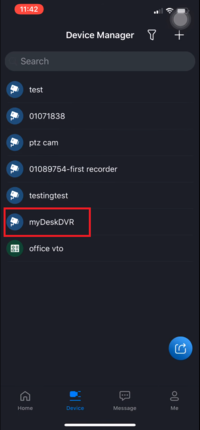
2. Select the recorder from the added device list. | 2. Select the recorder from the added device list. | ||
<br> | <br> | ||
| − | [[File:2._Choose_The_Device_-_Schedule_Record_DMSS.PNG| | + | [[File:2._Choose_The_Device_-_Schedule_Record_DMSS.PNG|200px]] |
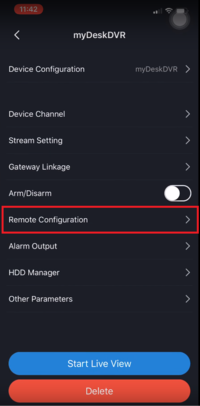
3. Select "Remote Configuration". | 3. Select "Remote Configuration". | ||
<br> | <br> | ||
| − | [[File:3._Remote_Configuration_-_Schedule_Record_DMSS.PNG| | + | [[File:3._Remote_Configuration_-_Schedule_Record_DMSS.PNG|200px]] |
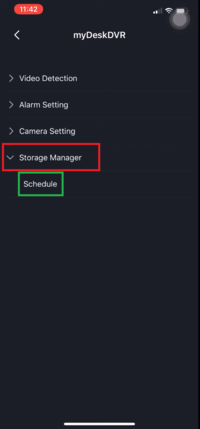
4. Expand "Storage Manager" => Select "Schedule". | 4. Expand "Storage Manager" => Select "Schedule". | ||
<br> | <br> | ||
| − | [[File:4._Storage_Manager_-_Schedule_Record_DMSS.PNG| | + | [[File:4._Storage_Manager_-_Schedule_Record_DMSS.PNG|200px]] |
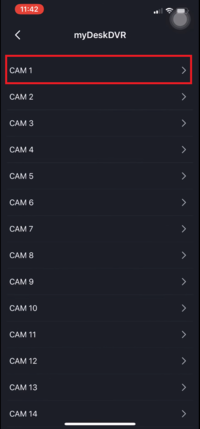
5. Choose the cameras that are going to be configured for schedule recordings. | 5. Choose the cameras that are going to be configured for schedule recordings. | ||
<br> | <br> | ||
| − | [[File:5._Choose_Camera_-_Schedule_Record_DMSS.PNG| | + | [[File:5._Choose_Camera_-_Schedule_Record_DMSS.PNG|200px]] |
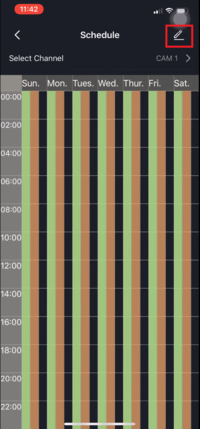
6. Select the "Pencil" to modify the recording options and date. | 6. Select the "Pencil" to modify the recording options and date. | ||
<br> | <br> | ||
| − | [[File:6._Edit_Schedule_-_Schedule_Record_DMSS.PNG| | + | [[File:6._Edit_Schedule_-_Schedule_Record_DMSS.PNG|200px]] |
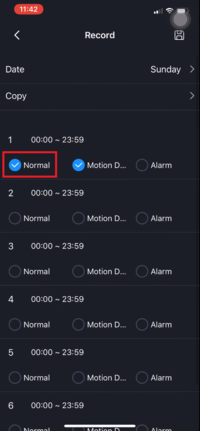
7. Enable "Normal" for continuous recordings. Select "Date" to configure which date to be recorded. | 7. Enable "Normal" for continuous recordings. Select "Date" to configure which date to be recorded. | ||
<br> | <br> | ||
| − | [[File:7._Enable_Reocording_-_Schedule_Record_DMSS.PNG| | + | [[File:7._Enable_Reocording_-_Schedule_Record_DMSS.PNG|200px]] |
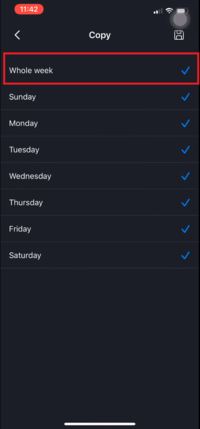
8. Select "Whole week" for 24/7 recordings. If not, choose the corresponding dates for recordings. | 8. Select "Whole week" for 24/7 recordings. If not, choose the corresponding dates for recordings. | ||
<br> | <br> | ||
| − | [[File:8._Choose_Date_For_Recording_-_Schedule_Record_DMSS.PNG| | + | [[File:8._Choose_Date_For_Recording_-_Schedule_Record_DMSS.PNG|200px]] |
Revision as of 00:46, 23 January 2020
Description
The tutorial shows how to schedule recordings via iDMSS or gDMSS.
Prerequisites
- iDMSS or gDMSS Plus
Video Instructions
Step by Step Instructions
1. Select "Device" to go to the device list.
2. Select the recorder from the added device list.
3. Select "Remote Configuration".
4. Expand "Storage Manager" => Select "Schedule".
5. Choose the cameras that are going to be configured for schedule recordings.
6. Select the "Pencil" to modify the recording options and date.
7. Enable "Normal" for continuous recordings. Select "Date" to configure which date to be recorded.
8. Select "Whole week" for 24/7 recordings. If not, choose the corresponding dates for recordings.
