Difference between revisions of "DMSS/Add Dahua Device via P2P"
| Line 14: | Line 14: | ||
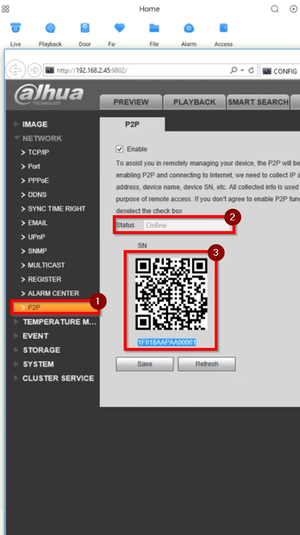
1. Get the serial number of the recorder by accessing Settings > Network > P2P > Ensure P2P is enable and take note of the serial number shown. | 1. Get the serial number of the recorder by accessing Settings > Network > P2P > Ensure P2P is enable and take note of the serial number shown. | ||
| − | [[File:1._Scan_QR_code_or_Copy_Serial_Number_-_DMSS.png| | + | [[File:1._Scan_QR_code_or_Copy_Serial_Number_-_DMSS.png|300px]] |
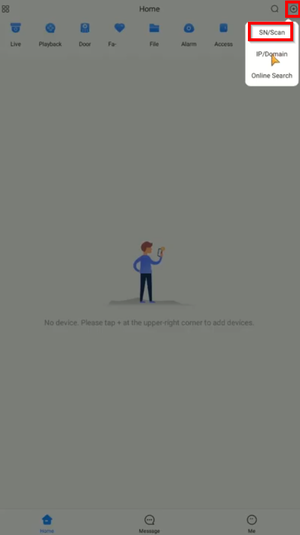
2. Tap the + sign on the app and select SN/Scan. | 2. Tap the + sign on the app and select SN/Scan. | ||
| − | [[File:2._SN_Scan_-_DMSS.png| | + | [[File:2._SN_Scan_-_DMSS.png|300px]] |
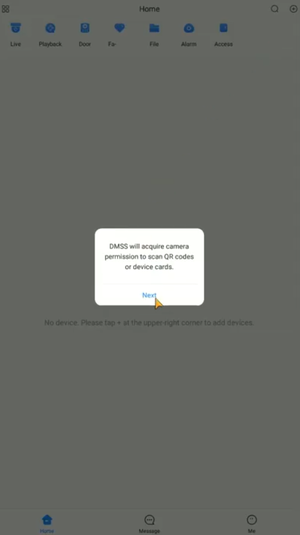
3. The app may prompt a message for granting access to the camera scan the QR. | 3. The app may prompt a message for granting access to the camera scan the QR. | ||
| − | [[File:3._Permission_to_Access_Phone_Camera_-_DMSS.png| | + | [[File:3._Permission_to_Access_Phone_Camera_-_DMSS.png|300px]] |
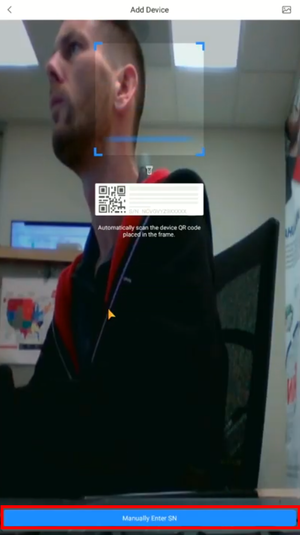
4. QR scanning is an option or the serial number can be done manually. | 4. QR scanning is an option or the serial number can be done manually. | ||
| − | [[File:4._Manually_Enter_SN_-_DMSS.png| | + | [[File:4._Manually_Enter_SN_-_DMSS.png|300px]] |
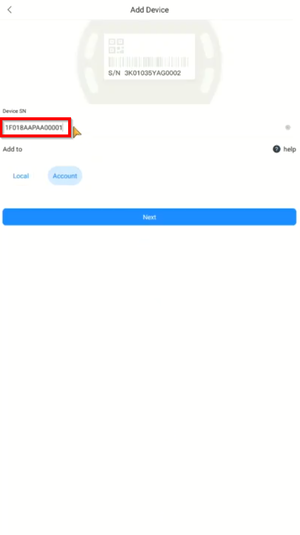
5. Input the serial number and tap Next. | 5. Input the serial number and tap Next. | ||
| − | [[File:5._Type_in_SN_-_DMSS.png| | + | [[File:5._Type_in_SN_-_DMSS.png|300px]] |
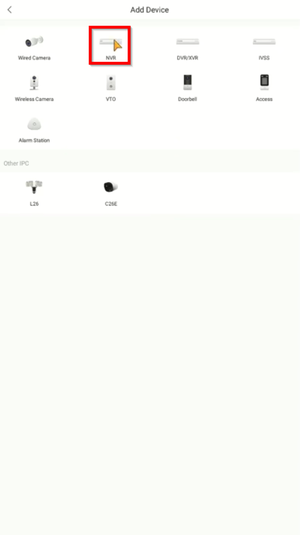
6. Choose NVR | 6. Choose NVR | ||
| − | [[File:6._Choose_NVR_for_the_Recorder_-_DMSS.png| | + | [[File:6._Choose_NVR_for_the_Recorder_-_DMSS.png|300px]] |
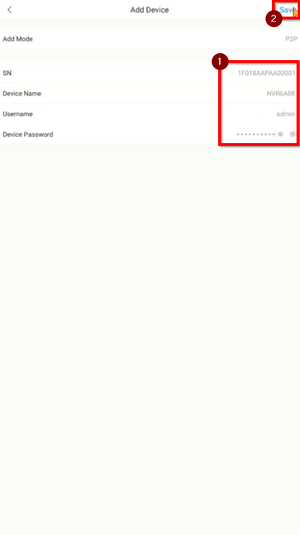
7. Input the information and tap Save. | 7. Input the information and tap Save. | ||
| − | [[File:7._Input_Information_and_Save_-_DMSS.png| | + | [[File:7._Input_Information_and_Save_-_DMSS.png|300px]] |
8. Confirm the timezone and DST if necessary. | 8. Confirm the timezone and DST if necessary. | ||
| − | [[File:8._Configure_TimeZone_and_DST_-_DMSS.png| | + | [[File:8._Configure_TimeZone_and_DST_-_DMSS.png|300px]] |
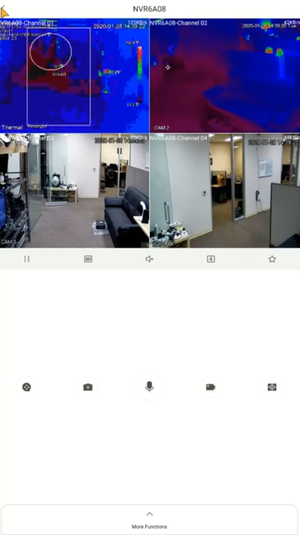
9. After the device is added successfully, the live view will be displayed. | 9. After the device is added successfully, the live view will be displayed. | ||
| − | [[File:9._Live_View_-_DMSS.png| | + | [[File:9._Live_View_-_DMSS.png|300px]] |
Revision as of 23:51, 30 March 2020
Contents
Add Dahua Device via P2P
Description
This tutorial demonstrate how to add Dahua device via P2P
Prerequisites
- Devices already initialized
- Bring up the QR code via local monitor or web interface
Video Instructions
Step by Step Instructions
1. Get the serial number of the recorder by accessing Settings > Network > P2P > Ensure P2P is enable and take note of the serial number shown.
2. Tap the + sign on the app and select SN/Scan.
3. The app may prompt a message for granting access to the camera scan the QR.
4. QR scanning is an option or the serial number can be done manually.
5. Input the serial number and tap Next.
6. Choose NVR
7. Input the information and tap Save.
8. Confirm the timezone and DST if necessary.
9. After the device is added successfully, the live view will be displayed.
