Difference between revisions of "Thermal/Hot Spot"
| Line 4: | Line 4: | ||
==Prerequisites== | ==Prerequisites== | ||
* Dahua device with Hot Spot function - '''DH-TPC-BF5400N-B7''' used for guide | * Dahua device with Hot Spot function - '''DH-TPC-BF5400N-B7''' used for guide | ||
| − | ==Instructions== | + | ==Video Instructions== |
| + | <embedvideo service="youtube">https://youtu.be/FG9-FgWzGBM</embedvideo> | ||
| + | ===Step by Step Instructions=== | ||
| + | 1. Enter the IP of the device into a browser (default 192.168.1.108) | ||
| + | |||
| + | At the Web Login | ||
| + | |||
| + | Enter the Username and Password | ||
| + | |||
| + | Click Login | ||
| + | |||
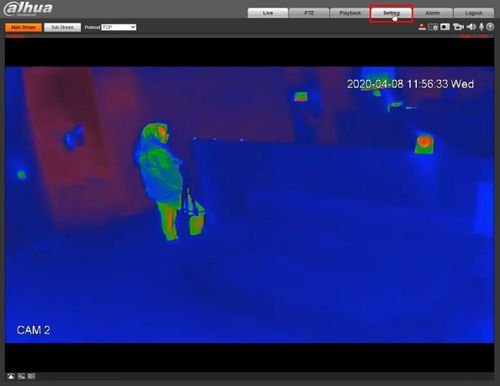
| + | 2. Click '''Setting''' | ||
| + | |||
| + | [[File:Fire_Warning_Setup_-_WebUI_-_1.jpg|500px]] | ||
| + | |||
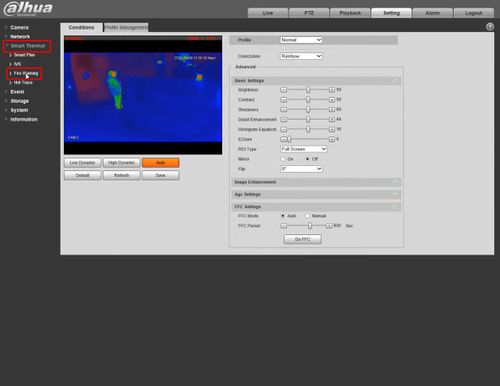
| + | 3. Click '''Smart Thermal''' > '''Fire Warning''' | ||
| + | |||
| + | [[File:Fire_Warning_Setup_-_WebUI_-_2.jpg|500px]] | ||
| + | |||
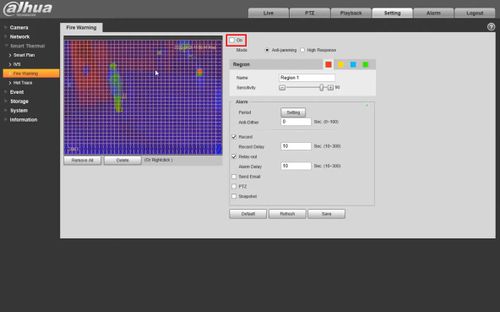
| + | 4. Check the box to '''Enable''' | ||
| + | |||
| + | [[File:Fire_Warning_Setup_-_WebUI_-_3.jpg|500px]] | ||
| + | |||
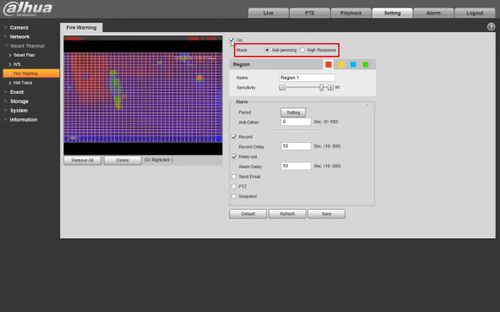
| + | 5. Select the desired Fire Warning mode: | ||
| + | |||
| + | [[File:Fire_Warning_Setup_-_WebUI_-_4.jpg|500px]] | ||
| + | |||
| + | * '''Anti-jamming:''' The camera will only detect those objects that are newly high temperature and send off alarms. That means under Anti-jamming mode, a constantly high-temperature object (a boiler/water heater, for example) is excluded | ||
| + | * '''High Response:''' The camera will detect any hidden fire danger and send off alarm | ||
| + | |||
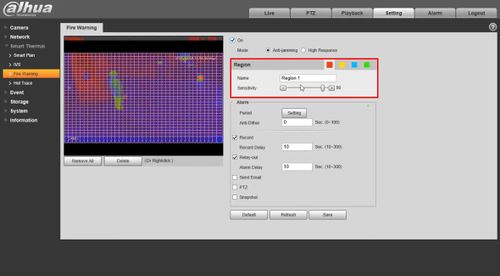
| + | 6. Region settings | ||
| + | |||
| + | Select a color in [[File:Region_color.jpg]] Each color represents a certain area which you can draw with your left mouse button. You can also give a name to the area you have drawn and set it's sensitivity. | ||
| + | |||
| + | '''''The larger the sensitivity is, the easier a fire will be triggered.''''' | ||
| + | |||
| + | [[File:Fire_Warning_Setup_-_WebUI_-_5.jpg|500px]] | ||
| + | |||
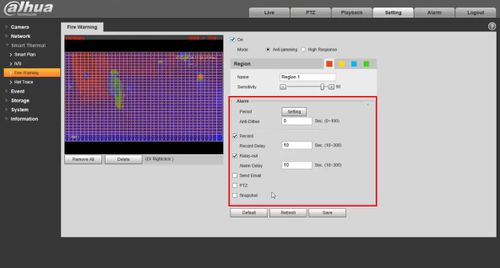
| + | 7. Configure the desired Alarm Parameters for a Fire Warning Event: | ||
| + | |||
| + | {{Template:Alarm_Parameters_IPC}} | ||
| + | [[File:Fire_Warning_Setup_-_WebUI_-_6.jpg|500px]] | ||
| + | |||
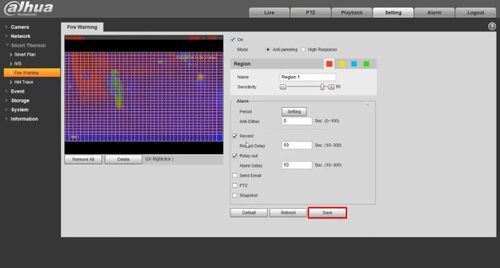
| + | 8. Click '''Save''' | ||
| + | |||
| + | [[File:Fire_Warning_Setup_-_WebUI_-_7.jpg|500px]] | ||
| + | |||
| + | |||
| + | |||
| + | <!-- | ||
<!-- | <!-- | ||
<div class="toccolours mw-collapsible mw-collapsed"> | <div class="toccolours mw-collapsible mw-collapsed"> | ||
| Line 15: | Line 64: | ||
<div class="mw-collapsible-content">{{Template:Hot_Spot_WebUI_New}}</div> | <div class="mw-collapsible-content">{{Template:Hot_Spot_WebUI_New}}</div> | ||
</div> | </div> | ||
| + | --> | ||
Revision as of 16:04, 9 April 2020
Contents
Hot Spot
Description
Hot Spot
Prerequisites
- Dahua device with Hot Spot function - DH-TPC-BF5400N-B7 used for guide
Video Instructions
Step by Step Instructions
1. Enter the IP of the device into a browser (default 192.168.1.108)
At the Web Login
Enter the Username and Password
Click Login
2. Click Setting
3. Click Smart Thermal > Fire Warning
4. Check the box to Enable
5. Select the desired Fire Warning mode:
- Anti-jamming: The camera will only detect those objects that are newly high temperature and send off alarms. That means under Anti-jamming mode, a constantly high-temperature object (a boiler/water heater, for example) is excluded
- High Response: The camera will detect any hidden fire danger and send off alarm
6. Region settings
Select a color in ![]() Each color represents a certain area which you can draw with your left mouse button. You can also give a name to the area you have drawn and set it's sensitivity.
Each color represents a certain area which you can draw with your left mouse button. You can also give a name to the area you have drawn and set it's sensitivity.
The larger the sensitivity is, the easier a fire will be triggered.
7. Configure the desired Alarm Parameters for a Fire Warning Event:
Alarm Parameters (Click to expand)
| Parameter | Description |
|---|---|
| Period | Define a period during which the alarm settings are active. |
| Duration | The shortest time from placing an object in the detection area to an alarm is triggered |
| Record | Enable this function and alarm recording will be triggered when there is an alarm |
| Record Delay | Set a length of time for the Device to delay turning off recording after an alarm is ended. |
| Relay-out | You can connect this relay-out port to such alarm devices as light and siren. When an alarm is triggered, those alarm devices will work. |
| Alarm Delay | Set a length of time for the Device to delay turning off alarm after an event is actually complete |
| Send Email | Select the Send Email check box and an e-mail will be delivered to the device user once an alarm is triggered |
| PTZ | Select the check box of PTZ and select an item from None, Preset, Tour, and Pattern in the Activation bar.
Once an alarm is triggered, the PTZ will execute the item you have selected in the Activation bar |
| Snapshot | Select the Snapshot check box to take a snapshot when there is an alarm. |
8. Click Save
Video Instructions
Step by Step Instructions
1. Enter the IP of the device into a browser (default 192.168.1.108)
At the Web Login
Enter the Username and Password
Click Login-->
