Difference between revisions of "Thermal/DHI-ASI7213X-T1/Instructions/Advertisement Management"
(→DHI-ASI7213X-T1 Advertisement Management) |
|||
| Line 2: | Line 2: | ||
==Description== | ==Description== | ||
| − | This guide will cover how to manage advertisement | + | This guide will cover how to manage/use the advertisement feature on [https://dahuawiki.com/Thermal/DHI-ASI7213X-T1 DHI-ASI7213X-T1] |
| + | |||
| + | You can put a picture or promotional video that will be displayed when the device is in standby | ||
==Prerequisites== | ==Prerequisites== | ||
*[https://dahuawiki.com/Thermal/DHI-ASI7213X-T1 DHI-ASI7213X-T1] (Firmware Version 1220786_Customer_ASI72XXX_EngFrn_NP_V1.000.10BE002.0.R.200904) | *[https://dahuawiki.com/Thermal/DHI-ASI7213X-T1 DHI-ASI7213X-T1] (Firmware Version 1220786_Customer_ASI72XXX_EngFrn_NP_V1.000.10BE002.0.R.200904) | ||
| + | * Device connected to network | ||
| + | * Local computer to access webUI | ||
| + | |||
| + | |||
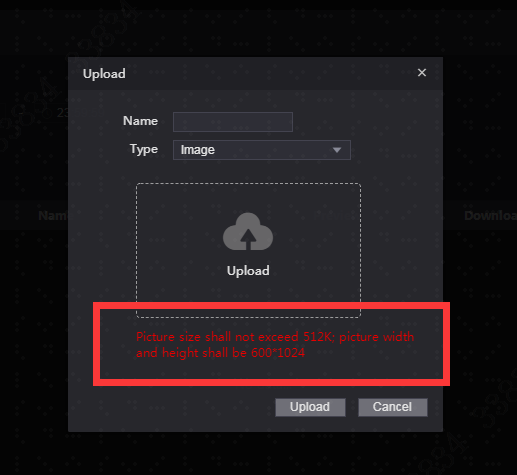
| + | * Image requirements | ||
| + | ** files must be jpg/png/dav file format | ||
| + | ** Resolution: 600x1024 | ||
| + | ** Less than 512k in size | ||
| + | |||
| + | |||
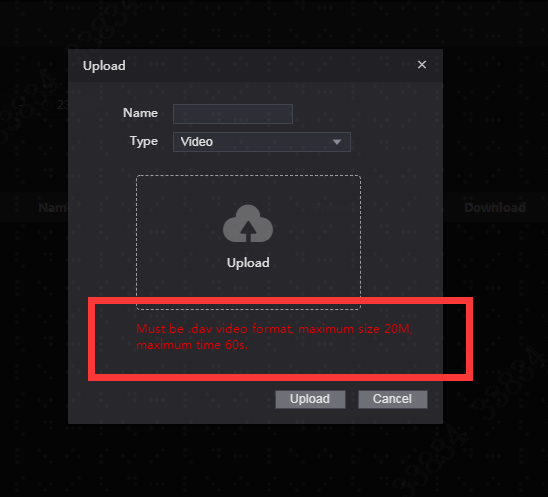
| + | * Video requirements | ||
| + | ** files must be DAV file format | ||
| + | ** Less than 20MB in size | ||
| + | ** 60 seconds/ 1 Minute or less in length. | ||
| + | |||
| + | |||
| + | You can use Video Format Conversion Tool to convert videos to the correct format | ||
| + | |||
| + | [https://dahuawiki.com/index.php?action=ajax&title=-&rs=SecureFileStore::getFile&f=/6/68/VideoFormatConversionTool.zip Click here to download] | ||
==Video Instruction== | ==Video Instruction== | ||
| Line 12: | Line 33: | ||
==Step by Step Instruction== | ==Step by Step Instruction== | ||
| + | 1. Login to the DHI-ASI7213X-T1 webUI by typing the IP address into a local browser and entering the username and password | ||
| + | |||
| + | Navigate to Advertisement Mgmt. | ||
| + | |||
| + | [[File:DHI-ASI7213X-T1_Advertisement_Management_-_WebUI_-_1.png|800px]] | ||
| + | |||
| + | Toggle to enable. | ||
| + | |||
| + | Time Section is the video playback time. | ||
| + | |||
| + | Switching Time is for the images playback, if users upload several images, the switch time is the interval time of each image display. | ||
| + | |||
| + | |||
| + | 2. Click '''Add''' to upload the video and images that you want to display in standby, taking note of the file requirements | ||
| + | |||
| + | [[File:DHI-ASI7213X-T1_Advertisement_Management_-_WebUI_-_image_upload.png]] | ||
| + | |||
| + | [[File:DHI-ASI7213X-T1_Advertisement_Management_-_WebUI_-_video_upload.png]] | ||
| + | |||
| + | |||
| + | === Explanation of Functions === | ||
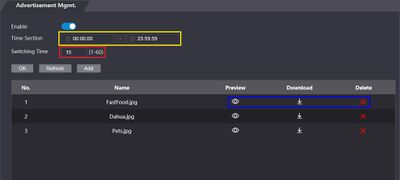
| + | Yellow: The time period during which advertisements will play on the screen. Only one period can be set. | ||
| + | |||
| + | Red: The time that each advertisement is displayed, can be set from 1second up to a minute. If videos are being used Switch time should be set to the length of the longest video used. | ||
| + | |||
| + | Blue: Advertisement management options. Can remove, download or preview selected files. | ||
| + | |||
| + | |||
| + | [[File:Kiosk_Ads.JPG|400px]] | ||
| + | |||
| + | |||
| + | <!-- | ||
<div class="toccolours mw-collapsible mw-collapsed"> | <div class="toccolours mw-collapsible mw-collapsed"> | ||
[[File:DHI-ASI7213X-T1_Mainmenu.jpg|200px]]<span style="font-size:180%;">'''System UI'''</span> | [[File:DHI-ASI7213X-T1_Mainmenu.jpg|200px]]<span style="font-size:180%;">'''System UI'''</span> | ||
| Line 21: | Line 74: | ||
<div class="mw-collapsible-content">{{Template:DHI-ASI7213X-T1/Instructions/Adjust_Volume_WebUI}}</div> | <div class="mw-collapsible-content">{{Template:DHI-ASI7213X-T1/Instructions/Adjust_Volume_WebUI}}</div> | ||
</div> | </div> | ||
| + | --> | ||
Latest revision as of 17:59, 2 October 2020
Contents
DHI-ASI7213X-T1 Advertisement Management
Description
This guide will cover how to manage/use the advertisement feature on DHI-ASI7213X-T1
You can put a picture or promotional video that will be displayed when the device is in standby
Prerequisites
- DHI-ASI7213X-T1 (Firmware Version 1220786_Customer_ASI72XXX_EngFrn_NP_V1.000.10BE002.0.R.200904)
- Device connected to network
- Local computer to access webUI
- Image requirements
- files must be jpg/png/dav file format
- Resolution: 600x1024
- Less than 512k in size
- Video requirements
- files must be DAV file format
- Less than 20MB in size
- 60 seconds/ 1 Minute or less in length.
You can use Video Format Conversion Tool to convert videos to the correct format
Video Instruction
Coming Soon
Step by Step Instruction
1. Login to the DHI-ASI7213X-T1 webUI by typing the IP address into a local browser and entering the username and password
Navigate to Advertisement Mgmt.
Toggle to enable.
Time Section is the video playback time.
Switching Time is for the images playback, if users upload several images, the switch time is the interval time of each image display.
2. Click Add to upload the video and images that you want to display in standby, taking note of the file requirements
Explanation of Functions
Yellow: The time period during which advertisements will play on the screen. Only one period can be set.
Red: The time that each advertisement is displayed, can be set from 1second up to a minute. If videos are being used Switch time should be set to the length of the longest video used.
Blue: Advertisement management options. Can remove, download or preview selected files.


