Notice: Firmware Links Under Maintenance We are currently undergoing maintenance on all firmware links. If any links are inaccessible, please email or contact Tech Support for the firmware. We appreciate your patience during the maintenance, thank you for your understanding.
Difference between revisions of "Video Intercom/SIP 2.0/Single VTH and VTO Onekey Config Setup"
| Line 15: | Line 15: | ||
==Step by Step Instructions== | ==Step by Step Instructions== | ||
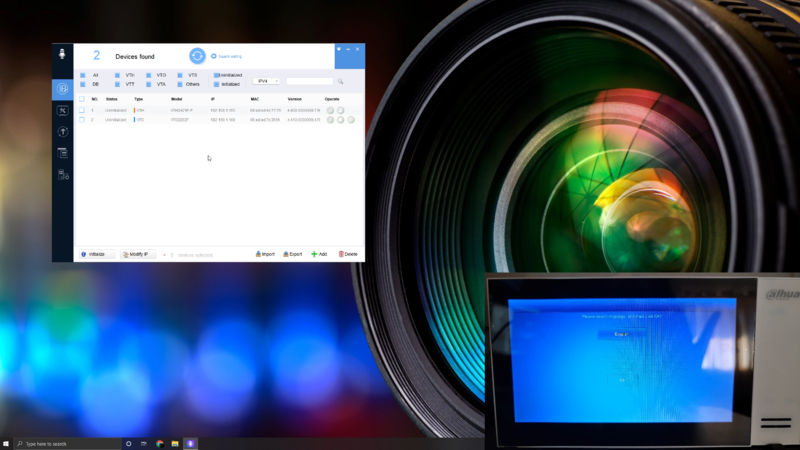
| + | 1. Make sure the VTO and VTH are booted up by checking with [https://dahuawiki.com/images/Files/Software/VDP_Config/985997_General_VDPConfig_Eng_V1.008.0000000.3.R.20191115.zip VDP Config] | ||
| + | |||
| + | [[File:Single VTH and VTO One-key Config Setup-1.png|800px]] | ||
| + | |||
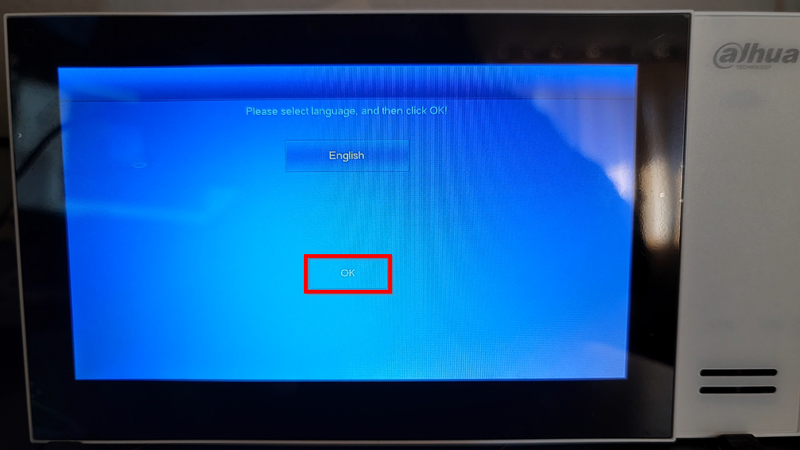
| + | 2. Go to the local UI of the VTH to start the initialization. Select the language and tap on "OK" | ||
| + | |||
| + | [[File:Single VTH and VTO One-key Config Setup-2.png|800px]] | ||
| + | |||
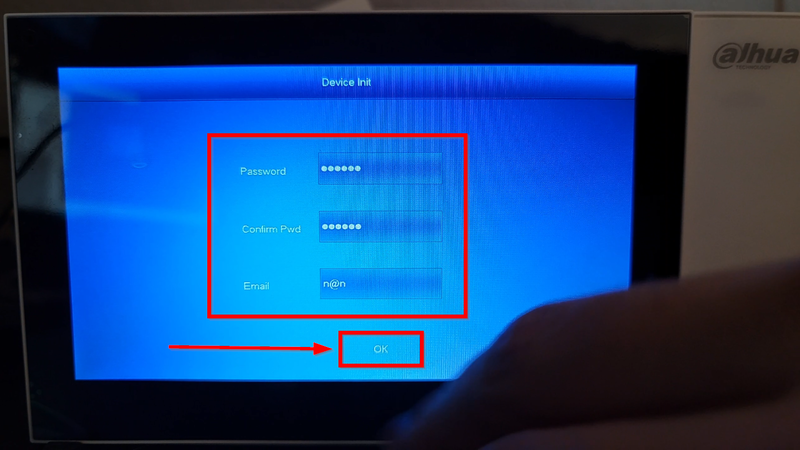
| + | 3. Enter a 6 digit password to initialize the VTH | ||
| + | |||
| + | [[File:Single VTH and VTO One-key Config Setup-3.png|800px]] | ||
| + | |||
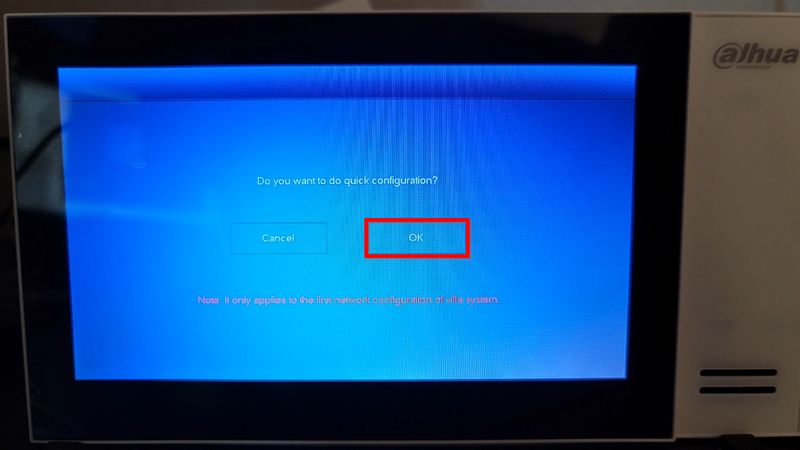
| + | 4. Tap on "OK" to start the One-Key Config | ||
| + | |||
| + | [[File:Single VTH and VTO One-key Config Setup-4.png|800px]] | ||
| + | |||
| + | 5. Tap on "Initialize" to initialize the VTO | ||
| + | |||
| + | [[File:Single VTH and VTO One-key Config Setup-5.png|800px]] | ||
| + | |||
| + | 6. The VTO requires an 8 digit and numerical combination for the password. Tap on "OK" to finalize the initialization. | ||
| + | |||
| + | [[File:Single VTH and VTO One-key Config Setup-6.png|800px]] | ||
| + | |||
| + | 7. Tap on "Next" to Continue | ||
| + | |||
| + | [[File:Single VTH and VTO One-key Config Setup-7.png|800px]] | ||
| + | |||
| + | 8. We will need to configure the VTH so tap on "Edit" | ||
| + | |||
| + | [[File:Single VTH and VTO One-key Config Setup-8.png|800px]] | ||
| + | |||
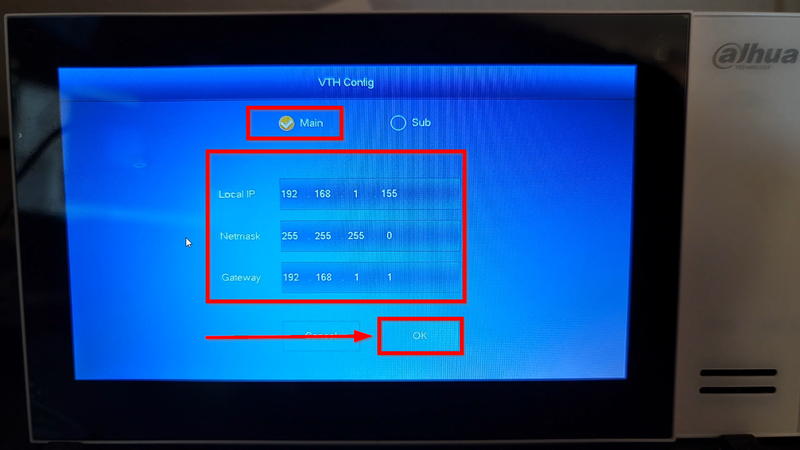
| + | 9. Assign the VTH as a Main and configure the network settings if needed. Tap on "OK" to save. | ||
| + | |||
| + | [[File:Single VTH and VTO One-key Config Setup-9.png|800px]] | ||
| + | |||
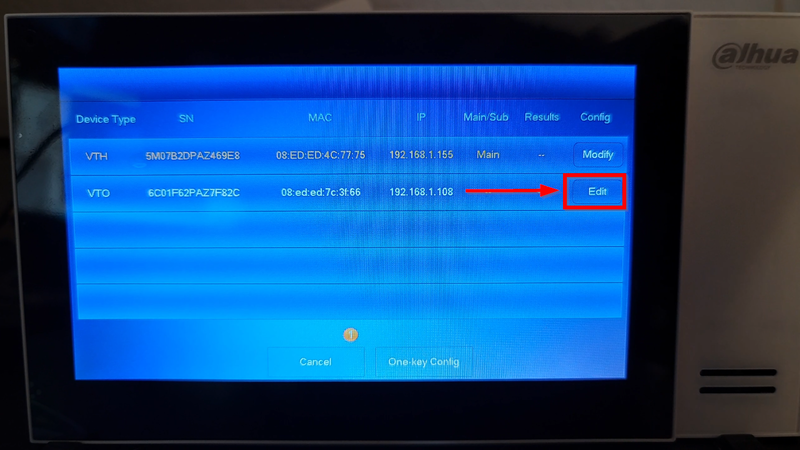
| + | 10. Tap on "Edit" on the VTO to start the Configuration | ||
| + | |||
| + | [[File:Single VTH and VTO One-key Config Setup-10.png|800px]] | ||
| + | |||
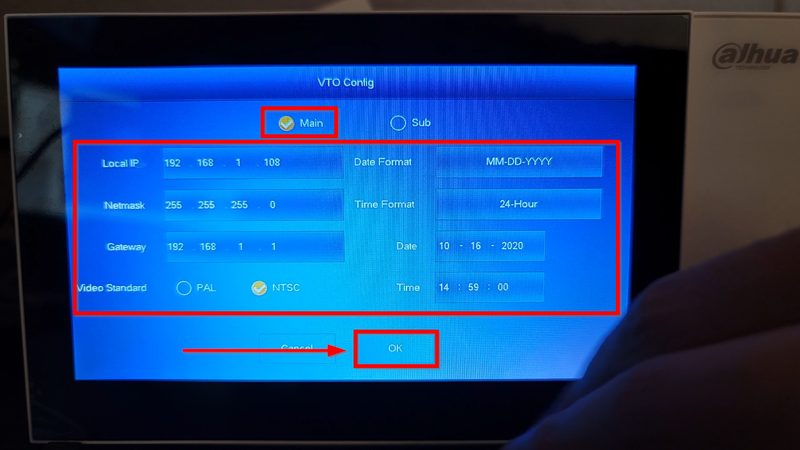
| + | 11. Set the VTO as a Main and edit any Network/Time and Date Settings. Tap on "OK" to save | ||
| + | |||
| + | [[File:Single VTH and VTO One-key Config Setup-11.png|800px]] | ||
| + | |||
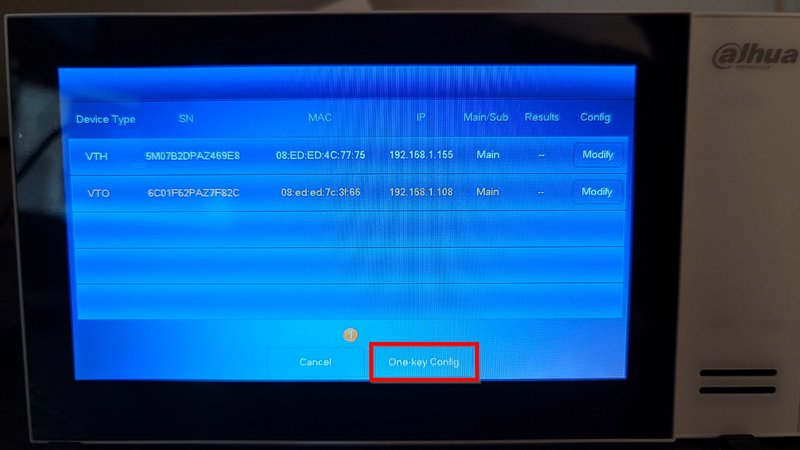
| + | 12. Tap on the "One-Key Config" button once both devices are configured. | ||
| + | |||
| + | [[File:Single VTH and VTO One-key Config Setup-12.png|800px]] | ||
| + | |||
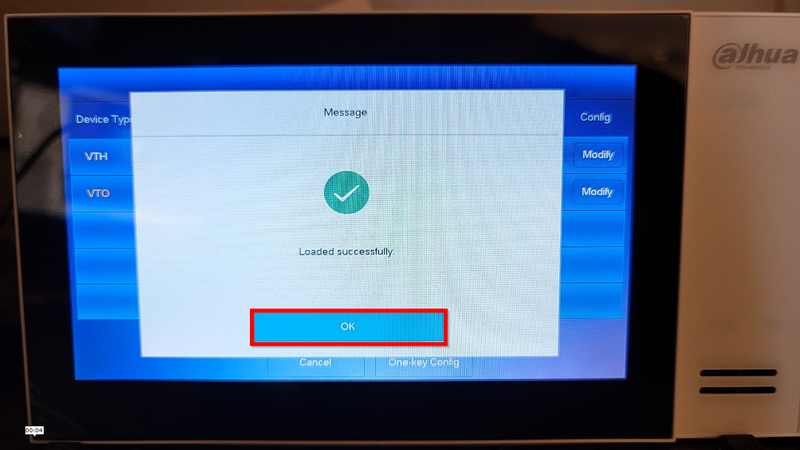
| + | 13. Tap on "OK" to Continue | ||
| + | |||
| + | [[File:Single VTH and VTO One-key Config Setup-13.png|800px]] | ||
| + | |||
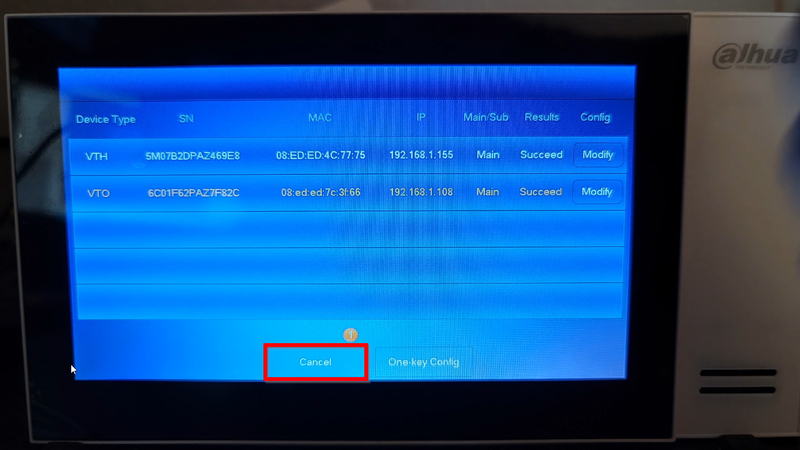
| + | 14. The one key config page will stay up. Hit cancel to end the process. | ||
| + | |||
| + | [[File:Single VTH and VTO One-key Config Setup-14.png|800px]] | ||
| + | |||
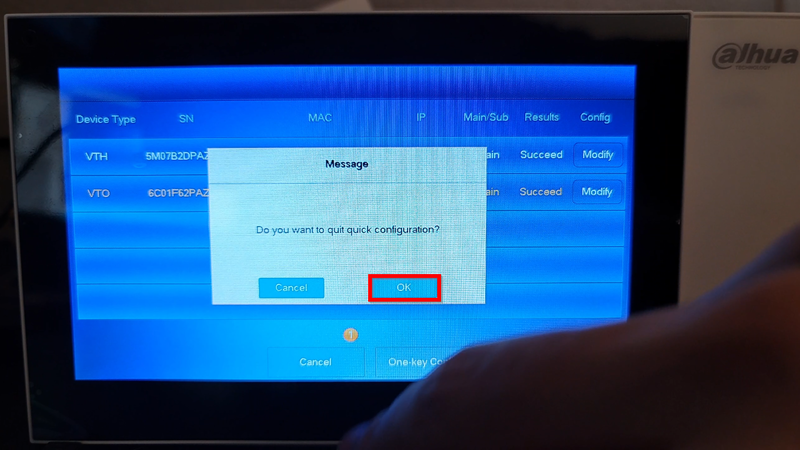
| + | 15. Tap on "OK" and wait around 5 minutes for the units to reboot and finalize any final configurations. | ||
| + | |||
| + | [[File:Single VTH and VTO One-key Config Setup-15.png|800px]] | ||
Revision as of 18:24, 19 October 2020
Contents
Single VTH and VTO One key Config Setup
Description
This article will go over the One-Key Config setup on our VTH2421F-P. As of writing this article, the VTH2421F-P is the only model that support this feature.
The VTH does not have a Web interface so the whole setup will be done on the local Interface.
Pre-requisites
- VTO
- VTH
- VDP Config
Video Instructions
Step by Step Instructions
1. Make sure the VTO and VTH are booted up by checking with VDP Config
2. Go to the local UI of the VTH to start the initialization. Select the language and tap on "OK"
3. Enter a 6 digit password to initialize the VTH
4. Tap on "OK" to start the One-Key Config
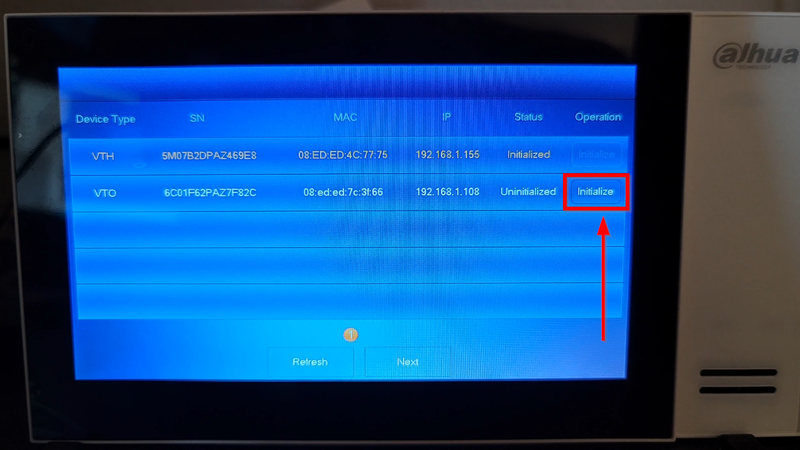
5. Tap on "Initialize" to initialize the VTO
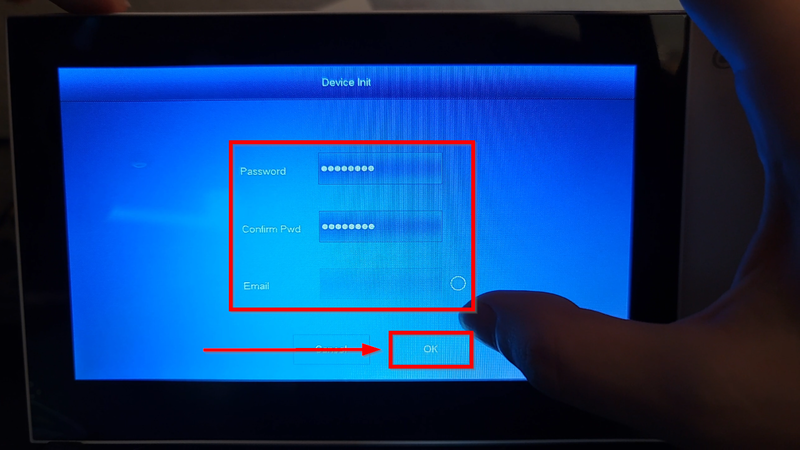
6. The VTO requires an 8 digit and numerical combination for the password. Tap on "OK" to finalize the initialization.
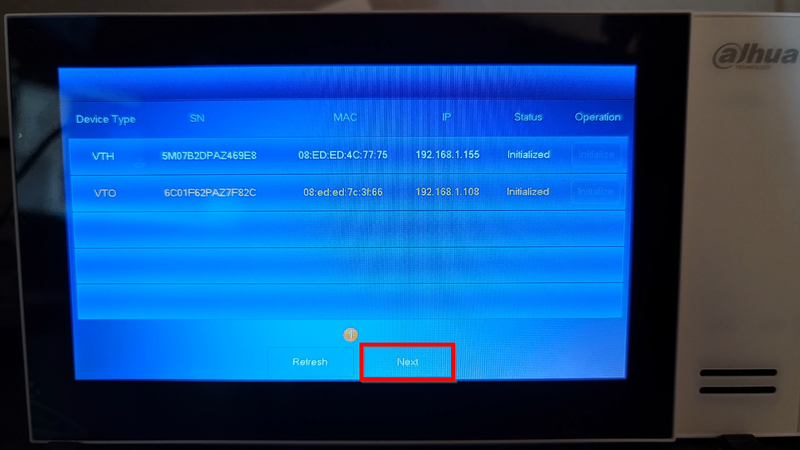
7. Tap on "Next" to Continue
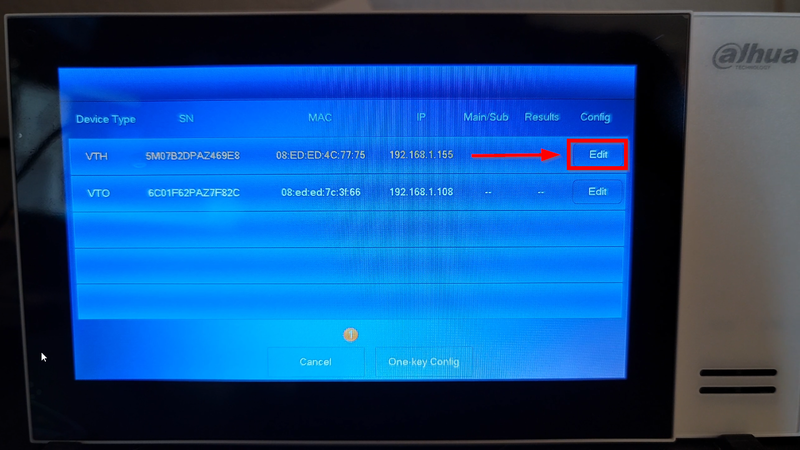
8. We will need to configure the VTH so tap on "Edit"
9. Assign the VTH as a Main and configure the network settings if needed. Tap on "OK" to save.
10. Tap on "Edit" on the VTO to start the Configuration
11. Set the VTO as a Main and edit any Network/Time and Date Settings. Tap on "OK" to save
12. Tap on the "One-Key Config" button once both devices are configured.
13. Tap on "OK" to Continue
14. The one key config page will stay up. Hit cancel to end the process.
15. Tap on "OK" and wait around 5 minutes for the units to reboot and finalize any final configurations.
