Difference between revisions of "LincX2PRO/Add Device To Dahua Recorder"
| Line 17: | Line 17: | ||
*Not compatible with Dahua Video Intercom devices | *Not compatible with Dahua Video Intercom devices | ||
| − | ==Instructions== | + | ==Video Instructions== |
| − | + | <embedvideo service="youtube">https://youtu.be/rwj3rSDfd30</embedvideo> | |
| + | |||
| + | ==Step by Step Instructions== | ||
| + | |||
| + | '''Method 1''': | ||
| + | |||
| + | This first method is extremely simple if all the cameras are still set to default credentials and settings. We will do a device search on the network and add them with a click of a button | ||
| + | |||
| + | * First go to Camera>Registration | ||
| + | |||
| + | [[File:AddDahuaDevice-1.jpg|1000px]] | ||
| + | |||
| + | * Click on "Device Search", it will scan the network and pick up any cameras on it | ||
| + | |||
| + | [[File:AddDahuaDevice-2.jpg|1000px]] | ||
| + | |||
| + | * Check the box of the camera you are adding and click on "ADD" and you will see the camera populate on the bottom box | ||
| + | |||
| + | [[File:AddDahuaDevice-3.jpg|1000px]] | ||
| + | |||
| + | * Give it a few seconds and click on refresh to see if it was added properly. As you can see the status light is now green | ||
| + | |||
| + | [[File:AddDahuaDevice-4.jpg|1000px]] | ||
| + | |||
| + | '''Method Two''': | ||
| + | |||
| + | The second method is used if there's an existing camera and it's password was changed. You will use device search to locate the camera and then go to manual add to change the password it's being added with | ||
| + | |||
| + | * Do a Device Search to locate the camera. Check the camera and click on "Manual Add" | ||
| + | |||
| + | [[File:AddDahuaDevice-5.jpg|1000px]] | ||
| + | |||
| + | * A popup window will come up and most of the information will be populated. You will just need to change the password, click on save when you're done. | ||
| + | |||
| + | [[File:AddDahuaDevice-6.jpg|1000px]] | ||
| + | |||
| + | * The camera will now be added | ||
| + | |||
| + | [[File:AddDahuaDevice-7.jpg|1000px]] | ||
| + | |||
| + | '''Method Three''': | ||
| + | |||
| + | This last method is used when Device Search fails and cannot locate the camera on the network. You will need to type in the camera's information manually. | ||
| + | |||
| + | * Click on Manual Add | ||
| + | |||
| + | [[File:AddDahuaDevice-8.jpg|1000px]] | ||
| + | |||
| + | * Input all the required information | ||
| + | |||
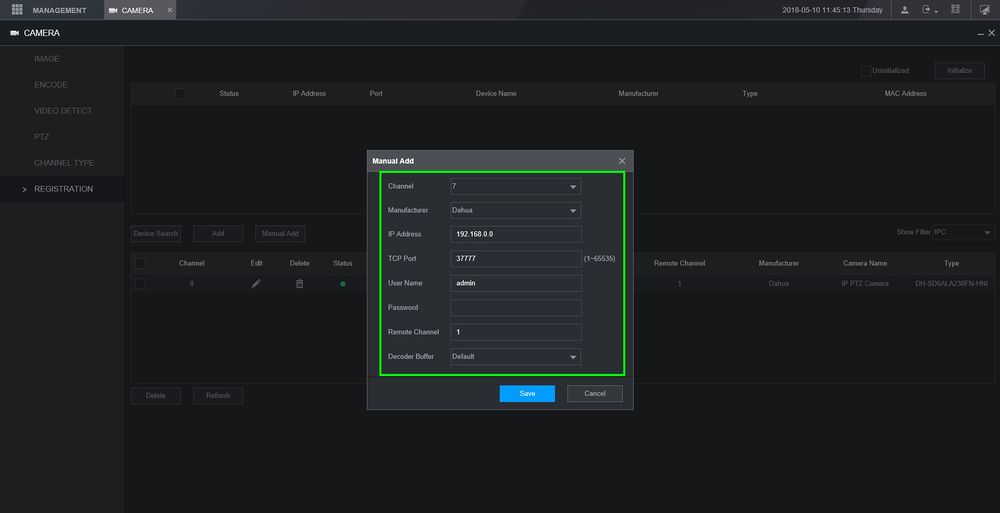
| + | [[File:AddDahuaDevice-9.jpg|1000px]] | ||
| + | |||
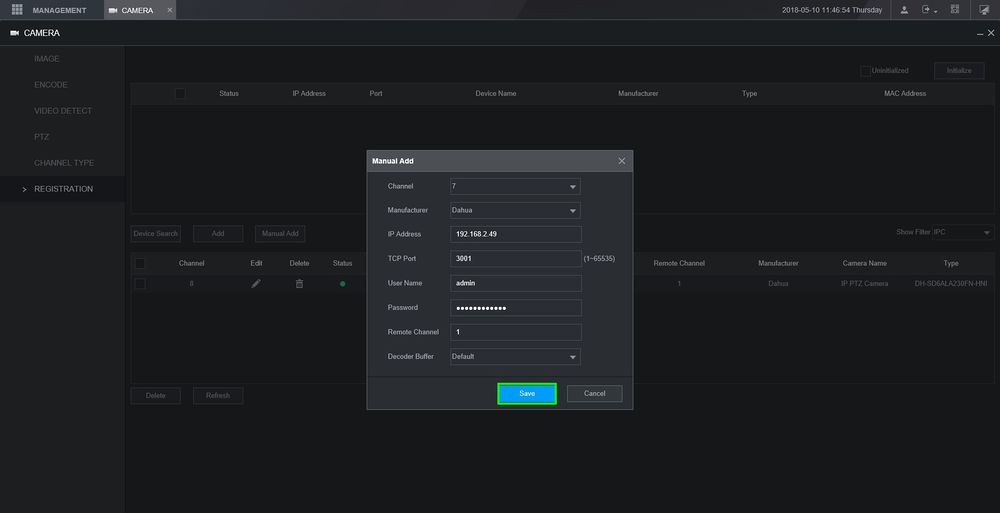
| + | * After manually inputting the information click on "Save" | ||
| + | |||
| + | [[File:AddDahuaDevice-10.jpg|1000px]] | ||
| + | |||
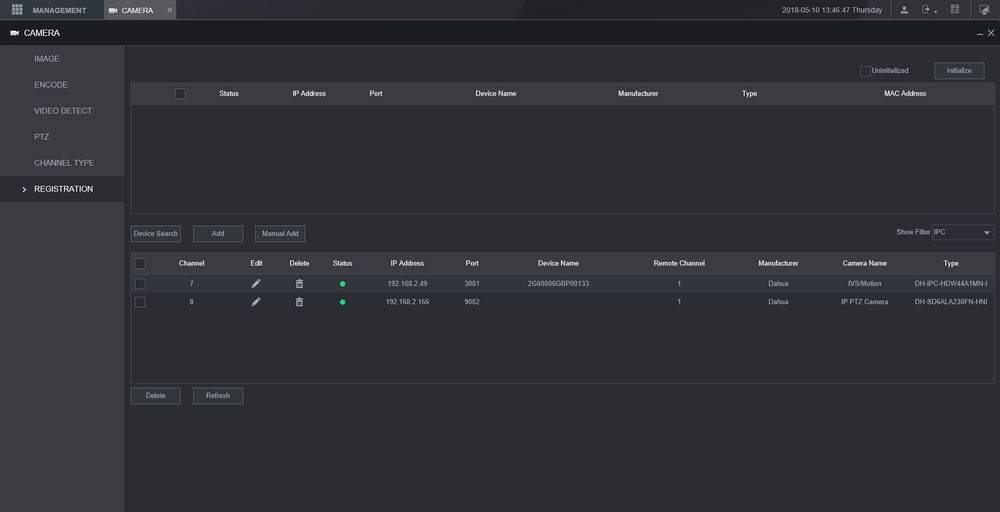
| + | * If the information was correct then the camera will be successfully added and have a green status light | ||
| + | |||
| + | [[File:AddDahuaDevice-11.jpg|1000px]] | ||
Latest revision as of 18:26, 26 February 2024
Add LincX2PRO Device To Dahua Recorder
Description
These instructions will show you how to add a LincX2PRO Device to a Dahua recorder.
Prerequisites
- LincX2Pro Device
- Dahua NVR, DVR, or XVR
- Completed Initial Setup of LincX2PRO Device
Not Working Functions
- No ONVIF
- No 3rd Party Support for 3rd Party VMS, Recorders, or Video Intercom devices
- No RTSP URL
- No PIR Recording
- No Calls to SmartPSS
- No Calls to Dahua Recorder
- Not compatible with Dahua Video Intercom devices
Video Instructions
Step by Step Instructions
Method 1:
This first method is extremely simple if all the cameras are still set to default credentials and settings. We will do a device search on the network and add them with a click of a button
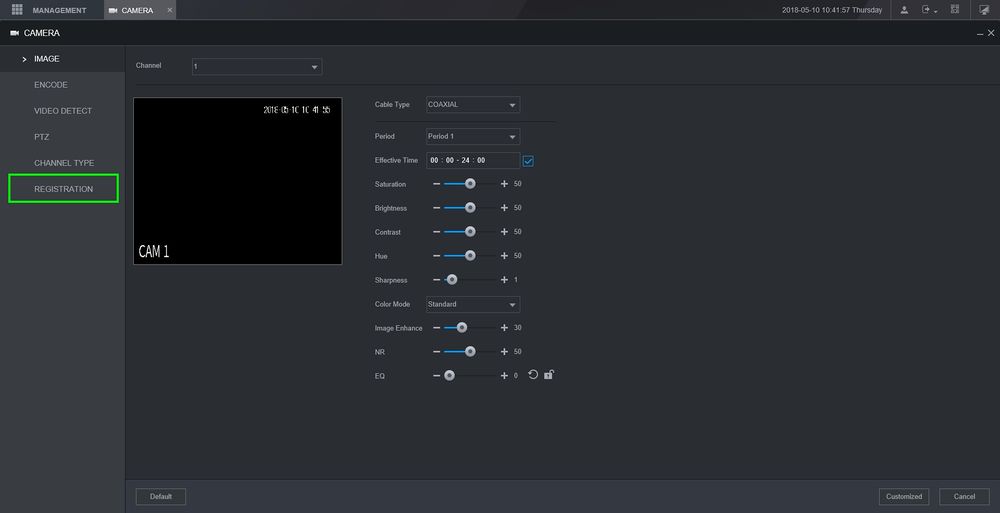
- First go to Camera>Registration
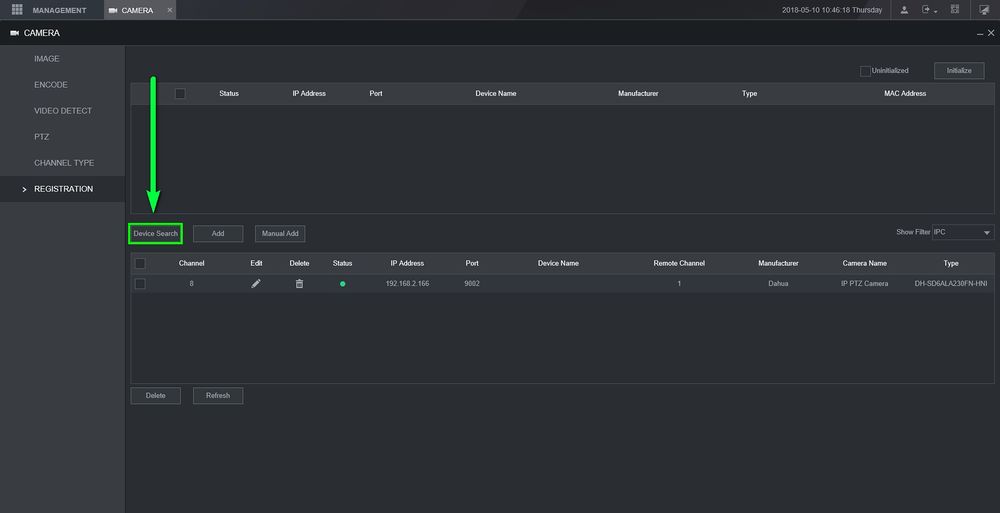
- Click on "Device Search", it will scan the network and pick up any cameras on it
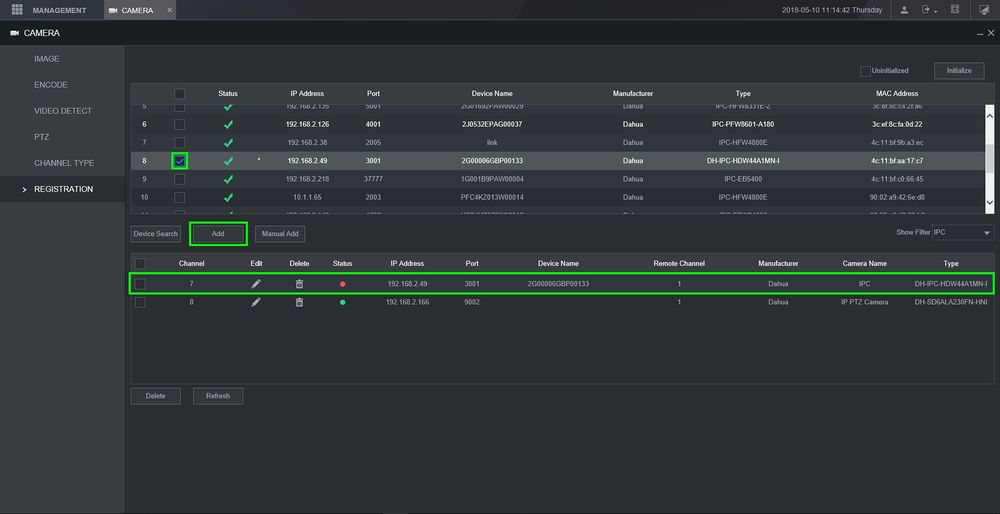
- Check the box of the camera you are adding and click on "ADD" and you will see the camera populate on the bottom box
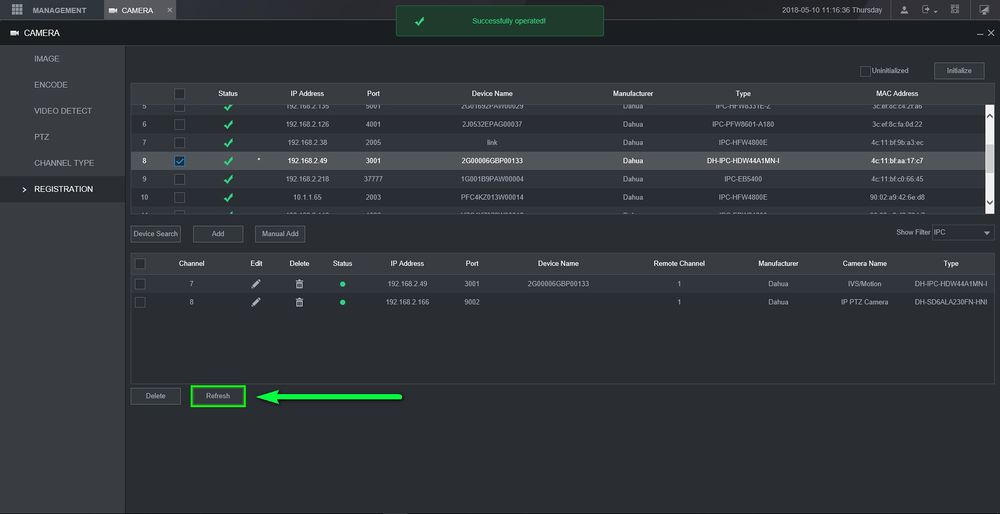
- Give it a few seconds and click on refresh to see if it was added properly. As you can see the status light is now green
Method Two:
The second method is used if there's an existing camera and it's password was changed. You will use device search to locate the camera and then go to manual add to change the password it's being added with
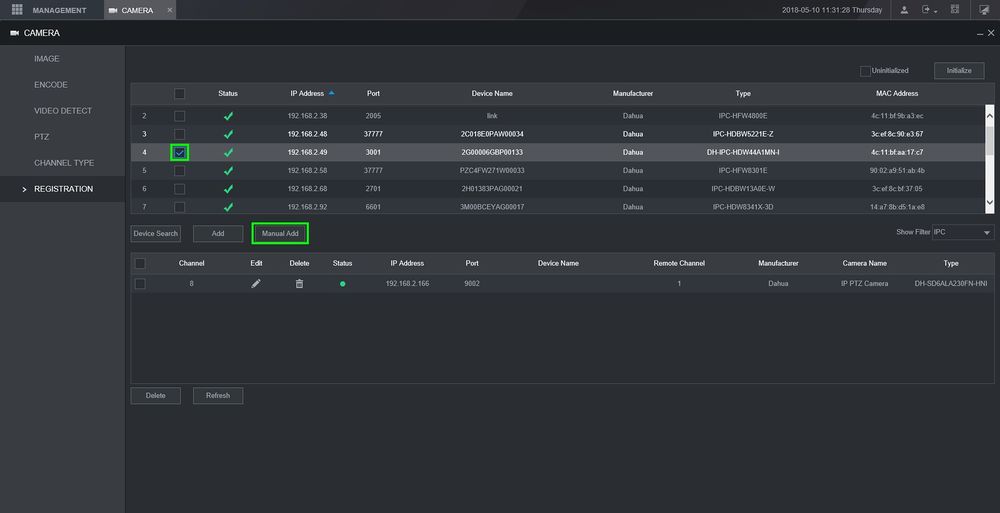
- Do a Device Search to locate the camera. Check the camera and click on "Manual Add"
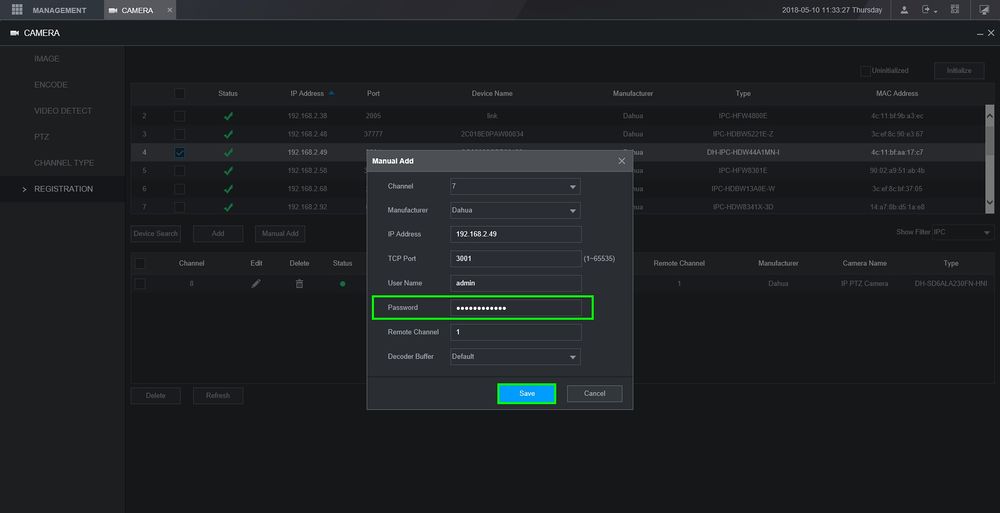
- A popup window will come up and most of the information will be populated. You will just need to change the password, click on save when you're done.
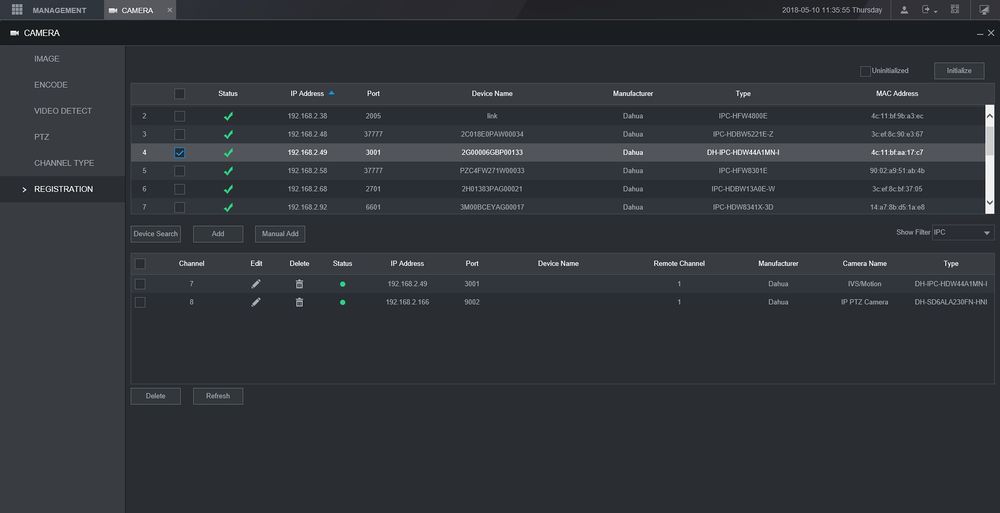
- The camera will now be added
Method Three:
This last method is used when Device Search fails and cannot locate the camera on the network. You will need to type in the camera's information manually.
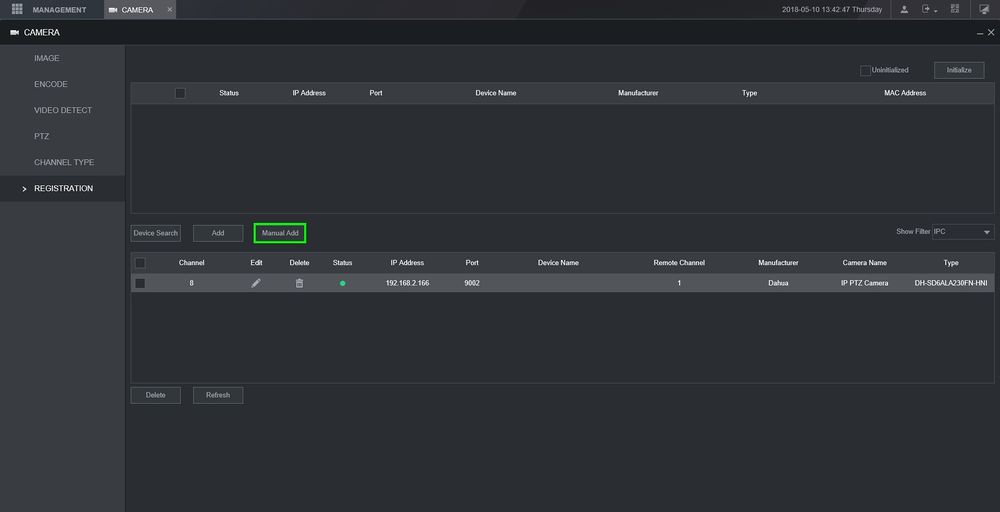
- Click on Manual Add
- Input all the required information
- After manually inputting the information click on "Save"
- If the information was correct then the camera will be successfully added and have a green status light
