Difference between revisions of "Backup/NM Standby Setup"
| Line 81: | Line 81: | ||
| − | '''Step 3'''. Add the Master NVR IP address on | + | '''Step 3'''. Add the Master NVR IP address on via Web Serivce of Slave NVR. |
[[File:nm14.png|500px]] | [[File:nm14.png|500px]] | ||
| Line 116: | Line 116: | ||
| − | '''Step 10.''' After about | + | '''Step 10.''' After about 120 seconds, the Slave NVR take over the task of Master slave and the status is “Using” now. |
[[File:nm21.png|500px]] | [[File:nm21.png|500px]] | ||
| − | '''Step 11.''' If the Master NVR online again, the status “Backup” and click the tick. | + | '''Step 11.''' If the Master NVR online again, the status “Backup” and click the tick icon. |
[[File:nm22.png|500px]] | [[File:nm22.png|500px]] | ||
| − | '''Step 12.''' Then Master NVR will take over the task again. | + | '''Step 12.''' Then Master NVR will take over the task again. If you want the Master NVR back online , you have to click the tick Icon in order to see this interface as seen on the previous step. Click "Yes" to passback record data. |
[[File:nm23.png|500px]] | [[File:nm23.png|500px]] | ||
Revision as of 18:30, 16 May 2016
Note :
1. All NVRs must be the same model and upgraded with the same firmware.
2. All NVRs must be in the same IP segment.
3. When Master NVR fail down and the Slave NVR will take over the task of it and then keep recording, but both of them will lose 90~120s recordings cos the Slave NVR need time to judge if the Master NVR is really offline. Meanwhile, you cannot do playback from any one of them.
4. But when you manually past the task and recordings from Slave NVR to the Master NVR when Master NVR recovered, the Master NVR will start to record and you can do playback from it.
N+M Hot Standby
N+M basic concept
- N = The number of NVR master
- M = The number of NVR slave
- If the master NVR crashes, one slave take over master and start work
- When the master NVR gets back online, user can turn slave into standby position manually, user can choose to past back record data in slave at same time
- N+M can realize NVR secure backup and monitoring system uninterrupted work.
Real IP
- Real IP = master and slave NVR local IP
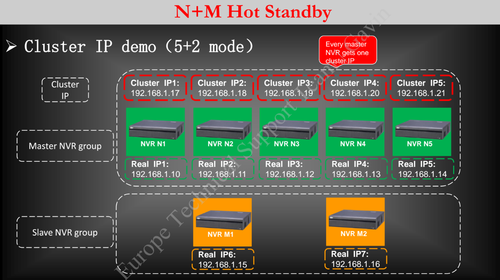
- Cluster IP = virtual IP, only on web of Master NVR, user can set this Cluster IP (Note : must be In the same network segment with master and slave and not occupied.)
- Each Master NVR have a different Cluster IP. If you want to use a software (VMS) to manage the N+M system, you can add the Cluster IP of N pcs Master devices to preview and playback. When one Master NVR crashed, the software will access the Slave NVR to get the realtime preview and playback automatically. But you may failed at the transition about 90s to 120s because the Master NVR is transfer the task from Master to Slave NVR
Cluster IP demo(5+2 mode)
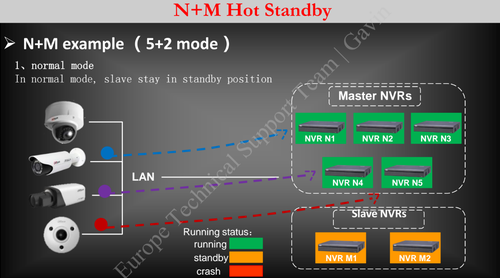
1. In normal mode, slave stays in standby position
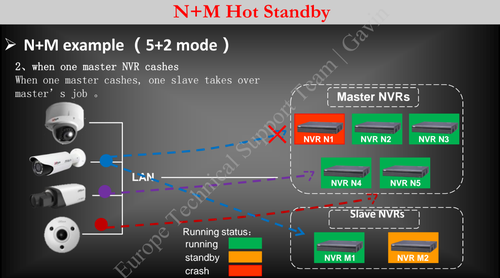
2. If one master NVR crashes, one slave takes over master’s job
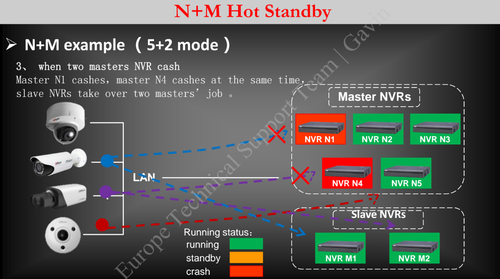
3. If two masters NVR crash Master and N1 crashes,Master N4 crashes at the same time,Slave NVRs take over two masters’job
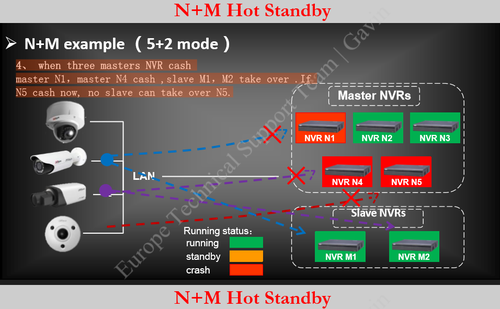
4. When three Masters NVR's crash Master N1,Master N4 cash ,Slave M1,M2 take over. If N5 crashes now, no slave can take over N5.
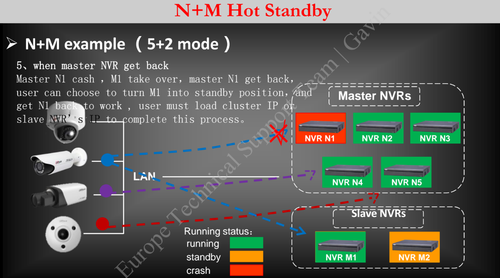
5. When the Master NVR get back online, Master N1 crashes ,M1 will take over,When Master N1 get back online,user can choose to turn M1 into standby position,and get N1 back to work , user must load cluster IP or slave NVR’s IP to complete this process.
How to Configure the N+M
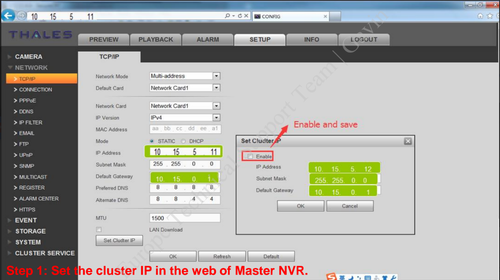
Step 1. Login into the Master NVR via Web Service ➞ Set the cluster IP in the web of Master NVR ➞ Check off Enable and select OK.
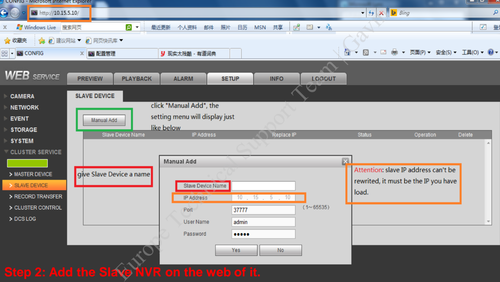
Step 2. Login into Slave NVR via Web Service ➞ Add the Slave NVR by selecting Manual Add ➞ Name Slave Device ➞ Input User Name and Password. Note: Slave IP address cannot be changed, it is defaulted as the IP address of the Slave NVR.
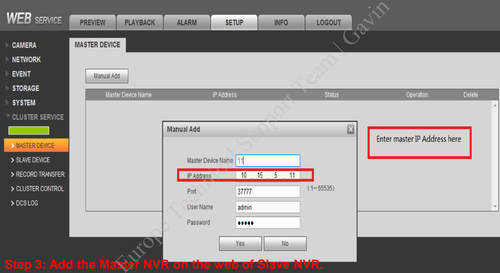
Step 3. Add the Master NVR IP address on via Web Serivce of Slave NVR.
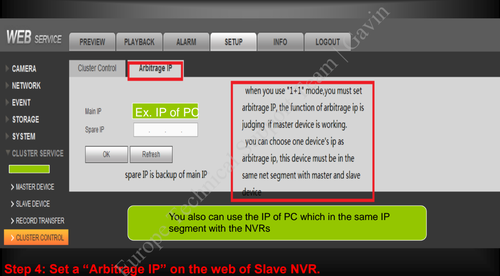
Step 4. Set a “Arbitrage IP” on the web of Slave NVR. Note: When you use "1+1 mode, you must set a arbitrage IP, the function of the arbitrage IP is judging if the Master device is working. You can choose one device's IP as the arbitrage IP, this device must be in the same net segment with the master and slave device. You can also use the IP of the PC which in the same IP segment with the NVRs.
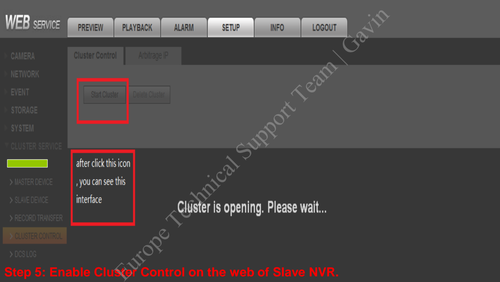
Step 5. Enable Cluster Control on the web of Slave NVR ➞ Select Start Cluster.
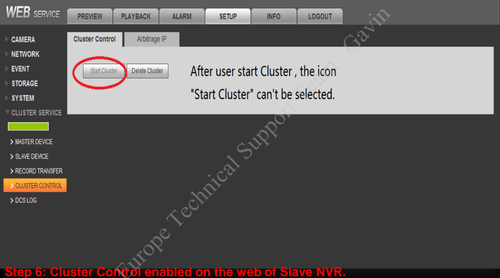
Step 6. Cluster Control enabled on the web of Slave NVR.
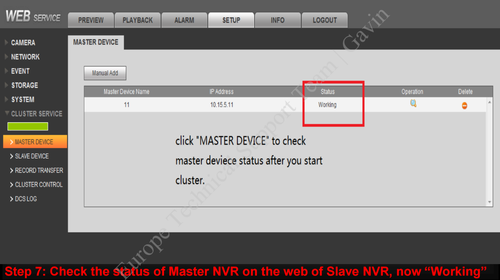
Step 7. Check the status of Master NVR on the web of Slave NVR, now “Working”
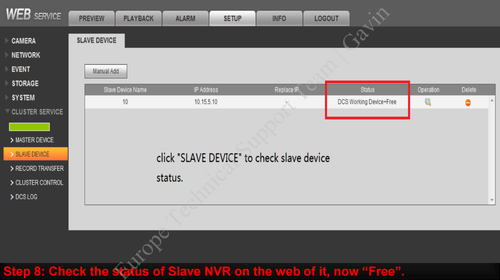
Step 8. Check the status of Slave NVR on the web of it, now “Free”.
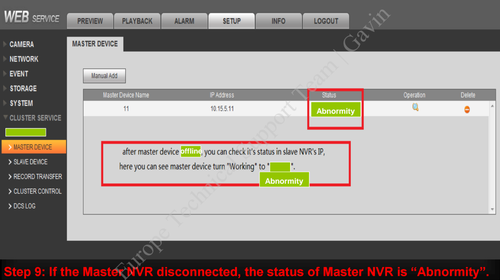
Step 9. If the Master NVR disconnected, the status of Master NVR is “Abnormity”.
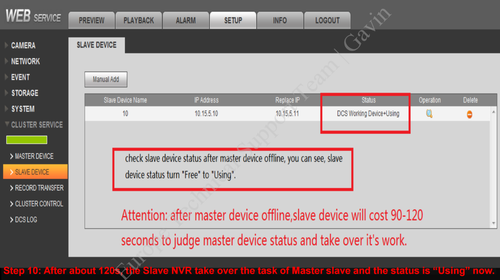
Step 10. After about 120 seconds, the Slave NVR take over the task of Master slave and the status is “Using” now.
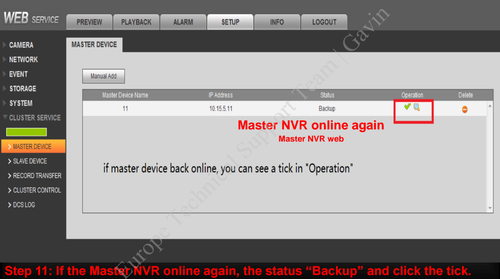
Step 11. If the Master NVR online again, the status “Backup” and click the tick icon.
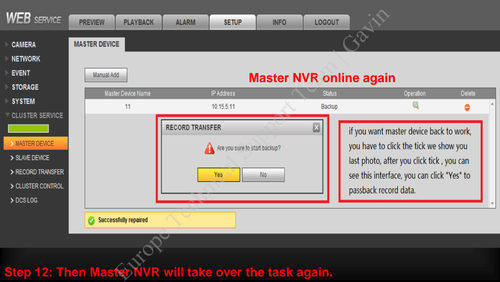
Step 12. Then Master NVR will take over the task again. If you want the Master NVR back online , you have to click the tick Icon in order to see this interface as seen on the previous step. Click "Yes" to passback record data.
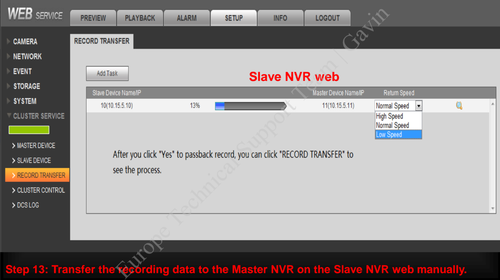
Step 13. Transfer the recording data to the Master NVR on the Slave NVR web manually.
