Difference between revisions of "Time Attendance/SmartPSS/Add User to Device"
(Created page with "=Add User to Device= ==Description== ==Prerequisites== ==Video Instructions== <embedvideo service="youtube">https://www.youtube.com/watch?v=EXAMPLE</embedvideo> ==Step by Step...") |
|||
| Line 1: | Line 1: | ||
=Add User to Device= | =Add User to Device= | ||
==Description== | ==Description== | ||
| + | This article will show how to create and add a user to a ASA2212A through SmartPSS | ||
==Prerequisites== | ==Prerequisites== | ||
| − | + | *SmartPSS v2.02 | |
| − | + | *ASA2212A | |
==Step by Step Instructions== | ==Step by Step Instructions== | ||
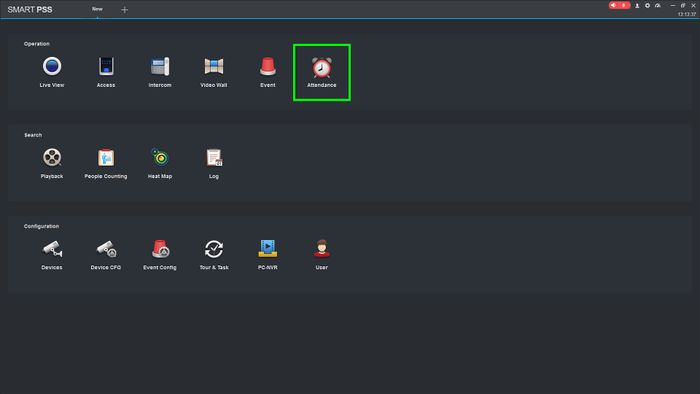
| − | 1. | + | 1. Open SmartPSS and click on the "Attendance" tab |
| − | [[File: | + | |
| + | [[File:SPSSAddUser-1.jpg|700px]] | ||
| + | |||
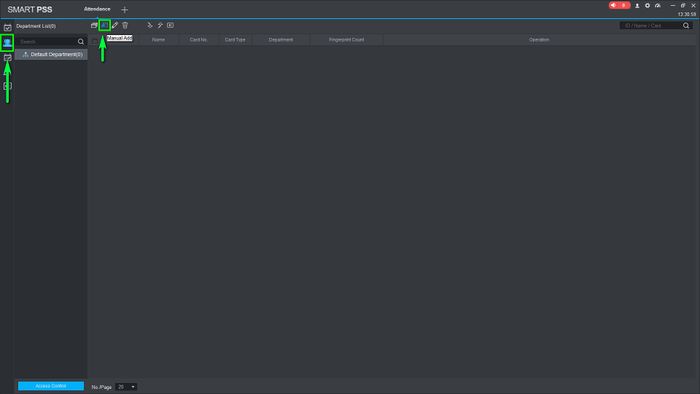
| + | 2. Click on the "User" icon on the left to enter the User tab and then click on "Manual add" | ||
| + | |||
| + | [[File:SPSSAddUser-2.jpg|700px]] | ||
| + | |||
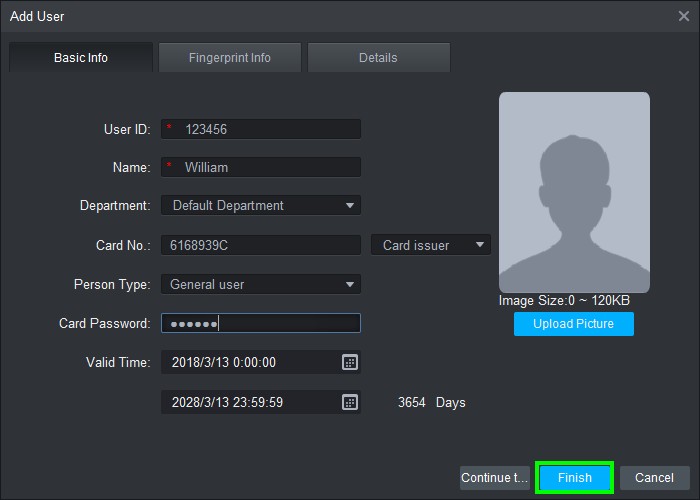
| + | 3. Fill in the information for the user and click on "Finish" to save. | ||
| + | |||
| + | [[File:SPSSAddUser-3.jpg|700px]] | ||
| + | |||
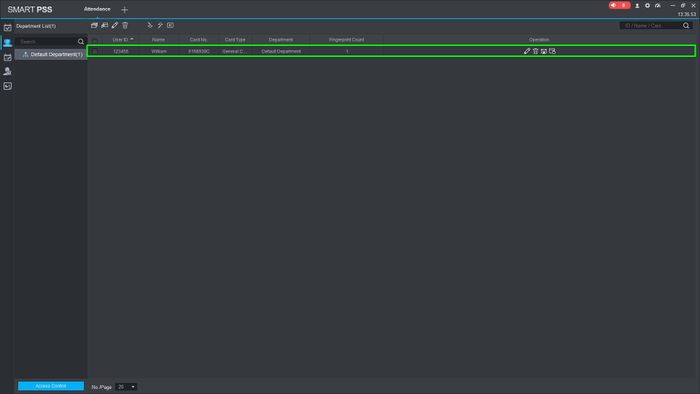
| + | 4. If done correctly, you will see the user in the field below. | ||
| + | |||
| + | [[File:SPSSAddUser-4.jpg|700px]] | ||
| + | |||
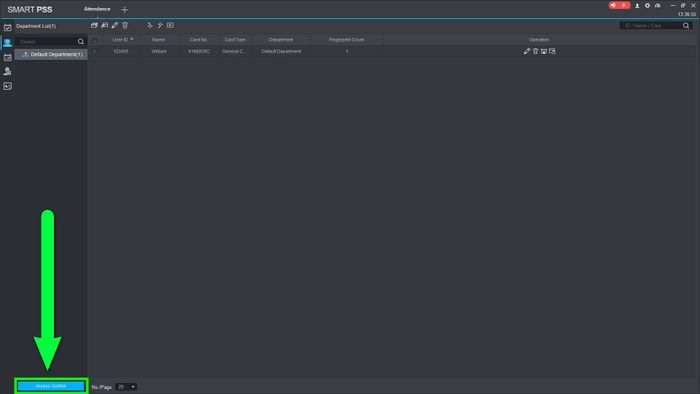
| + | 5. To bind the user to the unit we need to click on "Access Control" | ||
| + | |||
| + | [[File:SPSSAddUser-5.jpg|700px]] | ||
| + | |||
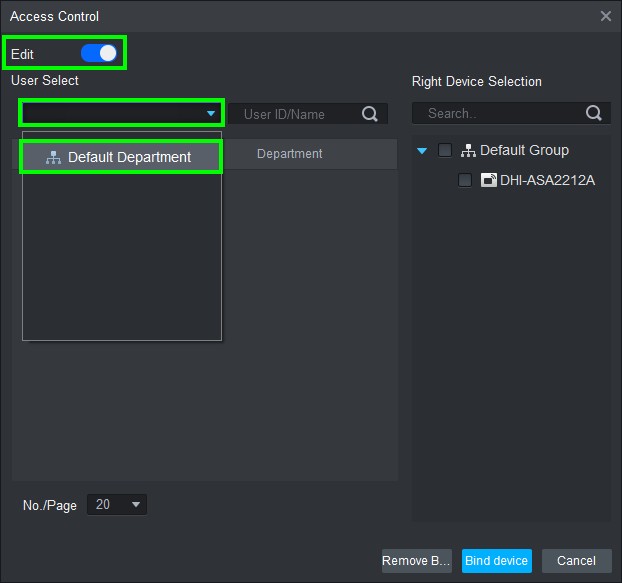
| + | 6. Enable the "Edit" option and on the drop-down bar select the department the user was added to. | ||
| + | |||
| + | [[File:SPSSAddUser-6.jpg|700px]] | ||
| + | |||
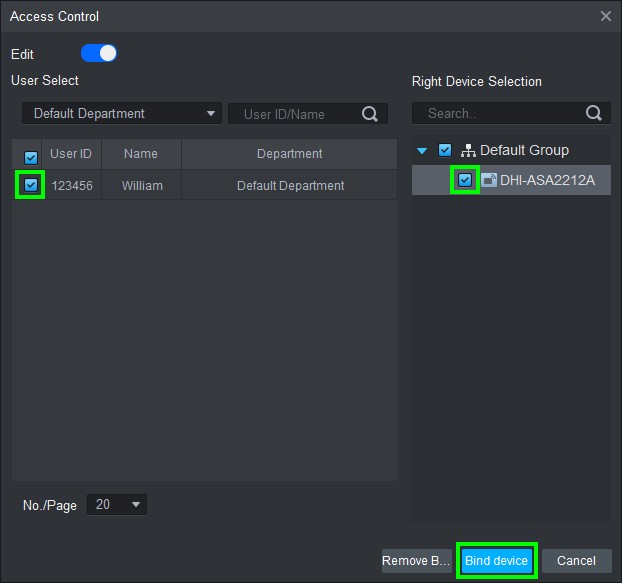
| + | 7.The user will populate, check the boxes on the user and the unit you want to bind them to and click on "Bind device" | ||
| + | |||
| + | [[File:SPSSAddUser-7.jpg|700px]] | ||
| + | |||
| + | 8. If done correctly you will see a successful pop up and the user has now been added to the unit. | ||
| + | |||
| + | [[File:SPSSAddUser-8.jpg|700px]] | ||
Revision as of 19:24, 16 March 2018
Add User to Device
Description
This article will show how to create and add a user to a ASA2212A through SmartPSS
Prerequisites
- SmartPSS v2.02
- ASA2212A
Step by Step Instructions
1. Open SmartPSS and click on the "Attendance" tab
2. Click on the "User" icon on the left to enter the User tab and then click on "Manual add"
3. Fill in the information for the user and click on "Finish" to save.
4. If done correctly, you will see the user in the field below.
5. To bind the user to the unit we need to click on "Access Control"
6. Enable the "Edit" option and on the drop-down bar select the department the user was added to.
7.The user will populate, check the boxes on the user and the unit you want to bind them to and click on "Bind device"
8. If done correctly you will see a successful pop up and the user has now been added to the unit.
