Difference between revisions of "AI/Instructions/Add Trigger or Alarm Based on face"
| Line 45: | Line 45: | ||
[[File:AddAlarmFaceRecognition5.png|1000px]] | [[File:AddAlarmFaceRecognition5.png|1000px]] | ||
| − | 7. From the Face Recognition page you can either set up Facial Recognition alarms via the AI built into the camera or AI built into the recorder. | + | 7. From the Face Recognition page, you can either set up Facial Recognition alarms via the AI built into the camera or AI built into the recorder. |
<br>If you want to set up Facial Recognition using the AI built into the camera, continue to Step 8. | <br>If you want to set up Facial Recognition using the AI built into the camera, continue to Step 8. | ||
<br>If you want to set up Facial Recognition using the AI built into the recorder, continue to Step 14. | <br>If you want to set up Facial Recognition using the AI built into the recorder, continue to Step 14. | ||
| Line 51: | Line 51: | ||
[[File:AddAlarmFaceRecognition6.png|800px]] | [[File:AddAlarmFaceRecognition6.png|800px]] | ||
| − | 8. Select the drop-down next to "Deployment Time" to choose the schedule you want the Face Recognition on the carmera to be active. If you already have a schedule set up skip to Step 12. | + | 8. Select the drop-down menu next to "Deployment Time" to choose the schedule you want the Face Recognition on the carmera to be active on. If you already have a schedule set up, skip to Step 12. |
<br>If there is no schedule or you want to make a different schedule, select "Add Schedule". | <br>If there is no schedule or you want to make a different schedule, select "Add Schedule". | ||
| Line 69: | Line 69: | ||
[[File:AddAlarmFaceRecognition10.png|1100px]] | [[File:AddAlarmFaceRecognition10.png|1100px]] | ||
| − | 12. Make sure the toggle next to "Enabled" is switched to | + | 12. Make sure the toggle next to "Enabled" is switched to On and the schedule you want is selected in the "Deployment Time" drop-down. |
[[File:AddAlarmFaceRecognition11.png|800px]] | [[File:AddAlarmFaceRecognition11.png|800px]] | ||
| Line 78: | Line 78: | ||
Select "Record" from the Actions drop-down if you want the system to start recording a specific camera's feed when a face from the database is recognized. | Select "Record" from the Actions drop-down if you want the system to start recording a specific camera's feed when a face from the database is recognized. | ||
| − | <br>You can select the "Device" drop-down to choose which camera's video feed is recorded when this is triggered. | + | <br>You can select the "Device" drop-down menu to choose which camera's video feed is recorded when this is triggered. |
[[File:AddAlarmFaceRecognition13.png|800px]] | [[File:AddAlarmFaceRecognition13.png|800px]] | ||
| − | Select "Snap" from the Actions drop-down if you want the system to take a snapshot image from the camera's video feed. | + | Select "Snap" from the Actions drop-down if you want the system to take a snapshot image from the camera's video feed when a face from the database is recognized. |
[[File:AddAlarmFaceRecognition14.png|800px]] | [[File:AddAlarmFaceRecognition14.png|800px]] | ||
| Line 99: | Line 99: | ||
14. Select "AI By Device" to set up Facial Recognition using the AI built into the recorder. | 14. Select "AI By Device" to set up Facial Recognition using the AI built into the recorder. | ||
| − | <br>Select the drop-down next to "Deployment Time" to choose the schedule you want the Face Recognition on the recorder to be active. | + | <br>Select the drop-down next to "Deployment Time" to choose the schedule you want the Face Recognition on the recorder to be active on. |
<br>If there is no schedule or you want to make a different schedule, select "Add Schedule" and go back to Step 9. | <br>If there is no schedule or you want to make a different schedule, select "Add Schedule" and go back to Step 9. | ||
<br>Select "+ Associate Face Database" to choose which face database to use for the facial recognition. | <br>Select "+ Associate Face Database" to choose which face database to use for the facial recognition. | ||
Revision as of 17:55, 22 May 2018
Contents
Add Trigger or Alarm Based on Face Recognition
Description
This article will cover how to add a trigger or an alarm based on facial recognition on an AI Camera or Recorder
Prerequisites
- A Dahua AI Recorder:
- A Dahua camera added to the recorder:
Add Dahua Camera to AI Recorder
- An existing Face Database:
Step by Step Instructions
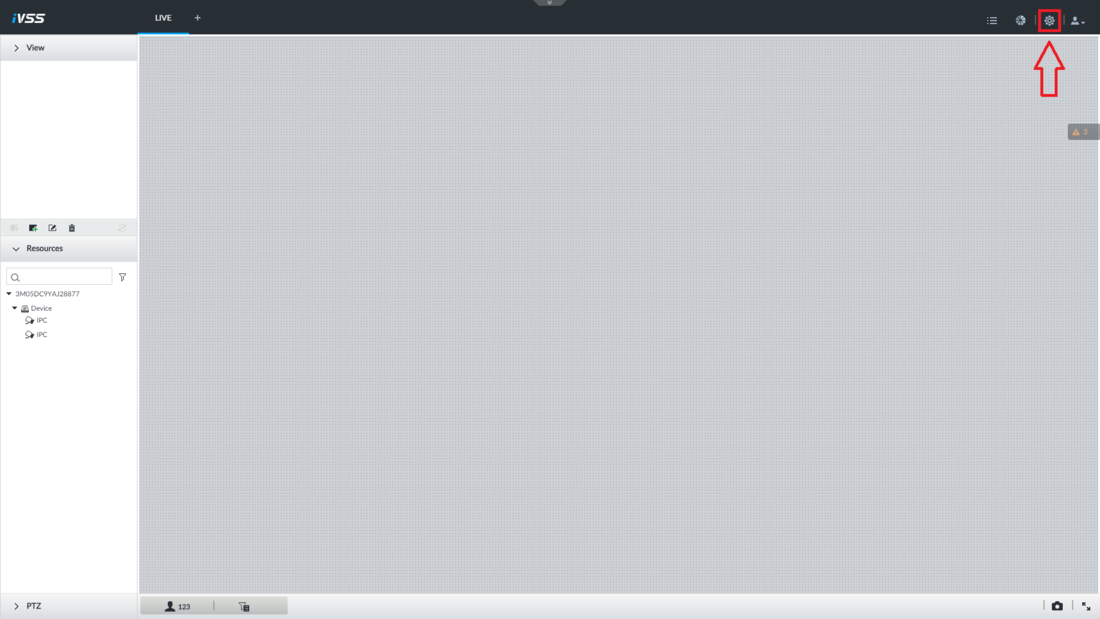
1. From the main screen of the iVSS system, select the gear icon at the top right.
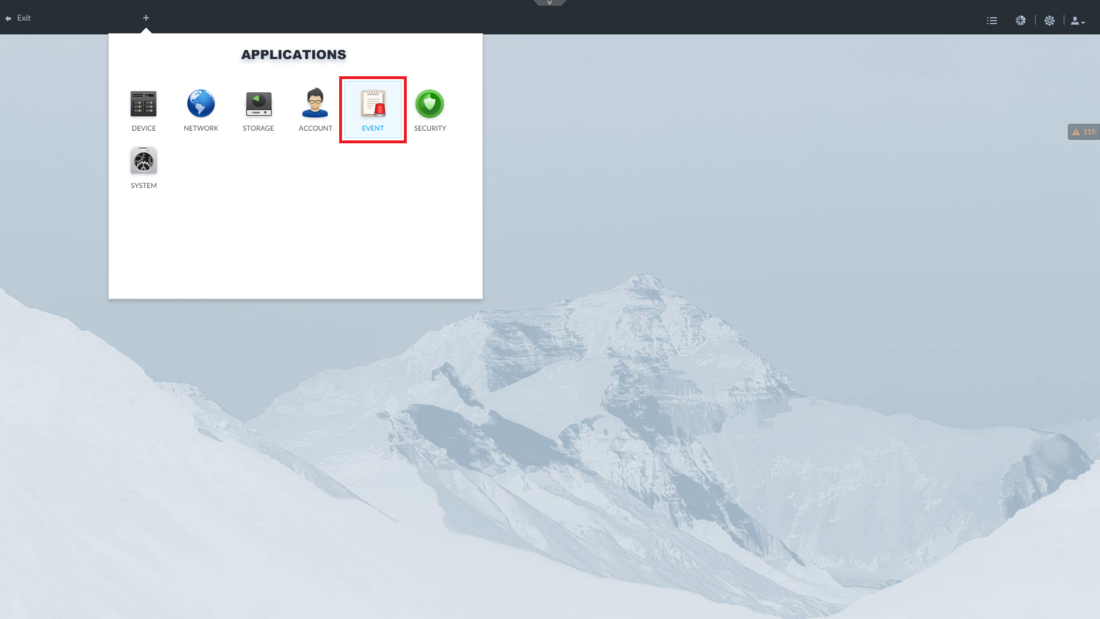
2. Select "Event" from the list of applications.
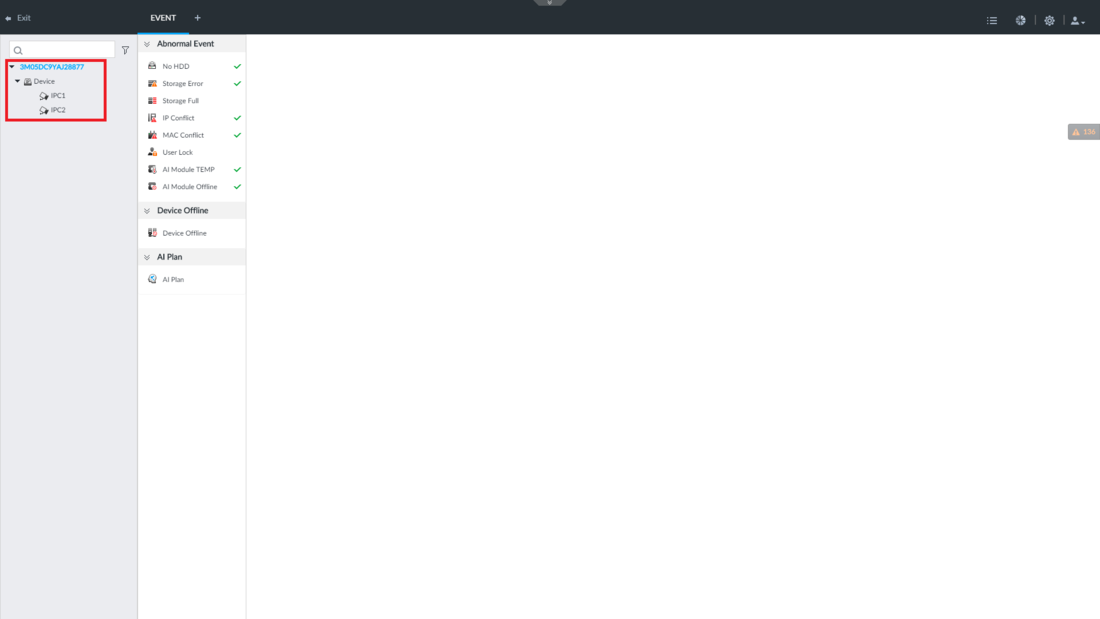
3. Click on the drop-down arrows to the left of the recorder's serial number to see the list of devices. Then select the camera you want to use from the list.
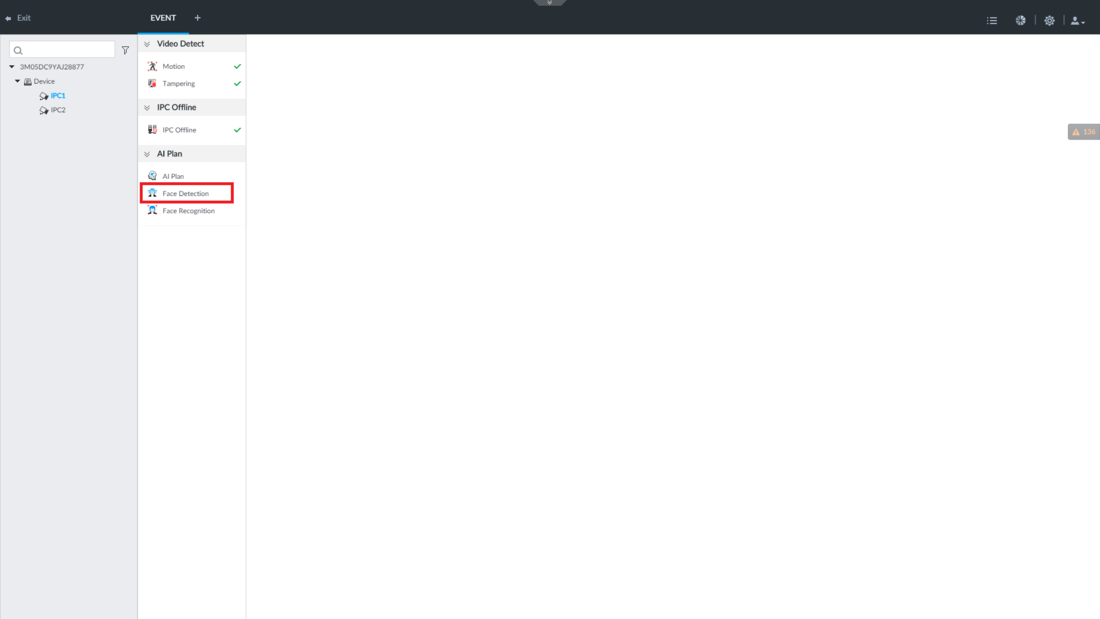
4. Select "Face Detection" from the AI Plan list.
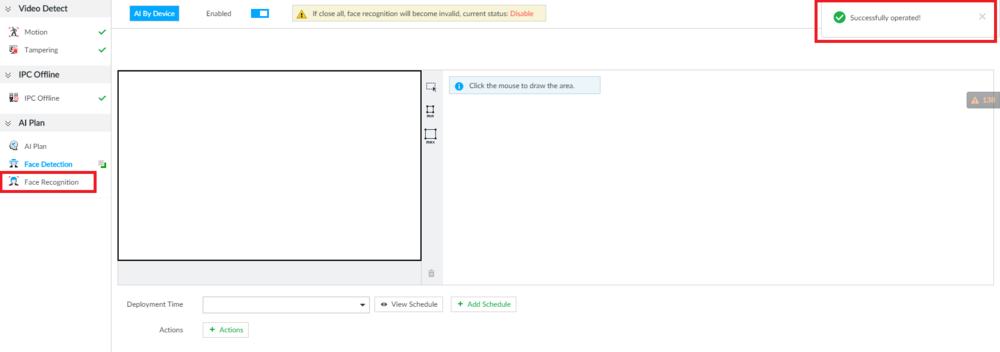
5. Flip the toggle next to "Enabled" to turn on Face Detection. Then select "Save".
6. Once the changes are saved it will say "Successfully Operated" at the top right.
Select "Face Recognition" from the AI Plan List.
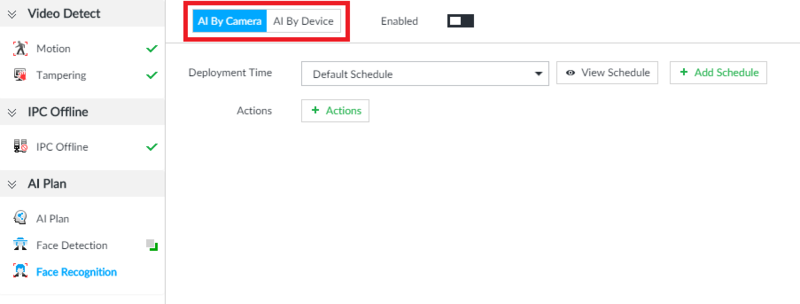
7. From the Face Recognition page, you can either set up Facial Recognition alarms via the AI built into the camera or AI built into the recorder.
If you want to set up Facial Recognition using the AI built into the camera, continue to Step 8.
If you want to set up Facial Recognition using the AI built into the recorder, continue to Step 14.
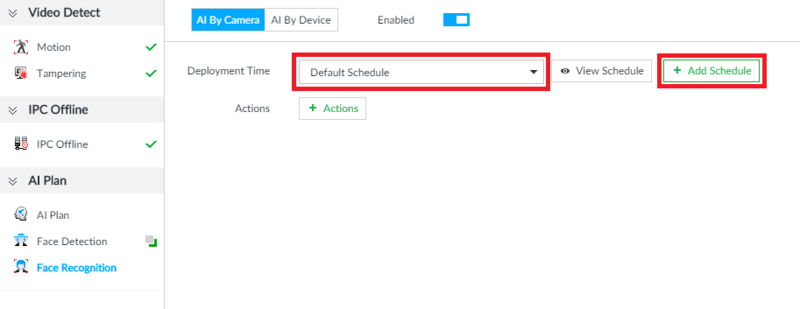
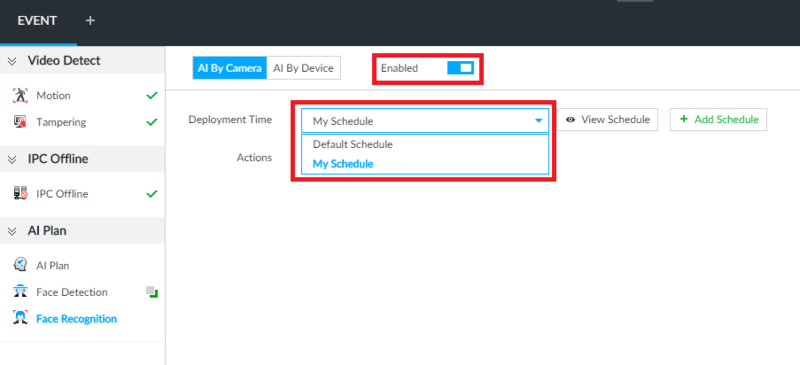
8. Select the drop-down menu next to "Deployment Time" to choose the schedule you want the Face Recognition on the carmera to be active on. If you already have a schedule set up, skip to Step 12.
If there is no schedule or you want to make a different schedule, select "Add Schedule".
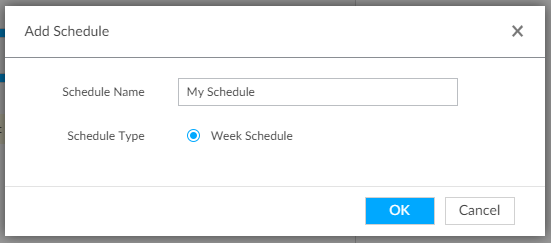
9. In the Schedule menu, press the plus "+" button to create a new schedule.
10. Type in the name of the new schedule.
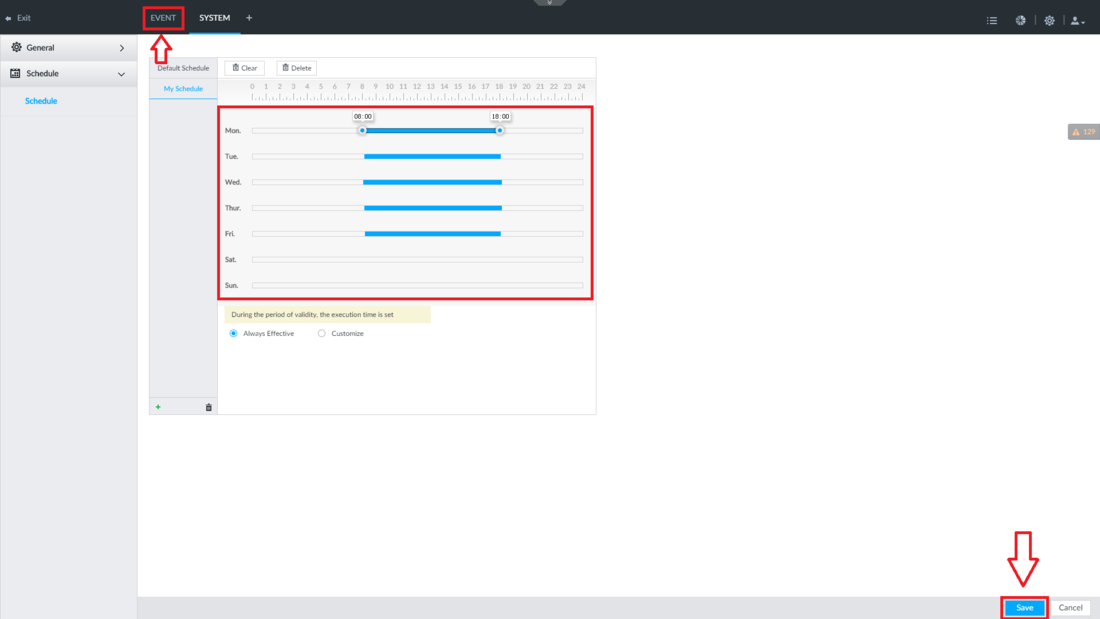
11. Drag and adjust the start and end times of the schedule on each day of the week. You can also select the schedule on a day and delete it if you don't want anything scheduled that day.
When you are done making changes, press "Save". Once the changes are saved, select the "Event" section at the top to go back to the Face Recognition alarm settings.
12. Make sure the toggle next to "Enabled" is switched to On and the schedule you want is selected in the "Deployment Time" drop-down.
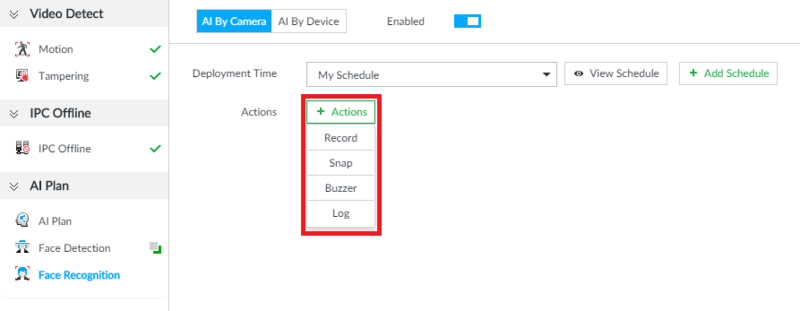
13. Select "+ Actions" to see all the actions that can be performed when a face is recognized. The options are "Record", "Snap", "Buzzer", and "Log".
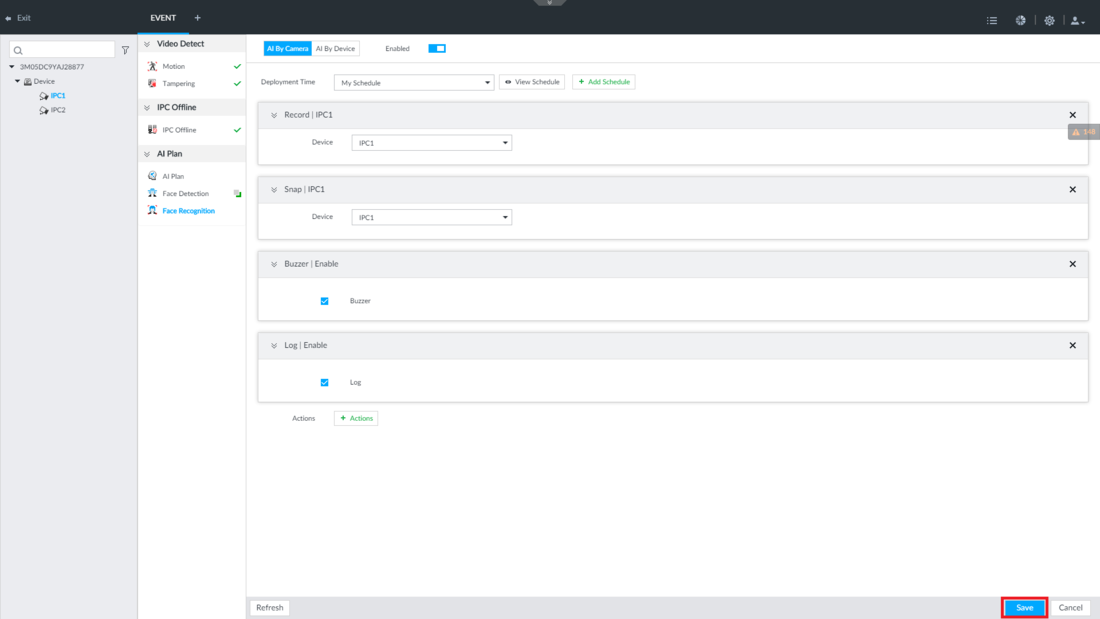
Select "Record" from the Actions drop-down if you want the system to start recording a specific camera's feed when a face from the database is recognized.
You can select the "Device" drop-down menu to choose which camera's video feed is recorded when this is triggered.
Select "Snap" from the Actions drop-down if you want the system to take a snapshot image from the camera's video feed when a face from the database is recognized.
Select "Buzzer" from the Actions drop-down if you want the recorder to make a buzzing/beeping noise every time a face from the database is recognized.
Select "Log" from the Actions drop-down if you want the system to save the information in a log.
When you are done selecting which actions you want to be activated when a face from the database is recognized, select "Save".
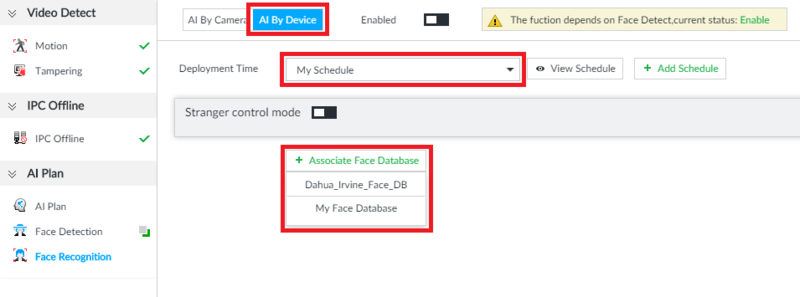
14. Select "AI By Device" to set up Facial Recognition using the AI built into the recorder.
Select the drop-down next to "Deployment Time" to choose the schedule you want the Face Recognition on the recorder to be active on.
If there is no schedule or you want to make a different schedule, select "Add Schedule" and go back to Step 9.
Select "+ Associate Face Database" to choose which face database to use for the facial recognition.
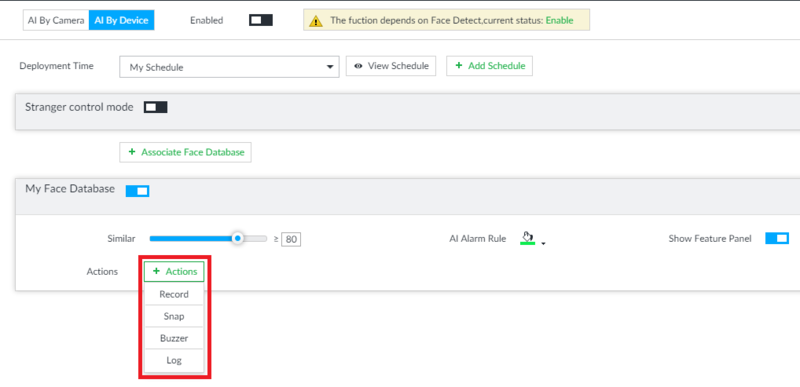
15. Adjust the slider next to "Similar" to choose the percentage of similarity between faces in the database and scanned faces to trigger the alarm event.
Select "AI Alarm Rule" to choose the color that highlights faces that trigger the alarm.
Select "Show Feature Panel" to turn on or off the panel that shows all the features of the faces that are recognized for this alarm event.
Select "+ Actions" to choose which actions are triggered when a face is recognized by the recorder.
(See Step 13, for an explanation on what all the actions do when triggered.)
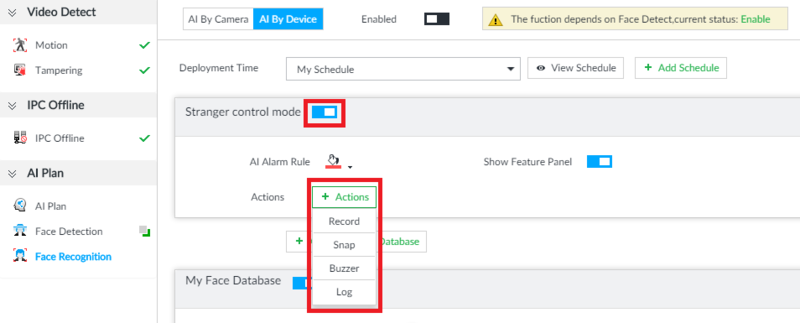
16. If you want to turn on Stranger Control Mode, which labels all faces that are detected but not recognized from the database as Strangers, turn on the toggle next to "Stranger control mode".
You can then adjust the alarm rule highlight color with "AI Alarm Rule".
You can turn on or off the feature panel that shows all the features of the face next to the face detection image by toggling on "Show Feature Panel".
You can also choose an action to be triggered when a stranger is detected by selecting "+ Actions" and choosing an action to be triggered.
(See Step 13, for an explanation on what all the actions do when triggered.)
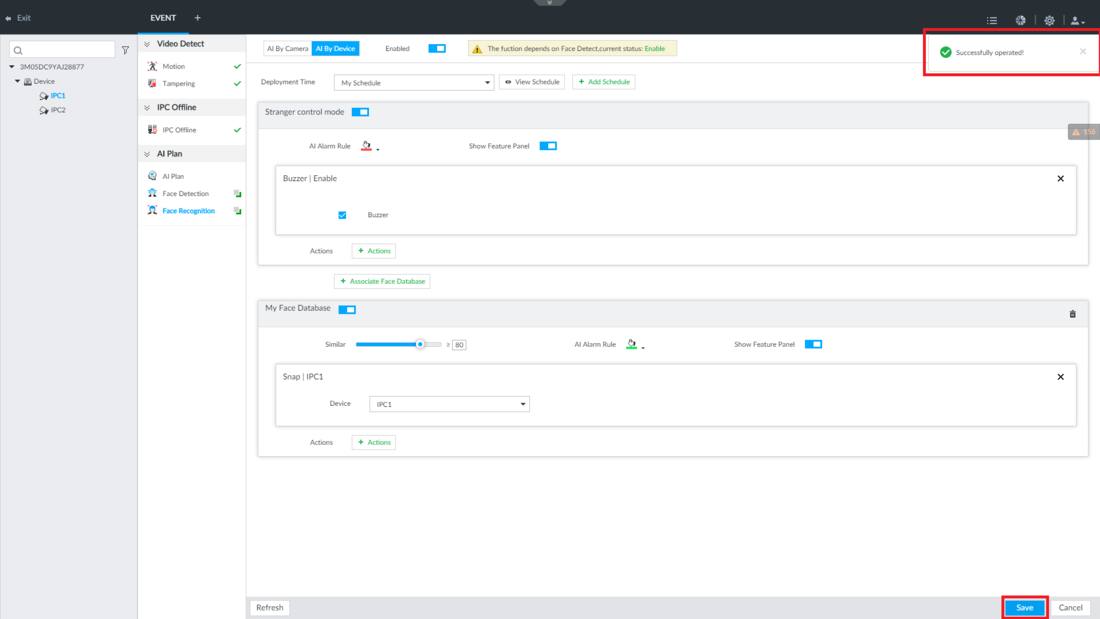
17. When you are done making changes to Facial Recognition using the AI built into the recorder, select "Save" at the bottom.
Once the changes are saved it will say "Successfully Operated" at the top right.
