Difference between revisions of "Lechange/Add Device"
(Created page with "==Add Device to Imou Application== ===Description=== This article is to show user how to add a device to your Imou Application ===Prerequisites=== 1. Lechange Device 2. And...") |
|||
| Line 13: | Line 13: | ||
===Step by step instruction=== | ===Step by step instruction=== | ||
| − | |||
| − | + | 1. On your Recorder Right Click and select main menu | |
| − | |||
| − | |||
| − | |||
| − | |||
[[file:mainmenulechange.png|300px]] | [[file:mainmenulechange.png|300px]] | ||
| − | + | 2. Select Network in the Settings Section | |
[[file:selectnetwork.png|300px]] | [[file:selectnetwork.png|300px]] | ||
| − | + | 3. Select Lechange on the left | |
[[file:p2psn.jpg|300px]] | [[file:p2psn.jpg|300px]] | ||
| + | |||
| + | 4. Launch and sign in to Imou Application | ||
| + | |||
| + | 5. Hit the Add device button in the top right of the Application | ||
| + | |||
| + | [[file:imoudevicepageadd.png|300px]] | ||
| + | |||
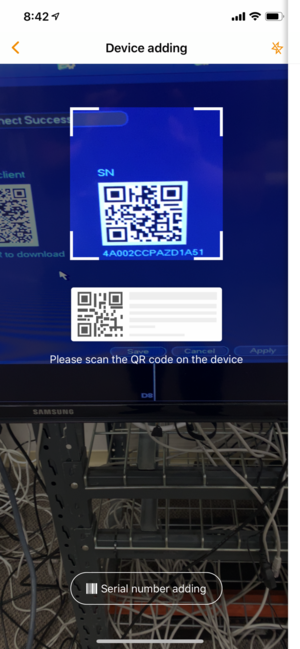
| + | 6. Scan QR code Under SN | ||
[[file:imouscanqr.png|300px]] | [[file:imouscanqr.png|300px]] | ||
| + | |||
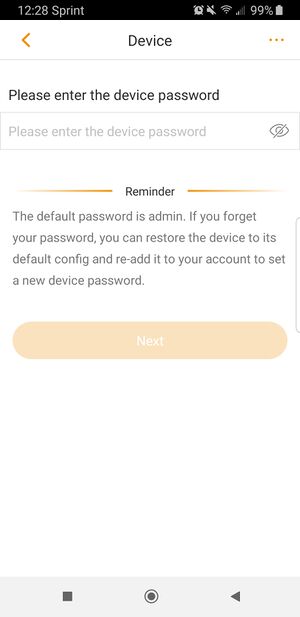
| + | 7. Enter Device's Admin Password and Select Next | ||
| + | |||
| + | [[file:adminpass.jpg|300px]] | ||
| + | |||
| + | 8. Your device is now added and ready to view | ||
| + | |||
| + | [[file:added.jpg|300px]] | ||
Revision as of 19:46, 21 May 2019
Contents
Add Device to Imou Application
Description
This article is to show user how to add a device to your Imou Application
Prerequisites
1. Lechange Device
2. Android or Apple Mobile Device
3.Imou Application with a registered account
Step by step instruction
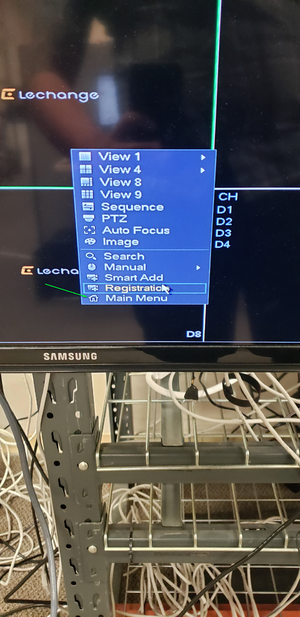
1. On your Recorder Right Click and select main menu
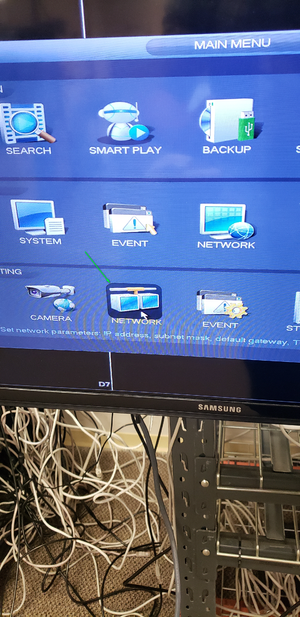
2. Select Network in the Settings Section
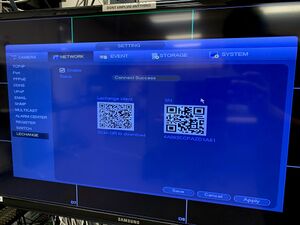
3. Select Lechange on the left
4. Launch and sign in to Imou Application
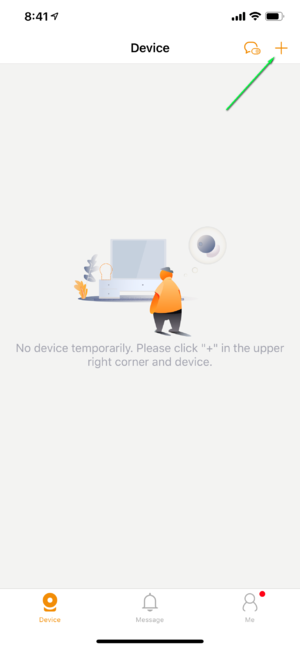
5. Hit the Add device button in the top right of the Application
6. Scan QR code Under SN
7. Enter Device's Admin Password and Select Next
8. Your device is now added and ready to view
