Difference between revisions of "Date and Time/NTP"
| Line 17: | Line 17: | ||
==Video Instructions== | ==Video Instructions== | ||
==Step by Step Instructions== | ==Step by Step Instructions== | ||
| − | |||
| − | |||
<gallery> | <gallery> | ||
File:NTP_-_New_UI_-_1.jpg|Old UI | File:NTP_-_New_UI_-_1.jpg|Old UI | ||
| Line 27: | Line 25: | ||
File:NTP_-_New_UI_-_5.jpg|DSS Express S | File:NTP_-_New_UI_-_5.jpg|DSS Express S | ||
</gallery> | </gallery> | ||
| − | |||
| − | |||
| − | |||
| − | |||
| − | |||
| − | |||
| − | |||
| − | |||
| − | |||
| − | |||
| − | |||
| − | |||
| − | |||
| − | |||
| − | |||
| − | |||
| − | |||
| − | |||
Revision as of 01:02, 5 November 2019
Contents
Date and Time-NTP
Description
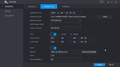
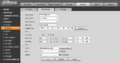
This guide will show how to adjust NTP (Network Time Protocol) settings on a Dahua device.
The NTP function allows a device to sync time with a NTP server
By default most Dahua devices will use the following default NTP server information:
- Server - time.windows.com
- Port - 123
- Interval - is a settng
Warning!
If you have video that needs to be backed up, please be sure to backup your recorded video before modifying the Date & Time on your recorder or cameras. It is strongly recommended that you format the hard drive after modifying the date and time to ensure accurate playback and recording.
Prerequisites
- Dahua device
- NTP server information (if not other than default)
Video Instructions
Step by Step Instructions

Old UI
New UI
Web UI (Old)
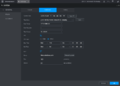
Web UI (New)
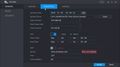
SmartPSS

DSS Express S


