Difference between revisions of ":Intrusion"
(→Installation Requirement) |
|||
| Line 15: | Line 15: | ||
Try to avoid backlight installation for the test device, and sky is not recommended to appear in the image, otherwise it may lead to over brightness or partial over darkness for the image, which is not good for detection. The brightness value difference between detection target and background is no less than 10 grey levels. | Try to avoid backlight installation for the test device, and sky is not recommended to appear in the image, otherwise it may lead to over brightness or partial over darkness for the image, which is not good for detection. The brightness value difference between detection target and background is no less than 10 grey levels. | ||
Try to lower the complexity of monitoring scene if possible. It is not advised to apply intelligent functions in the scenario where the targets are dense and light change is very frequent; Try to keep away from the reflection areas such as windows, ground and water surface etc.; try to keep away from the branches, shadow, mosquito disturbance area. It is recommended to make the distance between compensation lamp and test device more than 2 meters if it needs to use compensation lamp. | Try to lower the complexity of monitoring scene if possible. It is not advised to apply intelligent functions in the scenario where the targets are dense and light change is very frequent; Try to keep away from the reflection areas such as windows, ground and water surface etc.; try to keep away from the branches, shadow, mosquito disturbance area. It is recommended to make the distance between compensation lamp and test device more than 2 meters if it needs to use compensation lamp. | ||
| + | ==Additional Information== | ||
| + | 1)The function is related to two intelligent behaviors: appears and cross. Appears means it will trigger alarm when the target appears in the designated area and within the alarm time which has been set; Cross means it will trigger alarm when the target crosses (enters or exits) the area in the designated area and within the alarm time which has been set. | ||
| + | |||
| + | 2) Working period setting, it is full day by default. | ||
| + | |||
| + | 3) Supports alarm linkage setting: record, relay out, send email and snapshot. | ||
| + | |||
| + | 4)Target filter can set max and min target, which means the max and min target which can be detected. | ||
==Instructions== | ==Instructions== | ||
Latest revision as of 17:29, 2 December 2019
Contents
- 1 Intrusion
- 1.1 Description
- 1.2 Installation Requirement
- 1.3 Additional Information
- 1.4 Instructions
- 1.4.1 Description
- 1.4.2 Prerequisites
- 1.4.3 Video Instructions
- 1.4.4 Step By Step Instructions
- 1.4.5 Description
- 1.4.6 Prerequisites
- 1.4.7 Video Instructions
- 1.4.8 Step By Step Instructions
- 1.4.9 Prerequisites
- 1.4.10 Video Instructions
- 1.4.11 Step By Step Instructions
- 1.4.12 Description
- 1.4.13 Prerequisites
- 1.4.14 Video Instructions
- 1.4.15 Step By Step Instructions
- 1.4.16 Prerequisites
- 1.4.17 Video Instructions
Intrusion
Description
Intrusion is used to detect that some sensitive areas can’t be casually entered, exited or crossed in the monitoring scenario, it will trigger device alarm if the target object touches the detection line.
Installation Requirement
1)Installation Height Try to make the camera view angle have a certain depression angle, which is generally bigger than 20︒; Try to avoid mutual block between targets due to horizontal view and cause false alarm and leakage alarm; The camera indoor installation height is no lower than 3 meters, generally it is recommended that the outdoor installation height is between 5 and 10 meters; If the camera is applied in the fence scenario, the camera height has to be higher than the fence. The camera has to be installed stably, which is to avoid waggle to affect analysis effect.
2)Target size The total proportion of the target can’t be more than 10%, the size is no less than 10*10 pixel (CIF image) in the image, The height and width of the target can’t exceed 1/3 of the image; it is recommended that the target height is about 10% of the image height.
3)Movement Track Try to make the monitoring direction vertical with the movement direction of the target, which is to make the target displacement more obvious and make it more convenient for detection, meanwhile it has to guarantee that the detection target continuously appears within the view for more than 2 seconds, movement distance has to exceed the width of the target itself and it does cross the detection line. The detection area shall not be blocked, the movement buffer zones on both sides of the warning line can’t be too small, which is to avoid the detection target rushing out the image too fast.
4)Background & Light Try to avoid backlight installation for the test device, and sky is not recommended to appear in the image, otherwise it may lead to over brightness or partial over darkness for the image, which is not good for detection. The brightness value difference between detection target and background is no less than 10 grey levels. Try to lower the complexity of monitoring scene if possible. It is not advised to apply intelligent functions in the scenario where the targets are dense and light change is very frequent; Try to keep away from the reflection areas such as windows, ground and water surface etc.; try to keep away from the branches, shadow, mosquito disturbance area. It is recommended to make the distance between compensation lamp and test device more than 2 meters if it needs to use compensation lamp.
Additional Information
1)The function is related to two intelligent behaviors: appears and cross. Appears means it will trigger alarm when the target appears in the designated area and within the alarm time which has been set; Cross means it will trigger alarm when the target crosses (enters or exits) the area in the designated area and within the alarm time which has been set.
2) Working period setting, it is full day by default.
3) Supports alarm linkage setting: record, relay out, send email and snapshot.
4)Target filter can set max and min target, which means the max and min target which can be detected.
Instructions
 SystemUI Old
Description
Intrusion Detection is to detect if there is any object entering or leaving the area, the rule will trigger when crossing the area perimeter. Supports enter, leave, and enter & leave three direction selection, it can activate record, snapshot, and alarm according to the judgment result.
Application Scene: It is similar to warning line. It needs to leave some space for target movement outside the perimeter if it is to detect enter and leave event; It can only be applied to the scene where the target is sparse and there is rarely any covering between the targets, such as the perimeter without any guard. It will trigger alarm when the target is entering or leaving the area.
Prerequisites
- Intelligent Network Camera or an HDCVI Camera that is connected to a HDCVI DVR that has intelligent features.
- Updated firmware that supports intelligent features.
- Internet Explorer.
Video Instructions
Step By Step Instructions
1. From Live View, right click then select Main Menu

2. Click Event

3. Click Smart Plan

4. Use the dropdown box to select the channel
Click the IVS icon (lightbulb) to enable

5. Click Apply to save

6. Click IVS

7. Use the dropdown box to select the channel
Click Add to create a new IVS rule

8. The rule will appear in the list
Use the dropdown box to select Intrusion

9. Click the pencil icon under Draw to begin drawing the detection area

10. The video will fullscreen
Left click inside the frame to begin drawing

Right click to finish drawing
The Rule name will confirm the rule has been created

11. Use the interface to make any additional parameters settings:
- Name - Name of the rule
- Appears - Alarm is triggered when the target appears in the designated area and within the alarm time
- Cross - Alarm is triggered when the target crosses (enter or exists) the area in the designated area and within the alarm time
- Direction
Click OK to save

12. Click Apply to save

 SystemUI New
Description
Intrusion Detection is to detect if there is any object entering or leaving the area, the rule will trigger when crossing the area perimeter. Supports enter, leave, and enter & leave three direction selection, it can activate record, snapshot, and alarm according to the judgment result.
Application Scene: It is similar to warning line. It needs to leave some space for target movement outside the perimeter if it is to detect enter and leave event; It can only be applied to the scene where the target is sparse and there is rarely any covering between the targets, such as the perimeter without any guard. It will trigger alarm when the target is entering or leaving the area.
Prerequisites
- Intelligent Network Camera or an HDCVI Camera that is connected to a HDCVI DVR that has intelligent features.
- Updated firmware that supports intelligent features.
- Internet Explorer.
Video Instructions
Step By Step Instructions
1. From the Main Menu
Click AI

2. Click Parameters

3. Click Smart Plan

4. Use the dropdown box to select the channel
Click the IVS icon (lightbulb) to enable

5. Click Apply

6. Click IVS

7. Use the dropdown box to select the channel
Click Add to create a new IVS rule

8. The rule will appear in the list
Use the dropdown box under Type to select Intrusion

9. Click the Pencil icon under Draw to begin drawing the detection area

10. The video will fullscreen
Left click inside the video frame to begin drawing

Right click to finish drawing
The Rule name will confirm the rule has been created

11. Use the interface to make any additional parameters settings:
- Name - Name of the rule
- Action
- Appear - Alarm is triggered when the target appears in the designated area and within the alarm time
- Cross - Alarm is triggered when the target crosses (enter or exists) the area in the designated area and within the alarm time
- Direction
Click OK to save

12. Click the Gear icon under Trigger to configure a response when the rule is triggered

13. Use the interface to enable the desired Trigger functions
Click Apply to save

14. Click Apply to save all settings

 WebUI Old
Intrusion Detection is to detect if there is any object entering or leaving the area, the rule will trigger when crossing the area perimeter. Supports enter, leave, and enter & leave three direction selection, it can activate record, snapshot, and alarm according to the judgment result.
Application Scene: It is similar to warning line. It needs to leave some space for target movement outside the perimeter if it is to detect enter and leave event; It can only be applied to the scene where the target is sparse and there is rarely any covering between the targets, such as the perimeter without any guard. It will trigger alarm when the target is entering or leaving the area.
Prerequisites
- Intelligent Network Camera or an HDCVI Camera that is connected to a HDCVI DVR that has intelligent features.
- Updated firmware that supports intelligent features.
- Internet Explorer.
Video Instructions
Step By Step Instructions
1. Log into device using the Web Service.

2. Select Setup -> Select Event -> IVS

3. Under the IVS section, click the + and use the item that appears to set a name for your rule and in the drop down, define the rule type, in this case, "Intrusion" then select "Draw Rule.

4. Next, use your mouse to click and define the lines for the area you'd like to establish the rule for, then define the Action and Direction. In this example we'll use Cross and Enter to notify of entry into the region.
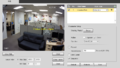
After clicking 'Draw Rule'
Region defined.


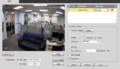
5. By default the schedule for the rule is set up for 24/7, to edit this go to 'Setup' by working period. Here you can make changes to the days and time periods in which it is active.

Working Period Setup
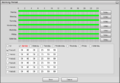
Working Period Edit window


6. Next be sure to check any other options you may want such as Record & Record Delay, Snapshot, Relay out (1, 2, or both)alarm Delay and email. Note: For instructions on email setup see Email Setup
 WebUI New
Description
This guide will show how to setup the Intrusion IVS feature at the WebUI with New GUI
Prerequisites
Video Instructions
Step By Step Instructions
1. From the Main Menu
Click AI

2. Click Parameters

3. Click Smart Plan

4. Use the dropdown box to select the channel
Click the IVS icon (lightbulb) to enable

5. Click OK to save

6. Click IVS

7. Use the dropdown box to select the channel
Click the + to add a new IVS rule

8. The rule will appear in the list
Use the dropdown box under Type to select Intrusion

9. Click Draw Rule to begin drawing the detection area

10. Left click inside the video frame to begin drawing

Right click to finish drawing
The rule name will confirm when drawing is complete

11. Use the Target interface to configure the Max/Min size for detection (if required)

12. Under Parameters Config
Use the interface to make any additional parameters settings for the rule:
- Name - Name of the rule
- Action
- Appear - Alarm is triggered when the target appears in the designated area and within the alarm time
- Cross - Alarm is triggered when the target crosses (enter or exists) the area in the designated area and within the alarm time
- Direction

13. Use the interface to enable the desired Trigger functions and schedule (if required)

Under More Setting
There are additional trigger actions to set for the rule
- Buzzer
- Log
- Alarm Upload
- Send Email

Make any desired changes and click OK to save

14. Click OK to save all settings

 SmartPSS
This guide will show how to setup the Intrusion IVS feature in SmartPSS
Prerequisites
- Dahua device with Intrusion IVS feature (added to SmartPSS)
Video Instructions
Step by Step Instructions
1, From the Main Menu of SmartPSS
Click Device CFG

2. Click to select the device from the device tree on the left

3. Click to expand Event

4. Click Intelligent Analyse

5. Confirm the preset (if required)
Click Next

6. Use the dropdown box to select the channel/preset
Click to select the IVS icon

7. Click Next

8. Under Detect Region
The detection zone can be configured, by default it will be the entire video frame

9. Under Rule config
Click Add rule to create a new IVS rule

10. Use the dropdown box to change Rule type to Intrusion

11. Left click inside the video frame to begin drawing the IVS rule

Right click to finish drawing, a prompt will confirm when the rule has been created

12. Click Config to make additional parameters adjustments

13. Under Parameters
- Action List
- Appear - Alarm is triggered when the target appears in the designated area and within the alarm time
- Cross - Alarm is triggered when the target crosses (enter or exists) the area in the designated area and within the alarm time
- Direction

14. Under Arming Schedule, the schedule for the rule can be created, by default it will be 24/7

15. Under Alarm, the various triggers for when the rule is triggered can be configured
Click Save

16. Click Save to save all settings

 DSS Express S