Difference between revisions of "PTZ/Instructions/Light Wiper"
(Created page with "=Light Wiper= ==Instructions== <div class="toccolours mw-collapsible mw-collapsed"> 250px<span style="font-size:180%;">'''SystemUI Old'...") |
|||
| Line 3: | Line 3: | ||
<div class="toccolours mw-collapsible mw-collapsed"> | <div class="toccolours mw-collapsible mw-collapsed"> | ||
[[File:Icon_for_type_SystemUI_Old.png|250px]]<span style="font-size:180%;">'''SystemUI Old'''</span> | [[File:Icon_for_type_SystemUI_Old.png|250px]]<span style="font-size:180%;">'''SystemUI Old'''</span> | ||
| − | <div class="mw-collapsible-content">{{Template: | + | <div class="mw-collapsible-content">{{Template:PTZ_Light_Wiper_SystemUI_OldGUI}}</div> |
</div> | </div> | ||
<div class="toccolours mw-collapsible mw-collapsed"> | <div class="toccolours mw-collapsible mw-collapsed"> | ||
[[File:Icon_for_type_SystemUI_New.png|250px]]<span style="font-size:180%;">'''SystemUI New'''</span> | [[File:Icon_for_type_SystemUI_New.png|250px]]<span style="font-size:180%;">'''SystemUI New'''</span> | ||
| − | <div class="mw-collapsible-content">{{Template: | + | <div class="mw-collapsible-content">{{Template:PTZ_Light_Wiper_SystemUI_NewGUI}}</div> |
</div> | </div> | ||
<div class="toccolours mw-collapsible mw-collapsed"> | <div class="toccolours mw-collapsible mw-collapsed"> | ||
[[File:Icon_for_type_WebUI_Old.png|250px]]<span style="font-size:180%;">'''WebUI Old'''</span> | [[File:Icon_for_type_WebUI_Old.png|250px]]<span style="font-size:180%;">'''WebUI Old'''</span> | ||
| − | <div class="mw-collapsible-content">{{Template: | + | <div class="mw-collapsible-content">{{Template:PTZ_Light_Wiper__WebUI_OldGUI}}</div> |
</div> | </div> | ||
<div class="toccolours mw-collapsible mw-collapsed"> | <div class="toccolours mw-collapsible mw-collapsed"> | ||
[[File:Icon_for_type_WebUI_New.png|250px]]<span style="font-size:180%;">'''WebUI New'''</span> | [[File:Icon_for_type_WebUI_New.png|250px]]<span style="font-size:180%;">'''WebUI New'''</span> | ||
| − | <div class="mw-collapsible-content">{{Template: | + | <div class="mw-collapsible-content">{{Template:PTZ_Light_Wiper__WebUI_NewGUI}}</div> |
</div> | </div> | ||
<div class="toccolours mw-collapsible mw-collapsed"> | <div class="toccolours mw-collapsible mw-collapsed"> | ||
[[File:Icon_for_type_SmartPSS.png|250px]]<span style="font-size:180%;">'''SmartPSS'''</span> | [[File:Icon_for_type_SmartPSS.png|250px]]<span style="font-size:180%;">'''SmartPSS'''</span> | ||
| − | <div class="mw-collapsible-content">{{Template: | + | <div class="mw-collapsible-content">{{Template:PTZ_Light_Wiper_SmartPSS}}</div> |
</div> | </div> | ||
<div class="toccolours mw-collapsible mw-collapsed"> | <div class="toccolours mw-collapsible mw-collapsed"> | ||
[[File:Icon_for_type_DSS_Express_S.png|250px]]<span style="font-size:180%;">'''DSS Express S'''</span> | [[File:Icon_for_type_DSS_Express_S.png|250px]]<span style="font-size:180%;">'''DSS Express S'''</span> | ||
| − | <div class="mw-collapsible-content">{{Template: | + | <div class="mw-collapsible-content">{{Template:PTZ_Light_Wiper_DSS_Express}}</div> |
</div> | </div> | ||
<div class="toccolours mw-collapsible mw-collapsed"> | <div class="toccolours mw-collapsible mw-collapsed"> | ||
[[File:iDMSS_Plus_Icon2.jpg|150px]]<span style="font-size:180%;">'''Mobile:iDMSS Plus & gDMSS Plus '''</span> | [[File:iDMSS_Plus_Icon2.jpg|150px]]<span style="font-size:180%;">'''Mobile:iDMSS Plus & gDMSS Plus '''</span> | ||
| − | <div class="mw-collapsible-content">{{Template: | + | <div class="mw-collapsible-content">{{Template:PTZ_Light_Wiper_MobileUI_DMSS}}</div> |
</div> | </div> | ||
Revision as of 18:58, 9 January 2020
Contents
- 1 Light Wiper
- 1.1 Instructions
- 1.2 Description
- 1.3 Prerequisites
- 1.4 Video Instructions
- 1.5 Step by Step Instructions
- 1.6 How to Use PTZ Light Wiper
- 1.7 How to Use PTZ Light Wiper
- 1.8 Description
- 1.9 Prerequisites
- 1.10 Video Instructions
- 1.11 Step by Step Instructions
- 1.12 Prerequisites
- 1.13 Video Instructions
- 1.14 Step by Step Instructions
- 1.15 Prerequisites
- 1.16 NOTICE
- 1.17 Prerequisites
- 1.18 Video Instructions
- 1.19 Step by Step Instructions
Light Wiper
Instructions
Description
This article will cover how to enable the PTZ Light & Wiper functions via the System UI with the Old GUI
Prerequisites
- Dahua PTZ with Light and/or Wiper function(s)
- Dahua Recorder with the Old GUI, connected to a TV or Monitor
Video Instructions
Step by Step Instructions
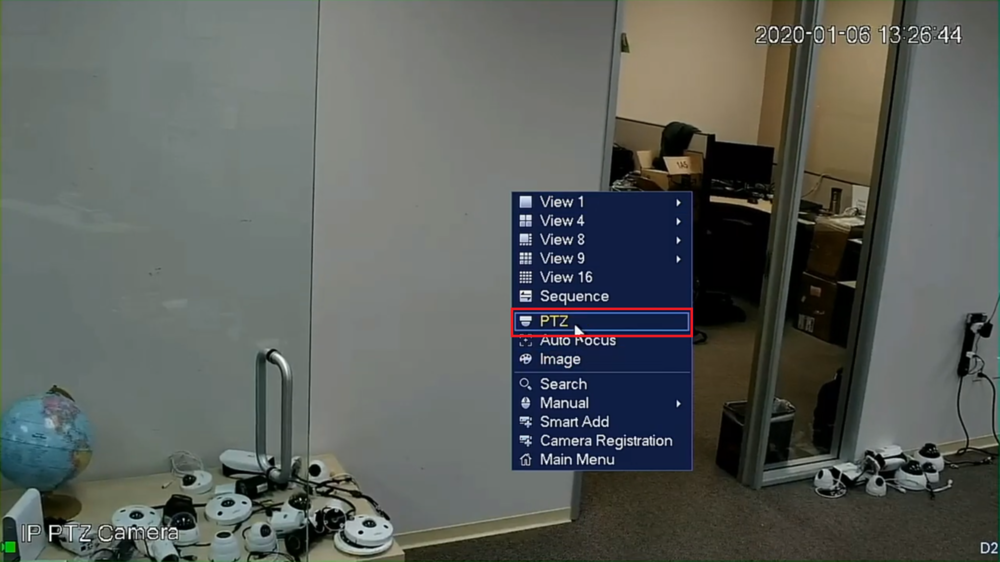
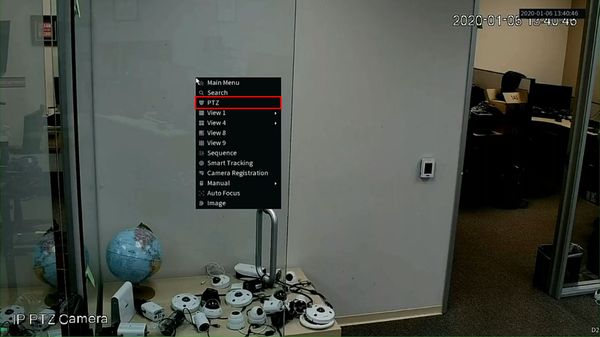
1. Select the PTZ camera's channel live view on the main screen of the recorder. (A green box should appear around the live view of that camera)
Right-click and select "PTZ" from the drop-down menu
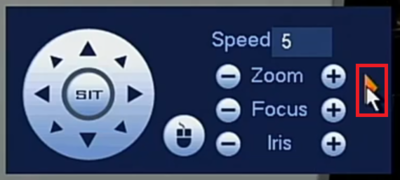
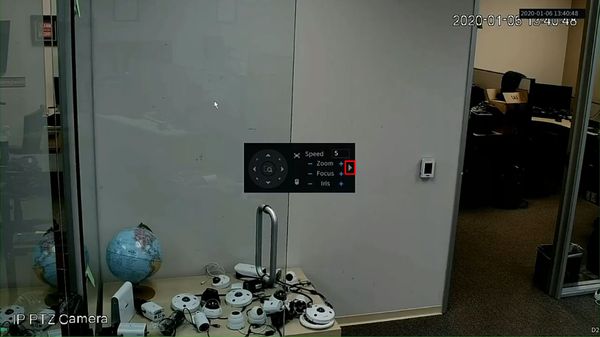
2. Click the arrow pointing right on the right-hand side of the PTZ control window
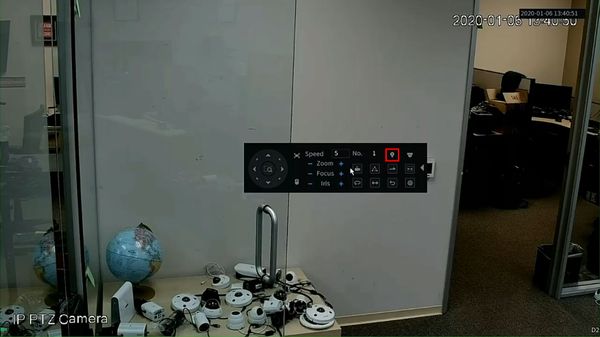
3. Select the AUX icon on the right, that looks like a Lightbulb
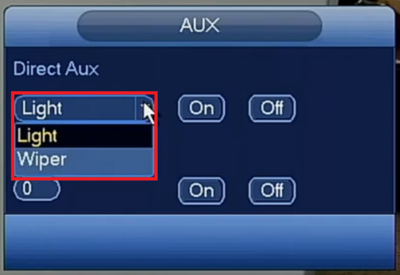
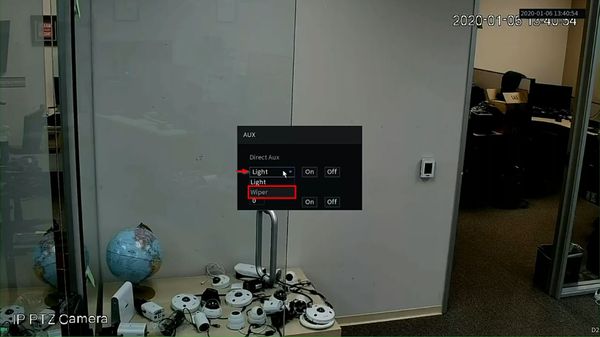
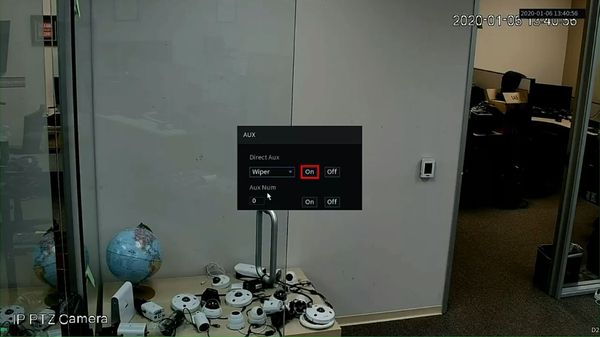
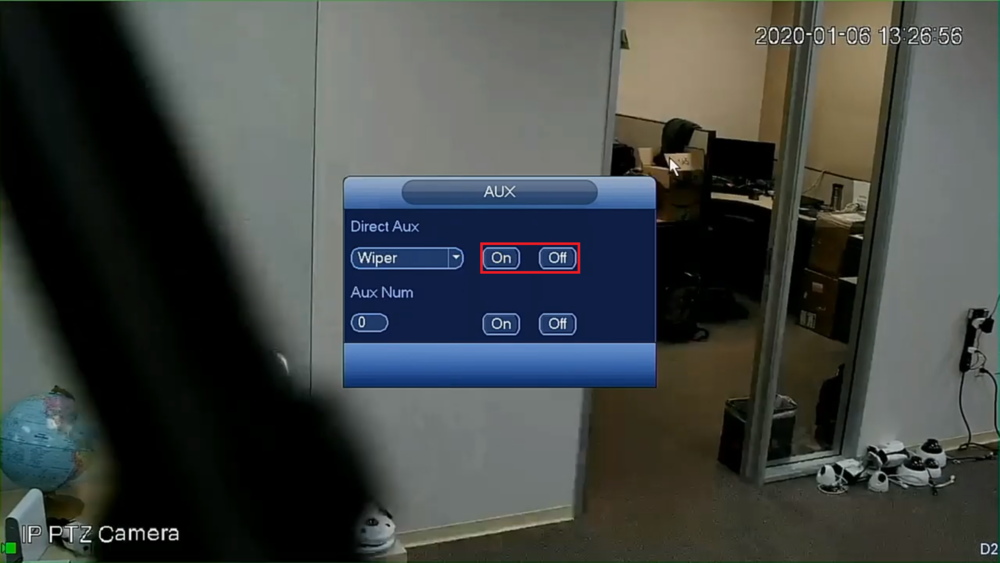
4. Click the drop-down menu under Direct Aux and select either "Light" or "Wiper" depending on the fuction you want to enable (Certain PTZ cameras have either a light, a wiper, or both)
5. Select the "On" button on the right to enable the Light or Wiper function.
The Light or Wiper will stay activated.
Select the "Off" button to disable the Light or Wiper when you are done
How to Use PTZ Light Wiper
Description
The Light Wiper feature allows a PTZ equipped with a Wiper to remotely clear moisture from the lens.
This guide will show how to use the PTZ Light Wiper in the System UI (New)
Prerequisites
- Dahua Network PTZ (with Light Wiper function)
Video Instructions
Step by Step Instructions
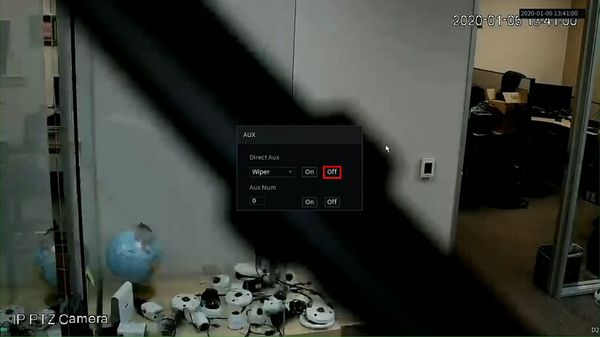
1. From Live View right click to open the menu
Select PTZ
2. Click the arrow to expand the PTZ menu
3. Click the AUX icon
4. Use the dropdown box to select Wiper
5. Click On to begin Light Wiper function
6. Click Off to stop Light Wiper function
How to Use PTZ Light Wiper
Description
The Light Wiper feature allows a PTZ equipped with a Wiper to remotely clear moisture from the lens.
This guide will show how to use the PTZ Light Wiper in the WebUI (Old)
Prerequisites
- Dahua Network PTZ (with Light Wiper function)
Video Instructions
Step by Step Instructions
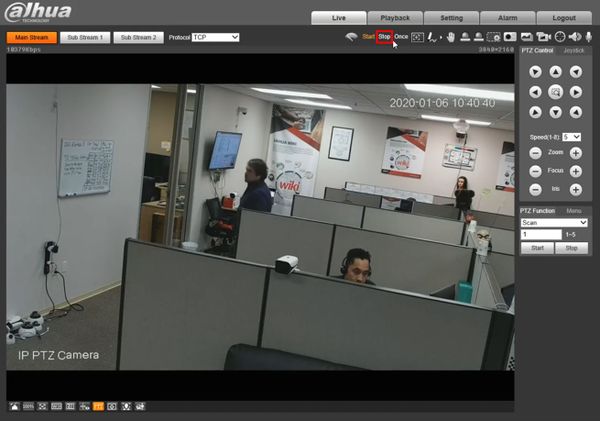
1. Log into the camera's web interface
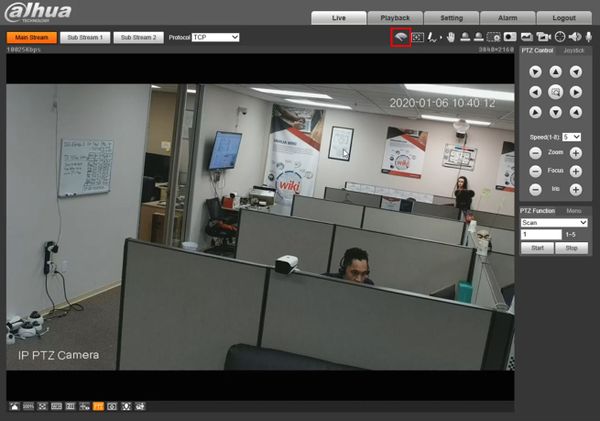
From Live View
Above the main screen click the PTZ Light Wiper icon
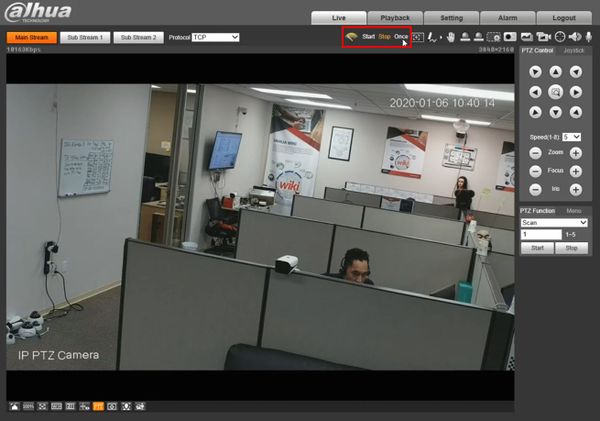
2. The PTZ LightWiper interface will expand
Click Once - the wiper will move a single time
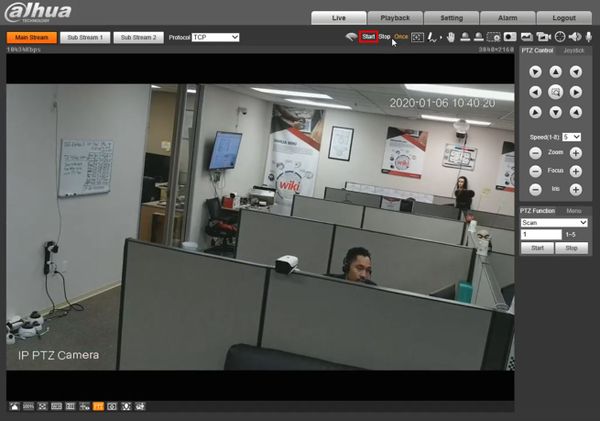
3. Click Start to begin continuous wiper movement
4. Click Stop to stop the wiper movement
Description
This article will cover how to enable the PTZ Light & Wiper functions via the Web UI with the New GUI
Prerequisites
- Dahua PTZ with Light and/or Wiper function(s)
- Dahua Recorder with the New GUI on the same network as a Mac or Windows PC
Video Instructions
Step by Step Instructions
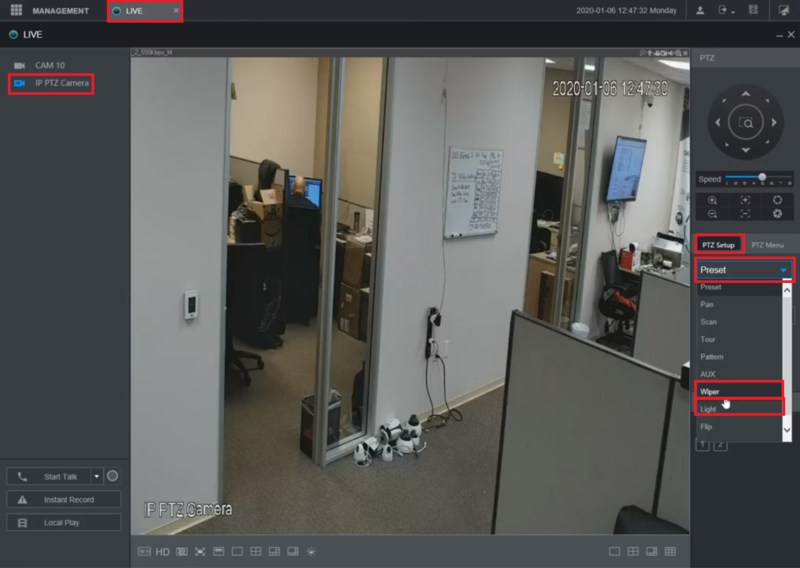
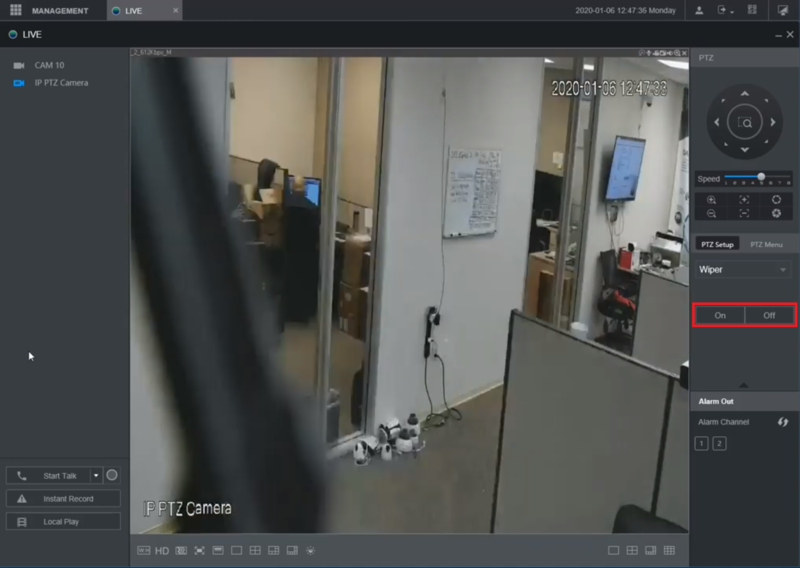
1. Log into the web interface of recorder that has the PTZ added to it and go to the Live section from the Main Menu.
Open the live view of the PTZ camera.
Select "PTZ Setup" in the PTZ section on the right.
Click the drop-down menu and select either "Wiper" or "Light" (Certain PTZ cameras have either a light, a wiper, or both)
2. Select the "On" button on the right to enable the Light or Wiper function.
The Light or Wiper will stay activated.
Select the "Off" button to disable the Light or Wiper when you are done
Prerequisites
- Dahua PTZ with Light and/or Wiper function(s)
- Dahua PTZ added to SmartPSS
Video Instructions
Step by Step Instructions
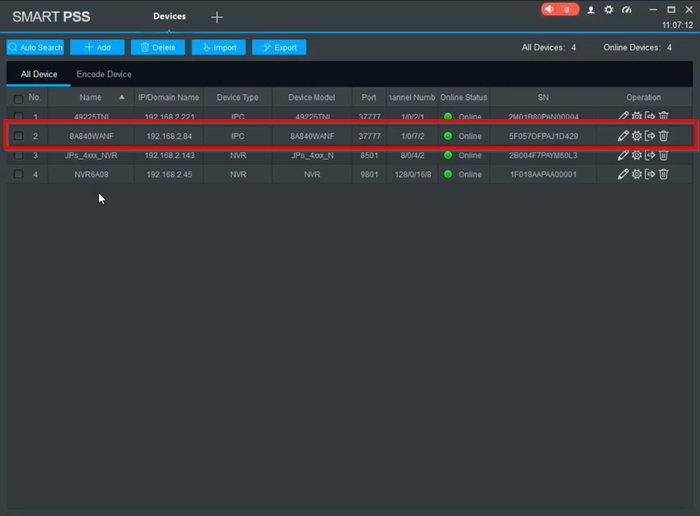
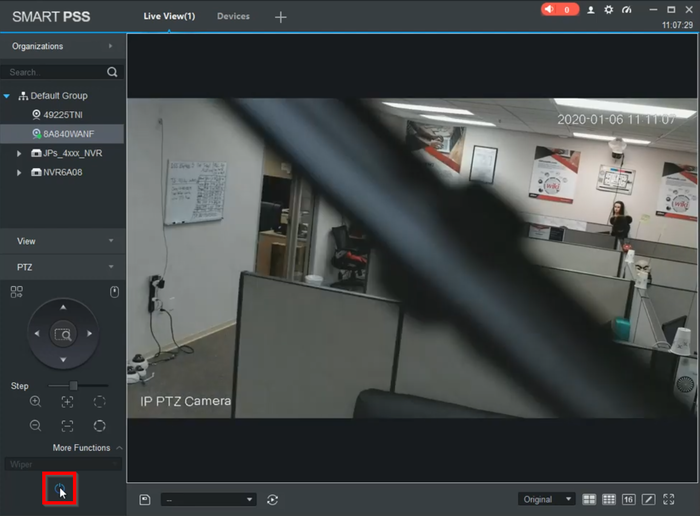
1. Make sure the PTZ camera is added to SmartPSS
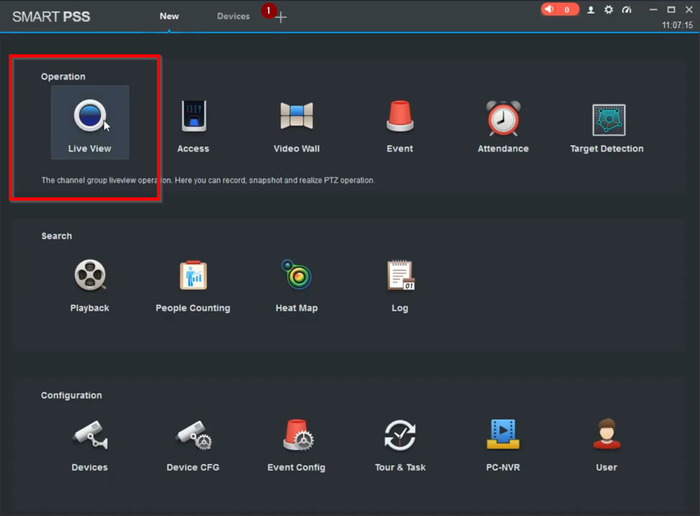
2. Open a new tab and select the Live Preview
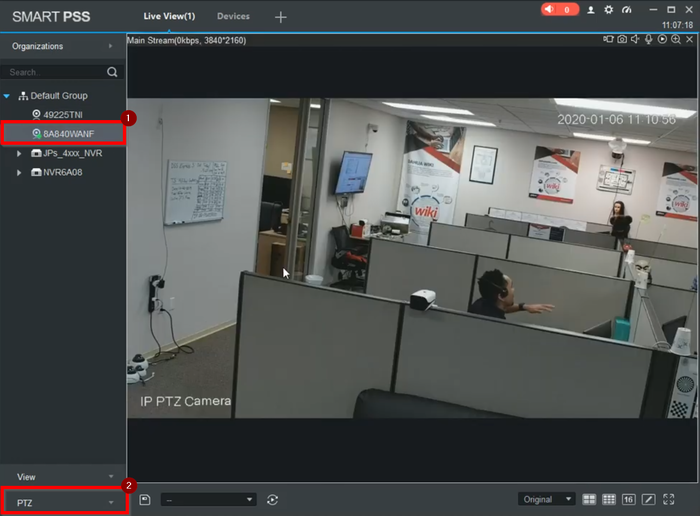
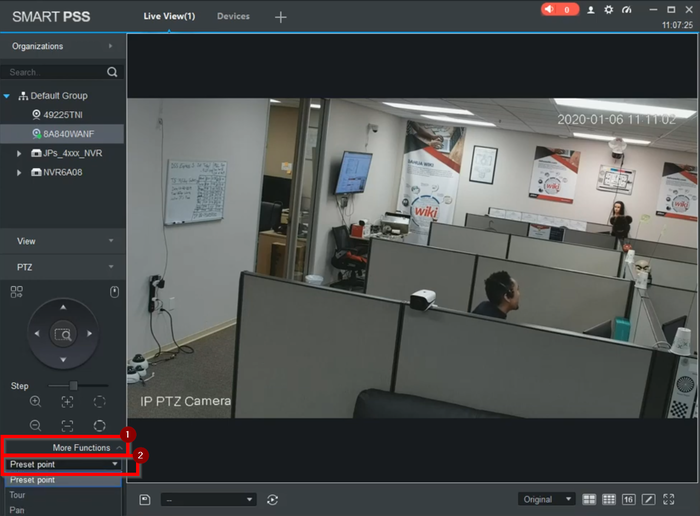
3. Select the PTZ and open the PTZ tab
4. Go to More Functions and search for "Wiper" on the drop-down menu
5. Click on the power icon and that should enable the wiper
Prerequisites
- Dahua PTZ with Light and/or Wiper function(s)
- Dahua PTZ added to DSS Express S
Video Instructions
Step by Step Instructions
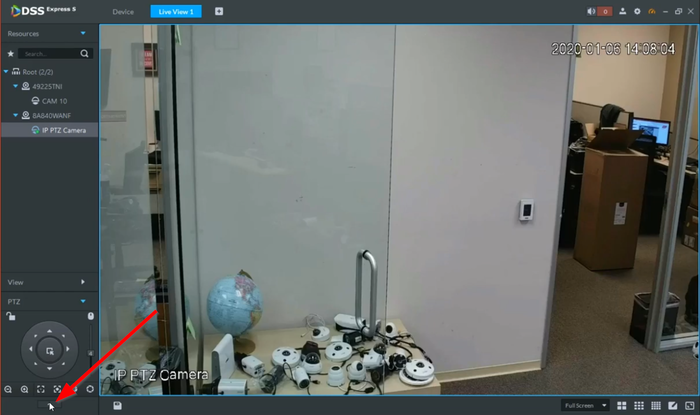
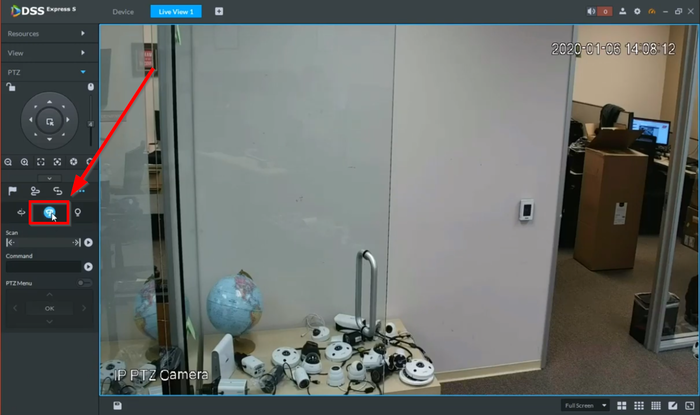
1. Open the live view of the PTZ camera an select the "More Funtions" icon on the bottom PTZ tab
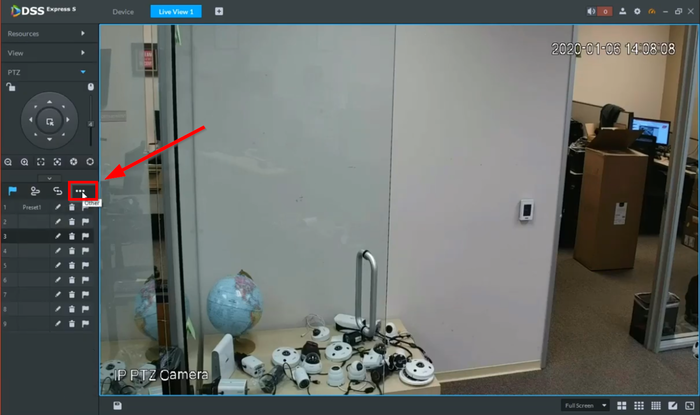
2. Click on the Three Dotted "Other" icon
3. Select the Wiper icon and that will enable the Light Wiper
NOTICE
Notice of Discontinuation of iDMSS and gDMSS
NOTE: The Mobile DSS app will only support the Light Wiper if connected directly to the camera via IP/P2P. Wiper commands through the NVR/XVR is not supported as of yet. Support will be added in an upcoming update.
Prerequisites
- Dahua PTZ with Light and/or Wiper function(s)
- DMSS Plus with PTZ added via IP/P2P
Video Instructions
Step by Step Instructions
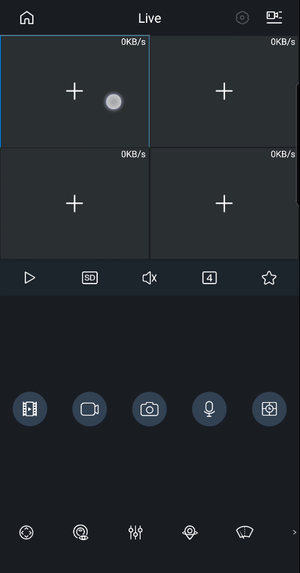
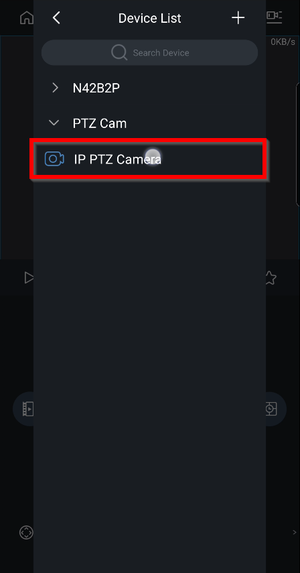
1. Go to live view on DMSS and click on the "+"
2. Select the PTZ camera
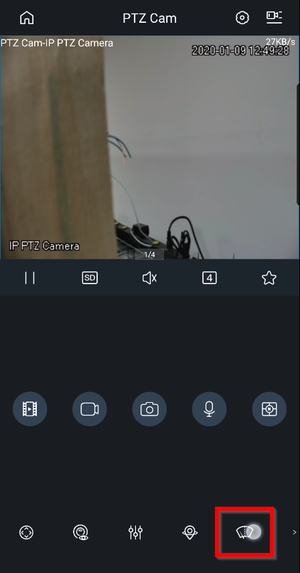
3. On the bottom bar select the Wiper icon
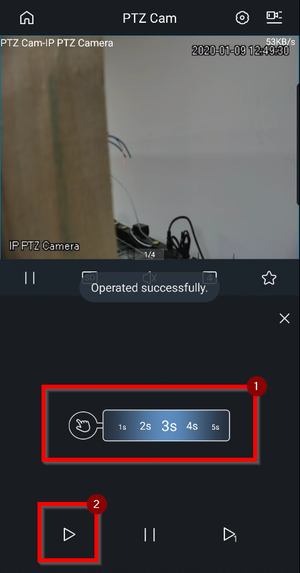
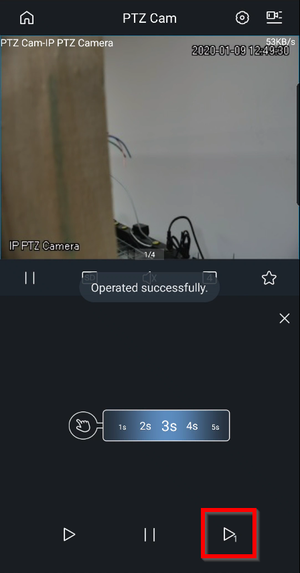
4. Select the Icon below to activate the wiper once.
5. Select the interval (Seconds) you want the wiper to activate continuously.
