Difference between revisions of "Template:Snapshot WebUI Old"
(Created page with " ==Prerequisites== ==Video Instructions== <embedvideo service="youtube">https://youtu.be/QeorSG1uD2g</embedvideo> ==Step by Step Instructions==") |
|||
| Line 1: | Line 1: | ||
| − | ==Prerequisites== | + | ==How To Take Snapshots via Old WebUI== |
| − | ==Video Instructions== | + | |
| + | ===Prerequisites=== | ||
| + | * Internet Explorer | ||
| + | |||
| + | ===Video Instructions=== | ||
<embedvideo service="youtube">https://youtu.be/QeorSG1uD2g</embedvideo> | <embedvideo service="youtube">https://youtu.be/QeorSG1uD2g</embedvideo> | ||
| − | ==Step by Step Instructions== | + | |
| + | ===Step by Step Instructions=== | ||
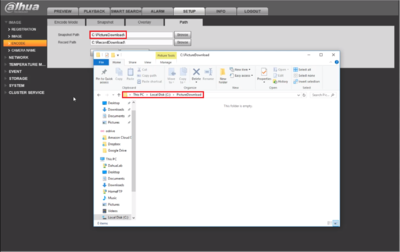
| + | 1. Before taking the snapshots, make sure the folder path set on the computer is correct. By default, the path will be set to "C:\PictureDownload" | ||
| + | <br> | ||
| + | [[File:1._Check_Folder_Path_-_Snapshot_Old_WebUI.PNG|400px]] | ||
| + | |||
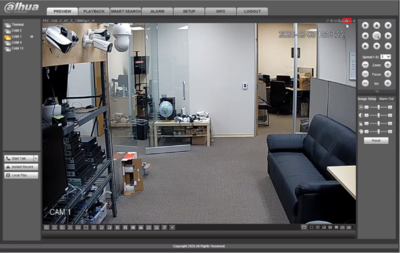
| + | 2. Select the camera to take snapshots and expand it into full screen. Press the camera icon located on the top right corner to take snapshots. | ||
| + | <br> | ||
| + | [[File:2._Select_Camera_to_Take_Snapshot_-_Snapshot_Old_WebUI.PNG|400px]] | ||
| + | |||
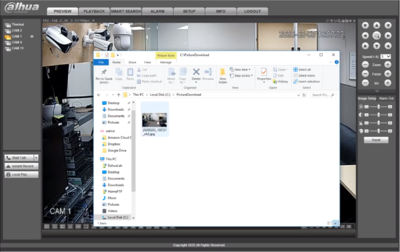
| + | 3. After snapshots have been taken, open the folder that contains them to view the snapshots again. | ||
| + | <br> | ||
| + | [[File:3._View_Snapshot_From_Computer_-_Snapshot_Old_WebUI.PNG|400px]] | ||
Latest revision as of 19:46, 4 February 2020
Contents
How To Take Snapshots via Old WebUI
Prerequisites
- Internet Explorer
Video Instructions
Step by Step Instructions
1. Before taking the snapshots, make sure the folder path set on the computer is correct. By default, the path will be set to "C:\PictureDownload"

2. Select the camera to take snapshots and expand it into full screen. Press the camera icon located on the top right corner to take snapshots.

3. After snapshots have been taken, open the folder that contains them to view the snapshots again.
