Difference between revisions of "Template:Motion Record SystemUI NewGUI"
(→Step by Step Instructions) |
|||
| Line 8: | Line 8: | ||
==Step by Step Instructions== | ==Step by Step Instructions== | ||
| + | 1. From Live View | ||
| + | |||
| + | Right click select Main Menu | ||
| + | |||
[[File:Motion_-_SystemUI_New_-_1.jpg|600px]] | [[File:Motion_-_SystemUI_New_-_1.jpg|600px]] | ||
| + | |||
| + | 2. Click Alarm | ||
[[File:Motion_-_SystemUI_New_-_2.jpg|600px]] | [[File:Motion_-_SystemUI_New_-_2.jpg|600px]] | ||
| + | |||
| + | 3. Click Video Detection > Motion Detect | ||
[[File:Motion_-_SystemUI_New_-_3.jpg|600px]] | [[File:Motion_-_SystemUI_New_-_3.jpg|600px]] | ||
| + | |||
| + | 4. Use the dropdown box to select the channel | ||
| + | |||
| + | Click to toggle and enable motion detect | ||
[[File:Motion_-_SystemUI_New_-_4.jpg|600px]] | [[File:Motion_-_SystemUI_New_-_4.jpg|600px]] | ||
| + | |||
| + | 5. Click the Setting button next to Region to define the parameters of the motion detection | ||
[[File:Motion_-_SystemUI_New_-_5.jpg|600px]] | [[File:Motion_-_SystemUI_New_-_5.jpg|600px]] | ||
| + | |||
| + | 6. The video will fullscreen | ||
| + | |||
| + | Use the on screen interface to adjust parameters of the motion detect: | ||
| + | |||
| + | * Name | ||
| + | * Sensitivity | ||
| + | * Threshold | ||
[[File:Motion_-_SystemUI_New_-_6.jpg|600px]] | [[File:Motion_-_SystemUI_New_-_6.jpg|600px]] | ||
| + | |||
| + | Left click inside the video frame to set the detection area. | ||
| + | |||
| + | Areas that are colored will be analyzed for motion | ||
| + | |||
| + | Once settings are right click to return to the Motion Detect menu | ||
[[File:Motion_-_SystemUI_New_-_7.jpg|600px]] | [[File:Motion_-_SystemUI_New_-_7.jpg|600px]] | ||
| + | |||
| + | 7. Check the box next to Record Channel to enable recording when motion is detected | ||
| + | |||
| + | Click Setting next to Record Channel | ||
[[File:Motion_-_SystemUI_New_-_8.jpg|600px]] | [[File:Motion_-_SystemUI_New_-_8.jpg|600px]] | ||
| + | |||
| + | Select which channel(s) to record when Motion is detected | ||
| + | |||
| + | Click OK | ||
[[File:Motion_-_SystemUI_New_-_9.jpg|600px]] | [[File:Motion_-_SystemUI_New_-_9.jpg|600px]] | ||
| + | |||
| + | 8. Enable any desired additional paramters/ alarm linkage for motion detection | ||
[[File:Motion_-_SystemUI_New_-_10.jpg|600px]] | [[File:Motion_-_SystemUI_New_-_10.jpg|600px]] | ||
| + | |||
| + | 9. Click Apply to save all settings | ||
[[File:Motion_-_SystemUI_New_-_11.jpg|600px]] | [[File:Motion_-_SystemUI_New_-_11.jpg|600px]] | ||
| + | |||
| + | 10. Return to the Main Menu | ||
| + | |||
| + | Select Storage | ||
[[File:Motion_-_SystemUI_New_-_12.jpg|600px]] | [[File:Motion_-_SystemUI_New_-_12.jpg|600px]] | ||
| + | |||
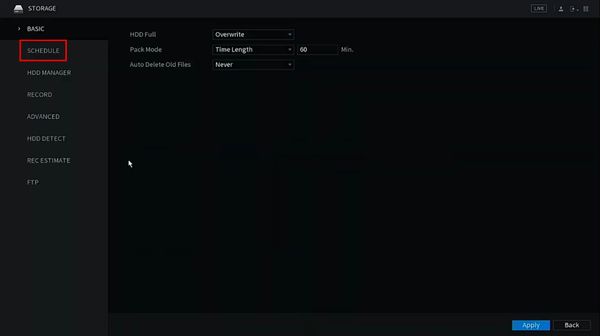
| + | 11. Click Schedule | ||
[[File:Motion_-_SystemUI_New_-_13.jpg|600px]] | [[File:Motion_-_SystemUI_New_-_13.jpg|600px]] | ||
| + | |||
| + | 12. Select the Channel using the dropdown box at the top | ||
| + | |||
| + | Click the gear icon to create the record schedule | ||
[[File:Motion_-_SystemUI_New_-_14.jpg|600px]] | [[File:Motion_-_SystemUI_New_-_14.jpg|600px]] | ||
| + | |||
| + | 13. Create the recording schedule using the interface, making sure to check the box for 'MD' (Motion Detect) | ||
| + | |||
| + | Select the days for the schedule | ||
[[File:Motion_-_SystemUI_New_-_15.jpg|600px]] | [[File:Motion_-_SystemUI_New_-_15.jpg|600px]] | ||
| + | |||
| + | Click OK to save settings | ||
[[File:Motion_-_SystemUI_New_-_16.jpg|600px]] | [[File:Motion_-_SystemUI_New_-_16.jpg|600px]] | ||
| + | |||
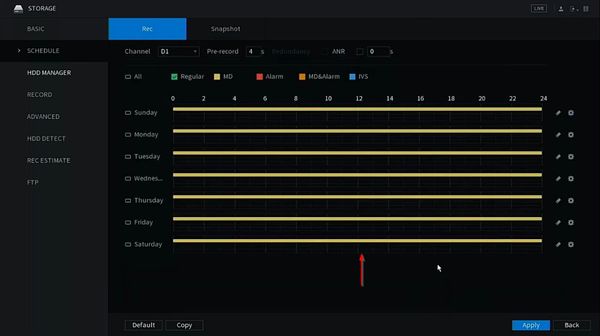
| + | 14. The on screen schedule will be updated | ||
[[File:Motion_-_SystemUI_New_-_17.jpg|600px]] | [[File:Motion_-_SystemUI_New_-_17.jpg|600px]] | ||
| + | |||
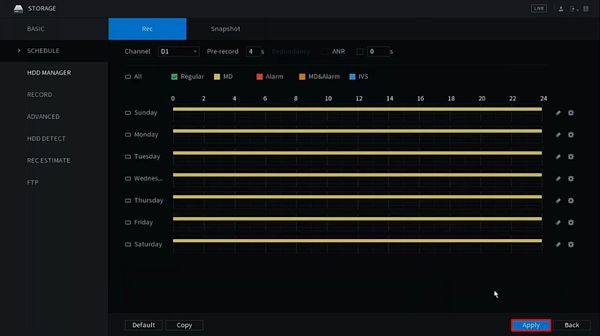
| + | 15. Click Apply to save | ||
[[File:Motion_-_SystemUI_New_-_18.jpg|600px]] | [[File:Motion_-_SystemUI_New_-_18.jpg|600px]] | ||
| + | |||
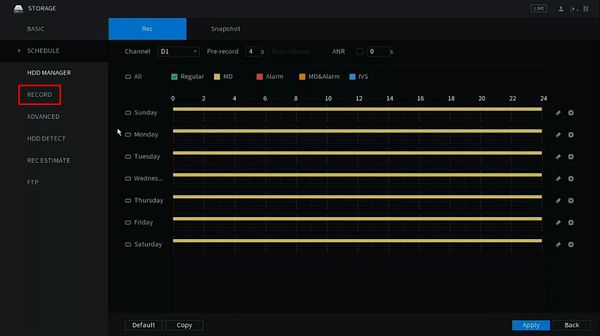
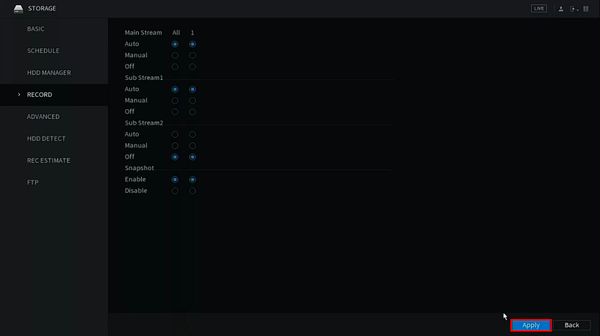
| + | 16. Click Record | ||
[[File:Motion_-_SystemUI_New_-_19.jpg|600px]] | [[File:Motion_-_SystemUI_New_-_19.jpg|600px]] | ||
| + | |||
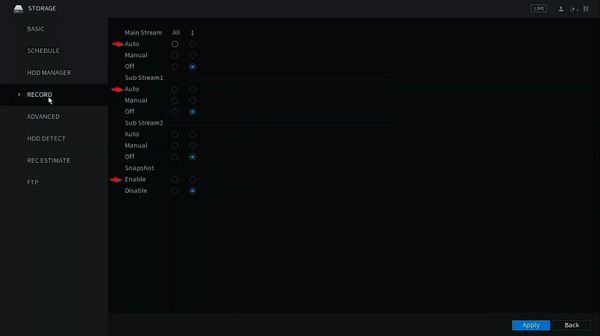
| + | 17. Select 'Auto' for each stream type you wish to record | ||
[[File:Motion_-_SystemUI_New_-_20.jpg|600px]] | [[File:Motion_-_SystemUI_New_-_20.jpg|600px]] | ||
| + | |||
| + | 18. Click Apply to save | ||
[[File:Motion_-_SystemUI_New_-_21.jpg|600px]] | [[File:Motion_-_SystemUI_New_-_21.jpg|600px]] | ||
Revision as of 00:15, 7 February 2020
Description
Prerequisites
Video Instructions
Step by Step Instructions
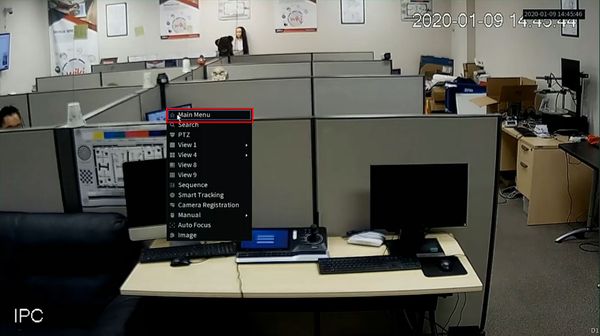
1. From Live View
Right click select Main Menu
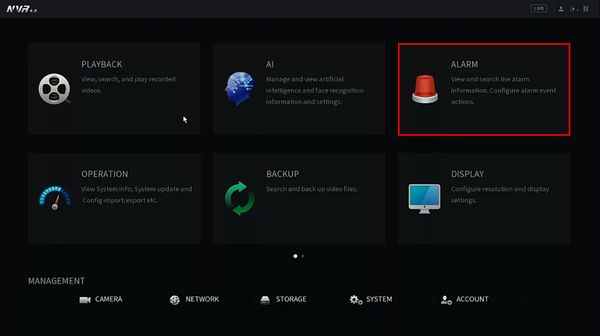
2. Click Alarm
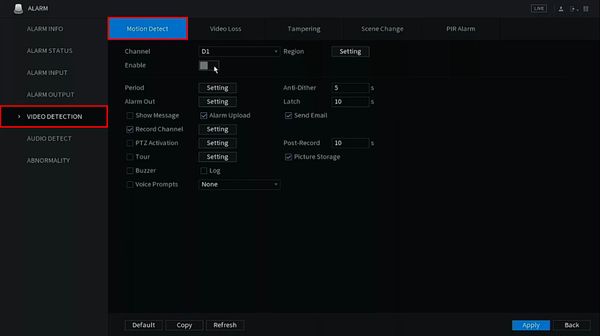
3. Click Video Detection > Motion Detect
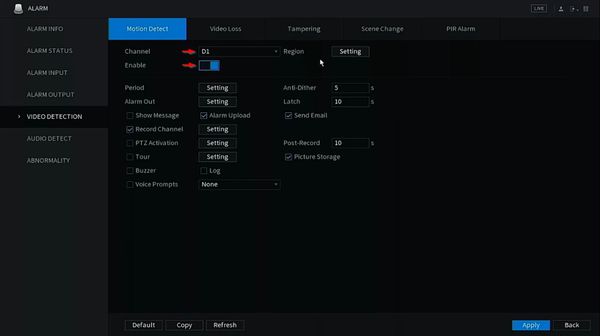
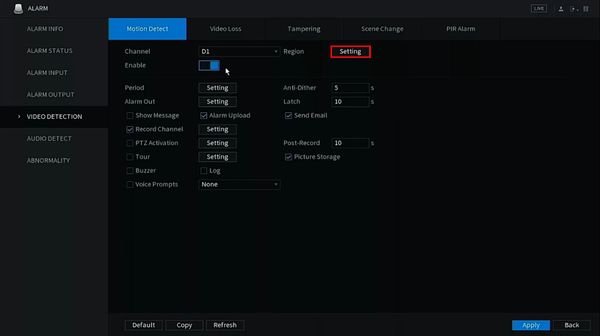
4. Use the dropdown box to select the channel
Click to toggle and enable motion detect
5. Click the Setting button next to Region to define the parameters of the motion detection
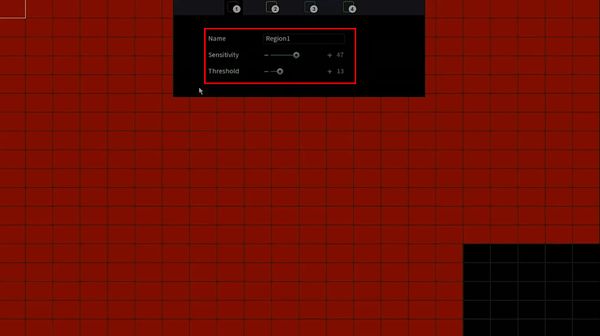
6. The video will fullscreen
Use the on screen interface to adjust parameters of the motion detect:
- Name
- Sensitivity
- Threshold
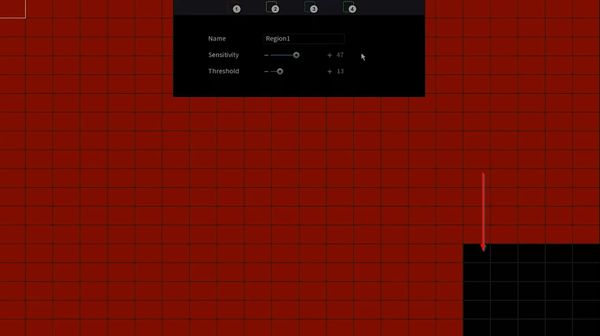
Left click inside the video frame to set the detection area.
Areas that are colored will be analyzed for motion
Once settings are right click to return to the Motion Detect menu
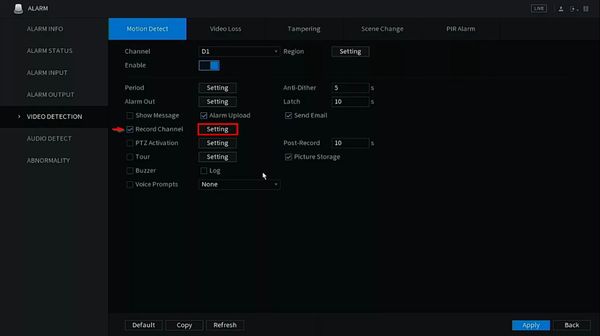
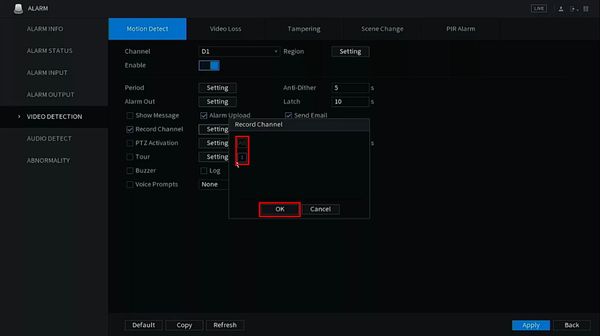
7. Check the box next to Record Channel to enable recording when motion is detected
Click Setting next to Record Channel
Select which channel(s) to record when Motion is detected
Click OK
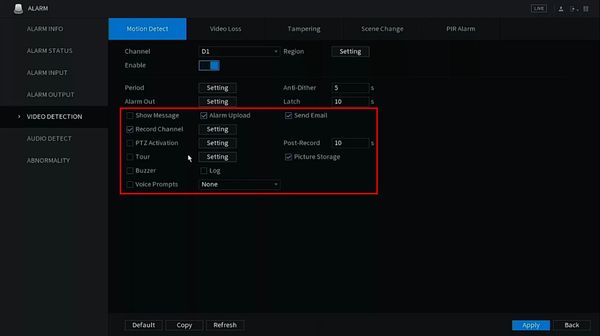
8. Enable any desired additional paramters/ alarm linkage for motion detection
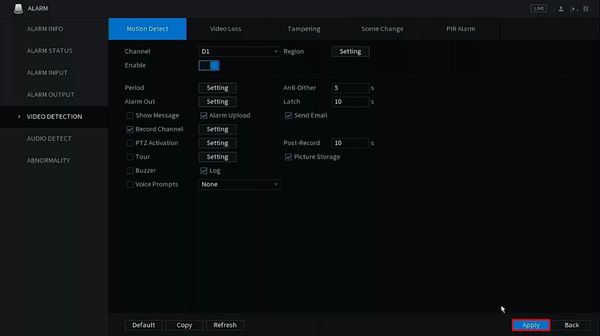
9. Click Apply to save all settings
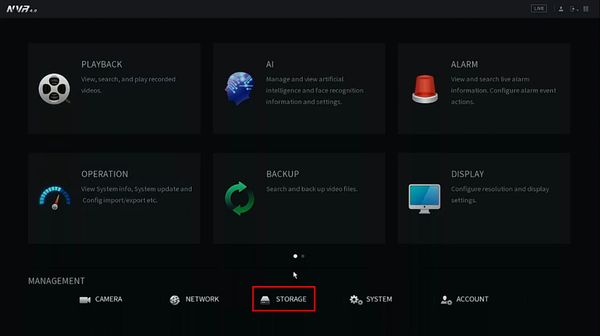
10. Return to the Main Menu
Select Storage
11. Click Schedule
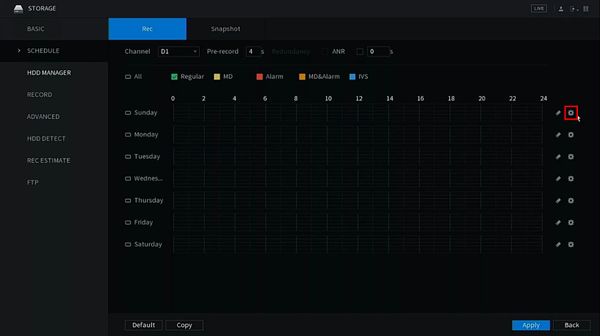
12. Select the Channel using the dropdown box at the top
Click the gear icon to create the record schedule
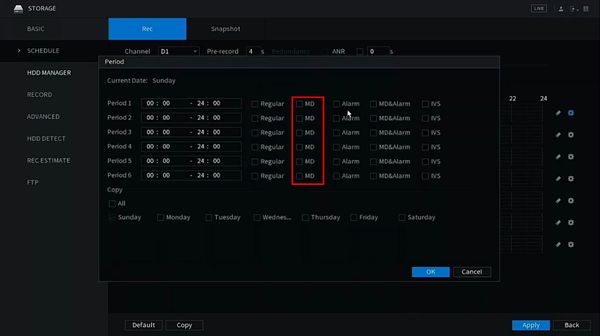
13. Create the recording schedule using the interface, making sure to check the box for 'MD' (Motion Detect)
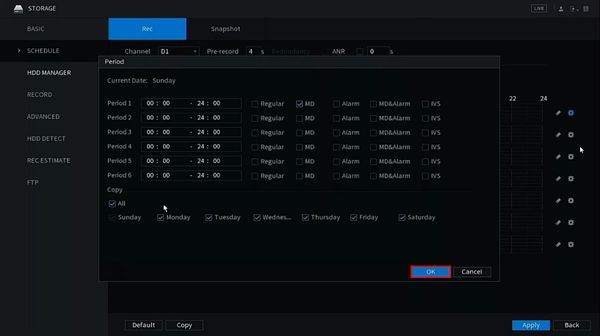
Select the days for the schedule
Click OK to save settings
14. The on screen schedule will be updated
15. Click Apply to save
16. Click Record
17. Select 'Auto' for each stream type you wish to record
18. Click Apply to save
