Difference between revisions of "Template:Smart Search Face Detection WebUI New"
(Created page with " ==Prerequisites== ==Video Instructions== <embedvideo service="youtube">https://youtu.be/wT_l7NyGMdE</embedvideo> ==Step by Step Instructions==") |
|||
| Line 4: | Line 4: | ||
<embedvideo service="youtube">https://youtu.be/wT_l7NyGMdE</embedvideo> | <embedvideo service="youtube">https://youtu.be/wT_l7NyGMdE</embedvideo> | ||
==Step by Step Instructions== | ==Step by Step Instructions== | ||
| + | |||
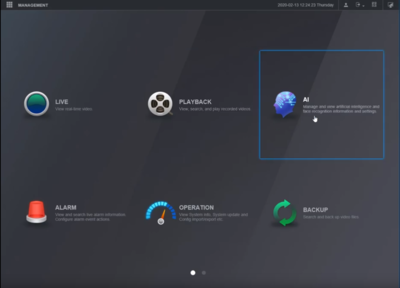
| + | 1. From the main menu Select the AI option. | ||
| + | |||
| + | [[File:Face_Detect_NWUI-1.PNG|400px]] | ||
| + | |||
| + | |||
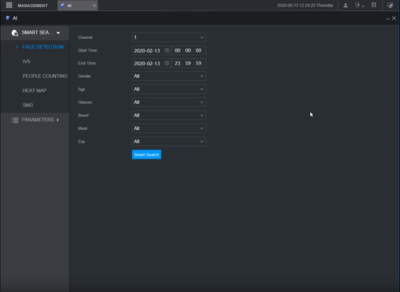
| + | 2. Under AI > Smart Search choose Facial Detection and set your channel, time frame, and search filters. | ||
| + | |||
| + | [[File:Face_Detect_NWUI-2.PNG|400px]] | ||
| + | |||
| + | |||
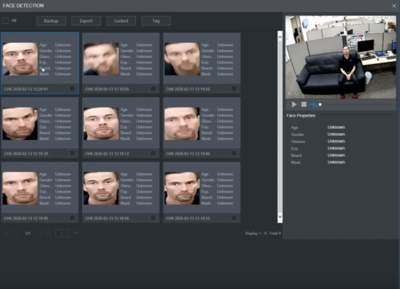
| + | 3. Once parameters have been set, hit Smart Search to see the results. Select any thumb nail to view the playback on the right side menu. | ||
| + | |||
| + | [[File:Face_Detect_NWUI-3.PNG|400px]] | ||
Latest revision as of 20:48, 20 February 2020
Prerequisites
Video Instructions
Step by Step Instructions
1. From the main menu Select the AI option.
2. Under AI > Smart Search choose Facial Detection and set your channel, time frame, and search filters.
3. Once parameters have been set, hit Smart Search to see the results. Select any thumb nail to view the playback on the right side menu.


