Difference between revisions of "Thermal/Temperature Monitoring/Initial NVR Setup"
(→Edit Network (TCP/IP) Information) |
(→Step by Step Instructions) |
||
| Line 49: | Line 49: | ||
===Factory Default=== | ===Factory Default=== | ||
| − | Resetting the device to Factory Default is recommended after upgrading the Firmware. | + | '''''Resetting the device to Factory Default is recommended after upgrading the Firmware.''''' |
<gallery> | <gallery> | ||
File:Temperature_Monitoring_-_Initial_NVR_Setup_-_18.jpg|Enter the password and click '''Login''' | File:Temperature_Monitoring_-_Initial_NVR_Setup_-_18.jpg|Enter the password and click '''Login''' | ||
| Line 60: | Line 60: | ||
===Edit Network (TCP/IP) Information=== | ===Edit Network (TCP/IP) Information=== | ||
| − | + | '''''Change the recorder from the default IP - 192.168.1.108''''' | |
| − | + | <gallery> | |
| − | + | File:Temperature_Monitoring_-_Initial_NVR_Setup_-_24.jpg|Enter the IP address of the NVR - default 192.168.1.108 in Internet Explorer on a local computer | |
| − | + | File:Temperature_Monitoring_-_Initial_NVR_Setup_-_25.jpg|Select the Region, Language and Video Standard. Click '''Next''' | |
| − | + | File:Temperature_Monitoring_-_Initial_NVR_Setup_-_26.jpg|Scroll down to review the agreement and check to confirm. | |
| − | + | File:Temperature_Monitoring_-_Initial_NVR_Setup_-_27.jpg|Click '''Next''' | |
| − | + | File:Temperature_Monitoring_-_Initial_NVR_Setup_-_28.jpg|Select the Time Zone and confirm the System Time. Click '''Next''' | |
| − | + | File:Temperature_Monitoring_-_Initial_NVR_Setup_-_29.jpg|Create a password for the device and enter twice to confirm. Click '''Next''' | |
| − | + | File:Temperature_Monitoring_-_Initial_NVR_Setup_-_30.jpg|Select which Password Protection feature(s) you wish to enable. Click '''OK''' | |
| − | + | </gallery> | |
| − | |||
| − | |||
| − | |||
Revision as of 21:43, 5 May 2020
Temperature Monitoring Solution Initial NVR Setup
Description
This guide will cover the initial NVR Setup for the Thermal Temperature Monitoring Solution including device initialization, firmware update , factory defaulting, and settign Network information
Prerequisites
- DHI-NVR5216-16P-I powered and connected to network
- Latest firmware for NVR (see below)
Temperature Monitoring Solution Firmware
| NVR Model | Firmware |
|---|---|
| DHI-NVR5216-16P-I | |
Video Instructions
Step by Step Instructions
Device Initialization

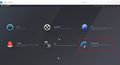
Enter the IP address of the NVR - default 192.168.1.108 in Internet Explorer on a local computer
Select the Region, Language and Video Standard. Click Next
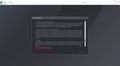
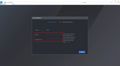
Scroll down to review the agreement and check to confirm.
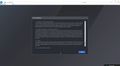
Click Next
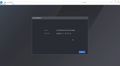
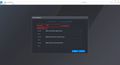
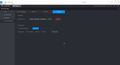
Select the Time Zone and confirm the System Time. Click Next
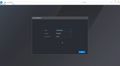
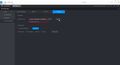
Create a password for the device and enter twice to confirm. Click Next
Select which Password Protection feature(s) you wish to enable. Click OK
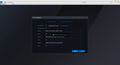
A prompt will confirm a successful initialization


Confirm/Upgrade NVR Firmware
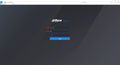
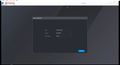
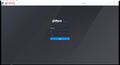
Enter the password and click Login
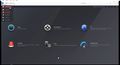
Click Operation
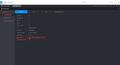
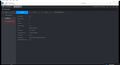
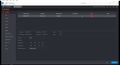
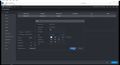
Click Information > Version. System Version will show the current firmware version of the NVR.

Compare the Build Date to the firmware file downloaded. If the Build Date matches that date the system is up to date.
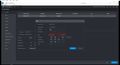
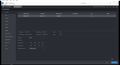
Click System Maintain
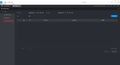
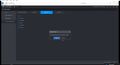
Click the Upgrade tab. Click Browse

Select the firmware file that was downloaded. Click Open
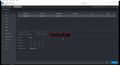
Click Upgrade
A prompt will appear to confirm the unit is upgrading

A prompt will appear to confirm the unit is rebooting after upgrading


Factory Default
Resetting the device to Factory Default is recommended after upgrading the Firmware.

Enter the password and click Login

Click Operation
Click Information > Version. System Version will show the current firmware version of the NVR.

Compare the Build Date to the firmware file downloaded. If the Build Date matches that date the system is up to date.
Click System Maintain
Click the Upgrade tab. Click Browse


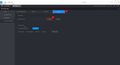
Edit Network (TCP/IP) Information
Change the recorder from the default IP - 192.168.1.108
Enter the IP address of the NVR - default 192.168.1.108 in Internet Explorer on a local computer
Select the Region, Language and Video Standard. Click Next
Scroll down to review the agreement and check to confirm.
Click Next
Select the Time Zone and confirm the System Time. Click Next
Create a password for the device and enter twice to confirm. Click Next
Select which Password Protection feature(s) you wish to enable. Click OK


