Difference between revisions of "IP Camera/Playback/Playback Menu"
(→Playback Cut) |
|||
| Line 192: | Line 192: | ||
Step 5. Click on Save button to save file. | Step 5. Click on Save button to save file. | ||
| + | |||
| + | ==Record Type== | ||
| + | [[file:IPCPlaybackRecordTypeBar.jpg]] | ||
| + | After checking record file type, only selected file will be displayed in progress bar and file list. Users can also select the record type to be displayed via the drop down box which is above the file list. | ||
Revision as of 17:40, 13 October 2015
Contents
Playback Menu
There are four sections:
1: Function of play
2: Playback file
3: Play time cut
4: Record type
5: Progress bar
6: Assistant function
Playback Toolbar
|
Parameter |
Function |
|
1. Play |
When you see this button, it means pause or not played record. Click on this button, switch to normal play status. |
|
2. Stop |
Click this button to stop playing. |
|
3. Play by frame |
Click on this button to go to next frame. Note: You shall pause record when you use this function. |
|
4. Slow |
Click on this button to play slowly. |
|
5. Quick |
Click on this button to play quickly. |
|
6. Silent |
When this button displays, it means audio is silent. Click on this button to switch back to normal. |
|
7. Volume |
Click on left mouse to adjust volume. |
|
8. Fisheye |
Click this button and fisheye device can adjust display mode according to different installation mode during the process of playback. |
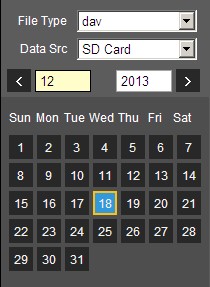
Playback Calendar
|
Parameter |
Function |
|
File Type |
|
|
Data Source |
Default is SD card. |
Playback Bar
![]() Step 1. Click on data in blue, time axis displays record file progress bar in color. While, green represents normal record, yellow represents motion detect record, red represents alarm record, and blue represents manual record.
Step 1. Click on data in blue, time axis displays record file progress bar in color. While, green represents normal record, yellow represents motion detect record, red represents alarm record, and blue represents manual record.
Step 2. Click on certain time on progress bar, playback starts from this time.
Step 3. Click on file list![]() , select date file will be displayed in list.
, select date file will be displayed in list.
Event Bar
1. Click on data in blue, time axis displays record file progress bar in color. While, green represents normal record, yellow represents motion detect record, red represents alarm record, and blue represents manual record.
2. Click on certain time on progress bar, playback starts from this time. See Figure 4- 4.
3. Click on file list![]() , select date file will be displayed in list.
, select date file will be displayed in list.
4. Double click on file in list, playback this file and display file size, start time and end time.
|
Parameter |
Function |
|
It means records within searched start time and end time on the date. | |
|
Record Download Format |
There are two formats: dav, mp4. |
Note: System does not support download and playback of MP4 file. | |
|
Click on back button to go to calendar interface. |
Playback Cut
Note:Playback cut function will automatically pause playing record as playback cut and playback cannot be at the same time.
Step 1. Click on start time to cut on time axis. This time must be within progress bar range.
Step 2. Move mouse to cut icon ![]() . You will be ask to select start time. Click on cut icon
. You will be ask to select start time. Click on cut icon ![]() to finish cutting.
to finish cutting.
Step 3. Click on playback cut end time on time axis. This time must be within progress bar range.
Step 4. Move mouse to cut icon ![]() , you will be asked to select end time. Click on cut icon
, you will be asked to select end time. Click on cut icon ![]() again to finish cutting.
again to finish cutting.
Step 5. Click on Save button to save file.
Record Type
![]() After checking record file type, only selected file will be displayed in progress bar and file list. Users can also select the record type to be displayed via the drop down box which is above the file list.
After checking record file type, only selected file will be displayed in progress bar and file list. Users can also select the record type to be displayed via the drop down box which is above the file list.


