Difference between revisions of "Accessories/Other/DH-VCS-SH30/IP Speaker Setup"
(Created page with "=IP Speaker Setup= ==Description== This article will cover how to setup a DH-VCS-SH30 IP Speaker with a Dahua NVR or DSS Pro ==Prerequisites== * DH-VCS-SH30 IP Speaker on th...") |
(No difference)
|
Revision as of 21:51, 21 August 2024
Contents
IP Speaker Setup
Description
This article will cover how to setup a DH-VCS-SH30 IP Speaker with a Dahua NVR or DSS Pro
Prerequisites
- DH-VCS-SH30 IP Speaker on the same network as a PC
- Dahua NVR
- DSS Pro with IP Speaker License
Step by Step Instructions
Initial IP Speaker Setup
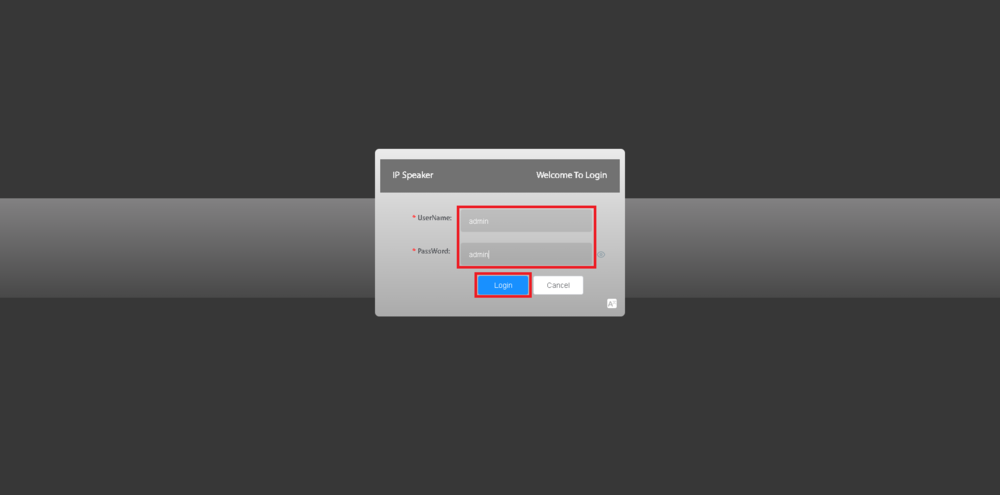
1. Open the web interface of the IP Speaker on a PC on the same network.
The defualt IP Address is 192.168.1.108.
Enter the defualt username of "admin" in the UserName field.
Enter the defualt password of "admin" in the PassWord field.
Click on Login
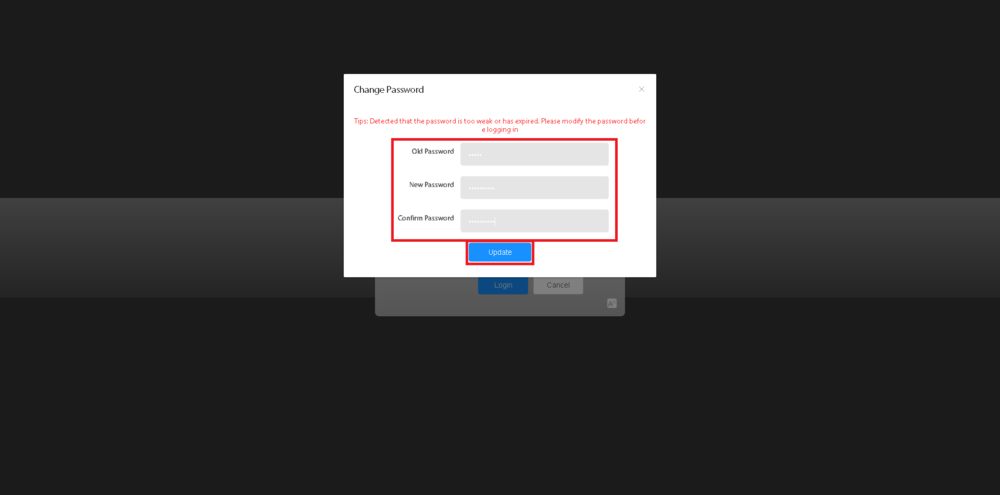
2. Enter the default password of "admin" in the Old Password field.
Enter a new password in the New Password field.
Enter the same new password in the Confirm Password field.
Click on Update
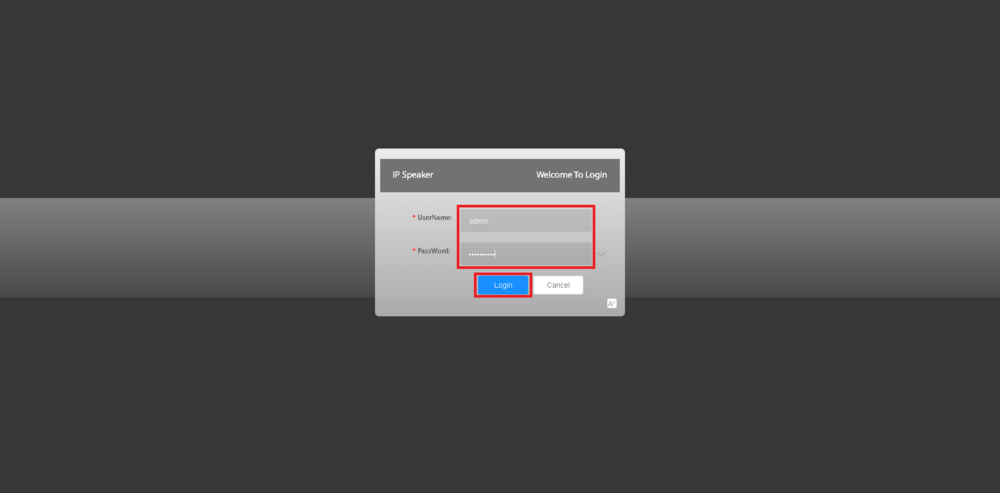
3. Enter "admin" in the UserName field.
Enter the IP Speaker's new password int he PassWord field.
Click on Login
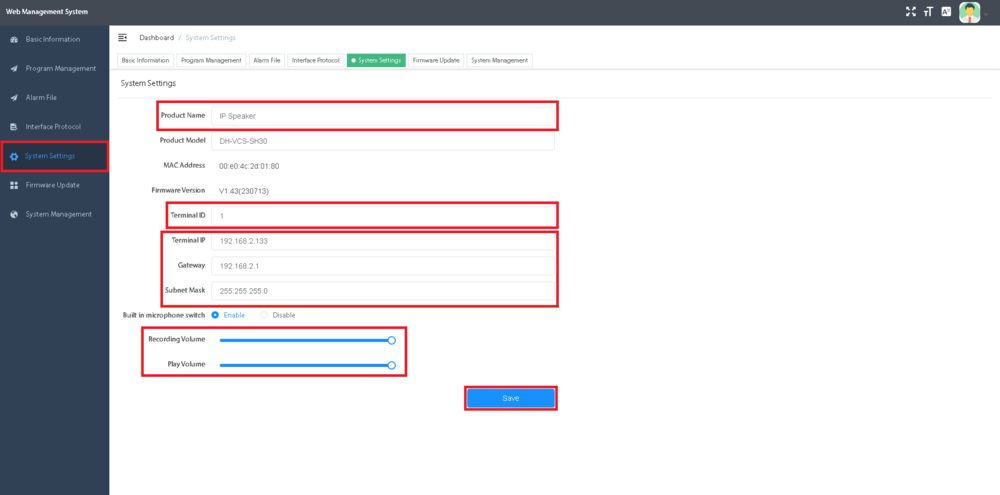
4. Select System Settings on the left.
Change the name of the IP Speaker in the Product Name field.
Enter a unique number in the Terminal ID field. NOTE: Each IP Speaker used on the same NVR or DSS Server needs a unique Terminal ID Number.
Enter an IP address in the Terminal IP field, if you want to change the IP address of the IP Speaker.
If you changed the IP address, update the information to match in the Gateway and Subnet Mask fields.
Adjust the sliders next to Recording Volume and Play Volume for the build in microphone and speaker.
Click on Save
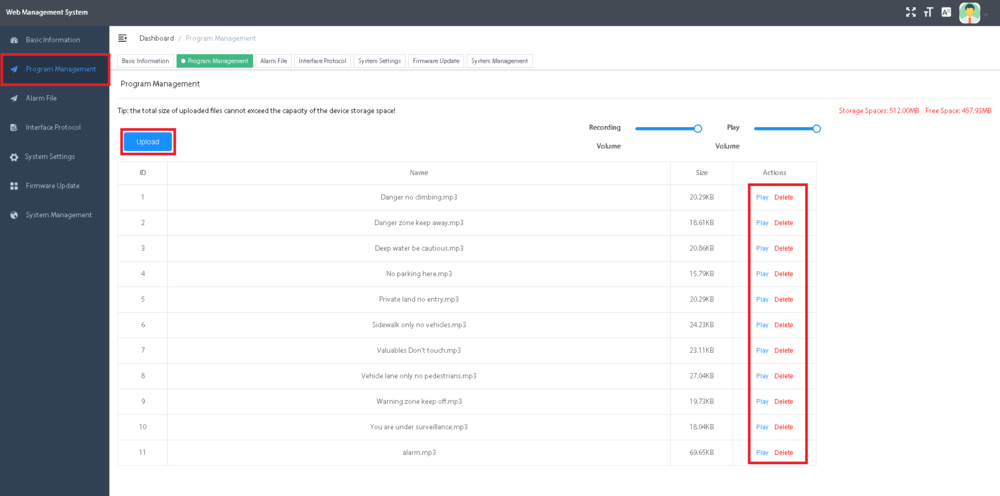
5. Select Program Management on the left.
You can test play any of the existing audio files through the speaker by pressing the Play button next to any of them.
If you want to delete any of the exisisting audio files, press Delete next to it.
To add more audio files, select the Upload button and select an audio file from your PC's file system.
NOTE: The speaker can only handle up to 16 audio files
IP Speaker Configuration on Dahua NVR
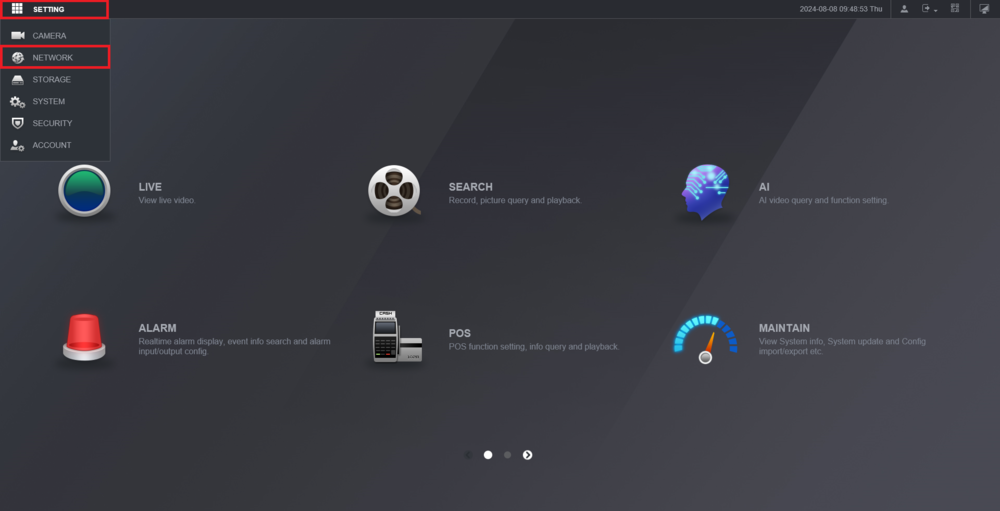
1. Open the web interface of a Dahua NVR.
From the Main Menu select Setting at the top left.
Then select Network
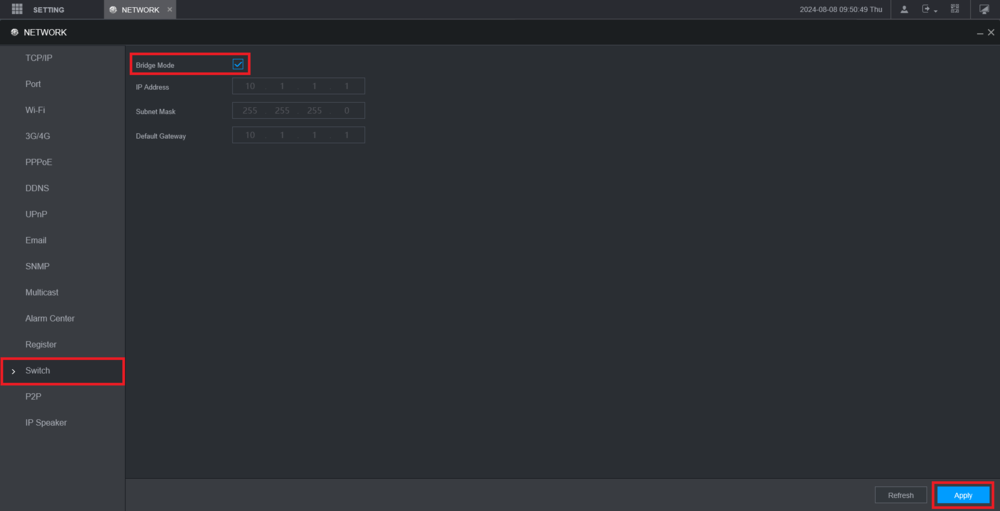
2. If you have the IP Speaker connected to the built in PoE switch on the back of the NVR, select Switch and check the box for Bridge Mode.
Otherwise, skip to the next step.
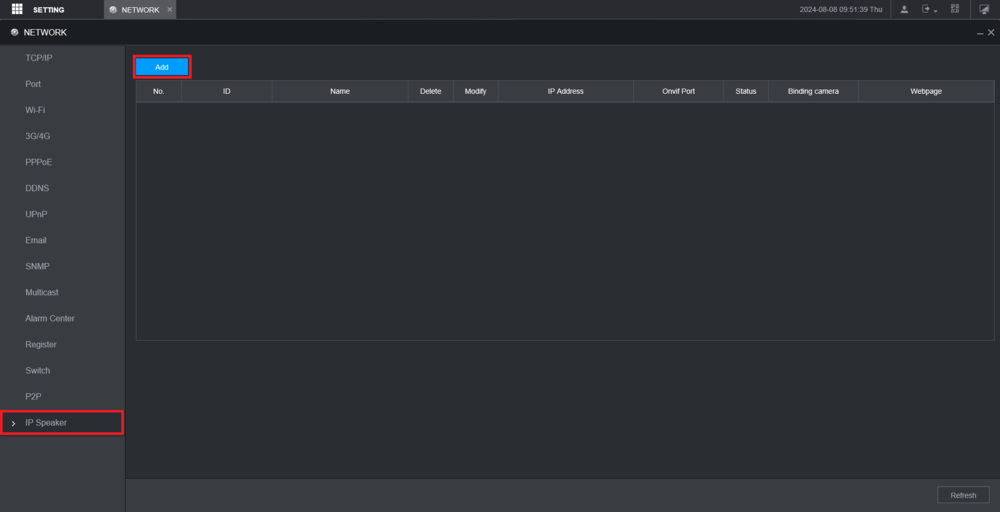
3. Select IP Speaker on the left.
Then click on the Add button
4. Enter a name for the IP Speaker in the SpeakerName field.
Enter the local IP address of the IP Speaker in the IP Address field.
Enter the unique terminal ID number for the IP Speaker in the Terminal ID field.
Enter "1000" in the Onvif Port field.
Enter "admin" in the Username field.
Enter the IP Speaker's admin account password in the Password field.
Click on the Setting button
5. Click on a camera channel to highlight it and bind the IP Speaker to 2 Way Talk for that channel.
Click on OK.
Then click on OK on the previous window
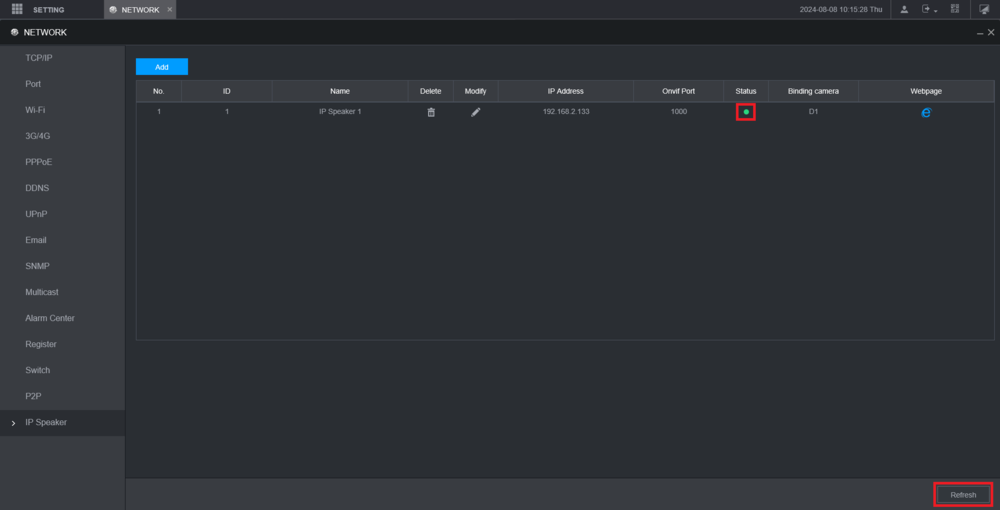
6. Click on the Refresh button at the bottom until the indicator under Status changes to a Green color.
If it does not change after 30 seconds to 1 minute, check click on the Pencil icon under Modify and verify the settings you entered are correct
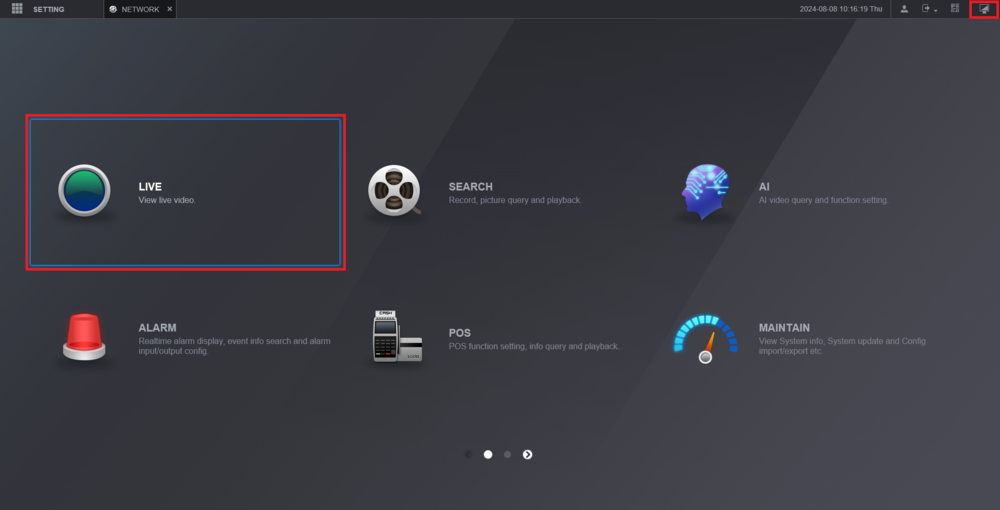
7. Click on the Main Menu icon at the top right.
Then select LIVE
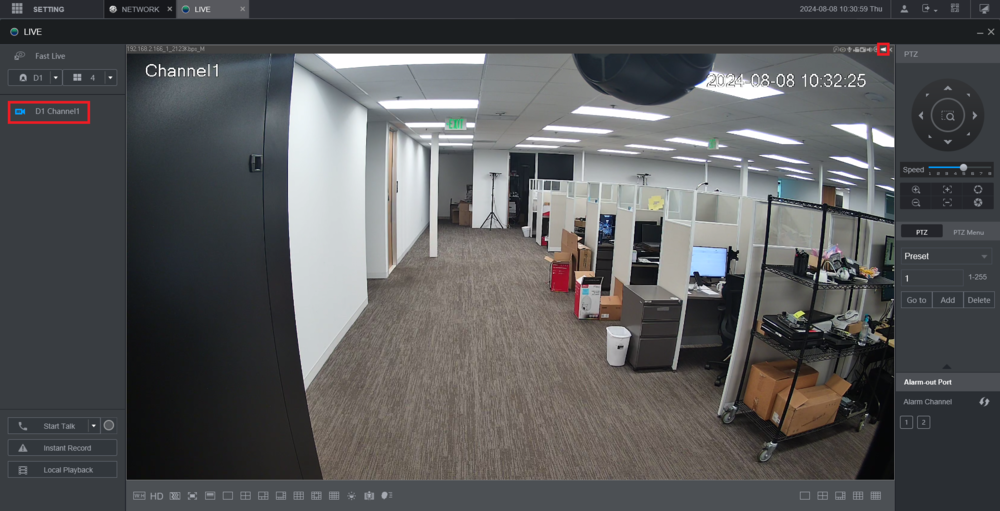
8. Select the camera on the list, that matches the channel you selected in Step 5 above, to view its live view.
Click on the IP Speaker icon at the top right of the live view of that camera to enable 2 Way Talk through the IP Speaker.
Click it again to disable it when you are done with 2 Way Talk
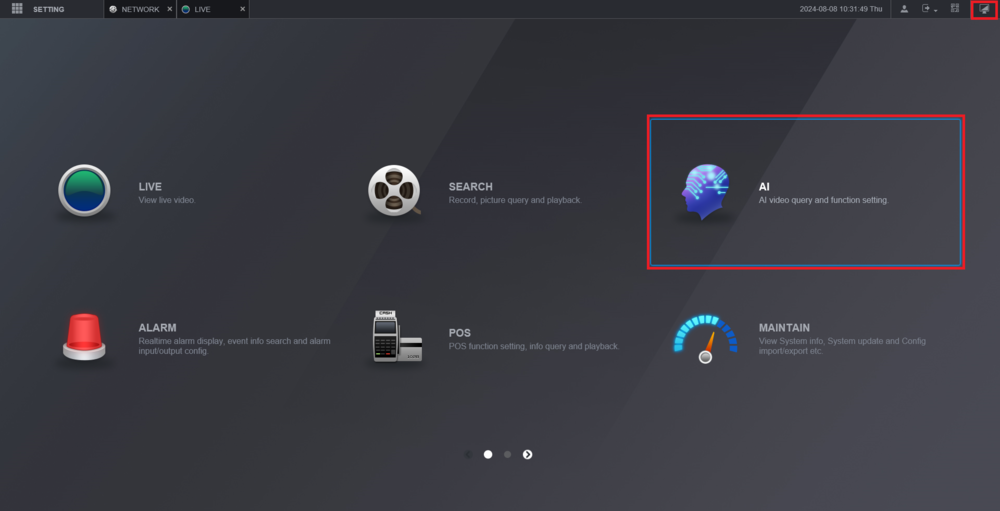
9. Click on the Main Menu icon at the top right.
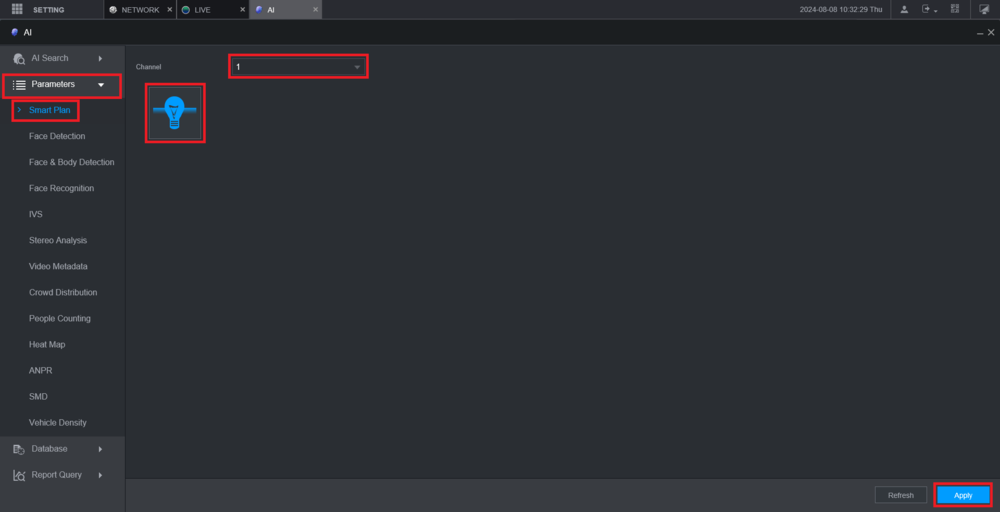
Then select AI
10. Expand the Parameters section on the left.
Then select Smart Plan.
Choose a channel that has IVS from the drop-down next to Channel.
Click on the IVS Lightbulb icon to highlight/enable it.
Click on Apply at the bottom
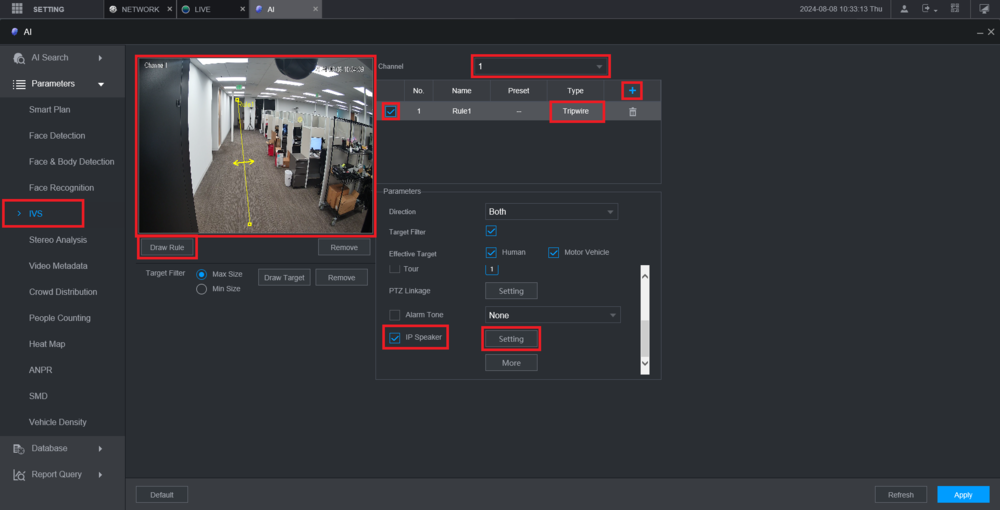
11. Select IVS on the left.
Choose the same channel from the previous step from the drop-down next to Channel.
Press the + plus button to create a new IVS rule.
Make sure the box is checked next to that new rule.
Double-click on the part of that new rule under Type and choose what type of IVS rule this will be.
Click on Draw Rule under the live view on the left.
Left click on the live view to start drawing the rule. Keep left clicking to add more segments. Right click to complete drawing the rule.
Check the box next to IP Speaker in the Parameters section.
Click on the Setting button
12. Check the box next to the IP Speaker.
Click on the Gear icon under Media
13. Select which audio file, you want to play out of the IP Speaker when the IVS rule is triggered, from the drop down list
14. Click on OK.
Then click on OK on the previous window
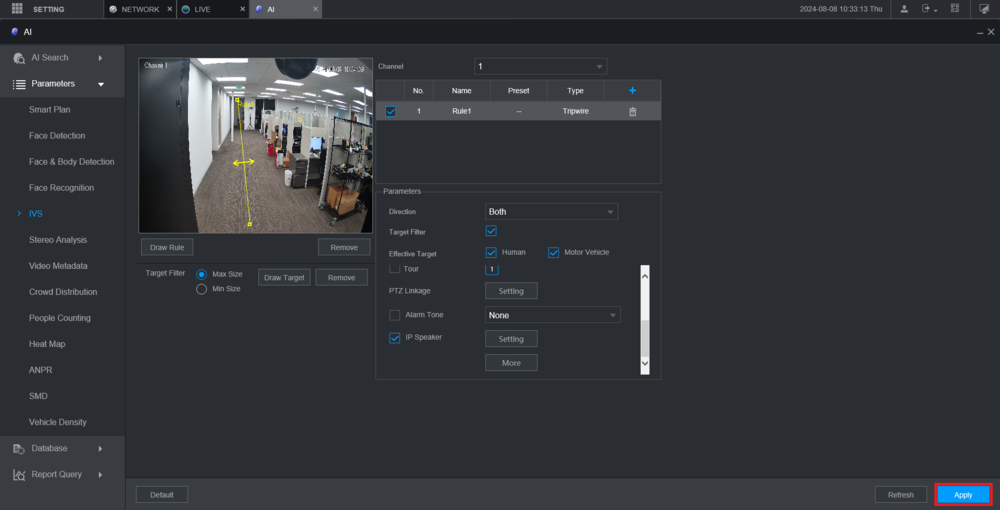
15. Click on Apply at the bottom
IP Speaker Configuration on DSS
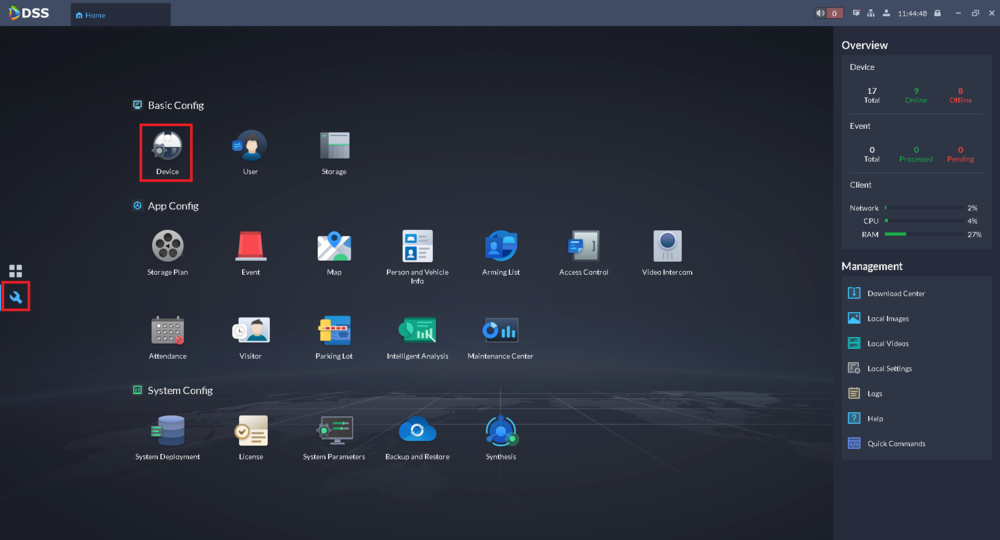
1. Open the DSS Client Software.
Click on the Wrench icon on the left.
Then select Device under Basic Config
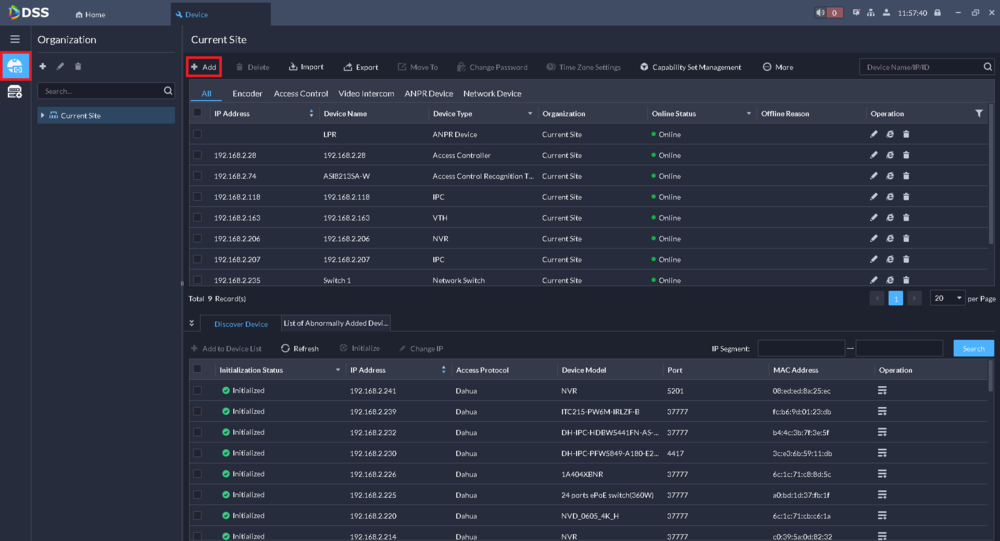
2. Click on the Device List icon on the left.
Then click on + Add
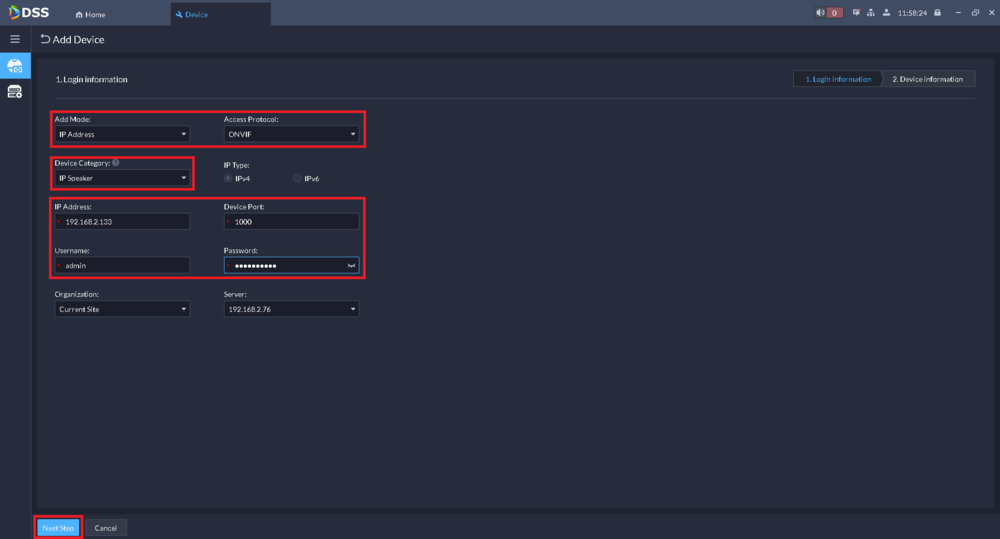
3. Under Add Mode select IP Address.
Under Access Protocol select ONVIF.
Under Device Category select IP Speaker.
Enter the IP address of the IP Speaker in the IP Address field.
Enter "1000" in the Device Port field.
Enter "admin" in the Username field.
Enter the password for the IP Speaker's admin account in the Password field.
Click on Next Step at the bottom
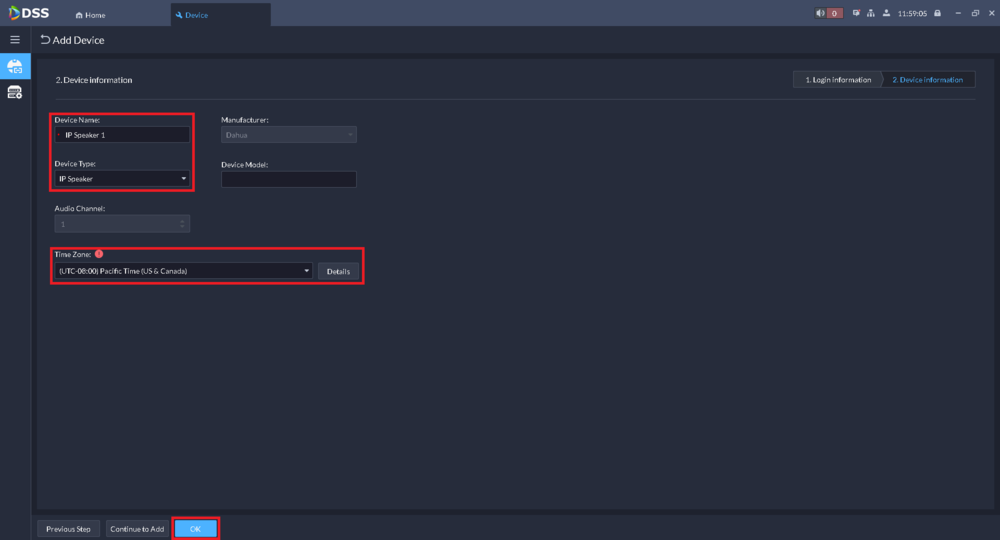
4. Enter a name for the IP Speaker in the Device Name field.
Select IP Speaker under Device Type.
Set the correct time zone for your area from the drop-down list under Time Zone.
Click on OK at the bottom
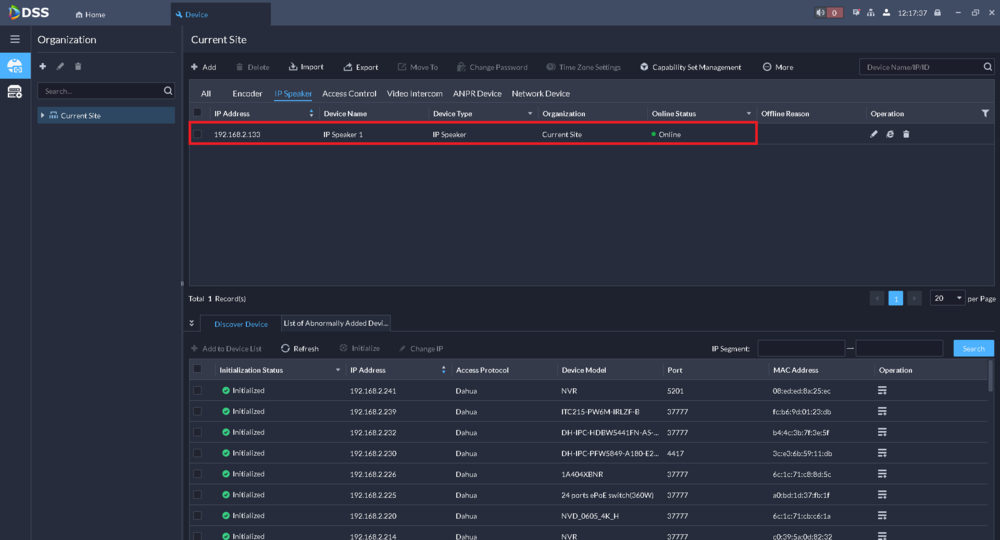
5. Verify that DSS has connected sucessfully to the IP Speaker.
It will show Online under Online Status
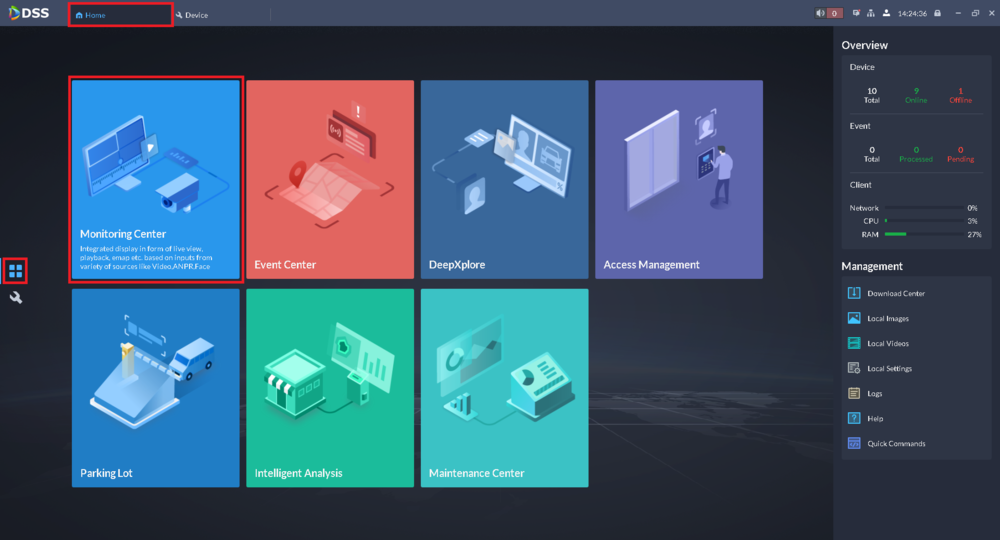
6. Click on the Home tab at the top.
Select the Apps icon on the left.
Click on Monitoring Center
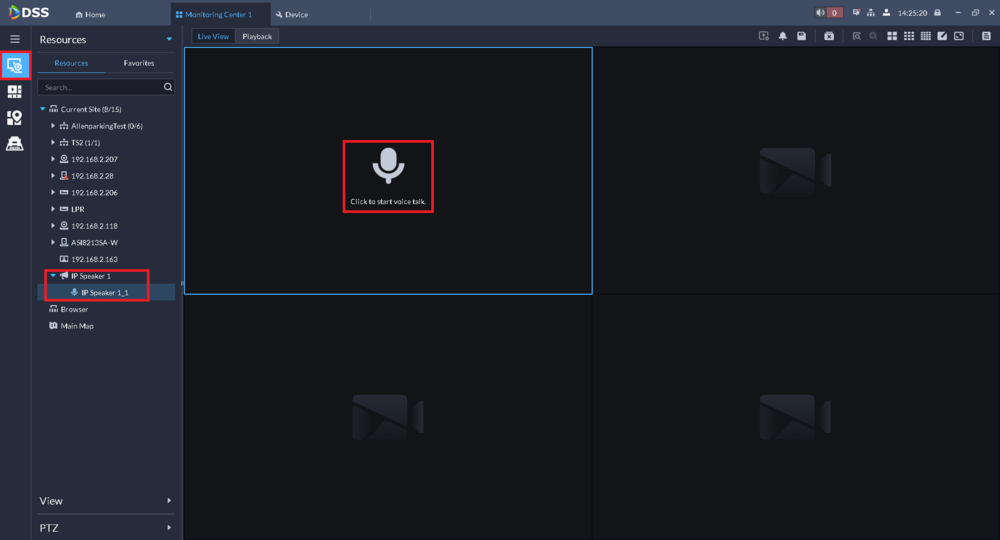
7. Click on the Live View Section icon at the top left.
Expand the IP Speaker in the list and drag the microphone icon to an empty camera view on the right.
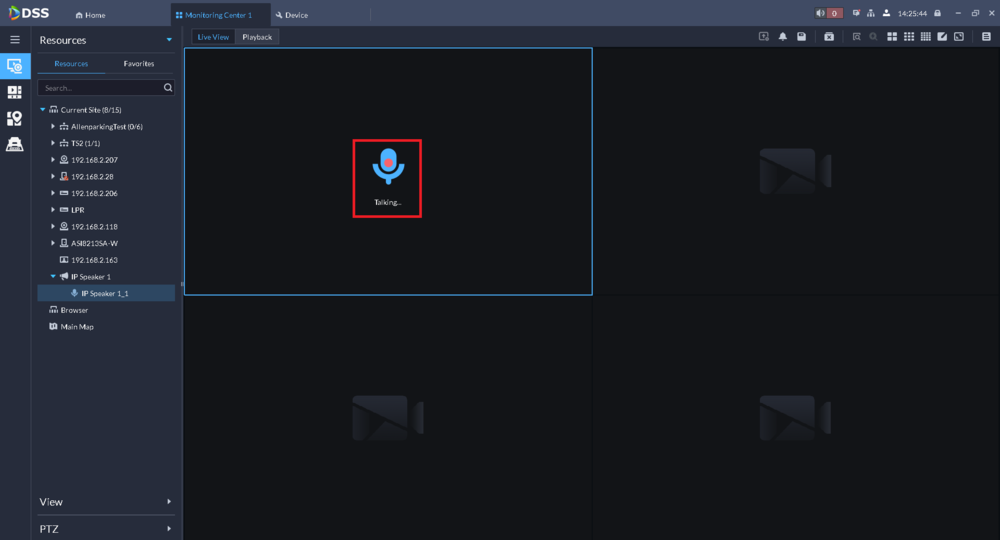
Click on the microphone icon above Click to start voice talk to begin two-way talk through the IP Speaker.
Click on it again when you are done with two-way talk
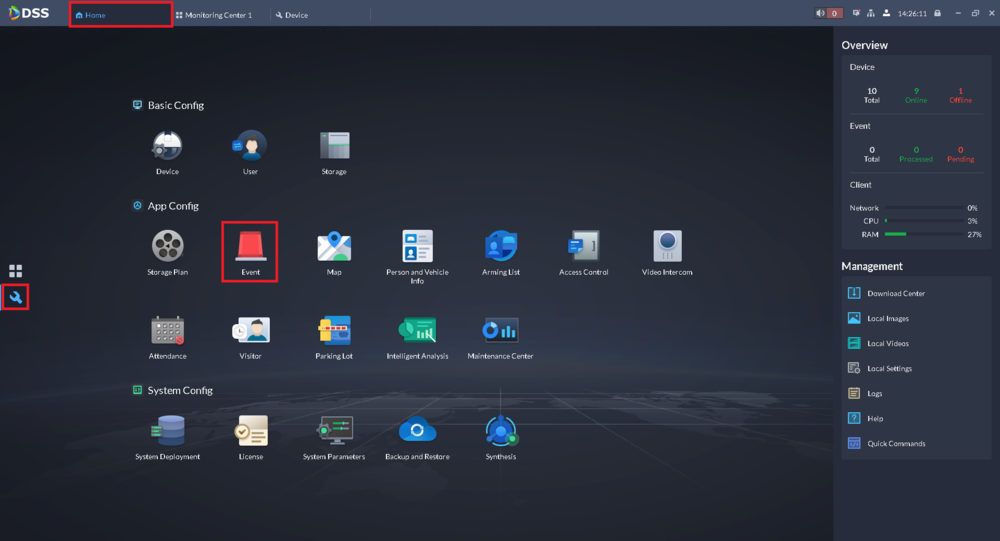
8. Click on the Home tab at the top.
Select the Configuration icon on the left.
Click on Event under App Config
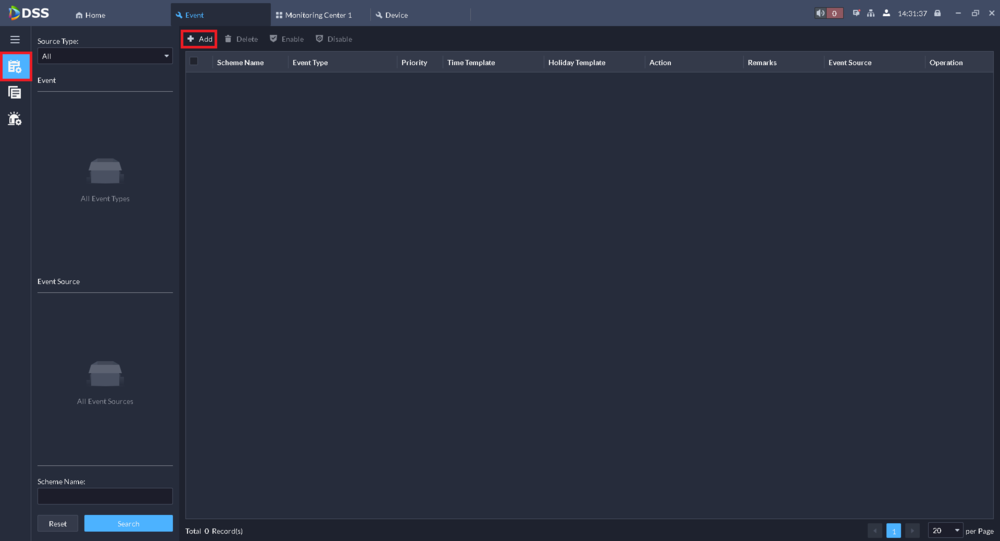
9. Select the Event Config icon on the left.
Then click on + Add at the top
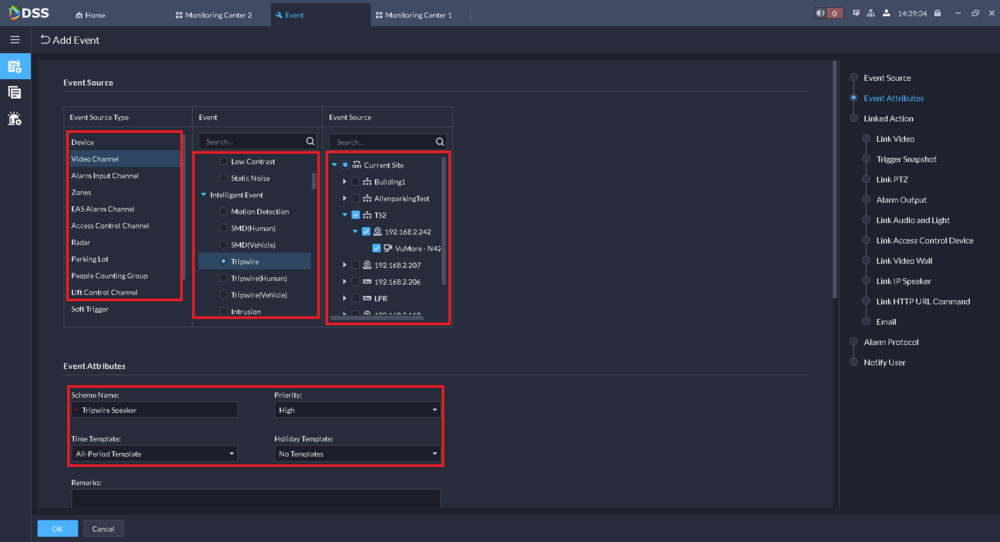
10. Select the type of event you want to trigger the IP Speaker with from the Event Source Type list.
Then select the exact event type from the Event list.
Check the box next to the devices that you want to use to trigger this event from the Event Source list.
Enter the name of this event configuration in the Scheme Name field.
Choose the priority for the event from the Priority drop-down.
Select the schedule for when this event can be triggered from the Time Template drop-down.
Select the schedule for specific holidays from the Holiday Template drop-down
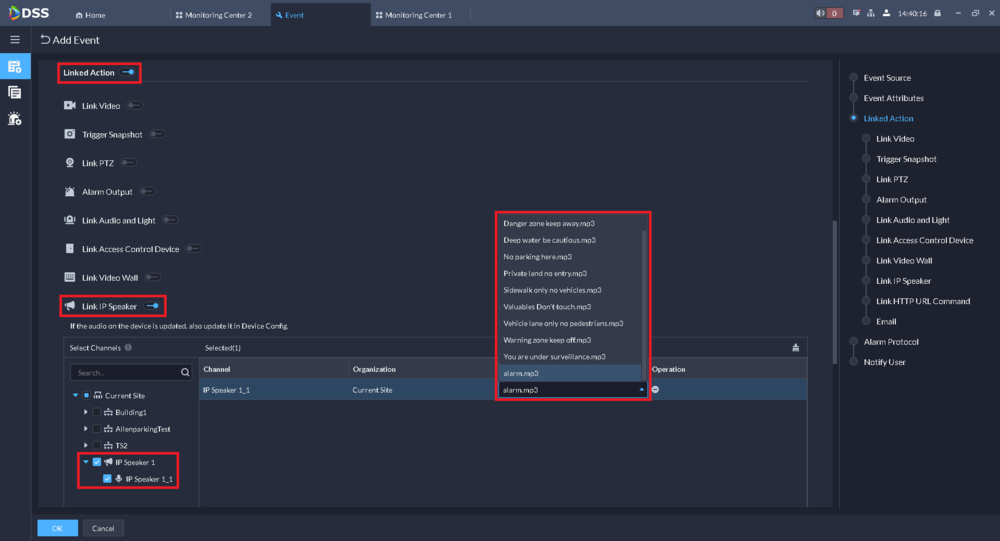
11. Enable the slider next to Linked Action.
Then enable the slider next to Link IP Speaker.
Check the box for the IP Speaker in the Select Channels list.
Select the audio you want to play when the alarm event is activated from the list under Audio
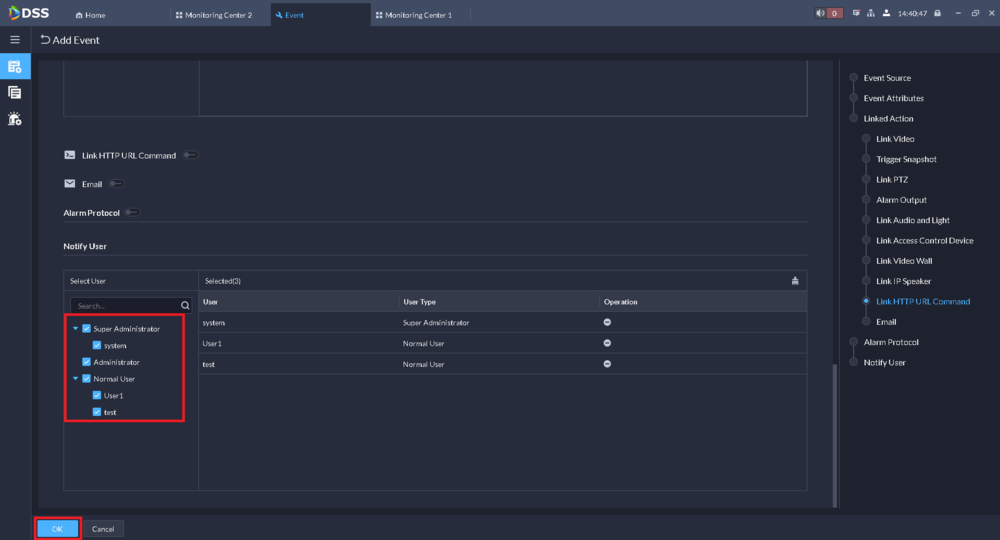
12. Check the boxes next to the users in the Select User list for which users this alarm event will be accessible.
Click on OK at the bottom to save the settings
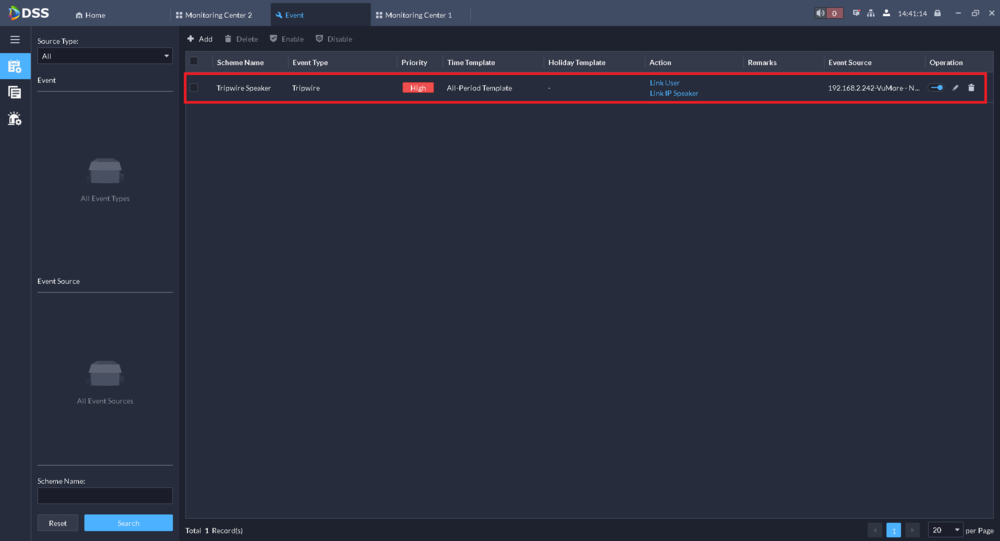
13. You will see the active rule in the list.
Whenever it is triggered the audio will play through the IP Speaker
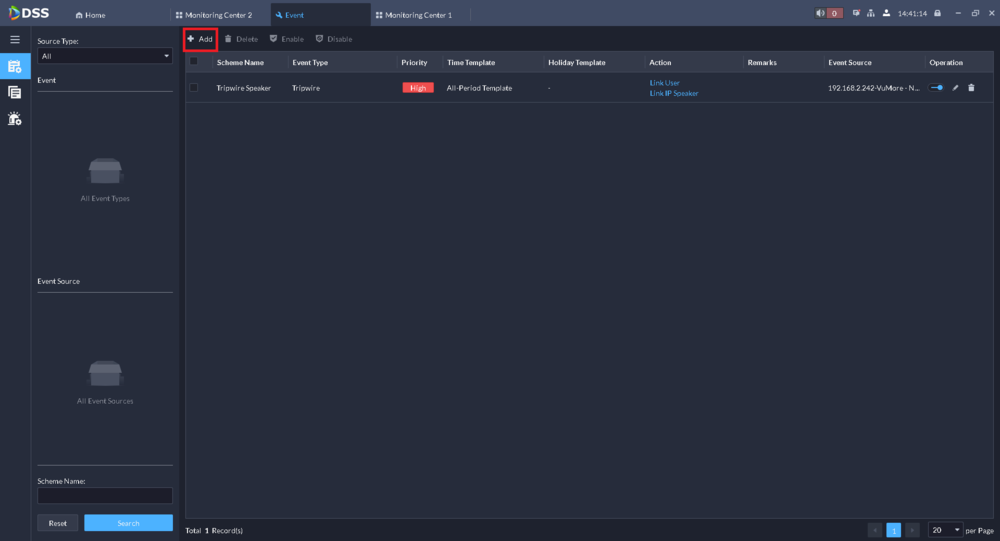
14. Click on + Add at the top
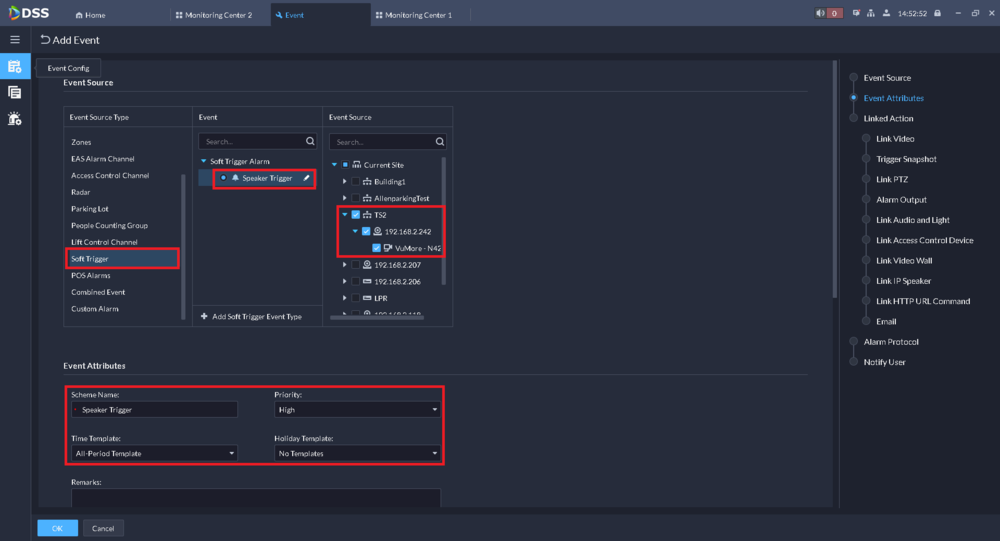
15. Select Soft Trigger from the Event Source Type list.
Select the trigger from the Event list. (Click on the pencil edit icon if you want to change the name and icon for the soft trigger.)
Check the box next to the devices that you want to use to have the soft trigger appear on from the Event Source list.
Enter the name of this soft trigger in the Scheme Name field.
Choose the priority for the soft trigger from the Priority drop-down.
Select the schedule for when this soft trigger can be activated from the Time Template drop-down.
Select the schedule for specific holidays from the Holiday Template drop-down
16. Enable the slider next to Linked Action.
Then enable the slider next to Link IP Speaker.
Check the box for the IP Speaker in the Select Channels list.
Select the audio you want to play when the soft trigger is activated from the list under Audio
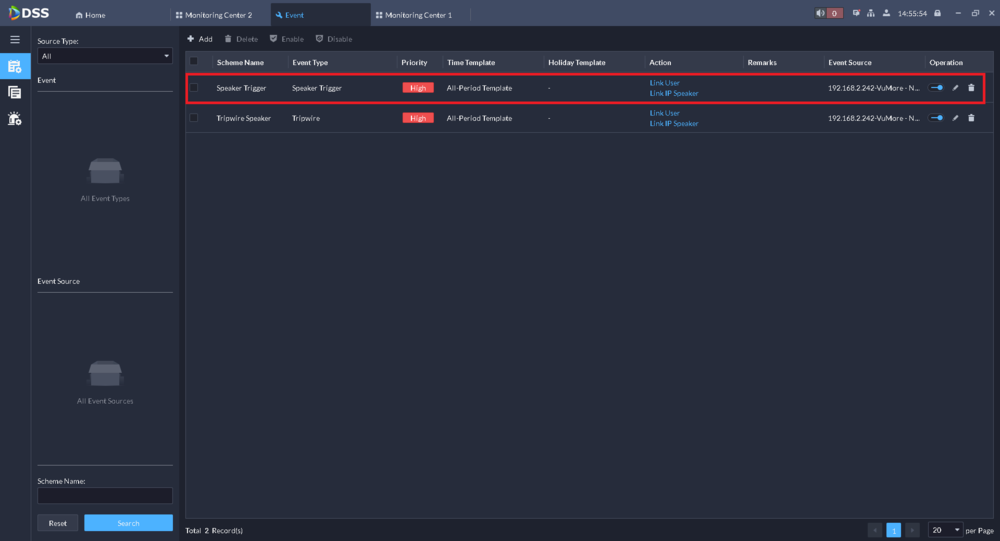
17. You will see the active rule in the list.
18. Click on the Home tab at the top.
Select the Apps icon on the left.
Click on Monitoring Center
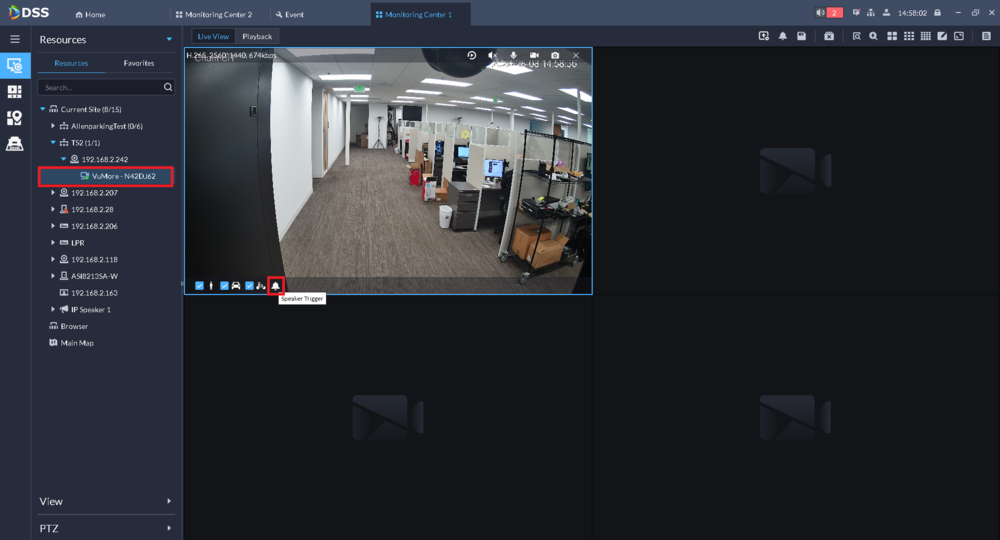
19. Double-click on the camera that you chose for the soft trigger in the previous steps to view its live view.
Hover over the live view of that camera and click on the soft trigger icon at the bottom left.
The audio you chose in Step 16 will play through the IP Speaker
