PTZ/Instructions/RS485
Contents
- 1 RS485
- 1.1 Description
- 1.2 Prerequisites
- 1.3 Instructions
- 1.4 Common RS485 Settings
- 1.5 Hardware Setup
- 1.6 Determine PTZ's Address, Baud, & Protocol
- 1.7 Configure Dahua Recorder
- 1.8 Prerequisites
- 1.9 Video Instructions
- 1.10 Step by Step Instructions
- 1.11 Prerequisites
- 1.12 Video Instructions
- 1.13 Step by Step Instructions
- 1.14 Prerequisites
- 1.15 Video Instructions
- 1.16 Step by Step Instructions
- 1.17 Prerequisites
- 1.18 Video Instructions
- 1.19 Step by Step Instructions
- 1.20 Prerequisites
- 1.21 Video Instructions
- 1.22 Step by Step Instructions
RS485
Description
RS485 is a communication port. It can control the camera via back-end device when the information of RS485 is set in accordance with that of the back-end coding device.
Prerequisites
- Dahua recorder with RS485 Port
Instructions
Common RS485 Settings
| Device | Channel | PTZ Type: | Protocol | Address | Baud Rate | Data Bit | Stop Bit | Parity |
|---|---|---|---|---|---|---|---|---|
| Dahua SD59230IN-HC | 1 | Local | Pelco-D | 1 | 9600 | 8 | 1 | None |
| Hikvision Analog PTZ | 1 | Local | Pelco-D | 1 | 2400 | 8 | 1 | None |
Hardware Setup
1. Connect the RS485 cable of the PTZ camera to the RS485 port on the Device. Ensure the match of A and B interfaces.
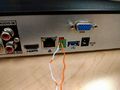
RS485 Port on Recorder, Wires connected to A and B

RS485 RS485 connection from PTZ, labeled for A and B
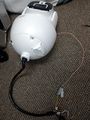
Wires connected from PTZ to recorder


2. Connect the video out cable of the PTZ camera to the video input port on the Device.
3. Turn on the PTZ camera.
Determine PTZ's Address, Baud, & Protocol
Method 1: Reboot and View OSD
1. Connect Analog or HD-CVI PTZ to Channel 1.
2. Bring up Channel 1 Live View
3. Power cycle PTZ.
4. Wait for PTZ to boot, and watch Channel 1 for PTZ Info.
Method 2: Check Manufacturer's Manual or Specifications
Configure Dahua Recorder
 SystemUI Old
Prerequisites
- Dahua recorder with RS485 port
Video Instructions
Step by Step Instructions
1. From Live View right click
Select Main Menu

2. Under Setting
Click Camera

3. Click System

4. Click PTZ

5. Use the dropdown box to select the Channel

6. Use the dropdown box to change PTZ Type to Local

7. Enter the desired settings for the RS485 communication
- Protocol
- Address
- Baud Rate
- Data Bit
- Stop Bit
- Parity

8. Click Apply then Save to save the settings

 SystemUI New
Prerequisites
- Dahua recorder with RS485 port
Video Instructions
Step by Step Instructions
1. From Live View right click
Select Main Menu

2. Click Camera

3. Click PTZ

4. Use the dropdown box to select the Channel

5. Use the dropdown box next to Control Mode to select Serial

6. Enter the desired settings for the RS485 communication
- Protocol
- Address
- Baud Rate
- Data Bit
- Stop Bit
- Parity

7. Click Apply to save the settings

 WebUI Old
Prerequisites
- Dahua recorder with RS485 port
- Network connection for recorder
Video Instructions
Step by Step Instructions
1. Enter the IP of the device into a browser
At the Web Login
Enter the Username and Password
Click Login

2. Click Setup

3. Click System > PTZ

4. Use the dropdown box to select the Channel

5. Use the dropdown box next to PTZ Type to select Local

6. Enter the desired settings for the RS485 communication
- Protocol
- Address
- Baud Rate
- Data Bit
- Stop Bit
- Parity

7. Click OK to save settings

 WebUI New
Prerequisites
- Dahua recorder with RS485 port
- Network connection for recorder
Video Instructions
Step by Step Instructions
1. Enter the IP of the device into a browser
At the Web Login
Enter the Username and Password
Click Login

2. Click Management in the top left corner of the screen
Select Camera

3. Click PTZ

4. Use the dropdown box to select the Channel

5. Use the dropdown box next to PTZ Type to select Local

6. Enter the desired settings for the RS485 communication
- Protocol
- Address
- Baud Rate
- Data Bit
- Stop Bit
- Parity

7. Click OK to save settings

 SmartPSS
Prerequisites
- SmartPSS
- Dahua recorder with RS485 port, added to SmartPSS
Video Instructions
Step by Step Instructions
1. From the Menu of SmartPSS
Click Device CFG

2. Click to select the recorder from the Device Tree on the left side of the screen

3. Click to expand the System section

4. Click PTZ

5. Use the dropdown to select the Channel

6. Use the dropdown box next to PTZ Type to select Local

7. Enter the desired settings for the RS485 communication
- Protocol
- Address
- Baud Rate
- Data Bit
- Stop Bit
- Parity

8. Click Save to save settings
