NVRiSettingSystem
Contents
NVR Interface-Setting-System

General
General
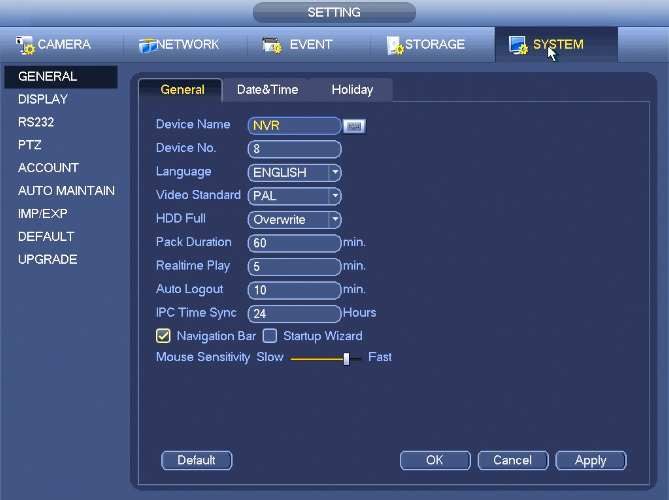
- Pack duration: Here is for you to specify record duration. The value ranges from 0 to 120 minutes. Default value is 60 minutes.
- Device ID: Please input a corresponding device name here.
- Device No: When you are using one remote control (not included in the accessory bag) to control several NVRs, you can give a name to each NVR for your management.
- Language: System supports various languages: Chinese (simplified), Chinese (Traditional), English, Italian, Japanese, French, Spanish (All languages listed here are optional. Slight difference maybe found in various series.)
- Video standard: There are two formats: NTSC and PAL.
- HDD full: Here is for you to select working mode when hard disk is full. There are two options: stop recording or rewrite. If current working HDD is overwritten or the current HDD is full while the next HDD is no empty, then system stops recording, If the current HDD is full and then next HDD is not empty, then system overwrites the previous files.
- Pack duration: Here is for you to specify record duration. The value ranges from 1 to 120 minutes. Default value is 60 minutes.
- Realtime play: It is to set playback time you can view in the preview interface. The value ranges from 5 to 60 minutes.
- Auto logout: Here is for you to set auto logout interval once login user remains inactive for a specified time. Value ranges from 0 to 60 minutes.
- Navigation bar: Check the box here, system displays the navigation bar on the interface.
- IPC Time Sync: You can input an interval here to synchronize the NVR time and IPC time.
- Startup wizard: Once you check the box here, system will go to the startup wizard directly when the system restarts the next time. Otherwise, it will go to the login interface.
- Mouse property: You can set double click speed via dragging the slide bard. You can Click Default button to restore default setup.
Date&Time
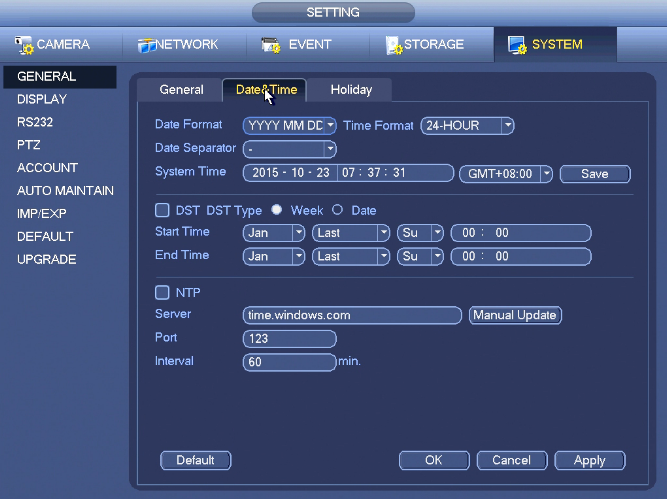
From Main menu->Setting->System->General, you can go to the general interface.
- System time: Here is for you to set system time
- Date format: There are three types: YYYYY-MM-DD: MM-DD-YYYYY or DD-MM-YYYY.
- Date separator: There are three denotations to separate date: dot, beeline and solidus.
- DST: Here you can set DST time and date by week or by date. Please enable DST function and then select setup mode. Please input start time and end time and click Save button.
- Time format: There are two types: 24-hour mode or 12-hour mode.
- NTP: It is to set NTP server, port and interval.
Note:
Since system time is very important, do not modify time casually unless there is a must!
Before your time modification, please stop record operation first!
After completing all the setups please click save button, system goes back to the previous menu.
Holiday
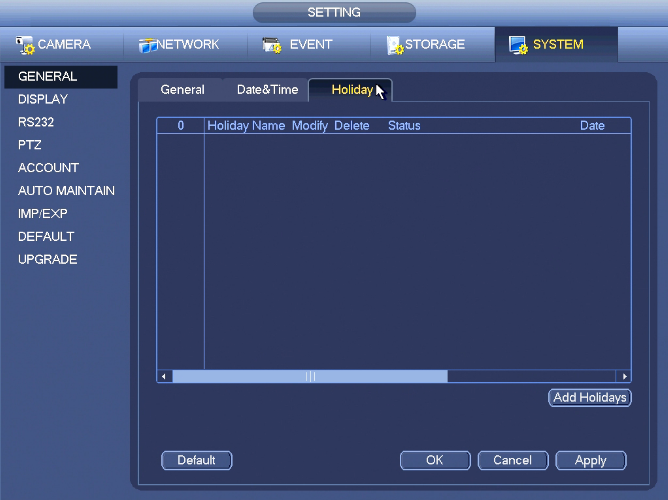
This section is to set holiday record or snapshot plan. Please note the holiday record/snapshot setup has the higher priority than the ordinary date record/snapshot setup.
Display
Display
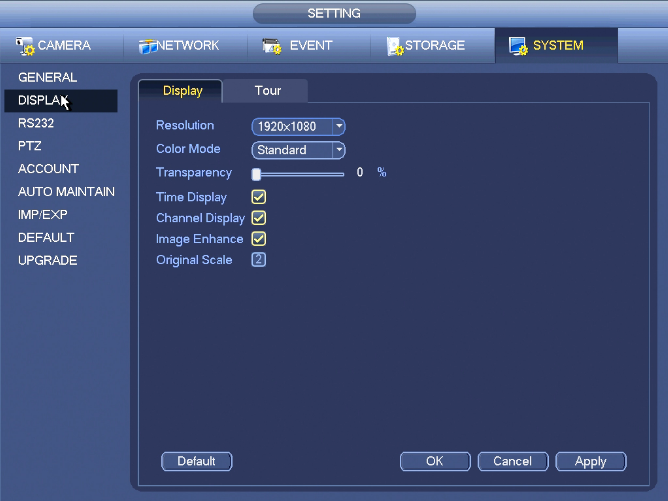
From Main Menu->Setting->System->Display, you can go to the following interface.
Here you can set menu and video preview effect. All you operation here does not affect the record file and playback effect.
Now you can set corresponding information.
- Resolution: There are five options: 1280×1024 (Default), 1280×720, 1920×1080, 1024×768 and 3840×2160. Please note the system needs to reboot to activate current setup. Please note 3840×2160 is for some series only.
- VGA+HDMI2: It is for dual-screen operation. Please select from the dropdown list according to your actual situation. Click Apply button, system needs to restart to activate new setup. For example, 32+4 means for VGA, system max supports 32-window split and for HDMI2, system max supports 4-window split.
- Transparency: Here is for you to adjust transparency. The value ranges from 128 to 255.
- Channel name: Here is for you to modify channel name. System max support 25-digit (The value may vary due to different series). Please note all your modification here only applies to NVR local end. You need to open web or client end to refresh channel name.
- Time display: You can select to display time or not when system is playback.
- Channel display: You can select to channel name or not when system is playback.
- Image enhance: Check the box; you can optimize the margin of the preview video.
- Original scale: Check the box here to restore video original scale.
Click OK button to save current setup.
Tour
Set preview display mode, channel display sequence and tour setup.
- Set preview display mode: On the preview interface, right click mouse, you can view right-click menu. Now you can select preview window amount and channel.
- Set channel display mode: On the preview interface, if you want to change channel 1 and channel 16 position, please right click channel 1 video window and then drag to the channel 16 video window, release button, you can change channel 1 and channel 16 position.
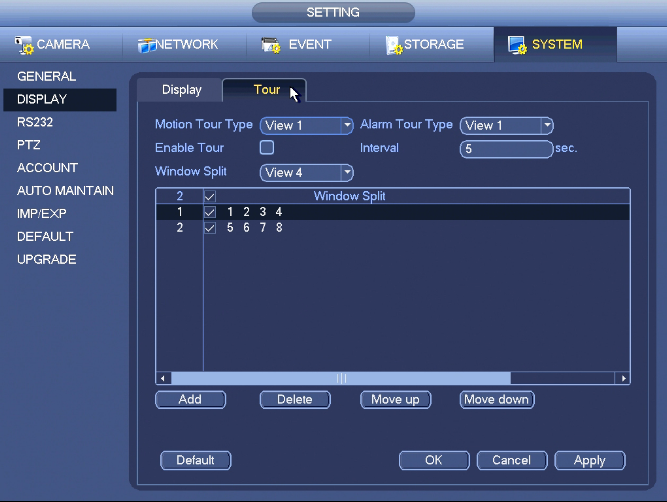
- Tour setup: Here you can set preview window channel display mode and interval. Please follow the steps listed below.
From Main menu->Setting->System->Display->Tour, you can see an interface shown as in Figure 4‑35.
Here you can set tour parameter.
- Enable tour: Check the box here to enable tour function.The general tour supports all types of window split mode.
- Interval: Input proper interval value here. The value ranges from 1-120 seconds.
- Motion tour type: System support 1/8-window tour. Please note you need to go to the main menu->Setting->Event->Video detect->Motion detect to enable tour function.
- Alarm tour type: System support 1/8-window tour. Please note you need to go to the main menu->Setting->Event->Alarm to enable tour function.
- Window split:It is to set window split mode.
RS232
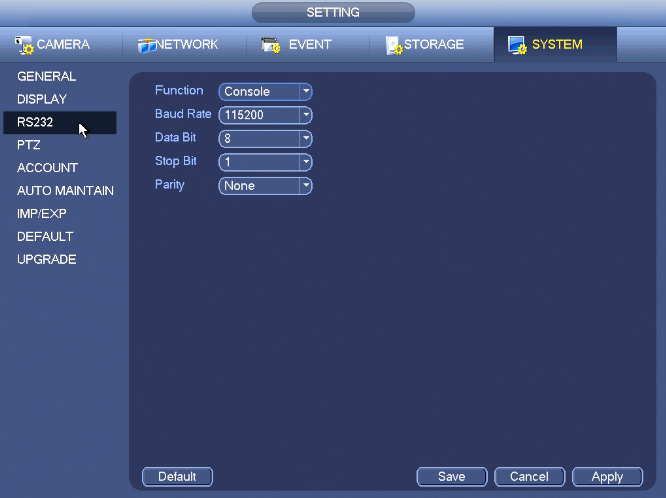
From Main Menu->Setting->System->RS232, RS232 interface is shown as below.
- Function: There are various devices for you to select. Console is for you to use the COM or mini-end software to upgrade or debug the program. The control keyboard is for you to control the device via the special keyboard. Transparent COM (adapter) is to connect to the PC to transfer data directly. Protocol COM is for card overlay function. Network keyboard is for you to use the special keyboard to control the device. PTZ matrix is to connect to the peripheral matrix control.
- Baud rate: You can select proper baud rate.
- Data bit: You can select proper data bit. The value ranges from 5 to 8.
- Stop bit: There are three values: 1/1.5/2.
- Parity: there are five choices: none/odd/even/space mark.
System default setup is:
- Function: Console
- Baud rate:115200
- Data bit:8
- Stop bit:1
- Parity: None
After completing all the setups please click save button, system goes back to the previous menu.
PTZ
If you are connecting to network PTZ, the PTZ type shall be remote.
Please follow the procedures below to go on cable connection
- Connect the dome RS485 port to NVR RS485 port.
- Connect dome video output cable to NVR video input port.
- Connect power adapter to the dome.
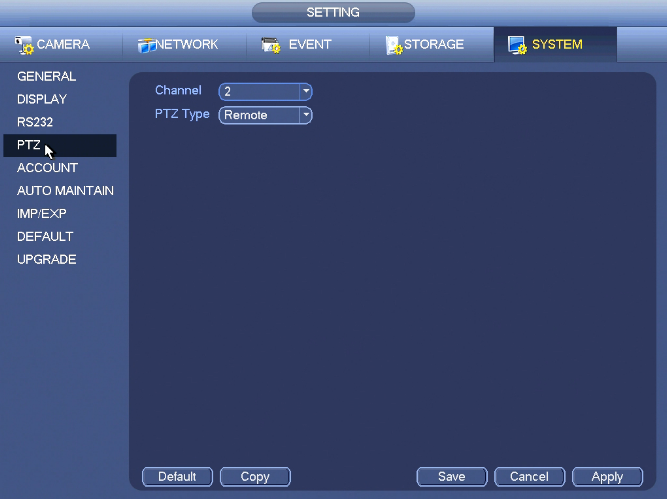
In the main menu, from Setting->System->PTZ
Here you can set the following items:
- Channel: Select the current camera channel.
- PTZ type: There are two types: local/remote. Please select local mode if you are connect RS485 cable to connect to the Speed dome (PTZ). Please select remote mode if you are connecting to the network PTZ camera.
- Protocol: Select corresponding PTZ protocol(such as PELCOD)
- Address: Default address is 1.
- Baud rate: Select corresponding baud rate. Default value is 9600.
- Data bit: Select corresponding data bits. Default value is 8.
- Stop bit: Select corresponding stop bits. Default value is 1.
- Parity: There are three options: odd/even/none. Default setup is none.
Account
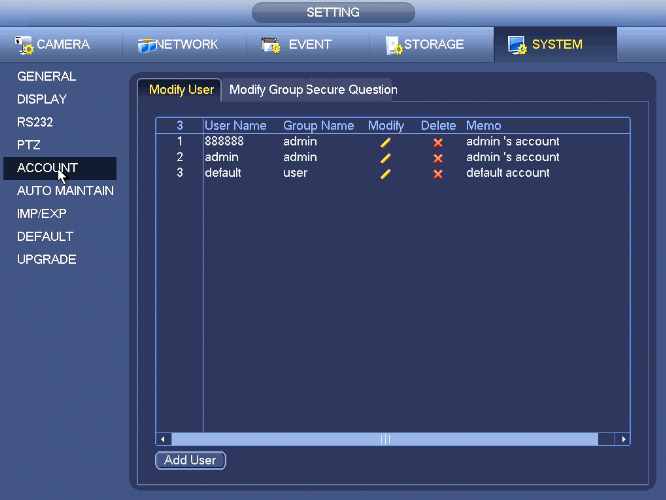
Modify User
Here is for you to implement account management. Here you can:
- Add new user
- Modify user
- Add group
- Modify group
- Modify password.
For account management please note:
- For the user account name and the user group, the string max length is 6-byte. The backspace in front of or at the back of the string is invalid. There can be backspace in the middle. The string includes the valid character, letter, number, underline, subtraction sign, and dot.
- The default user amount is 64 and the default group amount is 20. System account adopts two-level management: group and user. No limit to group or user amount.
- For group or user management, there are two levels: admin and user.
- The user name and group name can consist of eight bytes. One name can only be used once. There are four default users: admin/888888/666666 and hidden user “default”. Except user 6666, other users have administrator right.
- Hidden user “default” is for system interior use only and can not be deleted. When there is no login user, hidden user “default” automatically login. You can set some rights such as monitor for this user so that you can view some channel view without login.
- One user should belong to one group. User right can not exceed group right.
- About reusable function: this function allows multiple users use the same account to login.
After all the setups please click save button, system goes back to the previous menu.
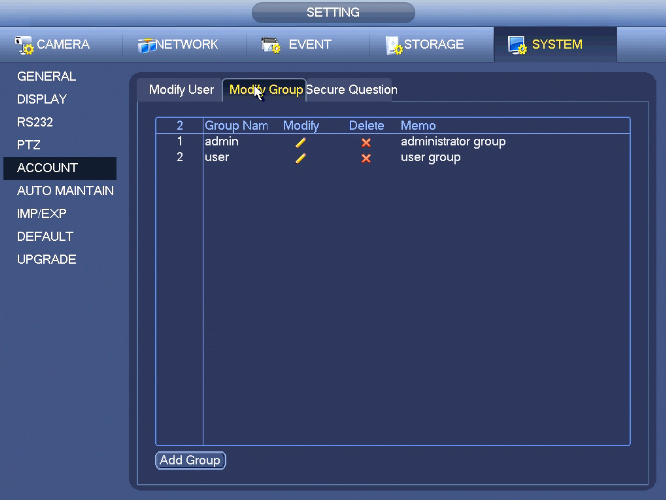
Modify Group
Click add group button, the interface is shown as below.
Here you can input group name and then input some memo information if necessary.
There are many rights such as control panel, shut down, real-time monitor, playback, record, record file backup, PTZ, user account, system information view, alarm input/output setup, system setup, log view, clear log, upgrade system, control device and etc.
Secure Question
MISSING!
Auto Maintain
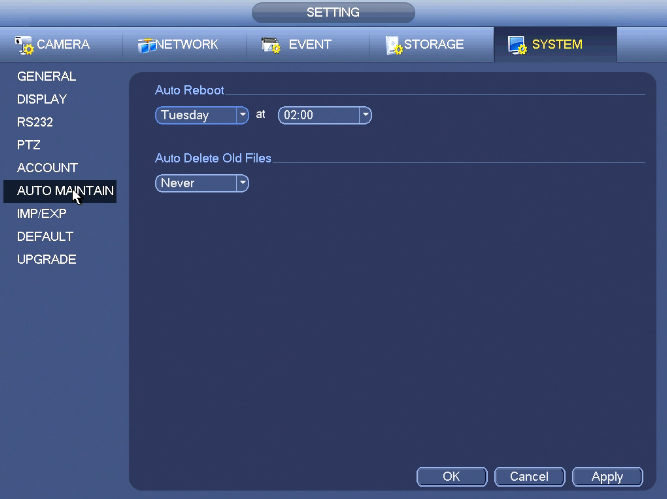
Here you can set auto-reboot time and auto-delete old files setup. You can set to delete the files for the specified days.
You can select proper setup from dropdown list. After all the setups please click save button, system goes back to the previous menu.
Imp/Exp
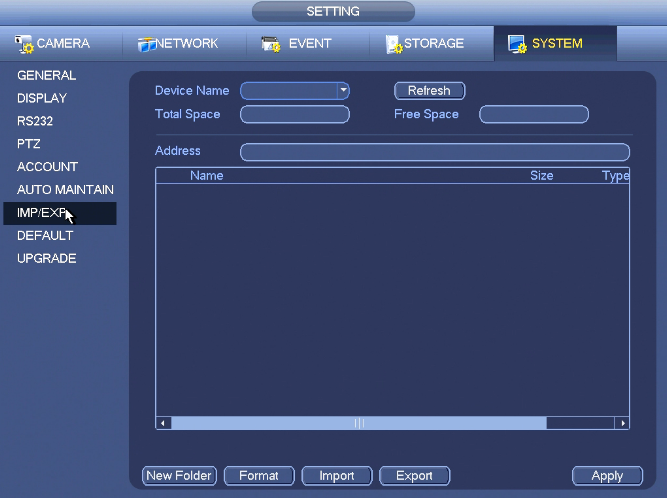
This function allows you to copy current system configuration to other devices. It also supports import, create new folder, and delete folder and etc function.
From Main menu->Setting->System->Import/Export, you can see the configuration file backup interface is shown as below:
- Export: Please connect the peripheral device first and then go to the following interface. Click Export button, you can see there is a corresponding “Config_Time” folder. Double click the folder, you can view some backup files.
- Import: Here you can import the configuration files from the peripheral device to current device. You need to select a folder first. You can see a dialogue box asking you to select a folder if you are selecting a file. System pops up a dialogue box if there is no configuration file under current folder. After successfully import, system needs to reboot to activate new setup.
- Format: Click Format button, system pops up a dialogue box for you to confirm current operation. System begins format process after you click the OK button.
Note:
- System can not open config backup interface again if there is backup operation in the process.
- System refreshes device when you go to the config backup every time and set current directory as the root directory of the peripheral device.
- If you go to the configuration backup interface first and then insert the peripheral device, please click Refresh button to see the newly added device.
Default
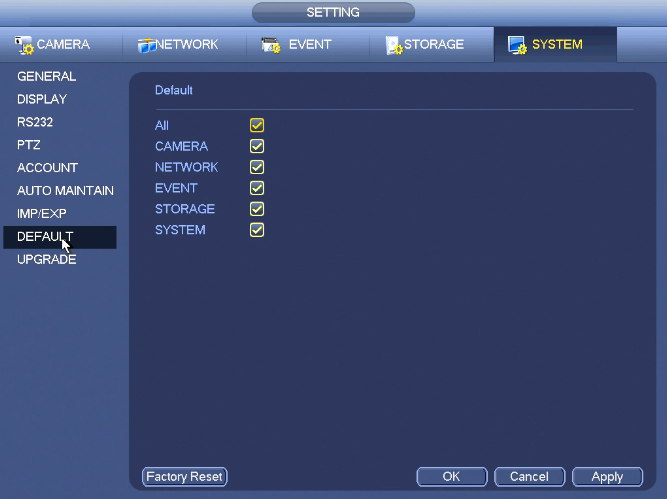
You can restore factory default setup to fix some problems when the device is running slowly. Configuration error occurred.
From Main menu->Setting->System->Default, you can go to the default interface.
Click default icon, system pops up a dialogue box. You can highlight ![]() to restore factory default setup.
to restore factory default setup.
- All
- Camera
- Network
- Event
- Storage
- System
Please highlight icon ![]() to select the corresponding function.
to select the corresponding function.
After all the setups please click OK button, system goes back to the previous menu.
Warning!
After you use default function, some your customized setup may lose forever! Please think twice before you begin the operation!
Upgrade
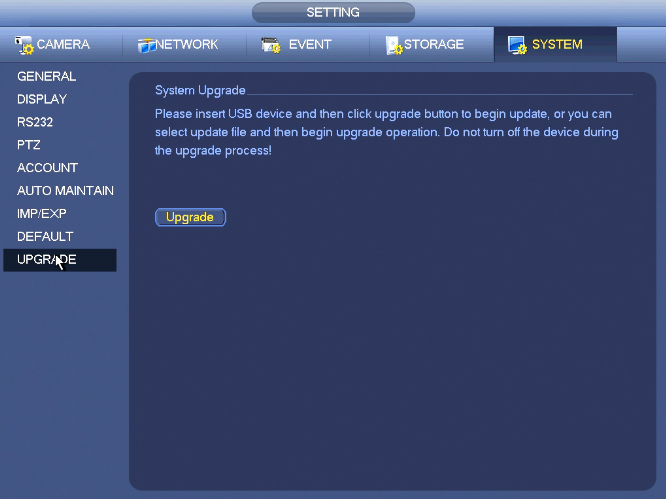
From Main Menu->Setting->Info->Update, you can go to the following interface.
- Insert USB device that contain the upgrade file.
- Click Start button and then select the .bin file.
- You can see the corresponding dialogue box after the update process is complete.
