Difference between revisions of "IVS2.0:WebUI/People Counting"
(Created page with "==People Counting Setup== ===Description=== Tripwire is used to trigger an alarm when a subject crossed the line in the defined direction, for example from A->B visa versa, or...") |
|||
| (11 intermediate revisions by the same user not shown) | |||
| Line 1: | Line 1: | ||
==People Counting Setup== | ==People Counting Setup== | ||
===Description=== | ===Description=== | ||
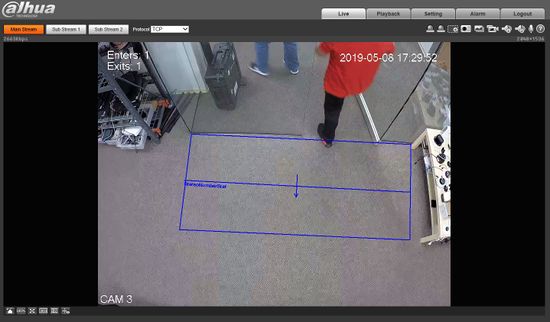
| − | + | [[IVS:People Counting|People Counting]] is used to detect and count People that enter or exit a specific area of an image. | |
| − | [[ | + | [[File:People_Counting_IE.jpg|550px]] |
===Prerequisites=== | ===Prerequisites=== | ||
| Line 16: | Line 16: | ||
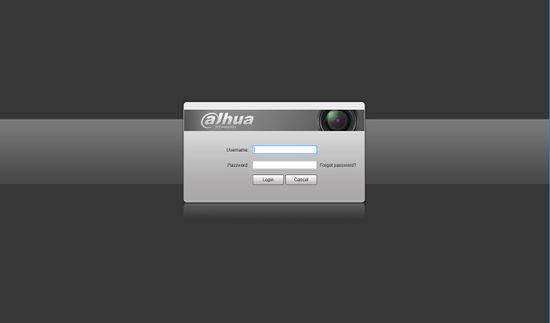
1.Log into device using the Web Service. | 1.Log into device using the Web Service. | ||
| − | [[File: | + | [[File:People_Counting_IE_1.jpg|550px]] |
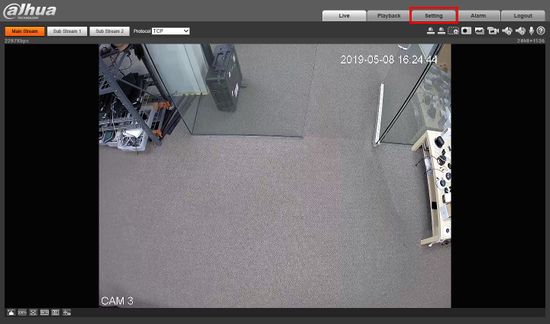
| − | 2.Select Setting | + | 2.Select Setting |
| − | [[File: | + | [[File:People_Counting_IE_2.jpg|550px]] |
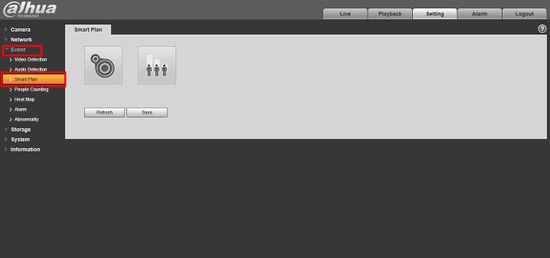
| − | 3. | + | 3. Click Event > Smart Plan |
| − | [[File: | + | [[File:People_Counting_IE_2.1.jpg|550px]] |
| + | 4. Click the People Counting icon, it will highlight in color when select | ||
| − | + | [[File:People_Counting_IE_2.2.jpg|550px]] | |
| − | + | 5. Click Save | |
| + | [[File:People_Counting_IE_2.3.jpg|550px]] | ||
| − | |||
| − | + | 6. Click Event > People Counting | |
| − | |||
| − | |||
| − | |||
| − | + | [[File:People_Counting_IE_3.jpg|550px]] | |
| − | |||
| − | + | 7. The People Counting menu will appear. Start by switching the dropdown box to People Counting, checking the box to Enable, then click Save | |
| + | [[File:People_Counting_IE_4.jpg|550px]] | ||
| + | |||
| + | 8. The default People Counting Area and Rule will appear. Click Draw Area to edit the focus area for People Counting | ||
| + | |||
| + | |||
| + | [[File:People_Counting_IE_5.jpg|550px]] | ||
| + | |||
| + | |||
| + | 9. The Area box will highlight yellow when it is editable. Start by clicking one of the corners of the default box and drag it the desired position. | ||
| + | |||
| + | [[File:People_Counting_IE_6.jpg|550px]] | ||
| + | |||
| + | [[File:People_Counting_IE_7.jpg|550px]] | ||
| + | |||
| + | |||
| + | |||
| + | |||
| + | 10. Continue with the remaining corners of the box until the desired focus area is created. Click Save | ||
| + | |||
| + | [[File:People_Counting_IE_8.jpg|550px]] | ||
| + | |||
| + | |||
| + | 11. You can draw a custom area by Clicking 'Clear' then clicking inside the video frame to draw the object. | ||
| + | |||
| + | [[File:People_Counting_IE_8-1.jpg|550px]] | ||
| + | |||
| + | [[File:People_Counting_IE_8-2.jpg|550px]] | ||
| + | |||
| + | [[File:People_Counting_IE_8-3.jpg|550px]] | ||
| + | |||
| + | [[File:People_Counting_IE_8-4.jpg|550px]] | ||
| + | |||
| + | Click Save to save the custom area | ||
| + | |||
| + | 12. The arrow shows the area and the direction the People Counting rule will follow. To create a custom rule start by clicking Draw Rule | ||
| + | |||
| + | [[File:People_Counting_IE_9.jpg|550px]] | ||
| + | |||
| + | |||
| + | 13. Similar to the Area, you can click to drag the default line or click Clear to draw a custom Rule line. This line will be the trigger for counting people that cross it. | ||
| + | |||
| + | [[File:People_Counting_IE_10.jpg|550px]] | ||
| + | |||
| + | 14. Click inside the video frame to draw the Rule line. The arrow defines the direction of people entering the scene | ||
| + | |||
| + | [[File:People_Counting_IE_11.jpg|550px]] | ||
| + | |||
| + | To create a downward facing arrow, create the Rule by starting on the left hand side then drag the mouse to the right | ||
| + | |||
| + | [[File:People_Counting_IE_12.jpg|550px]] | ||
| + | |||
| + | |||
| + | |||
| + | To create an upward facing arrow, create the Rule line by starting on the right hand side then drag the mouse to the left | ||
| + | |||
| + | [[File:People_Counting_IE_13.jpg|550px]] | ||
| + | |||
| + | Click Save once the Rule line has been created. | ||
| + | |||
| + | |||
| + | 15. Once the Area / Rule have been defined for the People Counting, the parameters of the rule can be configured: | ||
| + | |||
| + | [[File:People_Counting_IE_14.jpg|550px]] | ||
| + | |||
| + | |||
| + | |||
| + | *Sensitivity | ||
| + | *Max Height | ||
| + | *Min Height | ||
| + | *Period | ||
| + | *OSD - On Screen Display - click to enable an On Screen Display of the active People Counting rule - Enter Number and Leave Number can be enabled. | ||
| + | *Flowrate Alarm | ||
| + | *Record | ||
| + | *Relay-out | ||
| + | *Send email | ||
| + | *Snapshot | ||
| + | |||
| + | |||
| + | 16. Click Calibration Config to adjust installation height and and angle settings for the camera. | ||
| + | |||
| + | [[File:People_Counting_IE_15.jpg|550px]] | ||
| − | |||
| − | |||
Latest revision as of 19:32, 9 May 2019
People Counting Setup
Description
People Counting is used to detect and count People that enter or exit a specific area of an image.
Prerequisites
- Intelligent Network Camera or an HDCVI Camera that is connected to a HDCVI DVR that has intelligent features.
- Updated firmware that supports intelligent features.
- Internet Explorer.
Step By Step Instructions
1.Log into device using the Web Service.
2.Select Setting
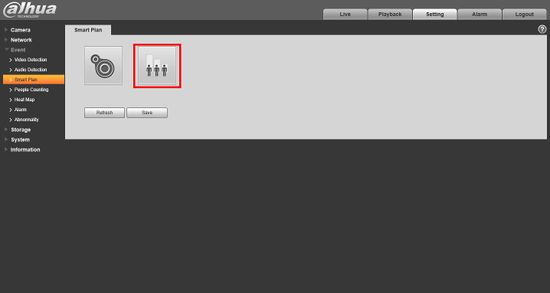
3. Click Event > Smart Plan
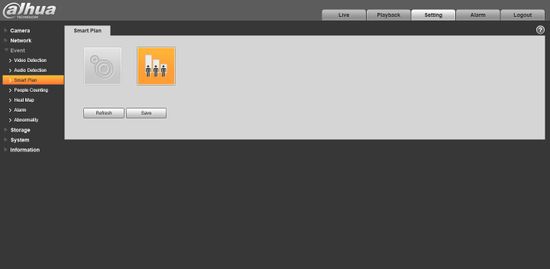
4. Click the People Counting icon, it will highlight in color when select
5. Click Save
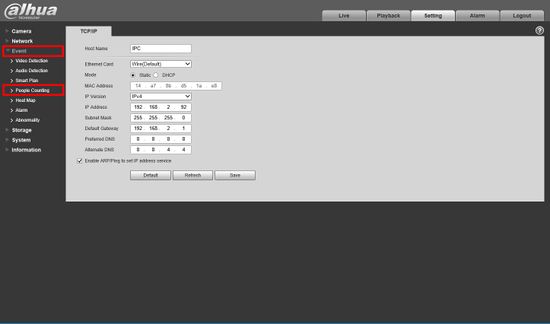
6. Click Event > People Counting
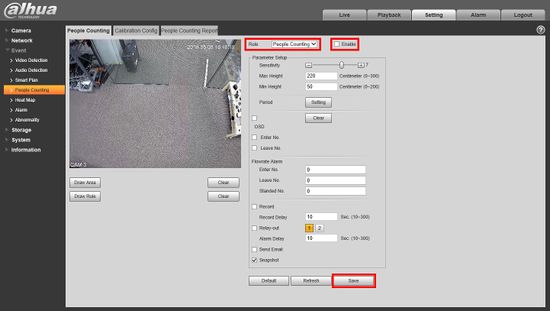
7. The People Counting menu will appear. Start by switching the dropdown box to People Counting, checking the box to Enable, then click Save
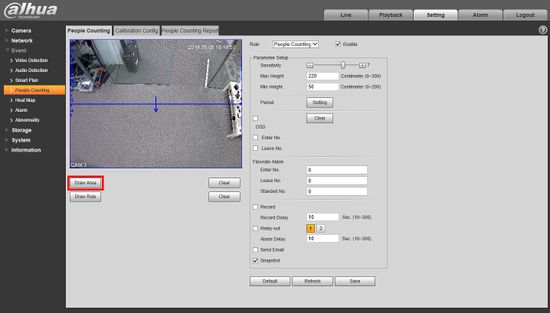
8. The default People Counting Area and Rule will appear. Click Draw Area to edit the focus area for People Counting
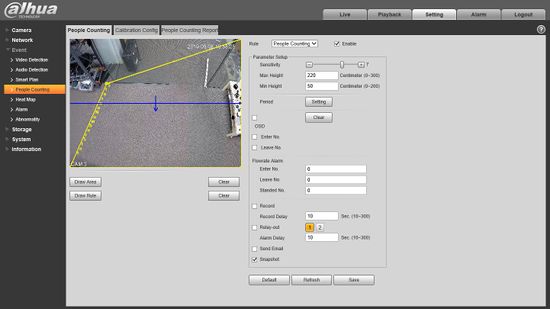
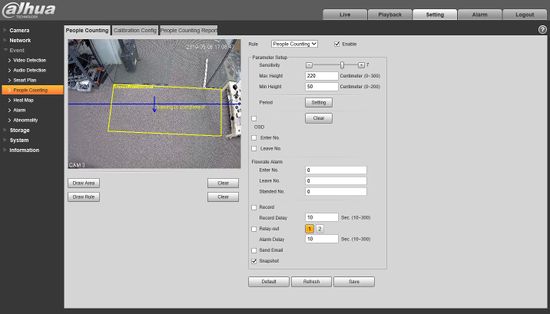
9. The Area box will highlight yellow when it is editable. Start by clicking one of the corners of the default box and drag it the desired position.
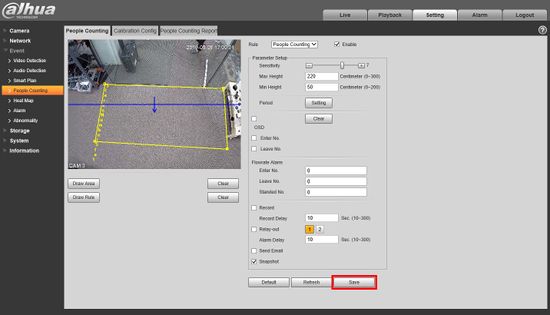
10. Continue with the remaining corners of the box until the desired focus area is created. Click Save
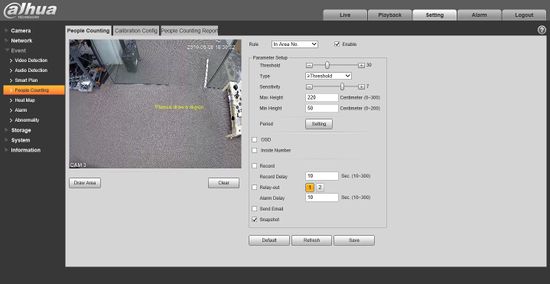
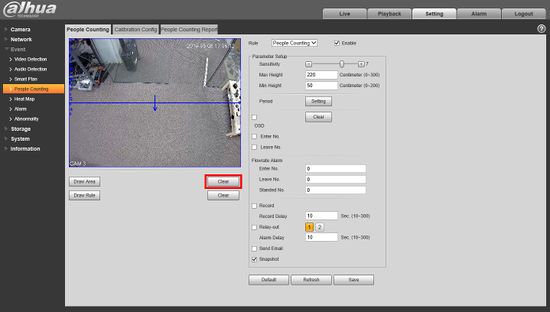
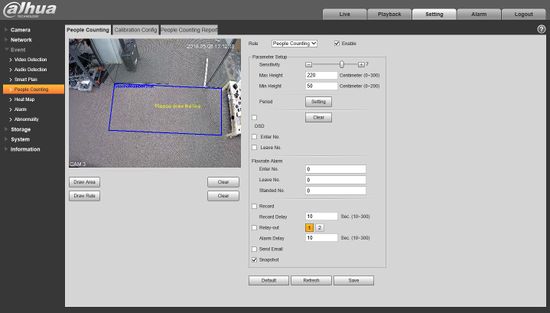
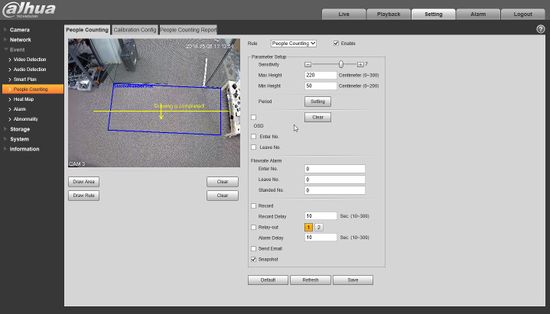
11. You can draw a custom area by Clicking 'Clear' then clicking inside the video frame to draw the object.
Click Save to save the custom area
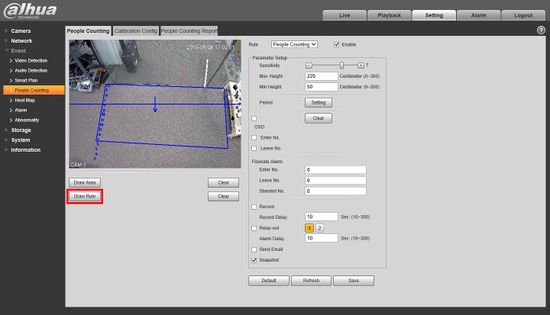
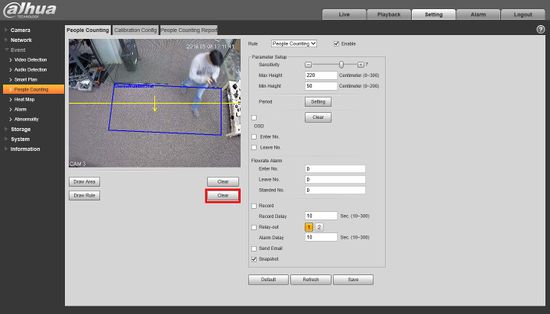
12. The arrow shows the area and the direction the People Counting rule will follow. To create a custom rule start by clicking Draw Rule
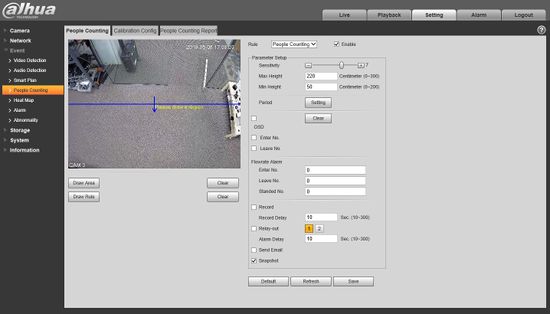
13. Similar to the Area, you can click to drag the default line or click Clear to draw a custom Rule line. This line will be the trigger for counting people that cross it.
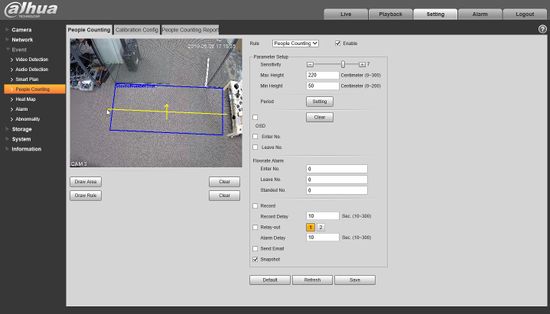
14. Click inside the video frame to draw the Rule line. The arrow defines the direction of people entering the scene
To create a downward facing arrow, create the Rule by starting on the left hand side then drag the mouse to the right
To create an upward facing arrow, create the Rule line by starting on the right hand side then drag the mouse to the left
Click Save once the Rule line has been created.
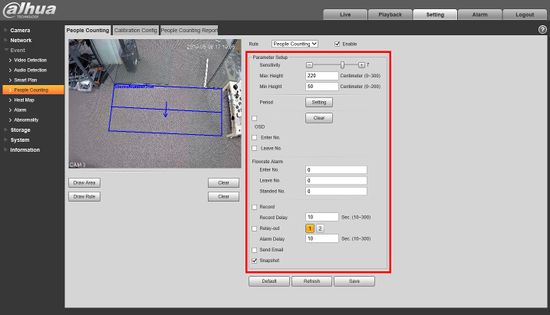
15. Once the Area / Rule have been defined for the People Counting, the parameters of the rule can be configured:
- Sensitivity
- Max Height
- Min Height
- Period
- OSD - On Screen Display - click to enable an On Screen Display of the active People Counting rule - Enter Number and Leave Number can be enabled.
- Flowrate Alarm
- Record
- Relay-out
- Send email
- Snapshot
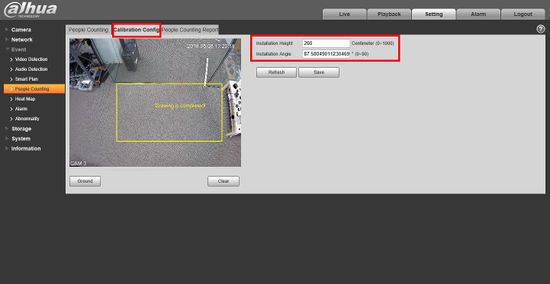
16. Click Calibration Config to adjust installation height and and angle settings for the camera.
