Difference between revisions of "New GUI/Instructions/IVS Record"
| (2 intermediate revisions by the same user not shown) | |||
| Line 1: | Line 1: | ||
| − | |||
| − | ==Description== | + | ===Description=== |
| − | + | This article will cover how to configure IVS Recording on a Dahua recorder with the New GUI | |
| − | + | ===Prerequisites=== | |
| − | + | *Dahua Recorder with IVS and Dahua Camera with IVS | |
| − | |||
| − | |||
| − | *IVS | ||
| − | + | ==Video Instructions== | |
| + | <embedvideo service="youtube">https://www.youtube.com/watch?v=TXbtDgjuTQQ</embedvideo> | ||
| − | == | + | ===Step By Step Instructions=== |
| − | + | 1. From the Main Menu select '''AI''' | |
| − | |||
| − | + | [[File:IVSRecordSetup1.png|1000px]] | |
| − | ''' | + | 2. Select '''Parameters''' on the left. |
| + | <br>Then select '''Smart Plan''' below it. | ||
| + | <br>Choose the channel of the camera you are configuring from the '''Channel''' drop-down. | ||
| + | <br>Select the IVS "Lightbulb" icon so that it highlights blue. | ||
| + | <br>Then click '''Apply''' at the bottom | ||
| − | + | [[File:IVSRecordSetup2.png|1000px]] | |
| − | |||
| − | + | 3. Select '''IVS''' on the left. | |
| + | <br>Choose the channel of the camera from the '''Channel''' drop-down. | ||
| + | <br>Then click the '''+''' button. | ||
| + | <br>Double-click on the rule type under the '''Type''' column to choose the type of IVS rule you want to use. | ||
| + | <br>Adjust all the settings in the '''Parameters''' section. | ||
| + | <br>Make sure that the box is checked next to '''Record Channel''' and the channel that camera is on is highlighted next to it | ||
| − | + | [[File:IVSRecordSetup3.png|1000px]] | |
| − | + | 4. Draw the rule in the live view on the left by left clicking on it. | |
| + | <br>Continue to left click to add more segments. | ||
| + | <br>When you are done, right click to finish drawing the rule. | ||
| + | <br>Then click '''Apply''' at the bottom | ||
| − | + | [[File:IVSRecordSetup4.png|1000px]] | |
| − | + | 5. Select '''Setting''' at the top left. | |
| + | <br>Then select '''Storage''' from the drop-down | ||
| − | + | [[File:IVSRecordSetup5.png|1000px]] | |
| − | |||
| − | - | + | 6. Select '''Schedule''' on the left. |
| + | <br>Then select the '''Record''' tab at the top. | ||
| + | <br>Choose the channel of the camera from the '''Channel''' drop-down. | ||
| + | <br>Then click on '''Setting''' to the right of any day of the week | ||
| − | [[File: | + | [[File:IVSRecordSetup6.png|1000px]] |
| − | + | 7. Check the box next to '''All''' to select all days of the week. | |
| + | <br>Check the box for '''Intelligent''' to the right of '''Period 1'''. | ||
| + | <br>(Feel free to adjust the days of the week and the time period for when you want to record IVS events). | ||
| + | <br>Then click on '''OK''' | ||
| − | [[File: | + | [[File:IVSRecordSetup7.png|1000px]] |
| − | + | 8. You will see blue bars on the schedule representing when IVS events will be recorded, when they are triggered. | |
| + | <br>Click '''Apply''' at the bottom | ||
| − | [[File: | + | [[File:IVSRecordSetup8.png|1000px]] |
| − | ''' | + | 9. Click on the Menu icon at the top right to go back to the Main Menu. |
| + | <br>Then click on '''Search''' | ||
| − | + | [[File:IVSRecordSetup9.png|1000px]] | |
| − | + | 10. Check the box next to the camera channel on the right. | |
| + | <br>Once IVS events have occured they will appear as blue bars on the timeline at the bottom. | ||
| + | <br>Click on the timeline on one of the blue bars to start playing that IVS event | ||
| − | [[File: | + | [[File:IVSRecordSetup10.png|1000px]] |
| − | |||
| − | |||
| − | |||
| − | |||
| − | |||
| − | |||
| − | |||
| − | |||
| − | |||
| − | |||
| − | |||
| − | |||
| − | |||
| − | |||
| − | |||
| − | |||
| − | |||
| − | |||
| − | |||
| − | |||
| − | |||
| − | |||
| − | |||
| − | |||
| − | |||
| − | |||
| − | |||
| − | |||
| − | |||
| − | |||
| − | |||
Latest revision as of 22:15, 1 August 2023
Description
This article will cover how to configure IVS Recording on a Dahua recorder with the New GUI
Prerequisites
- Dahua Recorder with IVS and Dahua Camera with IVS
Video Instructions
Step By Step Instructions
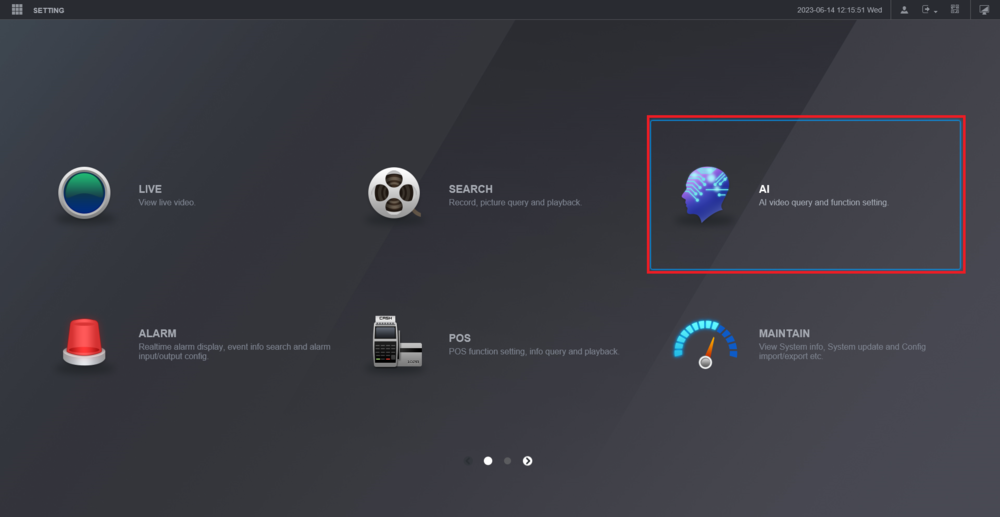
1. From the Main Menu select AI
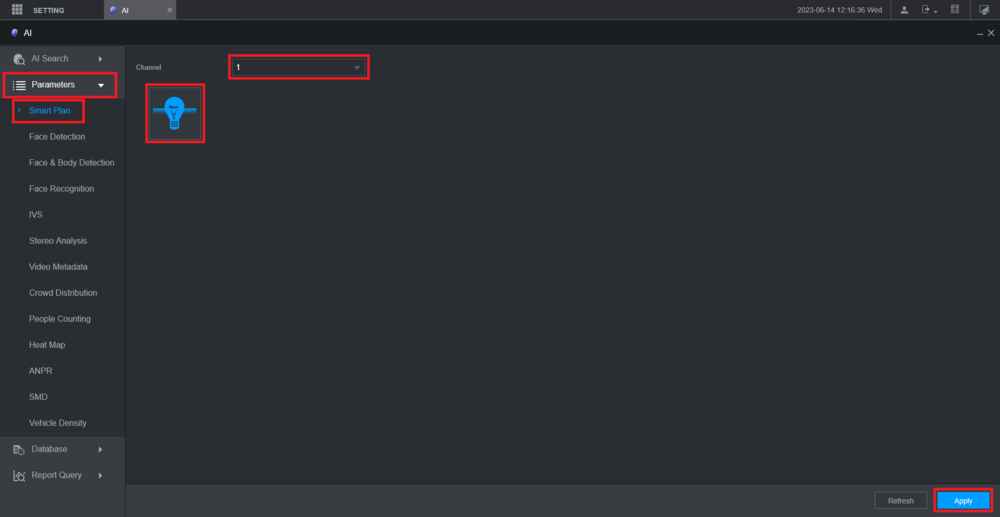
2. Select Parameters on the left.
Then select Smart Plan below it.
Choose the channel of the camera you are configuring from the Channel drop-down.
Select the IVS "Lightbulb" icon so that it highlights blue.
Then click Apply at the bottom
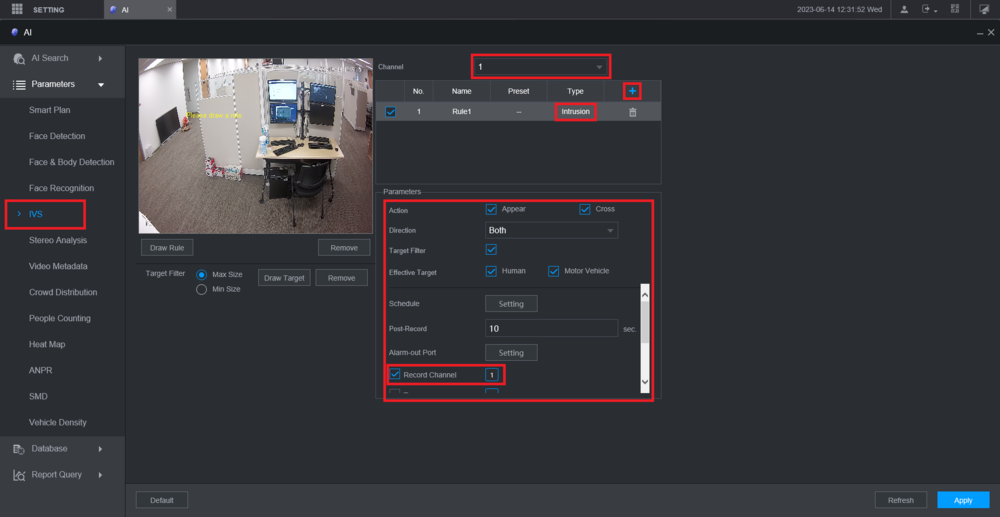
3. Select IVS on the left.
Choose the channel of the camera from the Channel drop-down.
Then click the + button.
Double-click on the rule type under the Type column to choose the type of IVS rule you want to use.
Adjust all the settings in the Parameters section.
Make sure that the box is checked next to Record Channel and the channel that camera is on is highlighted next to it
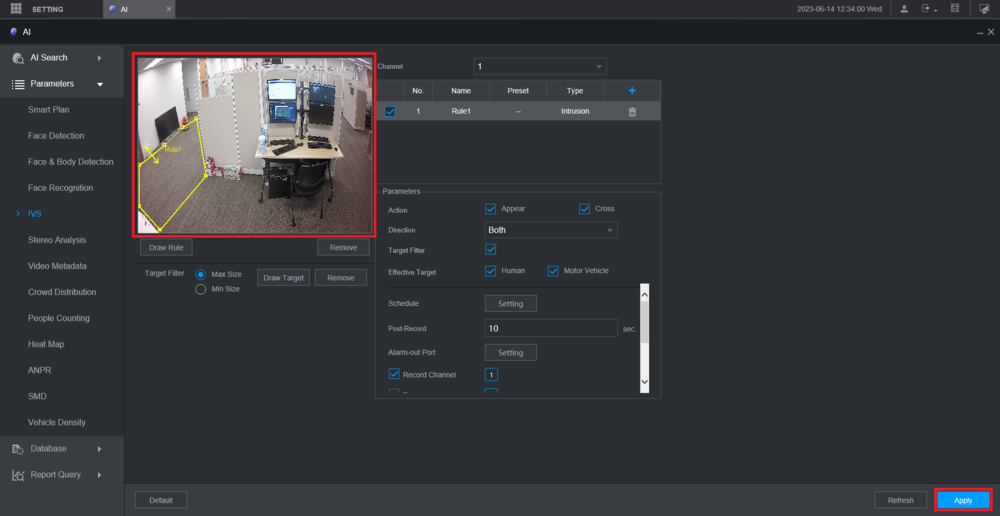
4. Draw the rule in the live view on the left by left clicking on it.
Continue to left click to add more segments.
When you are done, right click to finish drawing the rule.
Then click Apply at the bottom
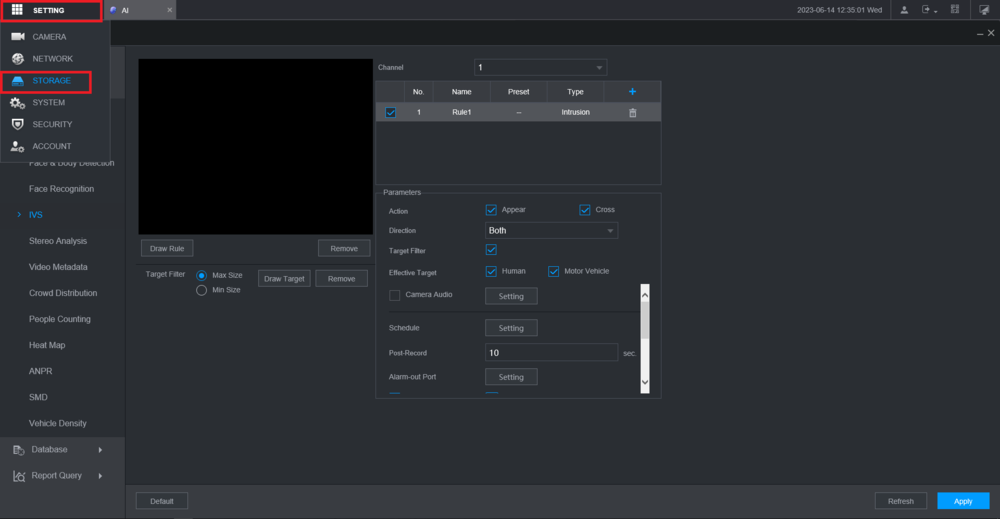
5. Select Setting at the top left.
Then select Storage from the drop-down
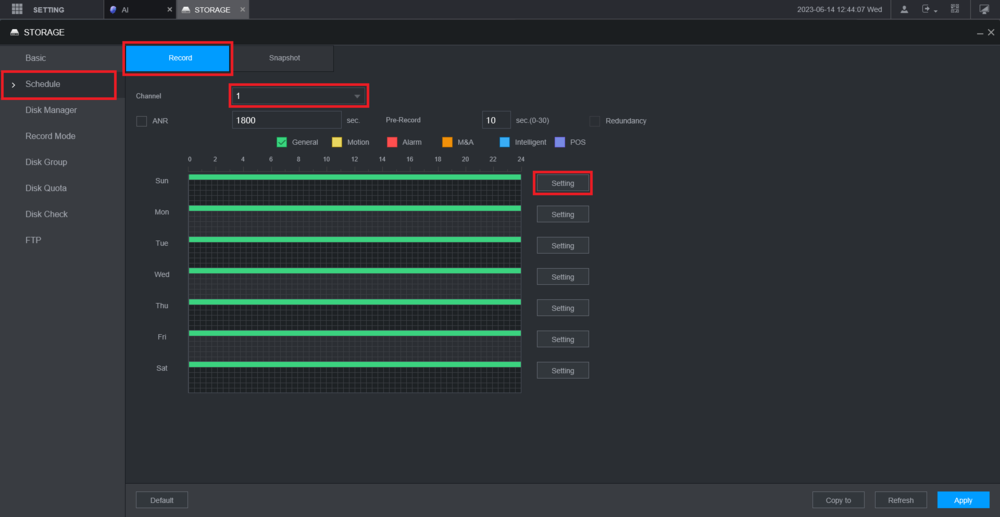
6. Select Schedule on the left.
Then select the Record tab at the top.
Choose the channel of the camera from the Channel drop-down.
Then click on Setting to the right of any day of the week
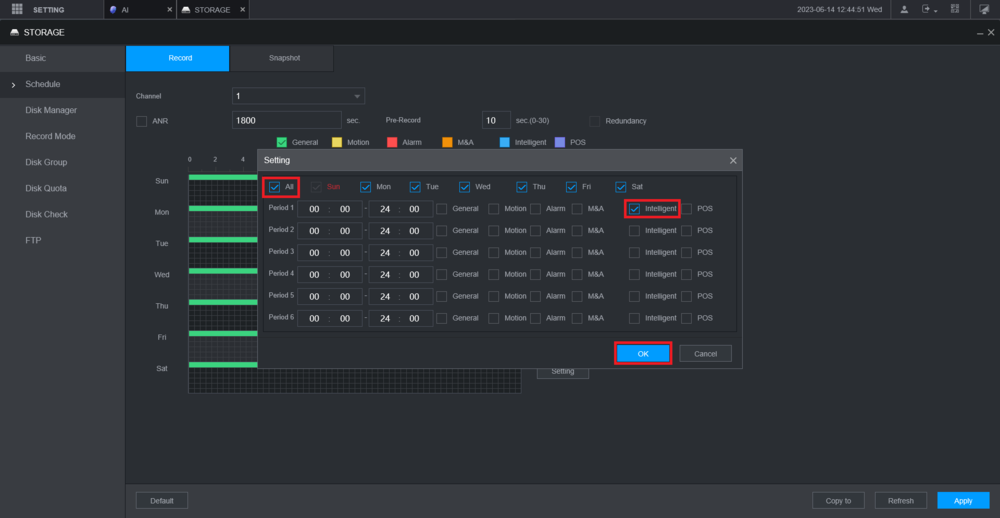
7. Check the box next to All to select all days of the week.
Check the box for Intelligent to the right of Period 1.
(Feel free to adjust the days of the week and the time period for when you want to record IVS events).
Then click on OK
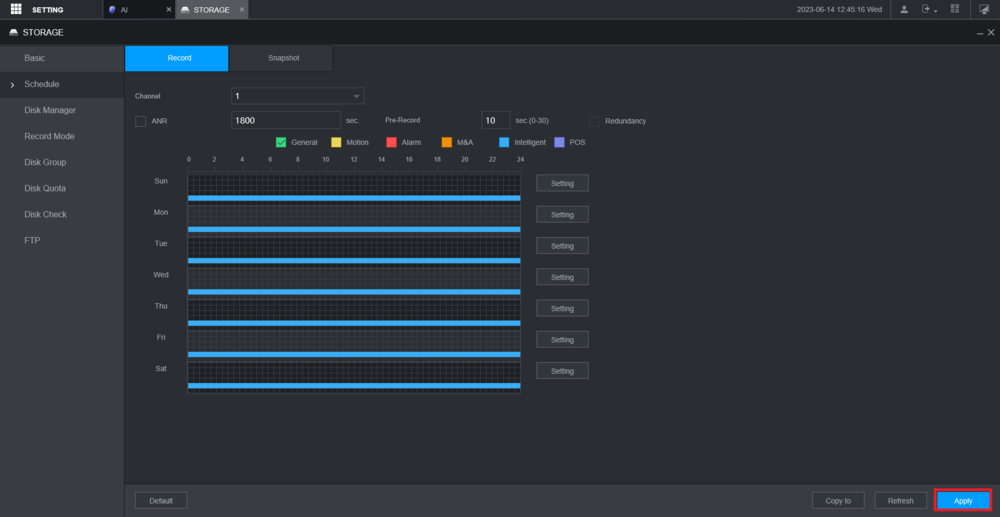
8. You will see blue bars on the schedule representing when IVS events will be recorded, when they are triggered.
Click Apply at the bottom
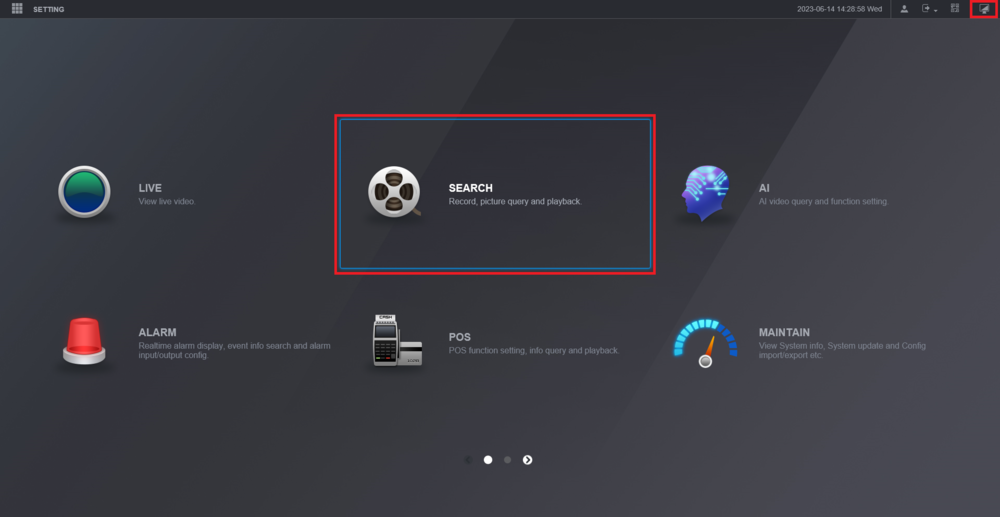
9. Click on the Menu icon at the top right to go back to the Main Menu.
Then click on Search
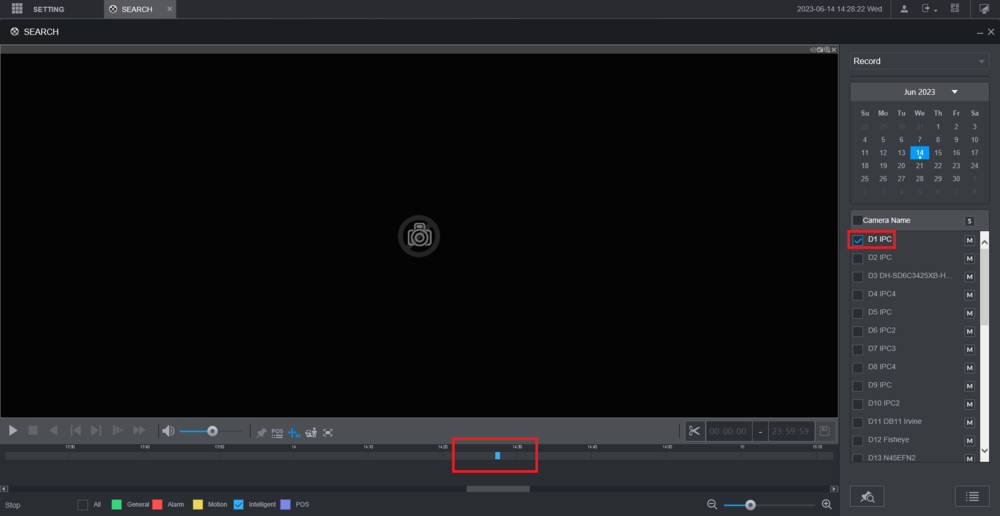
10. Check the box next to the camera channel on the right.
Once IVS events have occured they will appear as blue bars on the timeline at the bottom.
Click on the timeline on one of the blue bars to start playing that IVS event
