Difference between revisions of "Template:DMSS/Instructions/LincX2PRO Floodlight Setup"
(→Step by Step Instructions) |
|||
| Line 1: | Line 1: | ||
| + | 1. Launch the DMSS Mobile App. | ||
| + | <br>Tap on '''Device''' at the bottom to access your added device list. | ||
| + | <br>Select one of your added device that you wish to setup/modify Floodlight Settings for. Tap on '''...''' . | ||
| − | + | [[File:LincX2ProPIRFloodlight1.png|400px]] | |
| − | |||
| − | 2. Tap on [[File: | + | 2. Select '''Device Details''' |
| + | |||
| + | [[File:LincX2ProPIRFloodlight2.png|400px]] | ||
| + | |||
| + | 3. Scroll down and select '''Floodlight Settings''' | ||
| + | |||
| + | [[File:LincX2ProPIRFloodlight3.png|400px]] | ||
| + | |||
| + | 4. Tap on '''Select Mode''' | ||
| + | |||
| + | [[File:LincX2ProPIRFloodlight4.png|400px]] | ||
| + | |||
| + | 5. Select which mode you want the floodlight to follow: '''Motion Activation''', '''Manual''', '''Schedule''', or '''PIR''' | ||
| + | <br>Tap on '''OK''' | ||
| + | |||
| + | [[File:LincX2ProPIRFloodlight5.png|400px]] | ||
| + | |||
| + | ===PIR Mode=== | ||
| + | |||
| + | 1. Set the '''Select Mode''' to '''PIR''' | ||
| + | |||
| + | [[File:LincX2ProPIRFloodlight4.png|400px]] | ||
| + | |||
| + | 2. Select '''Brightness''' | ||
| + | |||
| + | [[File:LincX2ProPIRFloodlight6.png|400px]] | ||
| + | |||
| + | 3. Adjust the slider under '''Brightness Settings''' to the desired brightness level for the floodlight. | ||
| + | <br>When you are done, select '''Save''' at the top | ||
| + | |||
| + | [[File:LincX2ProPIRFloodlight7.png|400px]] | ||
| − | + | 4. Select '''Color Temperature''' | |
| − | [[File: | + | [[File:LincX2ProPIRFloodlight8.png|400px]] |
| − | 2. Select ''' | + | 5. Select '''Cool''' if you want a blue-ish color for the light or select '''Warm''' if you want a yellowish color for the light |
| + | |||
| + | [[File:LincX2ProPIRFloodlight9.png|400px]] | ||
| + | |||
| + | 6. Select '''PIR Region''' | ||
| + | |||
| + | [[File:LincX2ProPIRFloodlight10.png|400px]] | ||
| + | |||
| + | 7. Drag the slider on the right for the amount of distance you want the PIR to monitor. (100% = 10m [32.81 ft]) | ||
| + | <br>Tap the 3 zones either ON or OFF. | ||
| + | <br>Select '''Save''' at the top | ||
| + | |||
| + | [[File:LincX2ProPIRFloodlight11.png|400px]] | ||
| + | |||
| + | 8. Select '''Light Duration''' | ||
| + | |||
| + | [[File:LincX2ProPIRFloodlight12.png|400px]] | ||
| + | |||
| + | 9. Select the duration the light will stay on once activated. | ||
| + | <br>Tap on '''OK''' | ||
| + | |||
| + | [[File:LincX2ProPIRFloodlight13.png|400px]] | ||
| + | |||
| + | ===Motion Activation=== | ||
| + | |||
| + | 1. Set the '''Select Mode''' to '''Motion Activation''' | ||
| + | |||
| + | [[File:LincX2ProPIRFloodlight14.png|400px]] | ||
| + | |||
| + | 2. Select '''Brightness''' | ||
| + | |||
| + | [[File:LincX2ProPIRFloodlight6.png|400px]] | ||
| + | |||
| + | 3. Adjust the slider under '''Brightness Settings''' to the desired brightness level for the floodlight. | ||
| + | <br>When you are done, select '''Save''' at the top | ||
| + | |||
| + | [[File:LincX2ProPIRFloodlight7.png|400px]] | ||
| + | |||
| + | 4. Select '''Color Temperature''' | ||
| + | |||
| + | [[File:LincX2ProPIRFloodlight8.png|400px]] | ||
| + | |||
| + | 5. Select '''Cool''' if you want a blue-ish color for the light or select '''Warm''' if you want a yellowish color for the light | ||
| + | |||
| + | [[File:LincX2ProPIRFloodlight9.png|400px]] | ||
| + | |||
| + | 6. Select '''Light Duration''' | ||
| + | |||
| + | [[File:LincX2ProPIRFloodlight12.png|400px]] | ||
| + | |||
| + | 7. Select the duration the light will stay on once activated. | ||
| + | <br>Tap on '''OK''' | ||
| + | |||
| + | [[File:LincX2ProPIRFloodlight13.png|400px]] | ||
| + | |||
| + | ===Manual Mode=== | ||
| + | |||
| + | 1. Set the '''Select Mode''' to '''Manual''' | ||
| + | |||
| + | [[File:LincX2ProPIRFloodlight15.png|400px]] | ||
| − | + | 2. Select '''Brightness''' | |
| − | + | [[File:LincX2ProPIRFloodlight6.png|400px]] | |
| − | + | 3. Adjust the slider under '''Brightness Settings''' to the desired brightness level for the floodlight. | |
| + | <br>When you are done, select '''Save''' at the top | ||
| − | + | [[File:LincX2ProPIRFloodlight7.png|400px]] | |
| − | ''' | + | 4. Select '''Color Temperature''' |
| − | + | [[File:LincX2ProPIRFloodlight8.png|400px]] | |
| − | + | 5. Select '''Cool''' if you want a blue-ish color for the light or select '''Warm''' if you want a yellowish color for the light | |
| − | [[File: | + | [[File:LincX2ProPIRFloodlight9.png|400px]] |
| − | + | ===Schedule Mode=== | |
| − | + | 1. | |
Revision as of 23:51, 7 March 2024
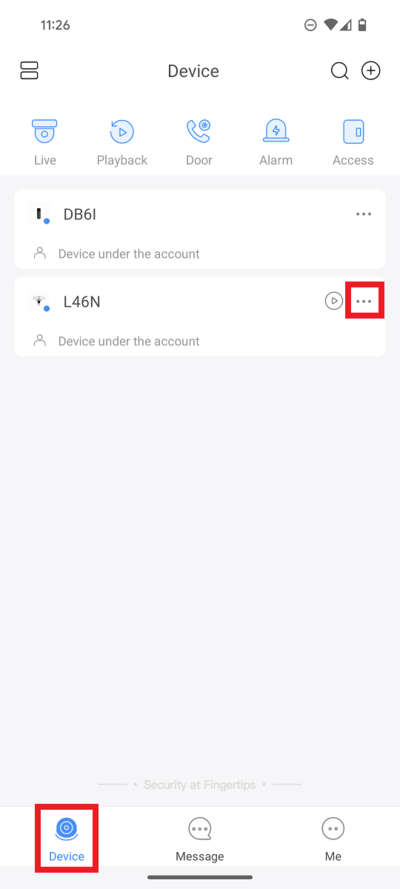
1. Launch the DMSS Mobile App.
Tap on Device at the bottom to access your added device list.
Select one of your added device that you wish to setup/modify Floodlight Settings for. Tap on ... .
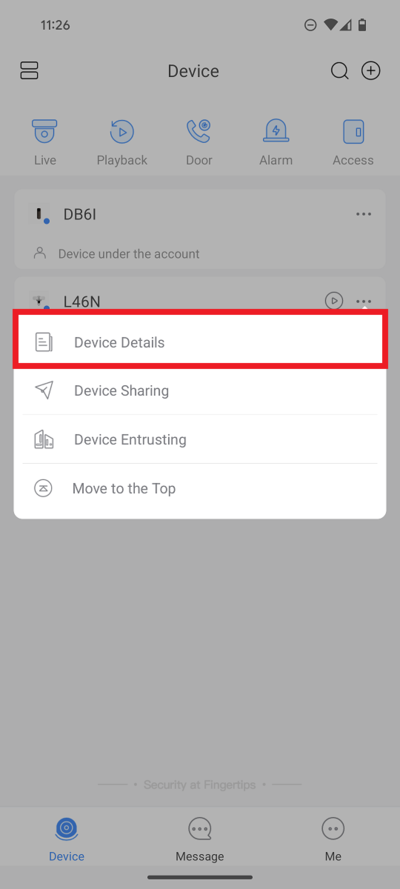
2. Select Device Details
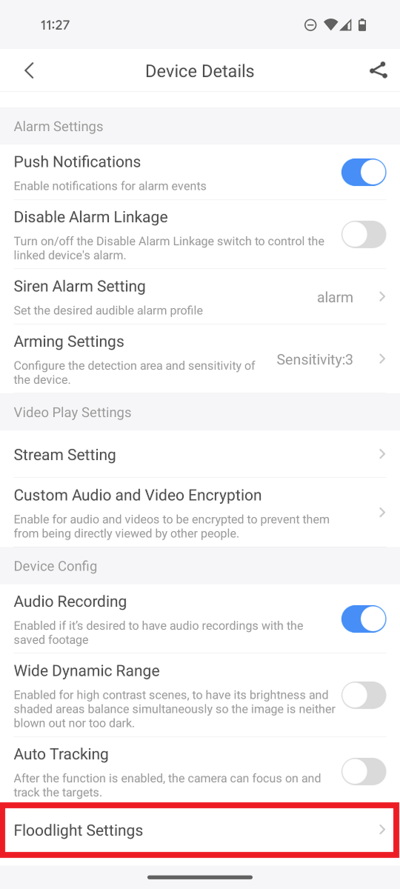
3. Scroll down and select Floodlight Settings
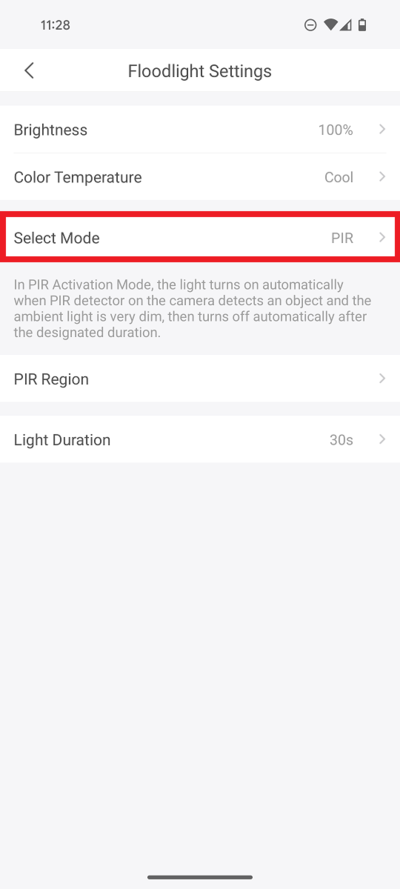
4. Tap on Select Mode
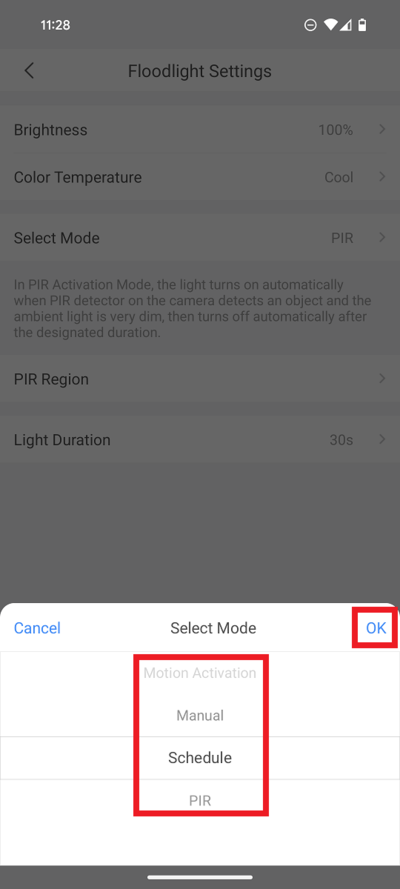
5. Select which mode you want the floodlight to follow: Motion Activation, Manual, Schedule, or PIR
Tap on OK
PIR Mode
1. Set the Select Mode to PIR
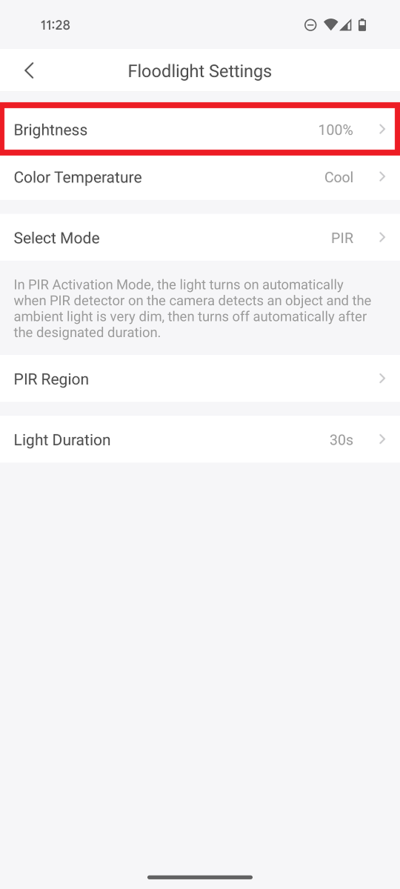
2. Select Brightness
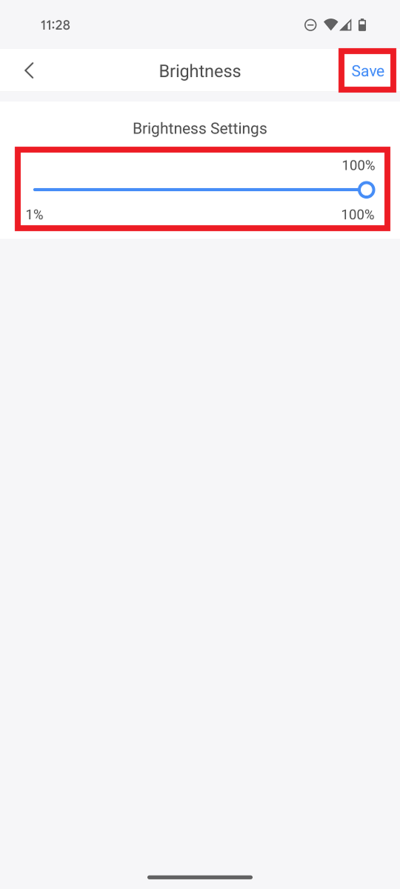
3. Adjust the slider under Brightness Settings to the desired brightness level for the floodlight.
When you are done, select Save at the top
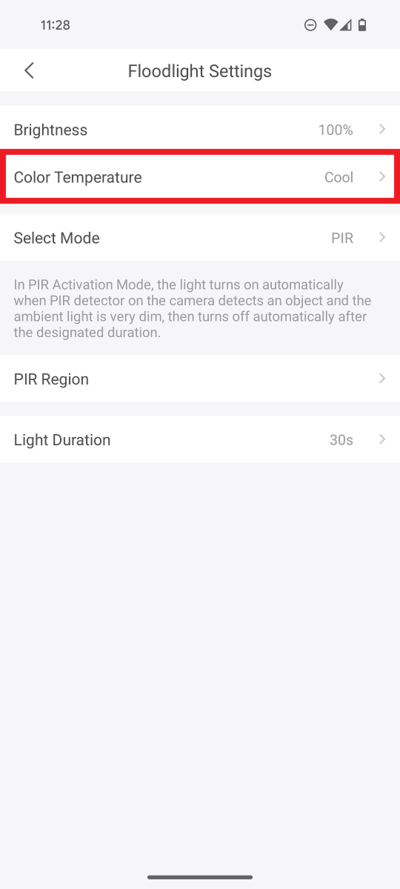
4. Select Color Temperature
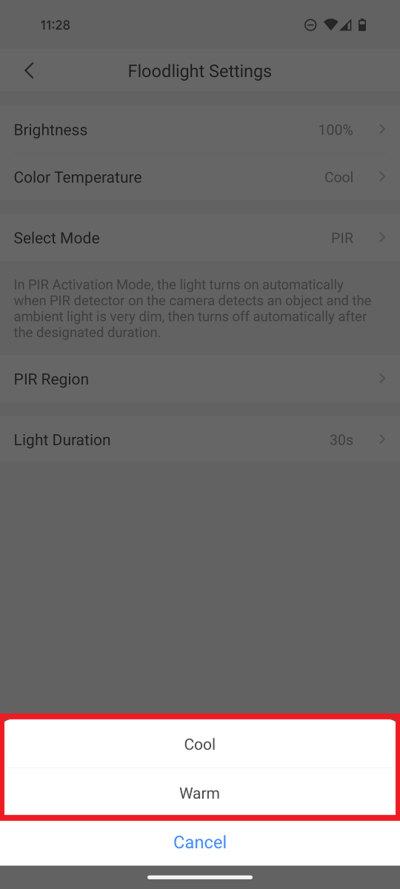
5. Select Cool if you want a blue-ish color for the light or select Warm if you want a yellowish color for the light
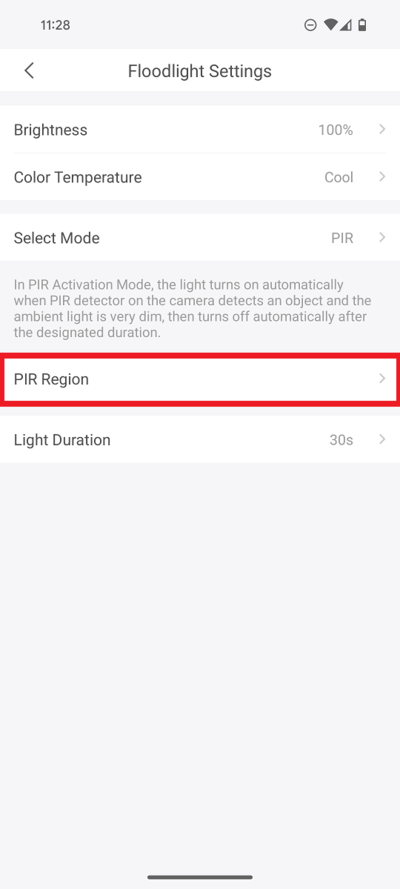
6. Select PIR Region
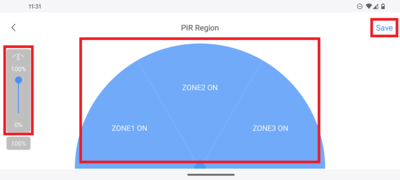
7. Drag the slider on the right for the amount of distance you want the PIR to monitor. (100% = 10m [32.81 ft])
Tap the 3 zones either ON or OFF.
Select Save at the top
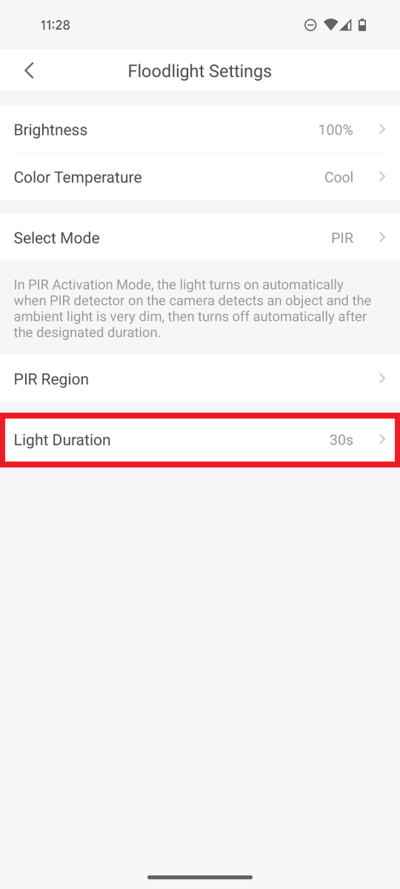
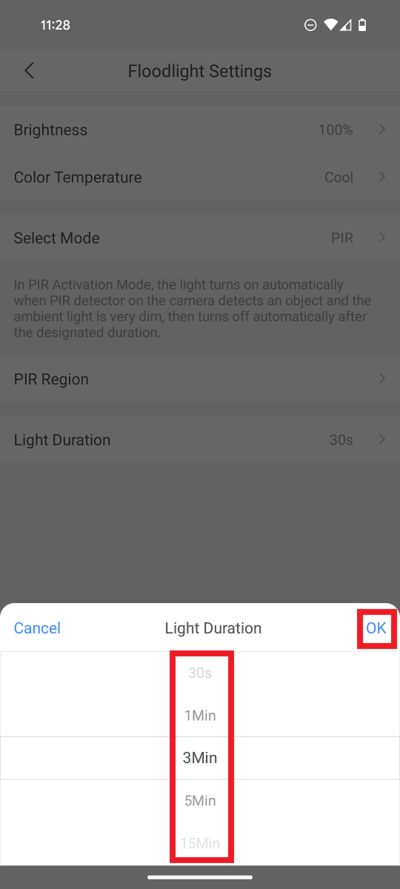
8. Select Light Duration
9. Select the duration the light will stay on once activated.
Tap on OK
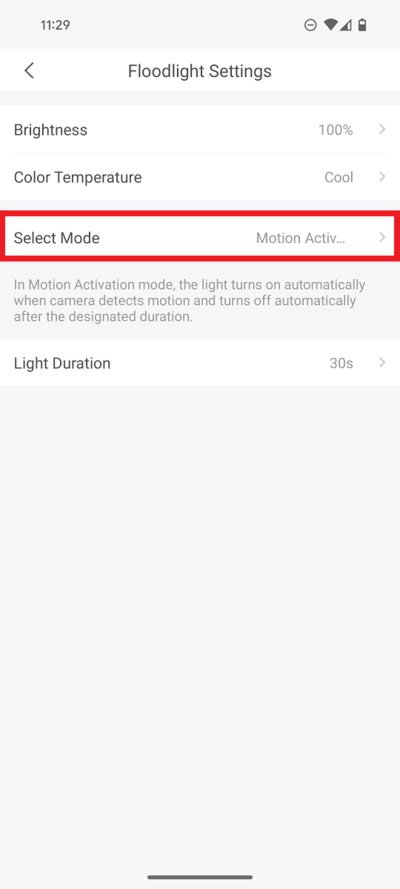
Motion Activation
1. Set the Select Mode to Motion Activation
2. Select Brightness
3. Adjust the slider under Brightness Settings to the desired brightness level for the floodlight.
When you are done, select Save at the top
4. Select Color Temperature
5. Select Cool if you want a blue-ish color for the light or select Warm if you want a yellowish color for the light
6. Select Light Duration
7. Select the duration the light will stay on once activated.
Tap on OK
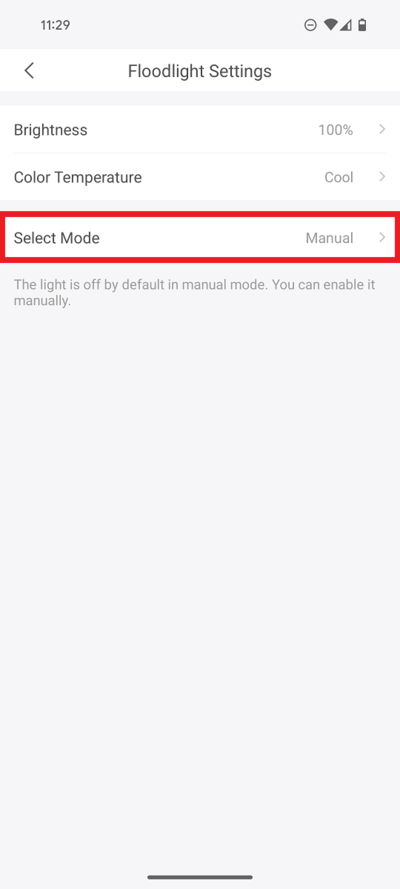
Manual Mode
1. Set the Select Mode to Manual
2. Select Brightness
3. Adjust the slider under Brightness Settings to the desired brightness level for the floodlight.
When you are done, select Save at the top
4. Select Color Temperature
5. Select Cool if you want a blue-ish color for the light or select Warm if you want a yellowish color for the light
Schedule Mode
1.
