Notice: Firmware Links Under Maintenance We are currently undergoing maintenance on all firmware links. If any links are inaccessible, please email or contact Tech Support for the firmware. We appreciate your patience during the maintenance, thank you for your understanding.
Template:Intrusion WebUI Old
Contents
How To Setup Intrusion Detection
Description
Intrusion Detection is to detect if there is any object entering or leaving the area, the rule will trigger when crossing the area perimeter. Supports enter, leave, and enter & leave three direction selection, it can activate record, snapshot, and alarm according to the judgment result.
Application Scene: It is similar to warning line. It needs to leave some space for target movement outside the perimeter if it is to detect enter and leave event; It can only be applied to the scene where the target is sparse and there is rarely any covering between the targets, such as the perimeter without any guard. It will trigger alarm when the target is entering or leaving the area.
Prerequisites
- Intelligent Network Camera or an HDCVI Camera that is connected to a HDCVI DVR that has intelligent features.
- Updated firmware that supports intelligent features.
- Internet Explorer.
Step By Step Instructions
1. Log into device using the Web Service.

2. Select Setup -> Select Event -> IVS

3. Under the IVS section, click the + and use the item that appears to set a name for your rule and in the drop down, define the rule type, in this case, "Intrusion" then select "Draw Rule.

4. Next, use your mouse to click and define the lines for the area you'd like to establish the rule for, then define the Action and Direction. In this example we'll use Cross and Enter to notify of entry into the region.
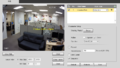
After clicking 'Draw Rule'
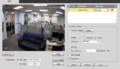
Region defined.


5. By default the schedule for the rule is set up for 24/7, to edit this go to 'Setup' by working period. Here you can make changes to the days and time periods in which it is active.

Working Period Setup
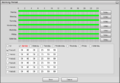
Working Period Edit window


6. Next be sure to check any other options you may want such as Record & Record Delay, Snapshot, Relay out (1, 2, or both)alarm Delay and email. Note: For instructions on email setup see Email Setup

7. Click Save to complete settings.