Difference between revisions of "Thermal/DHI-ASI7213X-T1/Instructions/Adjust Volume"
(→Step by Step Instruction) |
(→Step by Step Instruction) |
||
| Line 13: | Line 13: | ||
==Step by Step Instruction== | ==Step by Step Instruction== | ||
<div class="toccolours mw-collapsible mw-collapsed"> | <div class="toccolours mw-collapsible mw-collapsed"> | ||
| − | [[File:DHI-ASI7213X-T1_Mainmenu.jpg| | + | [[File:DHI-ASI7213X-T1_Mainmenu.jpg|200px]]<span style="font-size:180%;">'''System UI'''</span> |
<div class="mw-collapsible-content">{{Template:DHI-ASI7213X-T1/Instructions/Adjust_Volume_SystemUI}}</div> | <div class="mw-collapsible-content">{{Template:DHI-ASI7213X-T1/Instructions/Adjust_Volume_SystemUI}}</div> | ||
</div> | </div> | ||
Latest revision as of 20:39, 19 June 2020
Contents
DHI-ASI7213X-T1 Adjust Volume
Description
This guide will cover how to adjust volume on the thermal monitoring station.
Prerequisites
Video Instruction
Step by Step Instruction
 System UI
1. Tap on  to access the main menu.
 or
or  to adjust the volume.
2. Login with your admin credential that you created during initialization process.
3. Main menu page will launch.
4. Tap on System.

5. Tap on Volume.
6. Tap Web UI
1. Login to device with web browser.
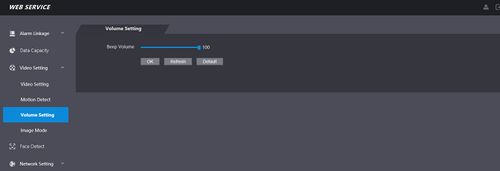
2. Click on Video Setting and then Volume Setting.
