Difference between revisions of "Video Intercom/SIP 2.0/How To Add VTO4202 To DSSPro Via Configtool"
| Line 14: | Line 14: | ||
==Step by Step Instructions== | ==Step by Step Instructions== | ||
| + | ===Configurating VDP devices using Configtool=== | ||
1. After all devices are initialized go to '''Building Config''' | 1. After all devices are initialized go to '''Building Config''' | ||
| Line 24: | Line 25: | ||
3. Global Parameters | 3. Global Parameters | ||
| + | |||
{| class="wikitable" | {| class="wikitable" | ||
|- | |- | ||
| Line 46: | Line 48: | ||
|VTH Password = Enter VTH Password | |VTH Password = Enter VTH Password | ||
|} | |} | ||
| + | |||
| + | Enter the proper information and click on '''OK''' to proceed | ||
[[File:How to Setup DHI-VTO4202F-P-S2 to DSS Pro-3.png|900px]] | [[File:How to Setup DHI-VTO4202F-P-S2 to DSS Pro-3.png|900px]] | ||
| − | 4. | + | 4. Click on '''Add Node''' to create a project |
[[File:How to Setup DHI-VTO4202F-P-S2 to DSS Pro-4.png|900px]] | [[File:How to Setup DHI-VTO4202F-P-S2 to DSS Pro-4.png|900px]] | ||
| − | 5. | + | 5. In this guide we have 1 VTO and 2 VTHs so we are checking the '''Main VTO''' and telling it we have 2 Rooms (VTHs) with 0 extensions. Click on '''OK''' |
[[File:How to Setup DHI-VTO4202F-P-S2 to DSS Pro-5.png|900px]] | [[File:How to Setup DHI-VTO4202F-P-S2 to DSS Pro-5.png|900px]] | ||
| − | 6. | + | 6. Associate the VTO's Serial Number to the Project's Main VTO Entry and click on '''Association''' |
[[File:How to Setup DHI-VTO4202F-P-S2 to DSS Pro-6.png|900px]] | [[File:How to Setup DHI-VTO4202F-P-S2 to DSS Pro-6.png|900px]] | ||
| − | + | ||
| − | 7. | + | 7. Do the same to the VTHs. Make sure to do them one at a time |
[[File:How to Setup DHI-VTO4202F-P-S2 to DSS Pro-7.png|900px]] | [[File:How to Setup DHI-VTO4202F-P-S2 to DSS Pro-7.png|900px]] | ||
| − | 8. | + | 8. After completing the Associations, click on '''Association List''' |
[[File:How to Setup DHI-VTO4202F-P-S2 to DSS Pro-8.png|900px]] | [[File:How to Setup DHI-VTO4202F-P-S2 to DSS Pro-8.png|900px]] | ||
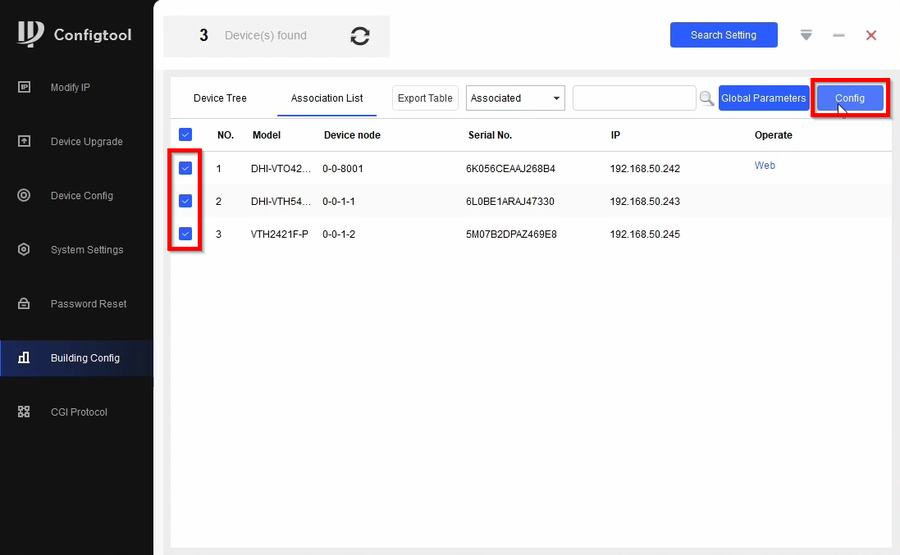
| − | 9. | + | 9. Check all the devices and the select '''Config'''. Configtool will handle the rest of the configurations |
[[File:How to Setup DHI-VTO4202F-P-S2 to DSS Pro-9.png|900px]] | [[File:How to Setup DHI-VTO4202F-P-S2 to DSS Pro-9.png|900px]] | ||
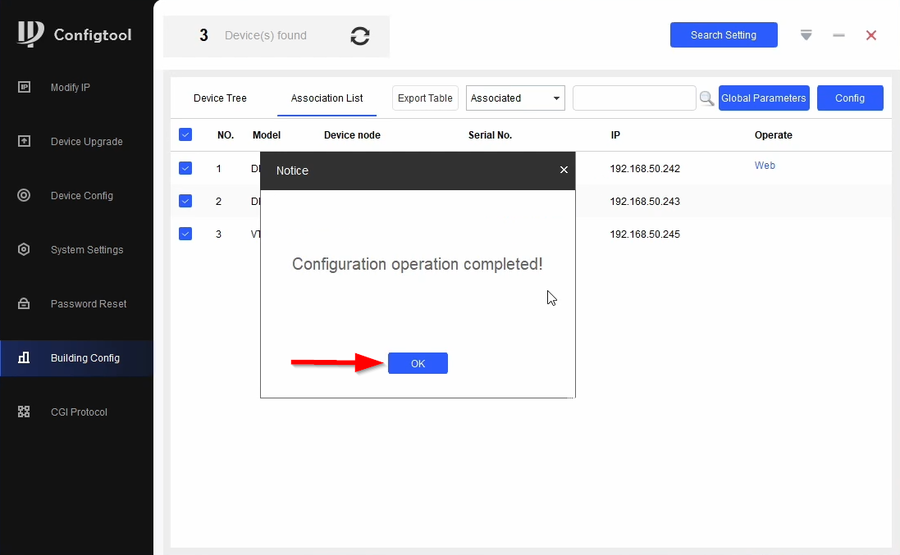
| − | 10. | + | 10. Devices will reboot and the configuration is complete |
[[File:How to Setup DHI-VTO4202F-P-S2 to DSS Pro-10.png|900px]] | [[File:How to Setup DHI-VTO4202F-P-S2 to DSS Pro-10.png|900px]] | ||
| − | + | ===Adding Devices to DSS Pro=== | |
| + | |||
| + | 1. Go to DSS Pro Web Manager Portal | ||
[[File:How to Setup DHI-VTO4202F-P-S2 to DSS Pro-11.png|900px]] | [[File:How to Setup DHI-VTO4202F-P-S2 to DSS Pro-11.png|900px]] | ||
| − | + | 2. Login to DSS Pro Web Manager | |
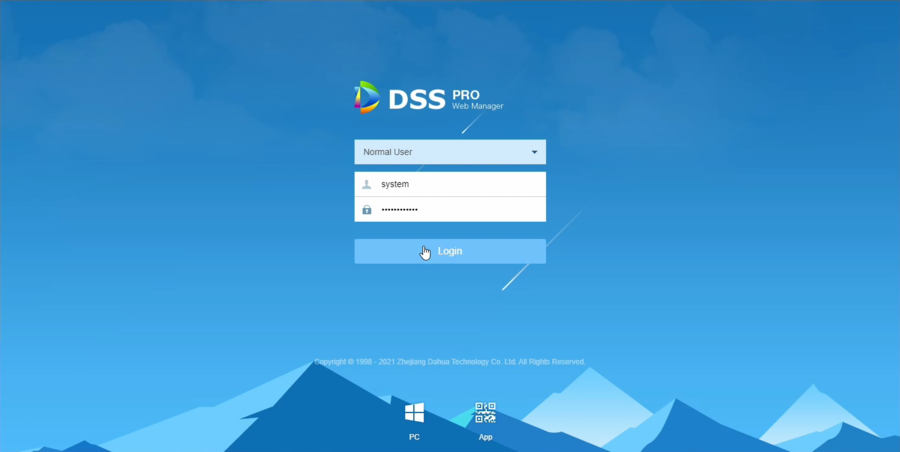
[[File:How to Setup DHI-VTO4202F-P-S2 to DSS Pro-12.png|900px]] | [[File:How to Setup DHI-VTO4202F-P-S2 to DSS Pro-12.png|900px]] | ||
| − | + | 3. Go to '''Device''' | |
[[File:How to Setup DHI-VTO4202F-P-S2 to DSS Pro-13.png|900px]] | [[File:How to Setup DHI-VTO4202F-P-S2 to DSS Pro-13.png|900px]] | ||
| − | + | 4. Click on '''Add''' | |
[[File:How to Setup DHI-VTO4202F-P-S2 to DSS Pro-14.png|900px]] | [[File:How to Setup DHI-VTO4202F-P-S2 to DSS Pro-14.png|900px]] | ||
| − | + | 5. Select '''Video Intercom''' as Device Category and enter the correct login information | |
[[File:How to Setup DHI-VTO4202F-P-S2 to DSS Pro-15.png|900px]] | [[File:How to Setup DHI-VTO4202F-P-S2 to DSS Pro-15.png|900px]] | ||
| − | + | 6. Give the device a name and click on '''OK''' to finish adding. '''Repeat steps 4-6 for all devices''' | |
[[File:How to Setup DHI-VTO4202F-P-S2 to DSS Pro-16.png|900px]] | [[File:How to Setup DHI-VTO4202F-P-S2 to DSS Pro-16.png|900px]] | ||
| − | + | 7. Open a new tab if you get a '''Building Enable''' Error for the VTO | |
[[File:How to Setup DHI-VTO4202F-P-S2 to DSS Pro-17.png|900px]] | [[File:How to Setup DHI-VTO4202F-P-S2 to DSS Pro-17.png|900px]] | ||
| − | + | 8. Go to the '''Video Intercom Management''' module | |
[[File:How to Setup DHI-VTO4202F-P-S2 to DSS Pro-18.png|900px]] | [[File:How to Setup DHI-VTO4202F-P-S2 to DSS Pro-18.png|900px]] | ||
| − | + | 9. Disable '''Building Enable''' | |
[[File:How to Setup DHI-VTO4202F-P-S2 to DSS Pro-19.png|900px]] | [[File:How to Setup DHI-VTO4202F-P-S2 to DSS Pro-19.png|900px]] | ||
| − | 20. | + | 20. Click on '''Save''' and confirm the popup |
[[File:How to Setup DHI-VTO4202F-P-S2 to DSS Pro-20.png|900px]] | [[File:How to Setup DHI-VTO4202F-P-S2 to DSS Pro-20.png|900px]] | ||
| − | 21. | + | 21. All devices should show '''Online''' now |
[[File:How to Setup DHI-VTO4202F-P-S2 to DSS Pro-21.png|900px]] | [[File:How to Setup DHI-VTO4202F-P-S2 to DSS Pro-21.png|900px]] | ||
| − | + | ===DSS Pro Client=== | |
| + | |||
| + | 1. Open and login to DSS Client, Go to the '''Video Intercom''' Module | ||
[[File:How to Setup DHI-VTO4202F-P-S2 to DSS Pro-22.png|900px]] | [[File:How to Setup DHI-VTO4202F-P-S2 to DSS Pro-22.png|900px]] | ||
| − | + | 2. Go to '''Call Management''' Icon | |
[[File:How to Setup DHI-VTO4202F-P-S2 to DSS Pro-23.png|900px]] | [[File:How to Setup DHI-VTO4202F-P-S2 to DSS Pro-23.png|900px]] | ||
| − | + | 3. and click on the refresh icon to make sure all the VDP devices populate. | |
[[File:How to Setup DHI-VTO4202F-P-S2 to DSS Pro-24.png|900px]] | [[File:How to Setup DHI-VTO4202F-P-S2 to DSS Pro-24.png|900px]] | ||
Revision as of 18:10, 5 May 2021
Contents
How To Add VTO4202 To DSSPro Via Configtool
Description
This article will go over DHI-VTO4202F setup to DSS Pro using Configtool
DSS Pro will be acting as the SIP server
Pre-requisites
- Initialized VDP Devices. Follow our guide here before continuing
- DSS Pro
- Configtool
Video Instructions
Step by Step Instructions
Configurating VDP devices using Configtool
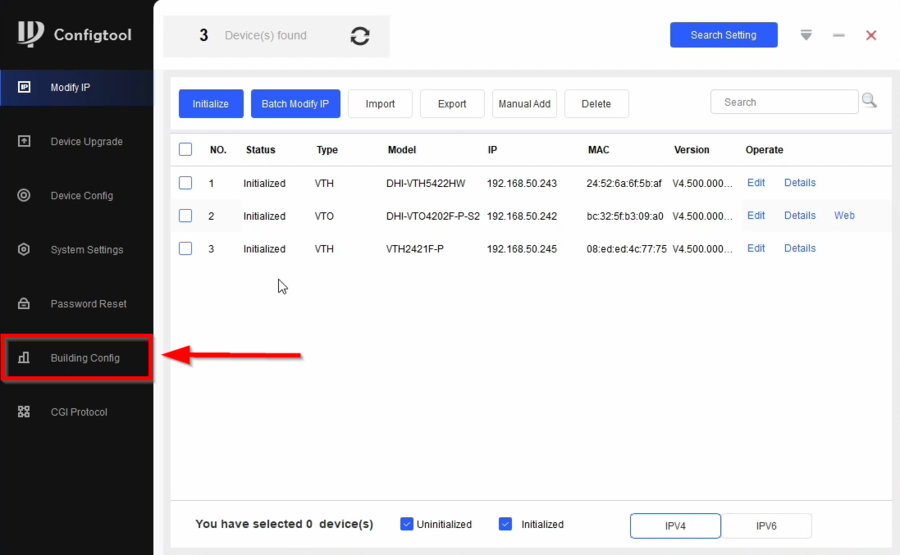
1. After all devices are initialized go to Building Config
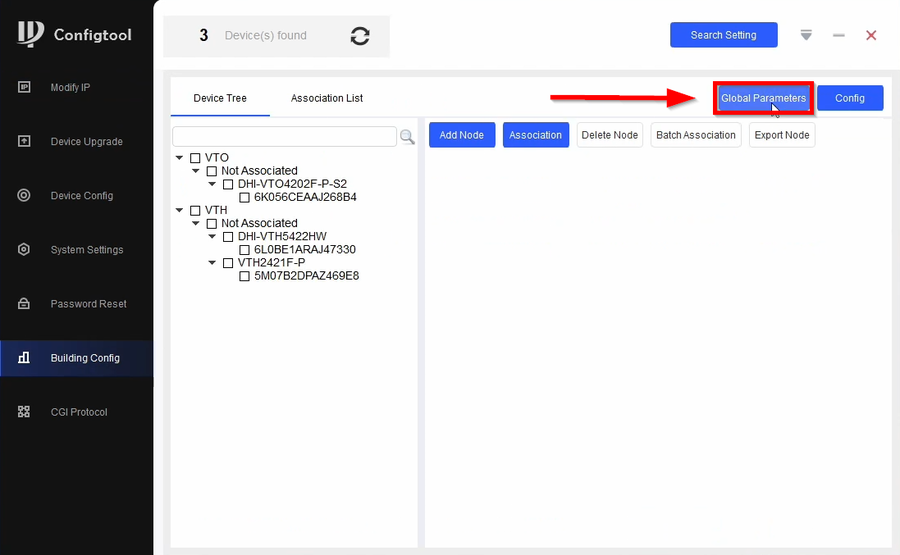
2. Go to Global Parameter
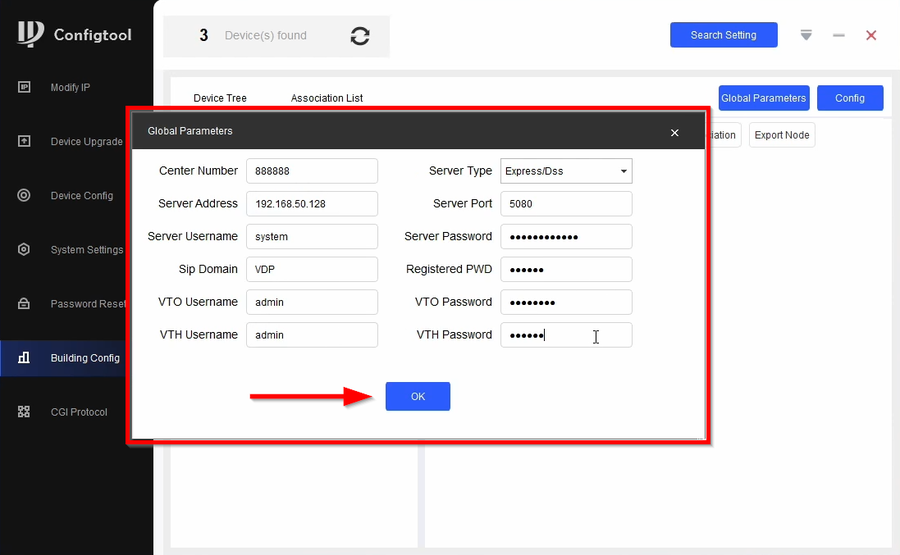
3. Global Parameters
| Global Parameters | |
|---|---|
| Center Number = 888888 | Sever Type = Express/Dss |
| Server Address = Enter DSS Pro IP Address | Server Port = 5080 |
| Server Username - Enter the Username used on DSS Pro | Server Password - Enter the Password for the DSS Pro User |
| Sip Domain = VDP | Registered PWD = Leave Default |
| VTO Username = Enter VTO Username | VTO Password = Enter VTO Password |
| VTH Username = Enter VTH Username (admin by default) | VTH Password = Enter VTH Password |
Enter the proper information and click on OK to proceed
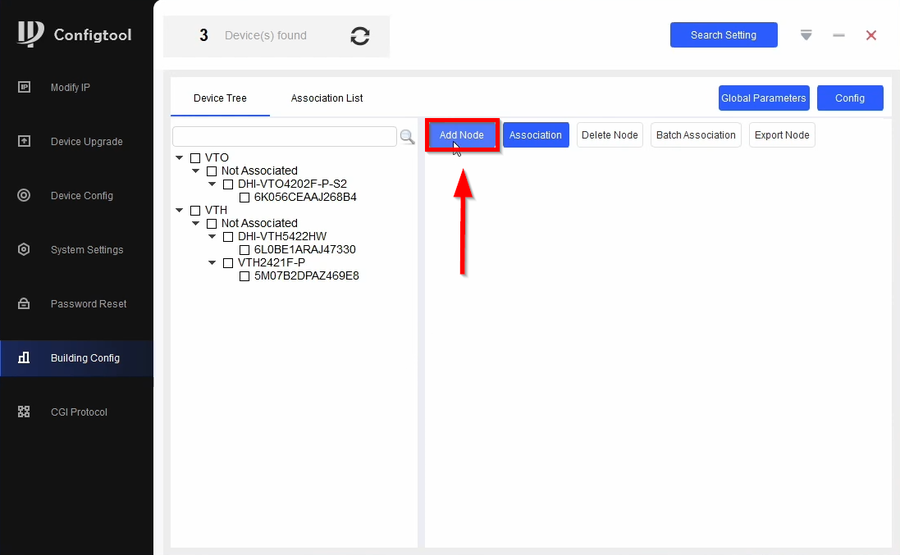
4. Click on Add Node to create a project
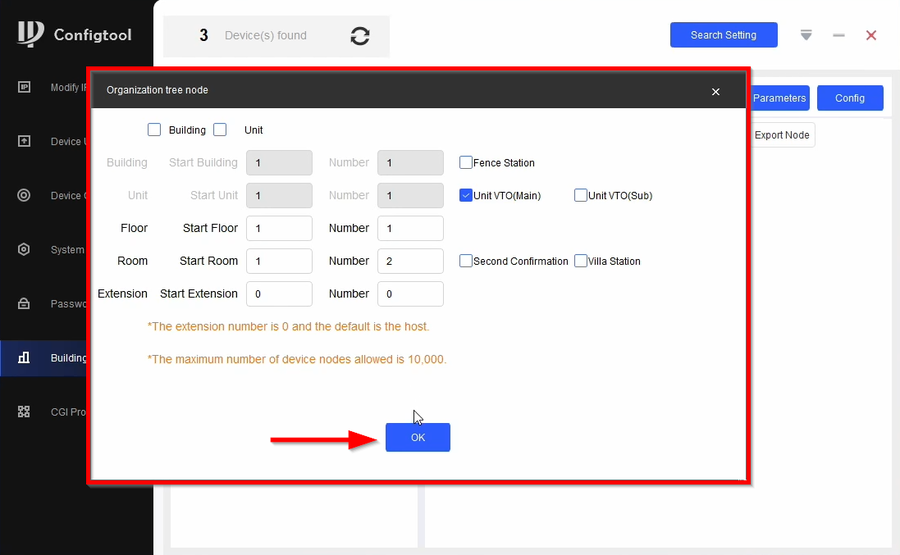
5. In this guide we have 1 VTO and 2 VTHs so we are checking the Main VTO and telling it we have 2 Rooms (VTHs) with 0 extensions. Click on OK
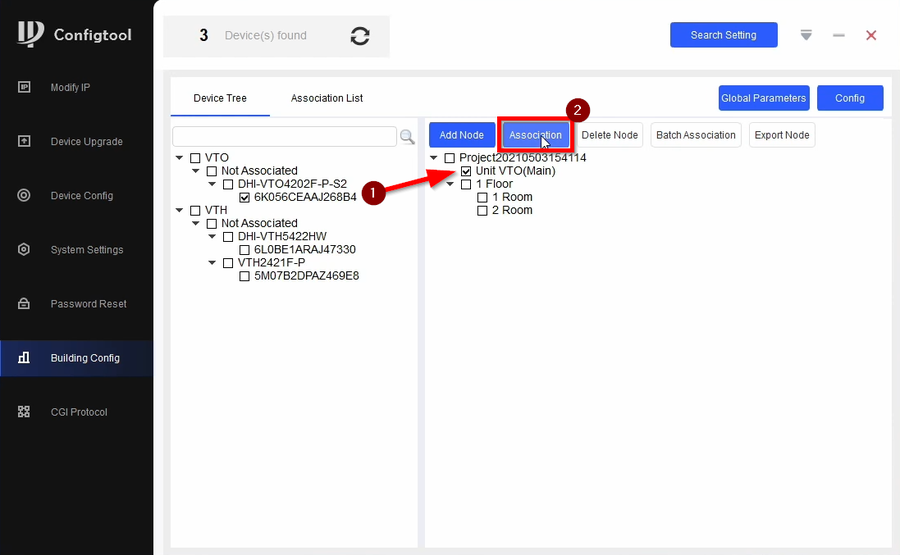
6. Associate the VTO's Serial Number to the Project's Main VTO Entry and click on Association
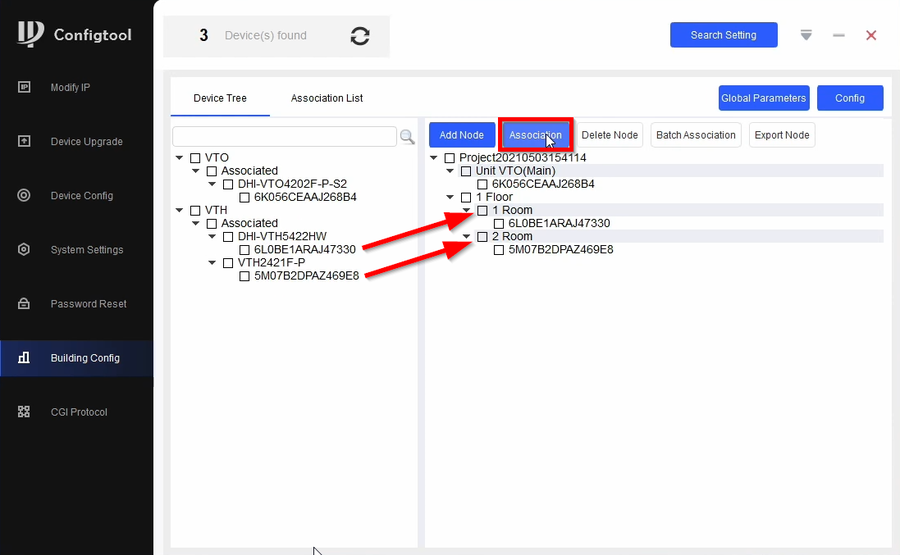
7. Do the same to the VTHs. Make sure to do them one at a time
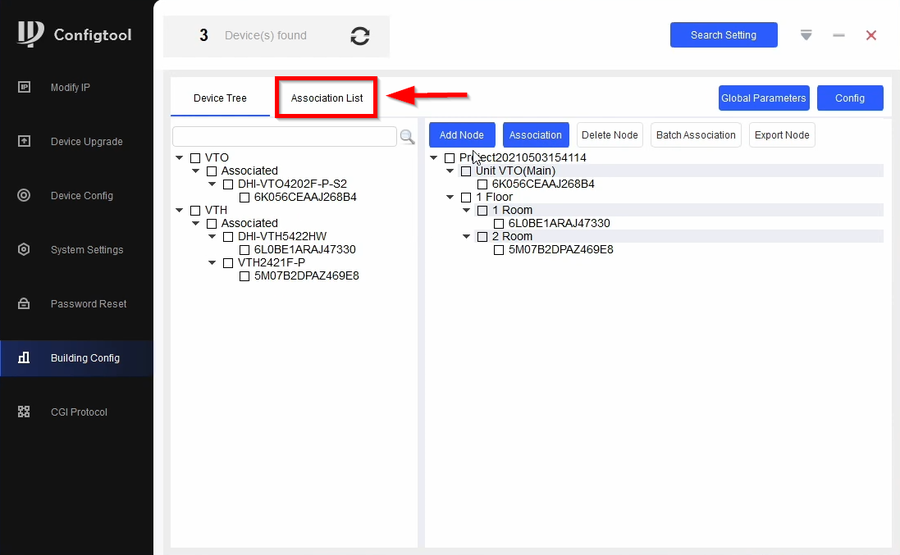
8. After completing the Associations, click on Association List
9. Check all the devices and the select Config. Configtool will handle the rest of the configurations
10. Devices will reboot and the configuration is complete
Adding Devices to DSS Pro
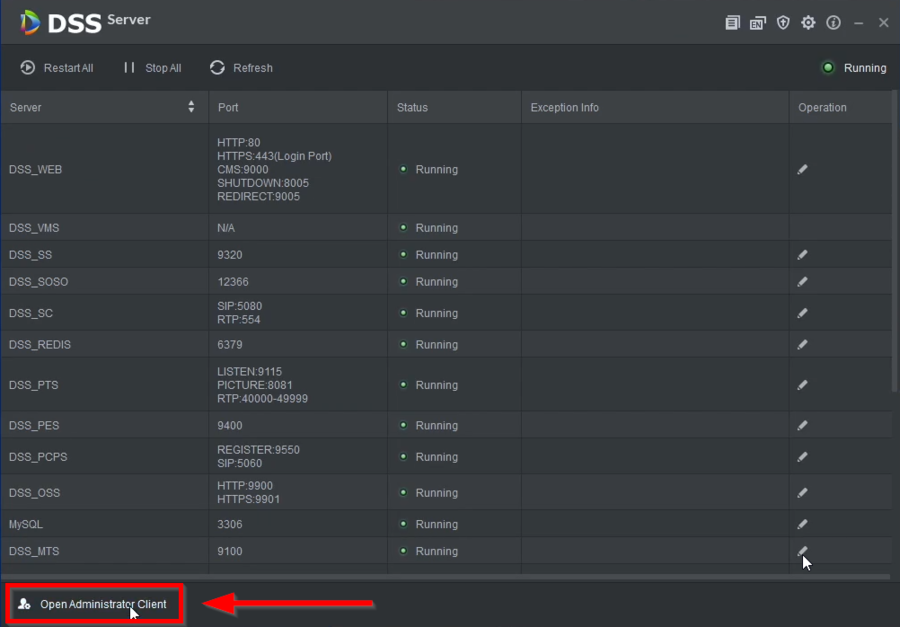
1. Go to DSS Pro Web Manager Portal
2. Login to DSS Pro Web Manager
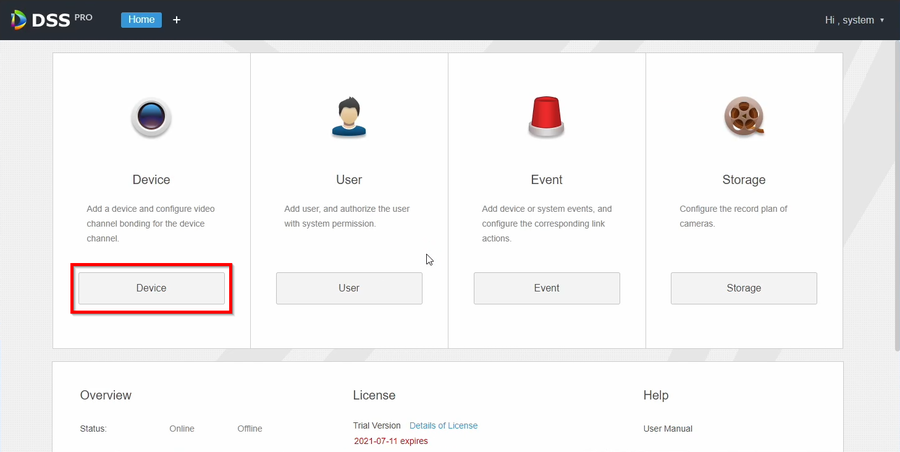
3. Go to Device
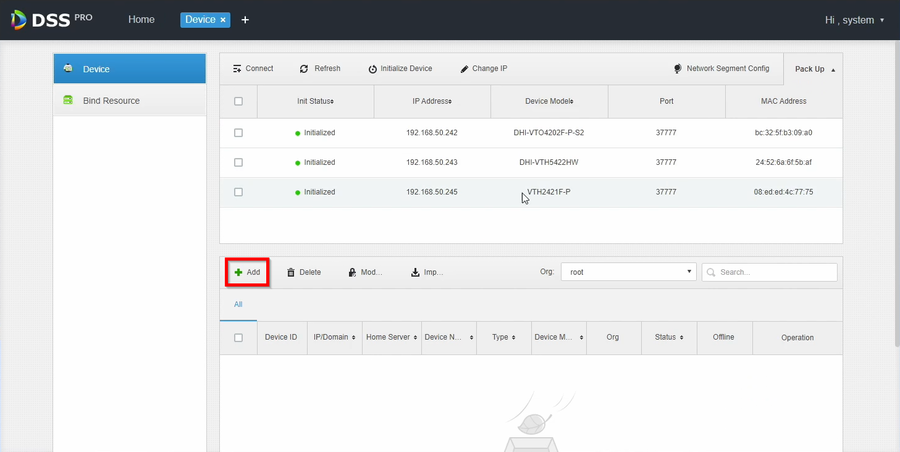
4. Click on Add
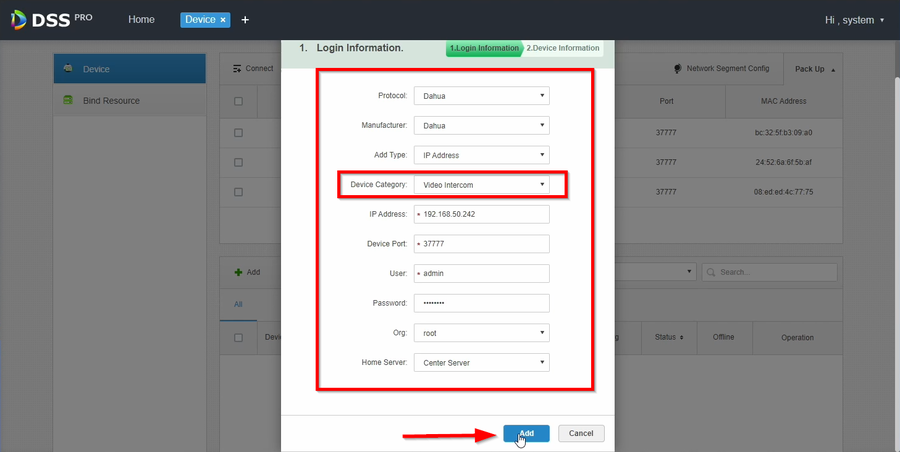
5. Select Video Intercom as Device Category and enter the correct login information
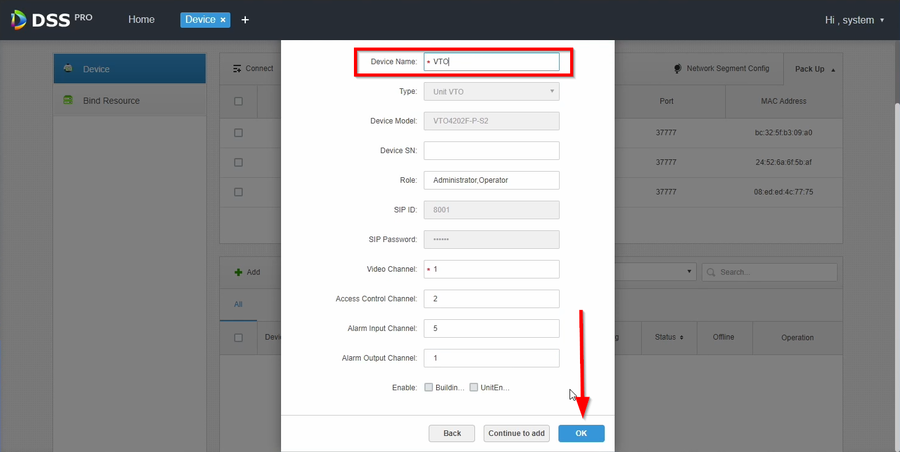
6. Give the device a name and click on OK to finish adding. Repeat steps 4-6 for all devices
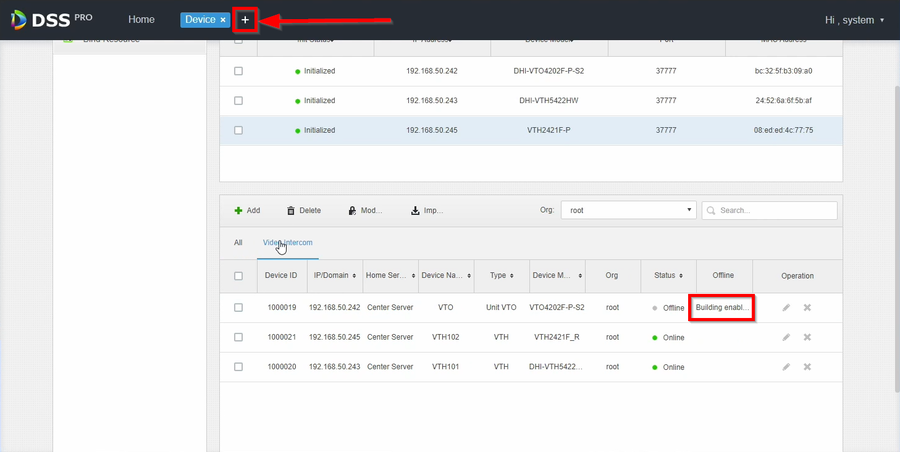
7. Open a new tab if you get a Building Enable Error for the VTO
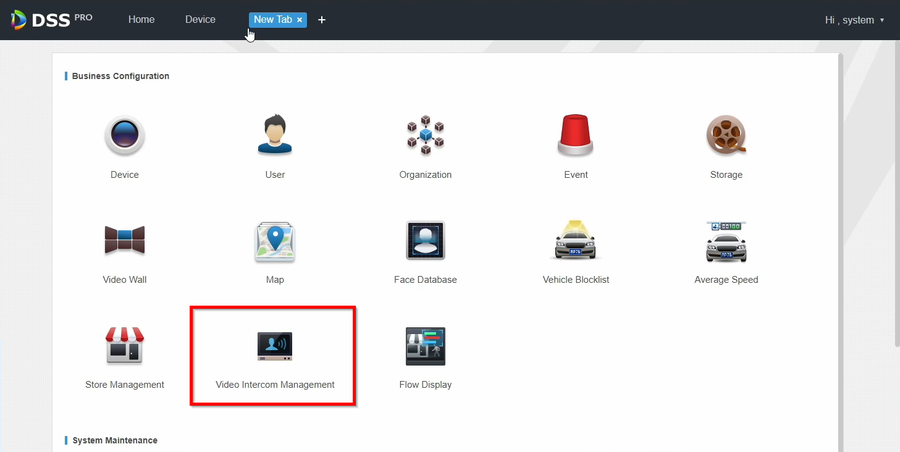
8. Go to the Video Intercom Management module
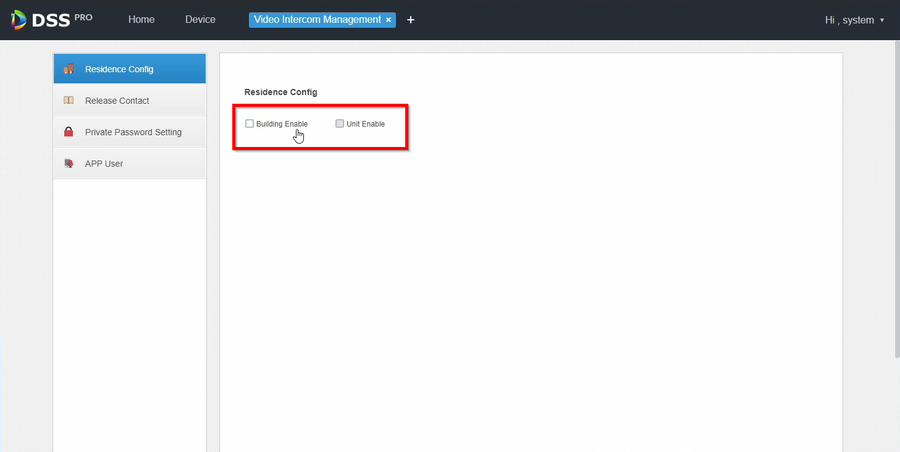
9. Disable Building Enable
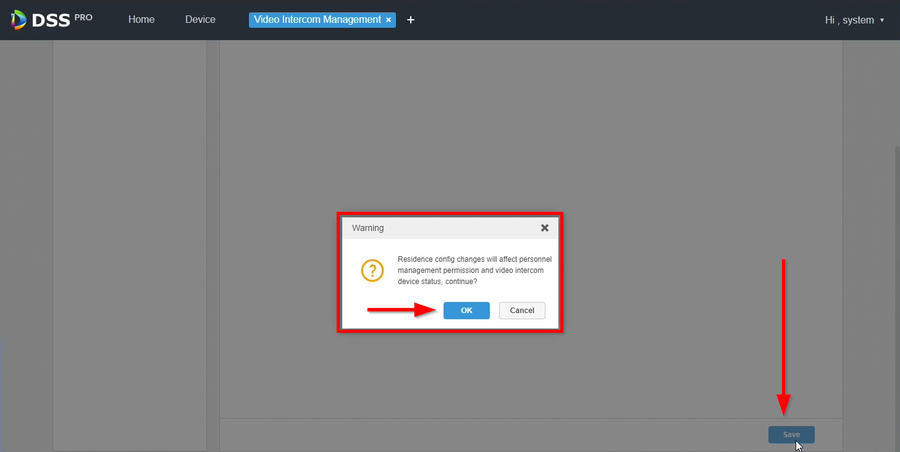
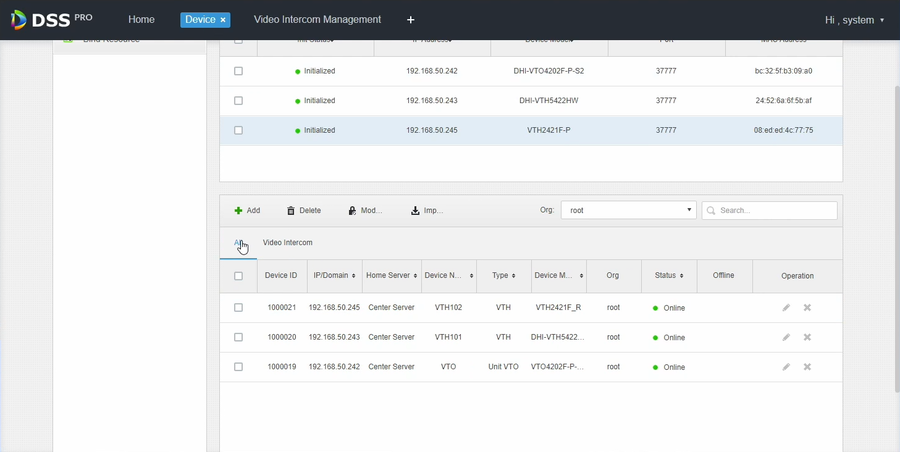
20. Click on Save and confirm the popup
21. All devices should show Online now
DSS Pro Client
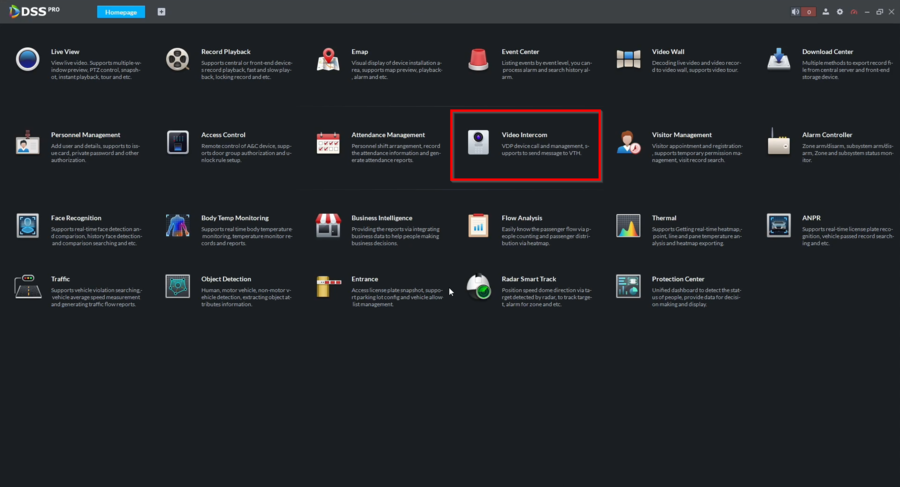
1. Open and login to DSS Client, Go to the Video Intercom Module
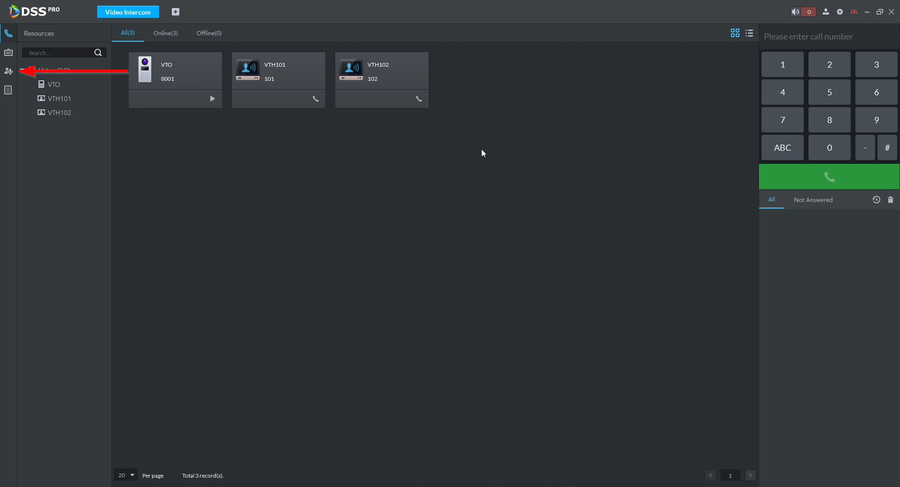
2. Go to Call Management Icon
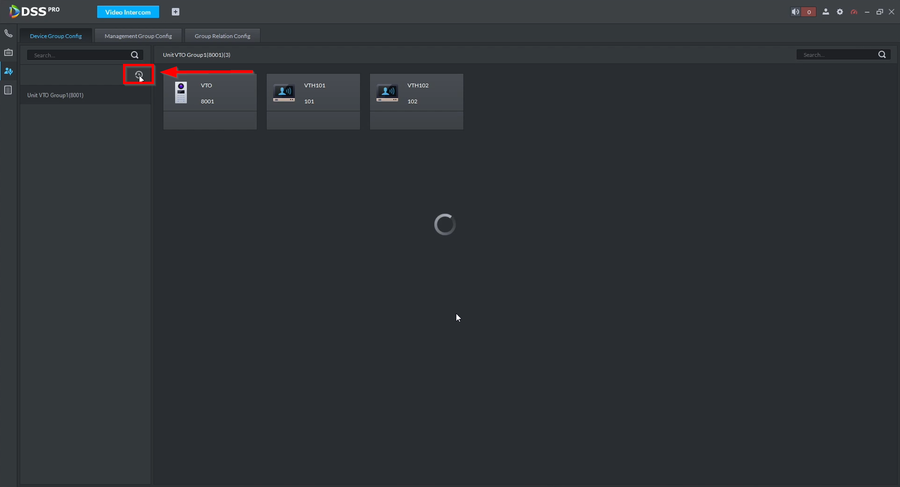
3. and click on the refresh icon to make sure all the VDP devices populate.
