IPCTCPIP
TCP/IP
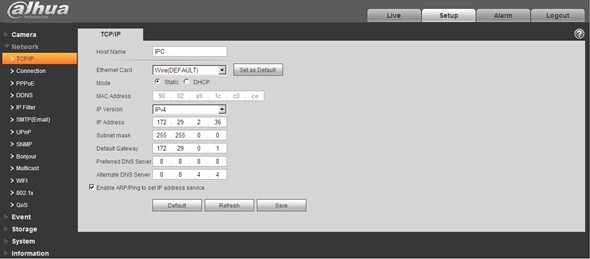
The TCP/IP interface is shown in the below image. It supports IPv4 and IPv6. IPv4 supports static IP and DHCP. IPv6 supports static IP only. When users manually modify IP address, WEB will automatically jump to the new IP address.
|
Parameter |
Function |
|
Host Name |
It is to set current host device name. It max supports 15 characters. |
|
Ethernet Card |
Please select the Ethernet port. Default is wired. Please note you can modify the default Ethernet card if there is more than one card. . Please note the device needs to reboot to activate the new setup once you modify the default setup. |
|
Mode |
There are two modes: static mode and the DHCP mode. Select DHCP mode, it auto searches IP, and you cannot set IP/subnet mask/gateway. Select static mode, you must manually set IP/subnet mask/gateway. |
|
Mac Address |
It is to display hose Mac address. |
|
IP Version |
It is to select IP version. IPV4 or IPV6. You can access the IP address of these two version. |
|
IP Address |
Please use the keyboard to input the corresponding number to modify the IP address and then set the corresponding subnet mask and the default gateway. |
|
Preferred DNS |
DNS IP address. |
|
Alternate DNS |
Alternate DNS IP address. |
|
Enable ARP/Ping set device IP address service. |
You can use ARP/Ping command to modify or set the device IP address if you know the device MAC address. Before the operation, please make sure the network camera and the PC in the same LAN. This function is on by default. You can refer to the steps listed below. Step 1: Get an IP address. Set the network camera and the PC in the same LAN. Step 2: Get the physical address from the label of the network camera. Step 3: Go to the Run interface and then input the following commands. arp –s <IP Address> <MAC> ping –l 480 –t <IP Address> Such as:arp -s 192.168.0.125 11-40-8c-18-10-11 ping -l 480 -t 192.168.0.125 Step 4: Reboot the device. Step 5: You can see the setup is OK if you can see there are output information such as “Reply from 192.168.0.125 …” from the command output lines. Now you can close the command line. Step 6: Open the browse and then input http://<IP address>. Click the Enter button, you can access now. |