Template:Kiosk WebUI Video Setting
Contents
Video Setting
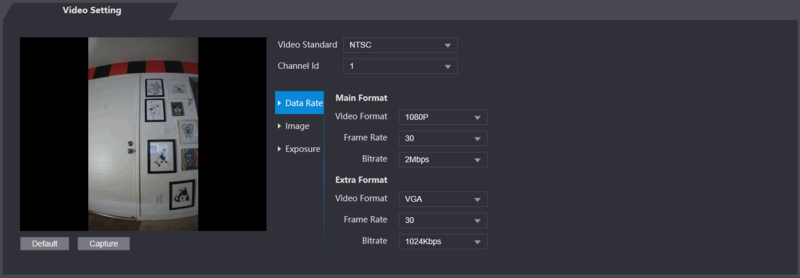
Data Rate
| Name | Description | |
|---|---|---|
| Video Standard | There are two options: NTSC and PAL. Select a standard according to the video standard of your region. | |
| Channel | There are two options: 1 and 2. 1 is white light camera and 2 is IR
light camera. | |
| Main Format | ||
| Video Format | There are four options: D1, VGA, 720p and 1080p. Select an option according to the video quality you want. | |
| Frame Rate | The rate at which consecutive frames appear on a display. The frame rate range is 1–30fps. | |
| Bit Rate | The number of bits that are conveyed or processed per unit of time. There are five options: 2Mbps, 4Mbps, 6Mbps, 8Mbps, and 10Mbps | |
| Extra Format | ||
| Video Format | There are three options: D1, VGA, and QVGA. | |
| Frame Rate | The rate at which consecutive frames appear on a display. The frame rate range is 1–30fps. | |
| Bit Rate | The number of bits that are conveyed or processed per unit of time. There are options: 512Kbps, 640Kbps, 768Kbps, 896Kbps, 1024Kbps, 1.25Mbps, 1.5Mbps, 1.75Mbps, and 2Mbps | |
Image
| Name | Description | |
|---|---|---|
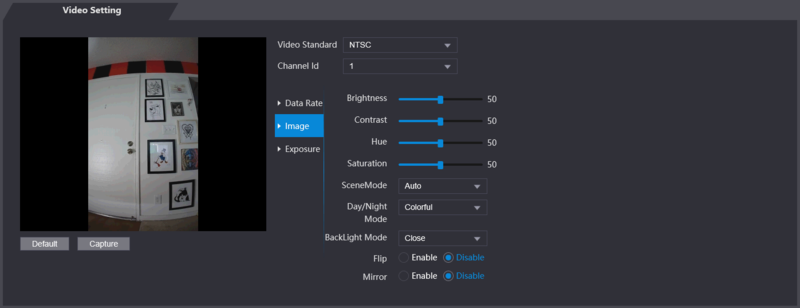
| Brightness | The larger the value is, the brighter the images will be. | |
| Contrast | Contrast is the difference in luminance or color that makes an object distinguishable. The larger the contrast value is, the greater the brightness and color contrast will be. | |
| Hue | The larger the value is, the deeper the color will be. | |
| Saturation | The larger the value is, the brighter the colors will be. The value does not change image brightness. | |
| Scene Mode |
(Sunny is selected by default.) | |
| Day/Night Mode |
Day/Night mode decides the working status of the fill light.
| |
| Back Light Mode |
| |
| Mirror | When the function is enabled, images will be displayed with left and right side reversed. | |
| Flip | When this function is enabled, images can be flipped over. | |
Exposure
| Name | Description | |
|---|---|---|
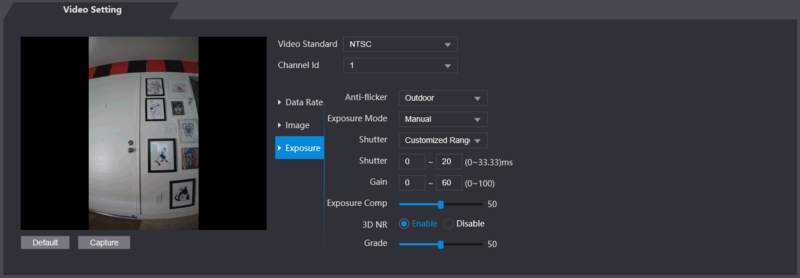
| Anti-flicker |
| |
| Exposure Mode |
You can select from:
| |
| Shutter | The larger the shutter value is and the shorter the exposure time is, the darker the images will be. | |
| Shutter Value Range | If you select Customized Range, you can customize the shutter value range. | |
| Gain Value Range | When the gain value range is set, video quality will be improved. | |
| Exposure Compensation | You can increase video brightness by adjusting exposure compensation value. | |
| 3D NR | When 3D Noise Reduction (RD) is enabled, video noise can be reduced, and high definition videos will be produced. | |
| Grade | You can adjust the value of the 3D NR when 3D NR is enabled. The larger the value is, the less the noise there will be. | |


