Difference between revisions of ":Tripwire"
(→Prerequisites) |
|||
| (15 intermediate revisions by 4 users not shown) | |||
| Line 22: | Line 22: | ||
*Internet Explorer. | *Internet Explorer. | ||
| + | ===IVS Best Practices=== | ||
| + | To assess issues with IVS compatibility between the camera and NVR, please update both devices to the most current firmware and factory reset the NVR, and use the hard reset button to reset the camera. | ||
| + | ==Instructions== | ||
| + | <div class="toccolours mw-collapsible mw-collapsed"> | ||
| + | [[File:Icon_for_type_SystemUI_Old.png|250px]]<span style="font-size:180%;">'''SystemUI Old'''</span> | ||
| + | <div class="mw-collapsible-content">{{Template:IVS_Tripwire_SystemUI_OldGUI}}</div> | ||
| + | </div> | ||
| + | |||
| + | <div class="toccolours mw-collapsible mw-collapsed"> | ||
| + | [[File:Icon_for_type_SystemUI_New.png|250px]]<span style="font-size:180%;">'''SystemUI New'''</span> | ||
| + | <div class="mw-collapsible-content">{{Template:IVS_Tripwire_SystemUI_NewGUI}}</div> | ||
| + | </div> | ||
| + | |||
| + | <div class="toccolours mw-collapsible mw-collapsed"> | ||
| + | [[File:Icon_for_type_WebUI_Old.png|250px]]<span style="font-size:180%;">'''WebUI Old'''</span> | ||
| + | <div class="mw-collapsible-content">{{Template:IVS_Tripwire_WebUI_Old}}</div> | ||
| + | </div> | ||
| + | |||
| + | <div class="toccolours mw-collapsible mw-collapsed"> | ||
| + | [[File:Icon_for_type_WebUI_New.png|250px]]<span style="font-size:180%;">'''WebUI New'''</span> | ||
| + | <div class="mw-collapsible-content">{{Template:IVS_Tripwire_WebUI_New}}</div> | ||
| + | </div> | ||
| + | |||
| + | <div class="toccolours mw-collapsible mw-collapsed"> | ||
| + | [[File:Icon_for_type_SmartPSS.png|250px]]<span style="font-size:180%;">'''SmartPSS'''</span> | ||
| + | <div class="mw-collapsible-content">{{Template:IVS_Tripwire__SmartPSS}}</div> | ||
| + | </div> | ||
| + | |||
| + | <div class="toccolours mw-collapsible mw-collapsed"> | ||
| + | [[File:Icon_for_type_DSS_Express_S.png|250px]]<span style="font-size:180%;">'''DSS Express S'''</span> | ||
| + | <div class="mw-collapsible-content">{{Template:IVS_Tripwire_DSS_Express}}</div> | ||
| + | </div> | ||
===Video Instructions=== | ===Video Instructions=== | ||
| − | <embedvideo service="youtube">https:// | + | |
| − | + | ||
| + | <embedvideo service="youtube">https://www.youtube.com/watch?v=LlwBWdUPfts</embedvideo> | ||
| + | |||
| + | |||
===Step by Step Instructions=== | ===Step by Step Instructions=== | ||
1. Navigate through Internet Explorer on the camera Setup-> Event -> IVS Analyse -> Click “Enable” button, the default rule name is line 1, line 2, line 3, line 4 when adding rule, it is ok to modify the rule name. | 1. Navigate through Internet Explorer on the camera Setup-> Event -> IVS Analyse -> Click “Enable” button, the default rule name is line 1, line 2, line 3, line 4 when adding rule, it is ok to modify the rule name. | ||
| Line 90: | Line 125: | ||
===SmartPSS Setup=== | ===SmartPSS Setup=== | ||
====Prerequisites==== | ====Prerequisites==== | ||
| − | * | + | * SmartPSS |
| + | * IVS capable device with Face Detection | ||
| + | * Upgraded devices to latest firmware | ||
| + | ====Video Instructions==== | ||
| + | <embedvideo service="youtube">X</embedvideo> | ||
| + | ====Step by Step Instructions==== | ||
| + | |||
| + | 1. Right click and select IVS channel config. | ||
| + | |||
| + | [[File:MissingSetupSmartPSS1.png|600px]] | ||
| + | |||
| + | 2. Click Add Rule if rule doesn't exist, select cross line detection, click on draw/redraw. | ||
| + | |||
| + | [[File:SmartPSSTripwire3.png|600px]] | ||
| + | |||
| + | 3. Draw Rule -> select max and min size -> apply -> save. | ||
| + | |||
| + | [[File:SmartPSSTripwire4.png|600px]] | ||
| + | |||
| + | |||
| + | ===SmartPSS 2 Setup=== | ||
| + | ====Prerequisites==== | ||
| + | * SmartPSS 2.0 | ||
* IVS capab device with Face Detection | * IVS capab device with Face Detection | ||
* Upgraded devices to latest firmware | * Upgraded devices to latest firmware | ||
| + | |||
| + | ===Video Instructions=== | ||
| + | |||
| + | <embedvideo service="youtube">https://youtu.be/qldAj10TAxU</embedvideo> | ||
| + | |||
| + | ===Step by Step Instructions=== | ||
1. Launch and Log into Smart PSS | 1. Launch and Log into Smart PSS | ||
| Line 102: | Line 165: | ||
[[File:smartpss2facedetectv1.png|600px]] | [[File:smartpss2facedetectv1.png|600px]] | ||
| − | 3. From Live View Select Device that is IVS capable - | + | 3. From Live View Select Device that is IVS capable -> right click on device and select IVS Config. |
[[File:smartpss2facedetectv3.png|600px]] | [[File:smartpss2facedetectv3.png|600px]] | ||
| − | 4. Select Trip Wire - | + | 4. Select Trip Wire -> Select Next. |
[[File:tripwiresmartpss1.png|600px]] | [[File:tripwiresmartpss1.png|600px]] | ||
| − | + | 5. Draw a detection zone. | |
| − | + | ||
| − | + | [[File:tripwiresmartpss2.png|600px]] | |
| + | |||
| + | 6.Select Rule Config -> Add Rule -> Draw Rule. More than one rule can be added and drawn. | ||
| + | |||
| + | [[File:tripwiresmartpss3.png|600px]] | ||
| + | |||
| + | 6. Select Config -> Parameters -> choose direction (in this tutorial it is set to bi-directional) -> Track may be enable to track subject. | ||
| + | |||
| + | [[File:tripwiresmartpss4.png|600px]] | ||
| + | |||
| + | 7. Set Arming Schedule -> Select Save | ||
| + | |||
| + | [[File:tripwiresmartpss5.png|600px]] | ||
| + | |||
| + | 8. From Parameters you may select disturbance filter and Adjust sensitivity -> apply and save. | ||
| + | |||
| + | [[File:tripwiresmartpss6.png|600px]] | ||
| + | |||
| + | |||
| Line 119: | Line 200: | ||
[[Category:Tripwire]] | [[Category:Tripwire]] | ||
[[Category:Event]] | [[Category:Event]] | ||
| + | [[Category:How To]] | ||
| + | [[Category:IVS/Analytics+]] | ||
Latest revision as of 16:57, 2 December 2019
Contents
- 1 Tripwire
- 2 Instructions
- 2.1 Description
- 2.2 Prerequisites
- 2.3 Video Instructions
- 2.4 Step By Step Instructions
- 2.5 Description
- 2.6 Prerequisites
- 2.7 Video Instructions
- 2.8 Step By Step Instructions
- 2.9 Description
- 2.10 Prerequisites
- 2.11 Video Instructions
- 2.12 Step By Step Instructions
- 2.13 Description
- 2.14 Prerequisites
- 2.15 Video Instructions
- 2.16 Step By Step Instructions
- 2.17 Prerequisites
- 2.18 Video Instructions
- 2.19 Step by Step Instructions
- 2.20 Video Instructions
- 2.21 Step by Step Instructions
- 2.22 System Interface Setup
- 2.23 Video Instructions
- 2.24 SmartPSS Setup
- 2.25 SmartPSS 2 Setup
- 2.26 Video Instructions
- 2.27 Step by Step Instructions
Tripwire
Description
Application Scene: it can only be applied to the scene where the targets are sparse and there is rarely any covering between targets, such as the perimeter without any guard.
It will trigger alarm when the target passes through the warning line according to the set movement direction. It takes some time from the target appears to the target is confirmed, so it needs to leave some space when setting warning line, do not set it near the covering.
Function Description: it is to detect if there is any object crossing the warning line, it can support different direction selection, such as A->B, B->A and bidirectional, and it can activate record , snapshot and alarm according to the judgment result.
Prerequisites
- Intelligent Network Camera.
- A HDCVI Camera that is connected to a HDCVI DVR that has intelligent features.
- Updated firmware that supports intelligent features.
- Internet Explorer.
IVS Best Practices
To assess issues with IVS compatibility between the camera and NVR, please update both devices to the most current firmware and factory reset the NVR, and use the hard reset button to reset the camera.
Instructions
Description
This article will cover how to configure an IVS Tripwire Alarm on a Dahua recorder with the Old SystemUI
Prerequisites
- IP Camera with IVS added to an NVR, with the Old SystemUI, or an HDCVI Camera that is connected to a HDCVI DVR, with the Old SystemUI, that has IVS
Video Instructions
Step By Step Instructions
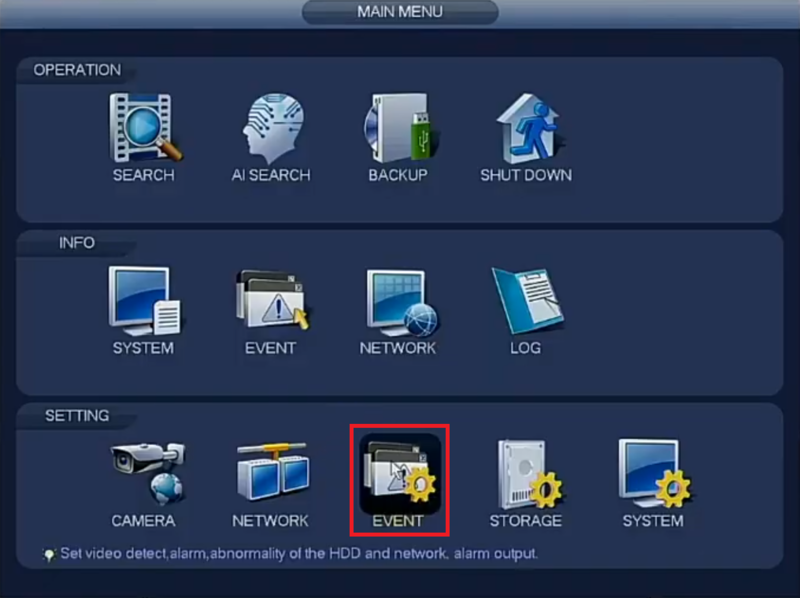
1. From the Main Menu select "Event" in the "Setting" section
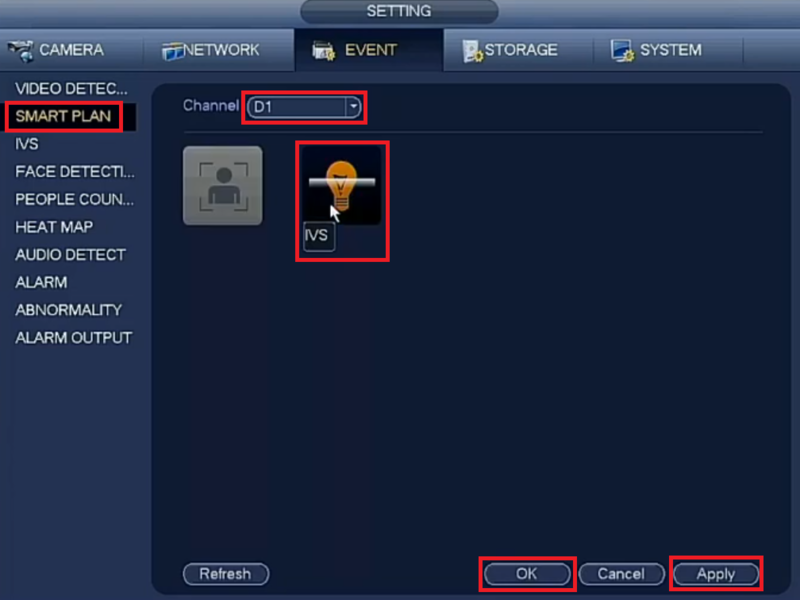
2. Select "Smart Plan" on the left.
Then select the camera channel at the top.
Select and highlight "IVS" (You may need to deselect any other options).
Select "Apply" and then "OK"
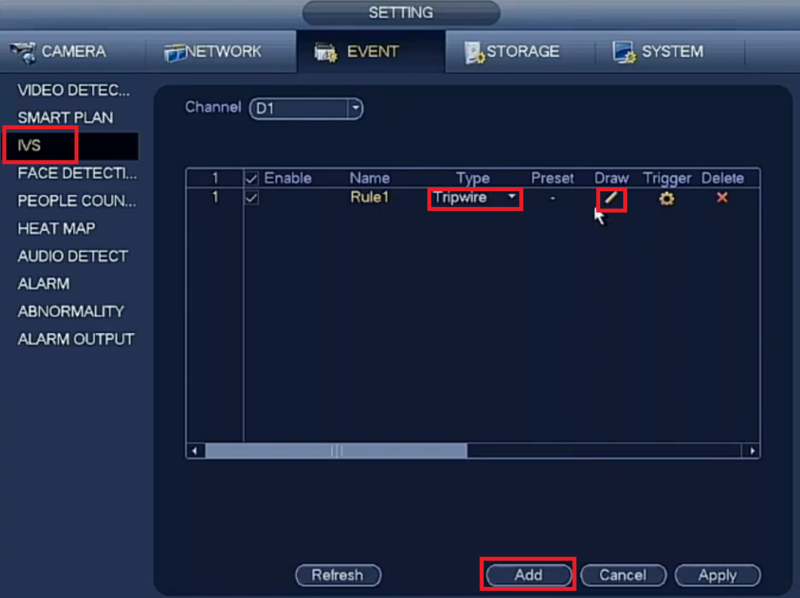
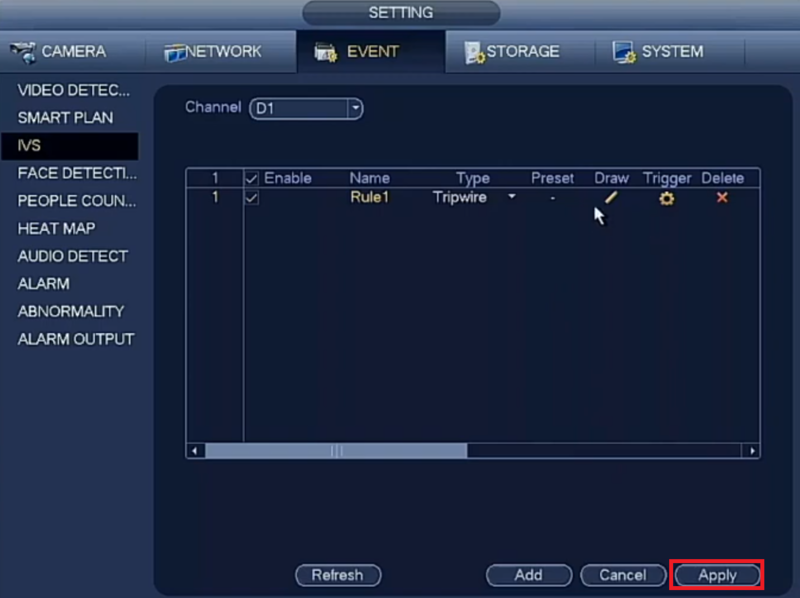
3. Select "IVS" on the left.
Then choose the channel number at the top.
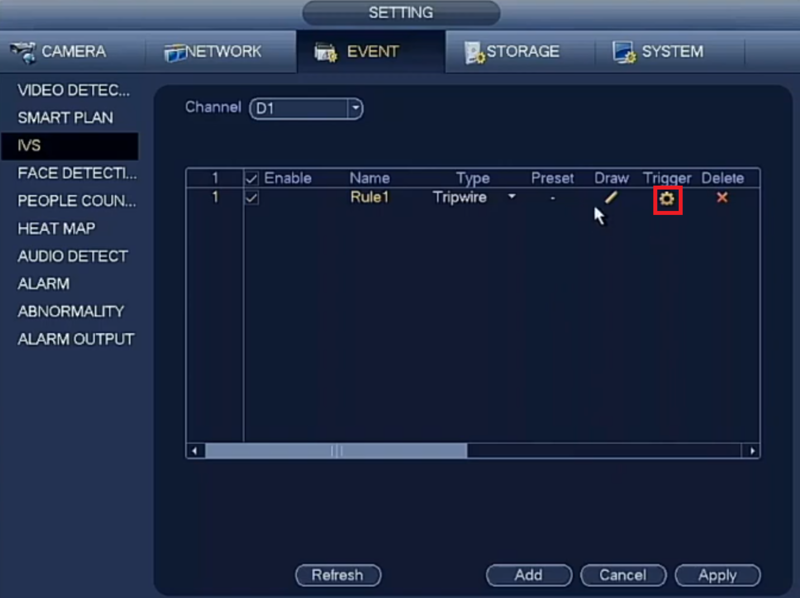
Select "Add" at the bottom to create a new IVS alarm rule.
Click on the drop-down menu under "Type" for the new rule you created and change set it to "Tripwire".
Select the Pencil icon under "Draw"
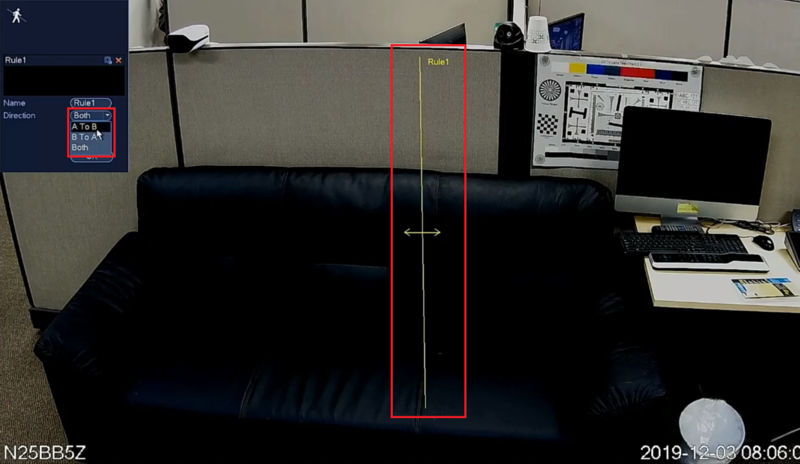
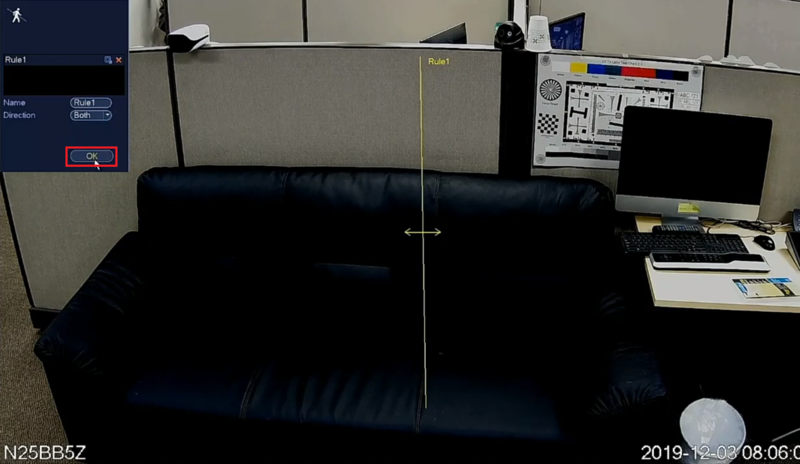
4. Left click anywhere on the camera view to start the tripwire line.
Left click anywhere else on the camera view to complete the segment of the line. Continue moving your mouse and left clicking to continue making multiple segments of the tripwire line.
When done drawing the line segments, right click to finish the line.
Give this rule a name by selecting the text box next to "Name" and typing in a name.
Select the drop-down menu next to "Direction" to choose if the IVS alarm is triggered in both directions ("Both") or just one direction ("A To B" or "B To A")
5. When you are done configuring the Tripwire rules, select "OK".
6. Select the Gear icon under "Trigger" to configure what happens when the tripwire alarm is triggered:
Period - Sets the time and days of the week this alarm can be triggered
Alarm Out - Sets alarm outputs that will be activate when this alarm is triggered
Latch - Sets how long the alarm outputs will stay activated when the alarm is triggered
Send Email - Sends an email, via the settings set in the Email section of the Network settings on the recorder, when the alarm is triggered
Record Channel - Sets which channels are recorded when the alarm is triggered
PTZ Activation - Sets the behavior of a PTZ camera connected to the same recorder when the alarm is triggered
Post-Record - Sets the amount of seconds that are recorded after the alarm event is done being triggered, if "Record Channel" is enabled
Tour - Enables a tour when the alarm is triggered
Buzzer - Makes the recorder emit an audible beeping noise when the alarm is triggered
Log - Records the event information in the system log when the alarm is triggerd
Select "Apply" to save the settings
7. Select "Apply" to save the Tripwire IVS alarm settings
Description
This article will cover how to configure an IVS Tripwire Alarm on a Dahua recorder with the New SystemUI
Prerequisites
- IP Camera with IVS added to an NVR, with the New SystemUI, or an HDCVI Camera that is connected to a HDCVI DVR, with the New SystemUI, that has IVS
Video Instructions
Step By Step Instructions
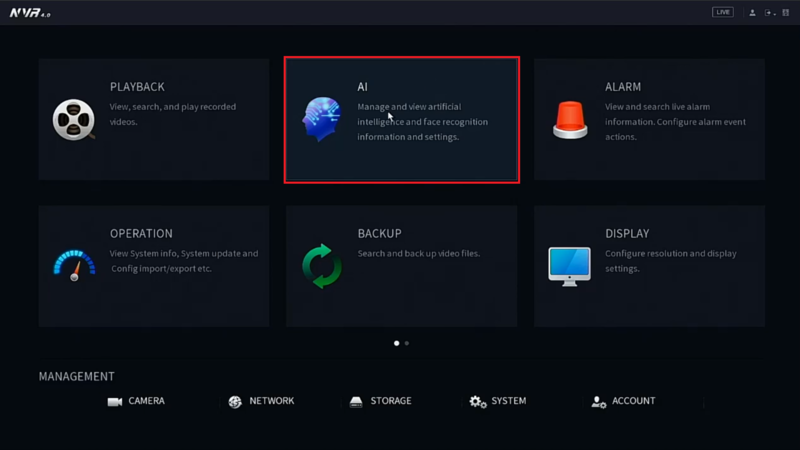
1. From the Main Menu select "AI"
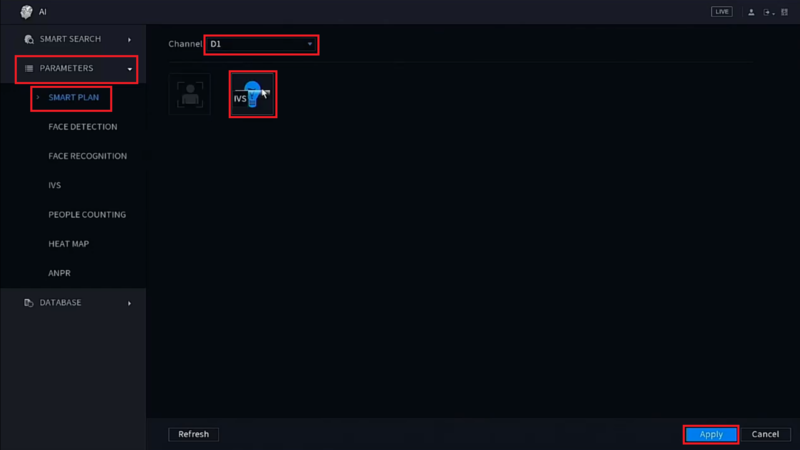
2. Select "Parameters" on the left.
Then select "Smart Plan".
Select the camera channel at the top.
Select and highlight "IVS" (You may need to de-select any other options).
Select "Apply"
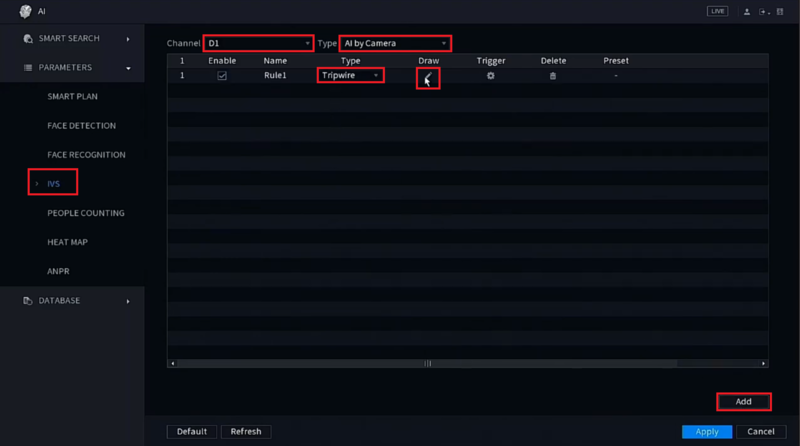
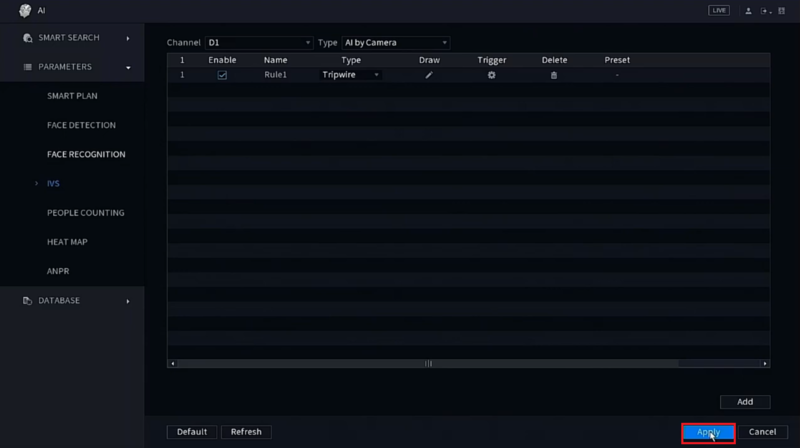
3. Select "IVS" on the left.
Then choose the channel number at the top and if the IVS will be done by the camera or by the recorder, by selecting either "AI by Camera" or "AI by Device" next to the channel number.
Select "Add" at the bottom to create a new IVS alarm rule.
Click on the drop-down menu under "Type" for the new rule you created and change set it to "Tripwire".
Select the Pencil icon under "Draw"
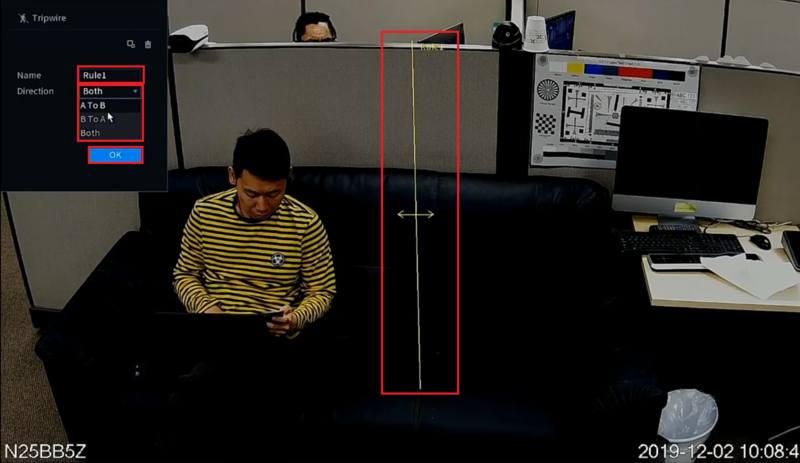
4. Left click anywhere on the camera view to start the tripwire line.
Left click anywhere else on the camera view to complete the segment of the line. Continue moving your mouse and left clicking to continue making multiple segments of the tripwire line.
When done drawing the line segments, right click to finish the line.
Give this rule a name by selecting the text box next to "Name" and typing in a name.
Select the drop-down menu next to "Direction" to choose if the IVS alarm is triggered in both directions ("Both") or just one direction ("A To B" or "B To A").
When you are done configuring the Tripwire rules, select "OK"
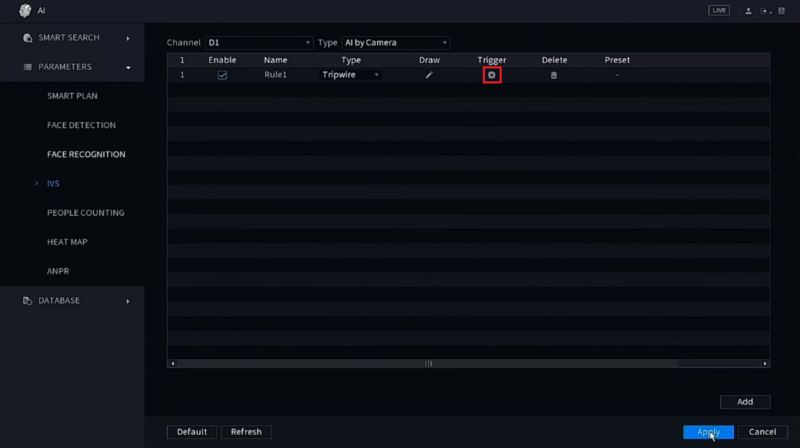
6. Select the Gear icon under "Trigger" to configure what happens when the tripwire alarm is triggered:
Period - Sets the time and days of the week this alarm can be triggered
Alarm Out - Sets alarm outputs that will be activate when this alarm is triggered
Latch - Sets how long the alarm outputs will stay activated when the alarm is triggered
Send Email - Sends an email, via the settings set in the Email section of the Network settings on the recorder, when the alarm is triggered
Record Channel - Sets which channels are recorded when the alarm is triggered
PTZ Activation - Sets the behavior of a PTZ camera connected to the same recorder when the alarm is triggered
Post-Record - Sets the amount of seconds that are recorded after the alarm event is done being triggered, if "Record Channel" is enabled
Tour - Enables a tour when the alarm is triggered
Buzzer - Makes the recorder emit an audible beeping noise when the alarm is triggered
Log - Records the event information in the system log when the alarm is triggerd
Select "Apply" to save the settings
7. Select "Apply" to save the Tripwire IVS alarm settings
Description
Tripwire is used to trigger an alarm when a subject crossed the line in the defined direction, for example from A->B visa versa, or bidirectionally and snapshot,begin recording or activate an alarm.
Prerequisites
- Intelligent Network Camera or an HDCVI Camera that is connected to a HDCVI DVR that has intelligent features.
- Updated firmware that supports intelligent features.
- Internet Explorer.
Video Instructions
Step By Step Instructions
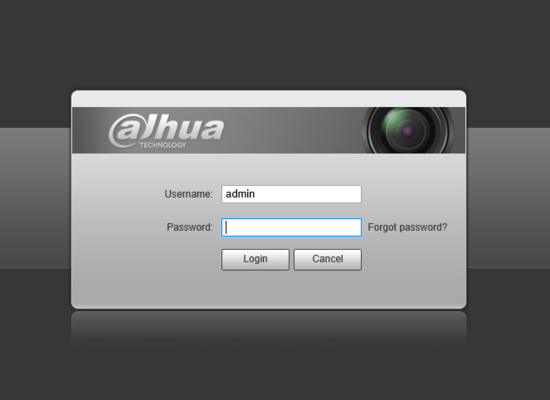
1.Log into device using the Web Service.
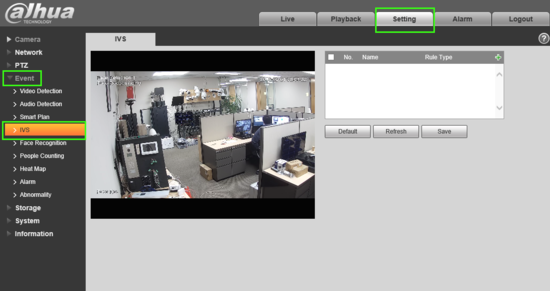
2.Select Setting -> Event -> IVS.
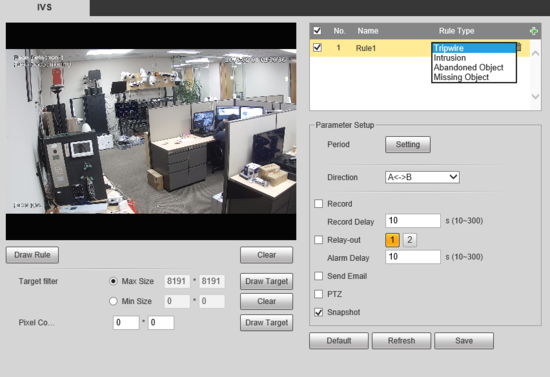
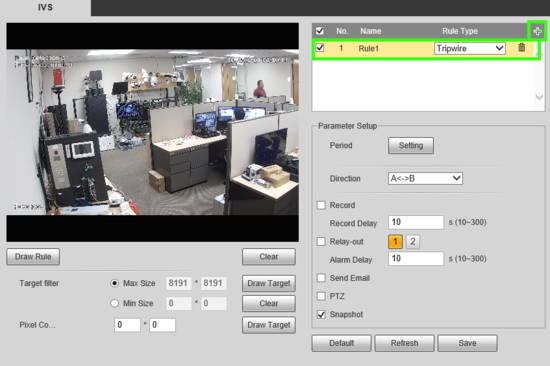
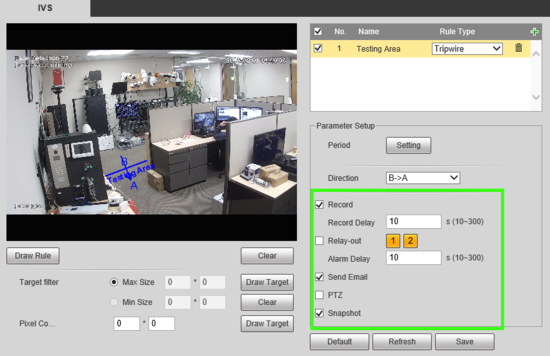
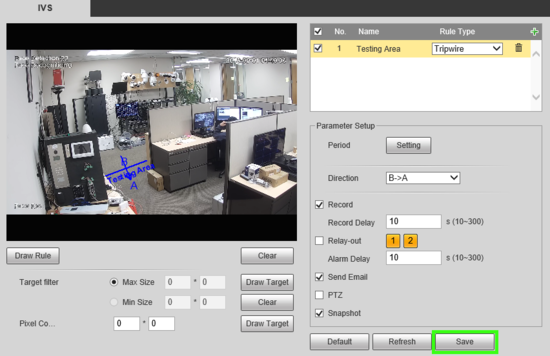
3. Next to Rule Type click "+" in the new rule that shows below, define the Rule Name and in the drop down select "Tripwire" as the rule type
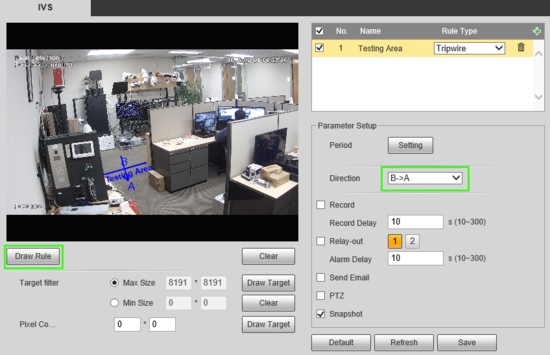
4. Once the rule is created and named, use "Draw Rule" to place your Tripwire line and under the "Direction drop down define in which direction, if only one, crossing is prohibited. In this example crossing from B -> A is prohibited.
5. Click "Setting" next to Period and a new window will appear. Here you can set the active time periods for the tripwire. By default the tripwire will be active 24/7. Each day can be edited individually or you can select multiple at once by checking the boxes and using the forms below to enter times. Up to 6 periods can be set for each day.
6. Next be sure to check any other options you may want such as Record & Record Delay, Snapshot, Relay out (1, 2, or both)alarm Delay and email. Note: For instructions on email setup see Email Setup. To record or save snapshots an SD card or recorder is required.
7. When finished click Save.
Description
This article will cover how to configure an IVS Tripwire Alarm on a Dahua recorder with the New WebUI
Prerequisites
- An IP Camera with IVS, with the New WebUI; or an IP camera with IVS added to an NVR, with the New WebUI; or an HDCVI Camera that is connected to a HDCVI DVR, with the New WebUI, that has IVS
- A computer on the same network as the camera or recorder
Video Instructions
Step By Step Instructions
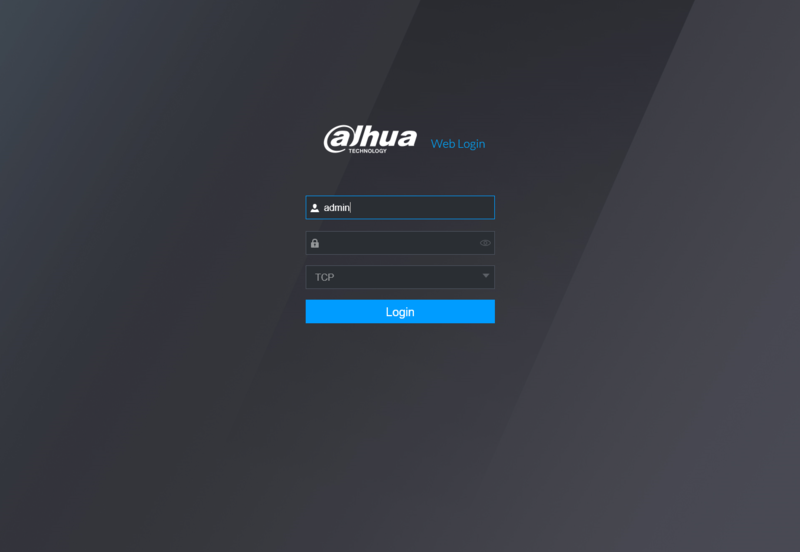
1. Navigate in a web browser to the IP address of the camera or recorder and log into the device
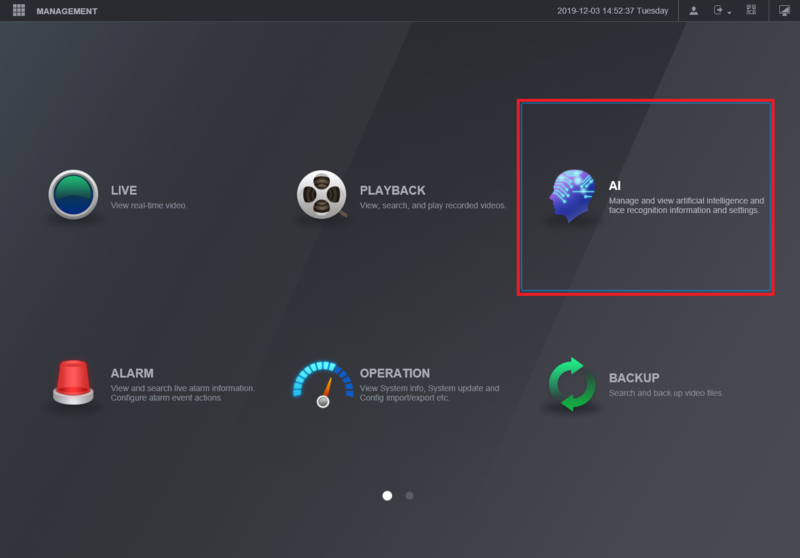
2. From the Main Menu select "AI"
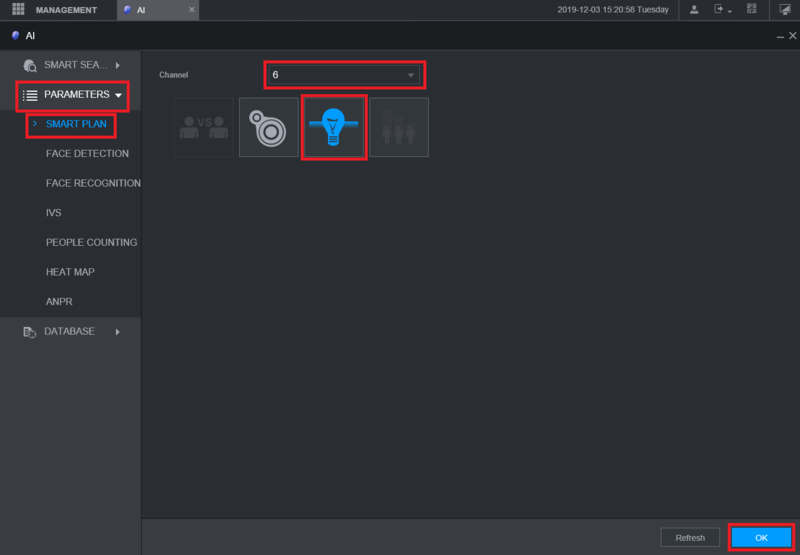
3. Select "Parameters" on the left.
Then select "Smart Plan".
Select the camera channel at the top.
Select and highlight "IVS" (You may need to de-select any other options).
Select "OK"
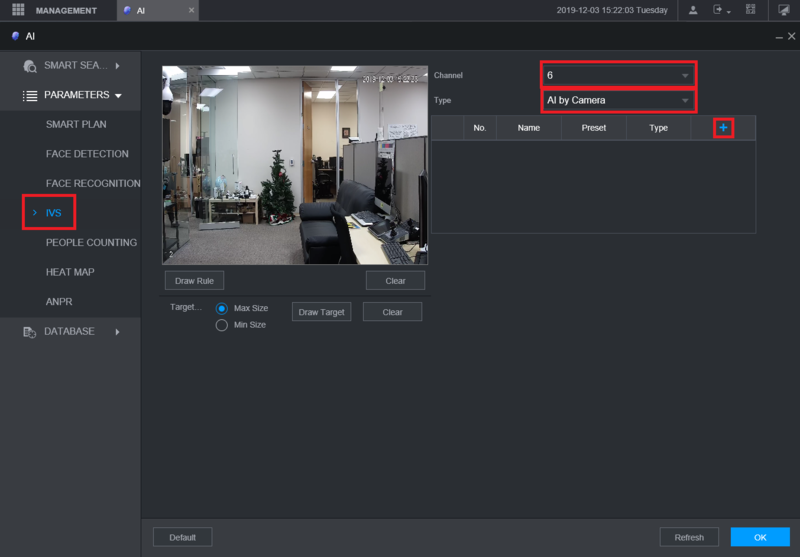
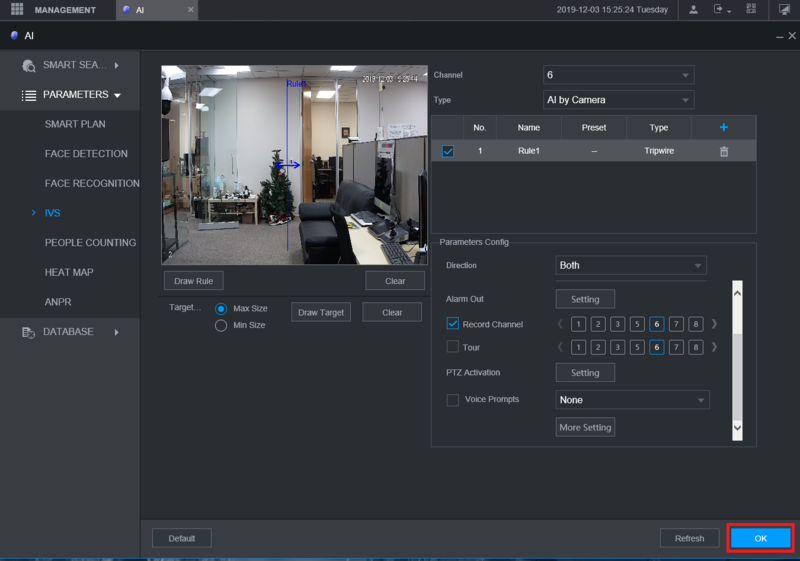
4. Select "IVS" on the left.
Then choose the channel number at the top right and if the IVS will be done by the camera or by the recorder, by selecting either "AI by Camera" or "AI by Device" below the channel number.
Select the Plus button on the right to create a new IVS alarm rule
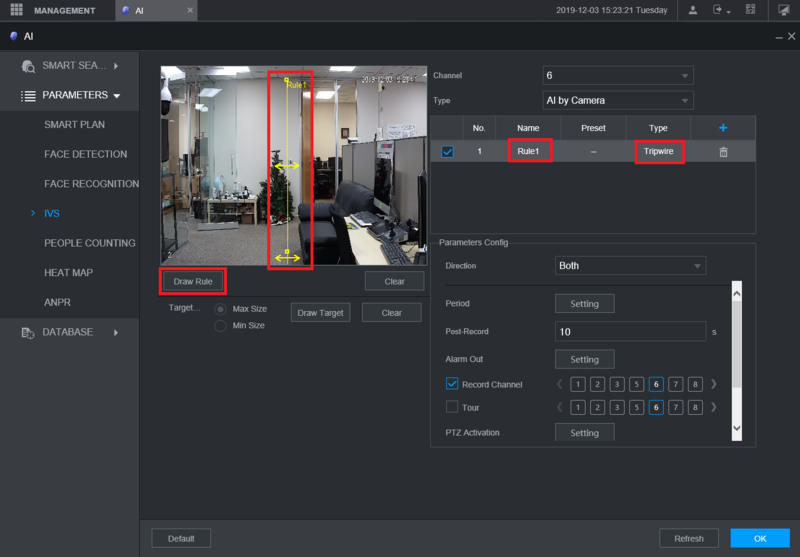
5. Double-click on the option under "Type" for the new rule you created and set it to "Tripwire".
Give this rule a name by double-clicking the text box under "Name" and typing in a name.
Select the "Draw Rule" button on the left.
Left click anywhere on the camera view to start the tripwire line.
Left click anywhere else on the camera view to complete the segment of the line. Continue moving your mouse and left clicking to continue making multiple segments of the tripwire line.
When done drawing the line segments, right click to finish the line.
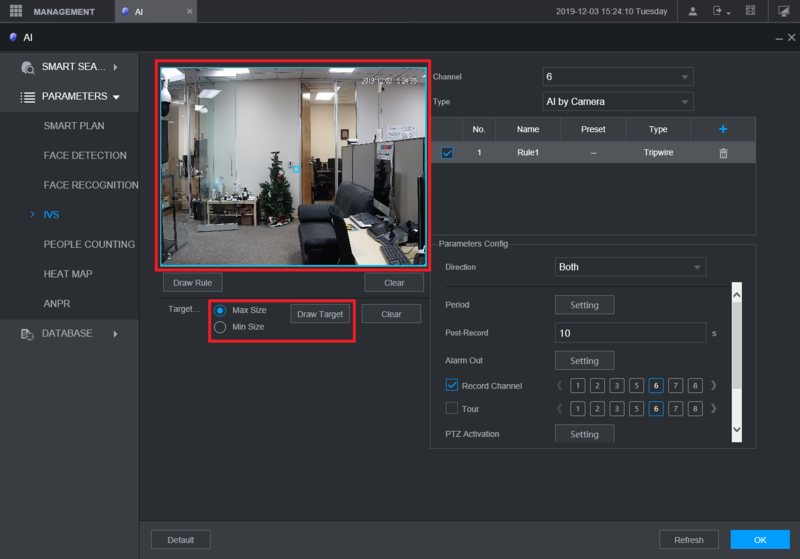
6. Select "Draw Target".
Then select "Max Size" and adjust the size of the box on the camera view to the relative maximum size for a target that can trigger the tripwire.
Select "Min Size" and adjust the size of the box on the camera view to the relative minimum size for a target that can trigger the tripwire
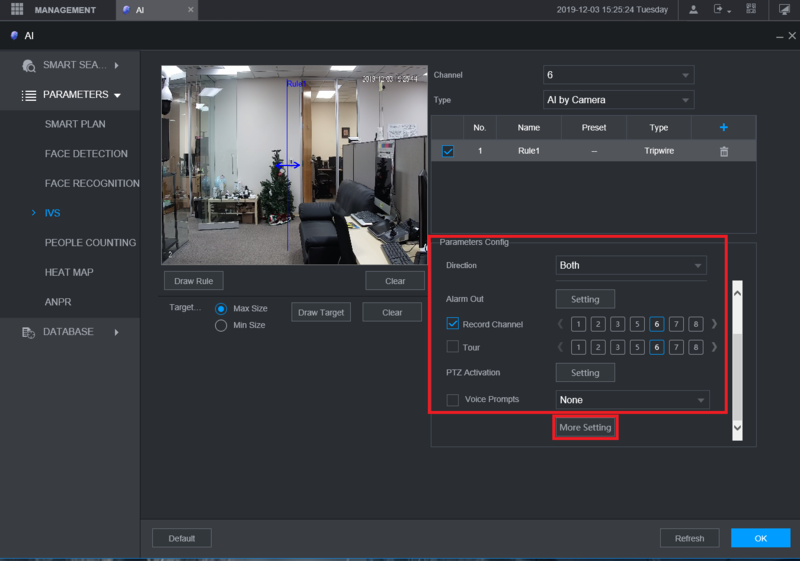
7. Select the drop-down menu next to "Direction" to choose if the IVS alarm is triggered in both directions ("Both") or just one direction ("A To B" or "B To A").
Adjust the settings below "Direction" to configure what happens when the tripwire alarm is triggered:
Period - Sets the time and days of the week this alarm can be triggered
Post-Record - Sets the amount of seconds that are recorded after the alarm event is done being triggered, if "Record Channel" is enabled
Alarm Out - Sets alarm outputs that will be activate when this alarm is triggered
Record Channel - Sets which channels are recorded when the alarm is triggered
Tour - Enables a tour when the alarm is triggered
PTZ Activation - Sets the behavior of a PTZ camera connected to the same recorder when the alarm is triggered
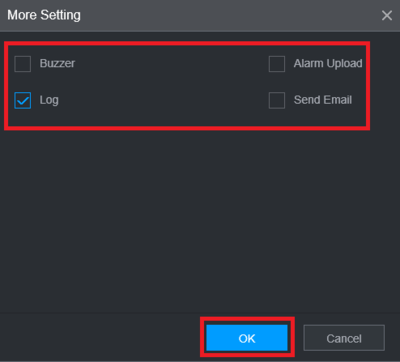
Select "More Settings for the following options:
Buzzer - Makes the recorder emit an audible beeping noise when the alarm is triggered
Log - Records the event information in the system log when the alarm is triggerd
Send Email - Sends an email, via the settings set in the Email section of the Network settings on the recorder, when the alarm is triggered
Select "OK" to save the settings
8. Select "OK" to save the Tripwire IVS alarm settings
Prerequisites
- SmartPSS 2.0
- IVS capab device with Face Detection
- Upgraded devices to latest firmware
Video Instructions
Step by Step Instructions
1. Launch and Log into Smart PSS
2. Select "Live".
3. From Live View Select Device that is IVS capable -> right click on device and select IVS Config.
4. Select Trip Wire -> Select Next.
5. Draw a detection zone.
6.Select Rule Config -> Add Rule -> Draw Rule. More than one rule can be added and drawn.
6. Select Config -> Parameters -> choose direction (in this tutorial it is set to bi-directional) -> Track may be enable to track subject.
7. Set Arming Schedule -> Select Save
8. From Parameters you may select disturbance filter and Adjust sensitivity -> apply and save.
600pxVideo Instructions
Step by Step Instructions
1. Navigate through Internet Explorer on the camera Setup-> Event -> IVS Analyse -> Click “Enable” button, the default rule name is line 1, line 2, line 3, line 4 when adding rule, it is ok to modify the rule name.
2. Click “Draw Rule” and draw a warning line in the image according to the actual needs, it will trigger alarm when the target is crossing the warning line according to the set movement direction.
3. Select one of the following directions: A->B, A<-B, AB and it is to judge if it will trigger intelligent alarm when tripwire happens according to the selected direction.
4. Working period setting, default it all day.
5. Support alarm activation setup: record, relay-out, send email and snapshot.
6. Target filter can set max size and min size; it means the max and min target it can detect.
System Interface Setup
Prerequisites
- NVR with IVS capable
- Camera with IVS capable
Video Instructions
Step by Step Instructions
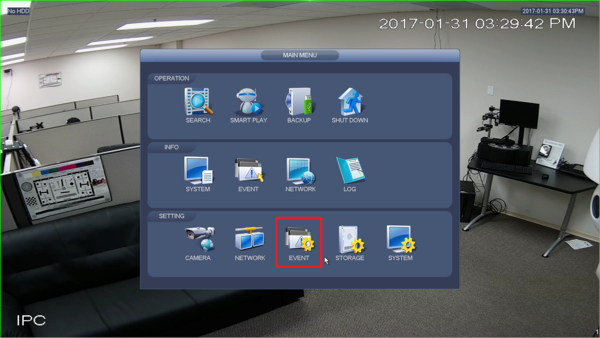
1. Go to Event.
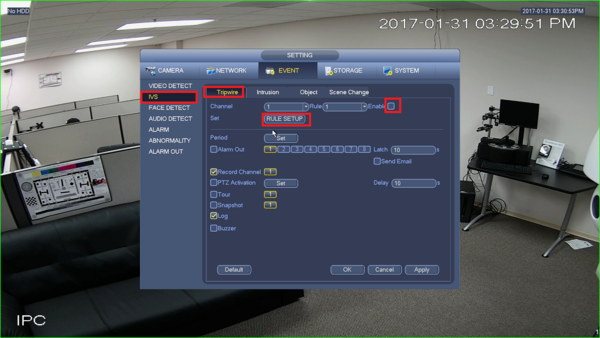
2. Enable tripwire under IVS and then click on rule setup.
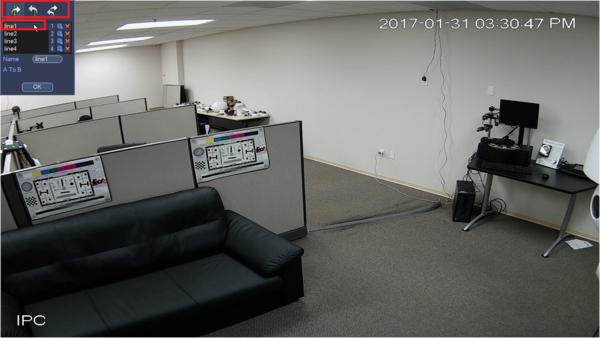
3. Select direction of the tripwire and click on which line to draw.
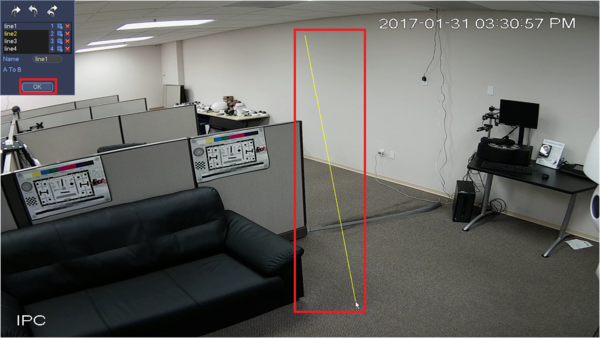
4. Draw the line and click ok.
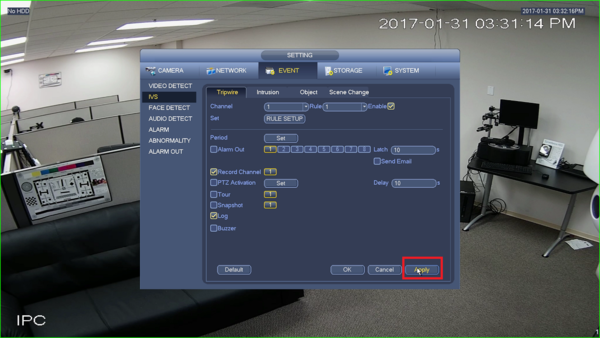
5. Click apply.
SmartPSS Setup
Prerequisites
- SmartPSS
- IVS capable device with Face Detection
- Upgraded devices to latest firmware
Video Instructions
Step by Step Instructions
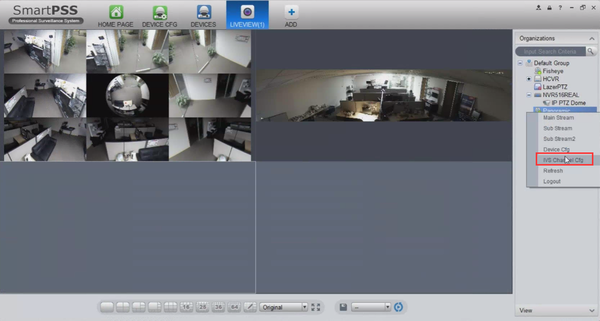
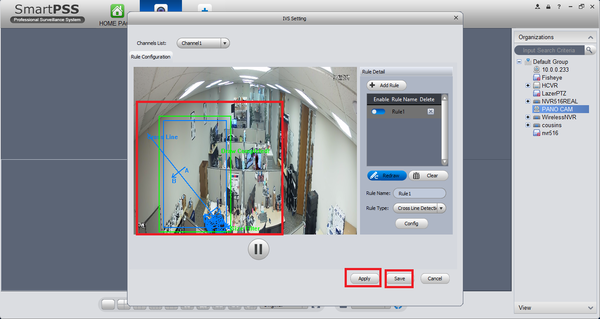
1. Right click and select IVS channel config.
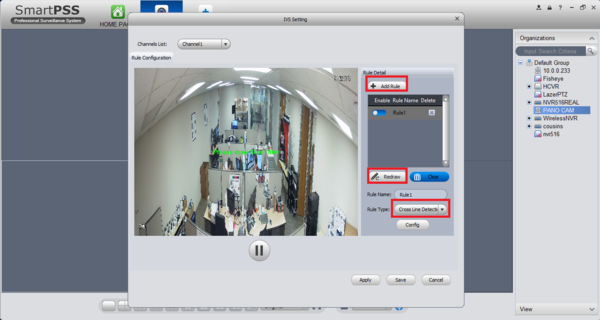
2. Click Add Rule if rule doesn't exist, select cross line detection, click on draw/redraw.
3. Draw Rule -> select max and min size -> apply -> save.
SmartPSS 2 Setup
Prerequisites
- SmartPSS 2.0
- IVS capab device with Face Detection
- Upgraded devices to latest firmware
Video Instructions
Step by Step Instructions
1. Launch and Log into Smart PSS
2. Select "Live".
3. From Live View Select Device that is IVS capable -> right click on device and select IVS Config.
4. Select Trip Wire -> Select Next.
5. Draw a detection zone.
6.Select Rule Config -> Add Rule -> Draw Rule. More than one rule can be added and drawn.
6. Select Config -> Parameters -> choose direction (in this tutorial it is set to bi-directional) -> Track may be enable to track subject.
7. Set Arming Schedule -> Select Save
8. From Parameters you may select disturbance filter and Adjust sensitivity -> apply and save.


