Difference between revisions of "Template:DB11 Add to Recorder WebUI New"
| (One intermediate revision by the same user not shown) | |||
| Line 9: | Line 9: | ||
===Step By Step Instructions=== | ===Step By Step Instructions=== | ||
| + | 1. From the Main Menu of the WebUI | ||
| + | |||
| + | Click Management | ||
| + | |||
| + | Click Camera | ||
| + | |||
| + | [[File:Add_DB11_Dahua_Recorder_-_WebUI_New_-_1.jpg|500px]] | ||
| + | |||
| + | 2. Under Registration | ||
| + | |||
| + | Click Device Search | ||
| + | |||
| + | The recorder will scan the local network for devices | ||
| + | |||
| + | [[File:Add_DB11_Dahua_Recorder_-_WebUI_New_-_2.jpg|500px]] | ||
| + | |||
| + | 3. If the DB11 does not appear you can add it manually | ||
| + | |||
| + | Click Manual Add | ||
| + | |||
| + | [[File:Add_DB11_Dahua_Recorder_-_WebUI_New_-_3.jpg|500px]] | ||
| + | |||
| + | 4. The Manual Add interface will appear | ||
| + | |||
| + | Enter the corect information for the DB11 | ||
| + | * IP Address | ||
| + | * TCP Port | ||
| + | * Username | ||
| + | * Password | ||
| + | |||
| + | Click OK | ||
| + | |||
| + | [[File:Add_DB11_Dahua_Recorder_-_WebUI_New_-_4.jpg|500px]] | ||
| + | |||
| + | 5. The DB11 will move to Added Device | ||
| + | |||
| + | Click the Pencil icon under Modify to change any settings form the DB11, such as Password or Port information (if required) | ||
| + | |||
| + | [[File:Add_DB11_Dahua_Recorder_-_WebUI_New_-_5.jpg|500px]] | ||
| + | |||
| + | 6. Once the DB11 is successfully connected you will see a green light under status | ||
| + | |||
| + | [[File:Add_DB11_Dahua_Recorder_-_WebUI_New_-_6.jpg|500px]] | ||
| + | |||
| + | 7. The DB11 video feed will appear in live view | ||
| + | |||
| + | [[File:Add_DB11_Dahua_Recorder_-_WebUI_New_-_7.jpg|500px]] | ||
Latest revision as of 18:12, 5 December 2019
Description
These instructions will show you how to add a DB11 to a Dahua recorder at the WebUI with NewUI
Prerequisites
- DB11
- Dahua NVR, DVR, or XVR
- Completed Initial Setup of DB11
Video Instructions
Step By Step Instructions
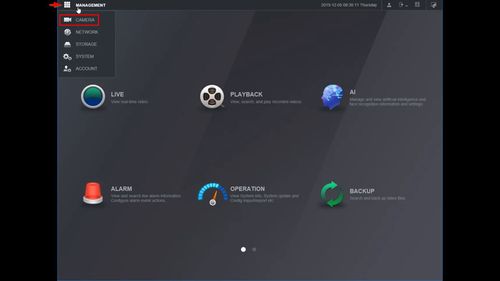
1. From the Main Menu of the WebUI
Click Management
Click Camera
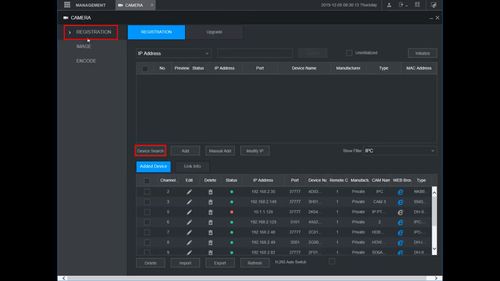
2. Under Registration
Click Device Search
The recorder will scan the local network for devices
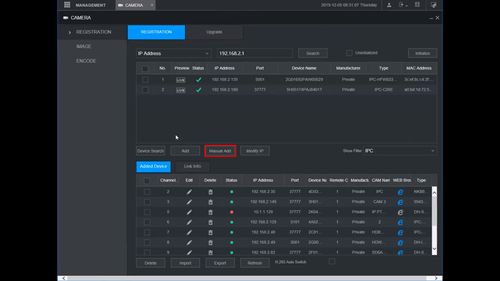
3. If the DB11 does not appear you can add it manually
Click Manual Add
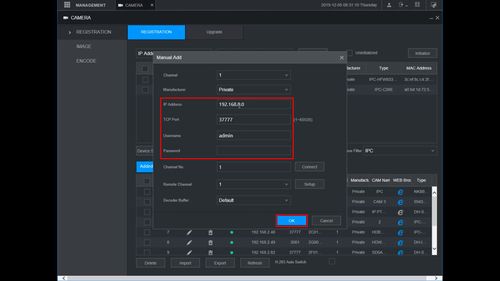
4. The Manual Add interface will appear
Enter the corect information for the DB11
- IP Address
- TCP Port
- Username
- Password
Click OK
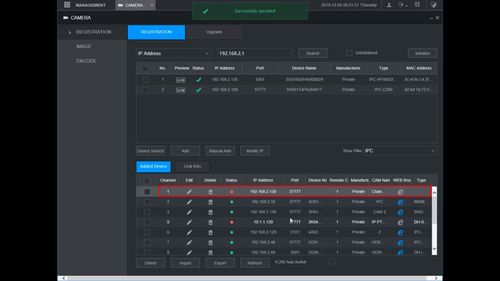
5. The DB11 will move to Added Device
Click the Pencil icon under Modify to change any settings form the DB11, such as Password or Port information (if required)
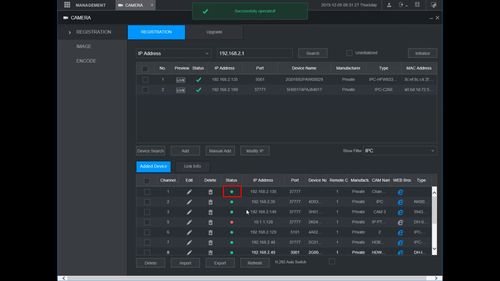
6. Once the DB11 is successfully connected you will see a green light under status
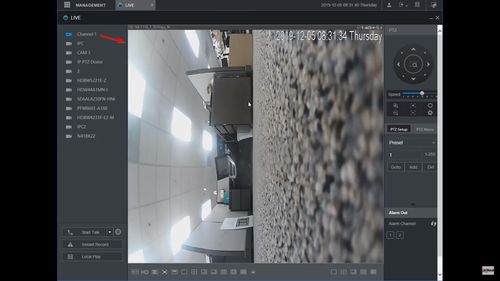
7. The DB11 video feed will appear in live view
