Difference between revisions of "PTZ/Instructions/Tour"
(Created page with "=Tour= ==Instructions== <div class="toccolours mw-collapsible mw-collapsed"> 250px<span style="font-size:180%;">'''SystemUI Old'''</spa...") |
|||
| (9 intermediate revisions by 3 users not shown) | |||
| Line 1: | Line 1: | ||
=Tour= | =Tour= | ||
| + | __NOTOC__ | ||
| + | ==Description== | ||
| + | Tour allows the PTZ camera to move and cycle between established Preset locations | ||
| + | |||
==Instructions== | ==Instructions== | ||
<div class="toccolours mw-collapsible mw-collapsed"> | <div class="toccolours mw-collapsible mw-collapsed"> | ||
[[File:Icon_for_type_SystemUI_Old.png|250px]]<span style="font-size:180%;">'''SystemUI Old'''</span> | [[File:Icon_for_type_SystemUI_Old.png|250px]]<span style="font-size:180%;">'''SystemUI Old'''</span> | ||
| − | <div class="mw-collapsible-content">{{Template: | + | <div class="mw-collapsible-content">{{Template:PTZ_Tour_SystemUI_OldGUI}}</div> |
</div> | </div> | ||
<div class="toccolours mw-collapsible mw-collapsed"> | <div class="toccolours mw-collapsible mw-collapsed"> | ||
[[File:Icon_for_type_SystemUI_New.png|250px]]<span style="font-size:180%;">'''SystemUI New'''</span> | [[File:Icon_for_type_SystemUI_New.png|250px]]<span style="font-size:180%;">'''SystemUI New'''</span> | ||
| − | <div class="mw-collapsible-content">{{Template: | + | <div class="mw-collapsible-content">{{Template:PTZ_Tour_SystemUI_NewGUI}}</div> |
</div> | </div> | ||
<div class="toccolours mw-collapsible mw-collapsed"> | <div class="toccolours mw-collapsible mw-collapsed"> | ||
[[File:Icon_for_type_WebUI_Old.png|250px]]<span style="font-size:180%;">'''WebUI Old'''</span> | [[File:Icon_for_type_WebUI_Old.png|250px]]<span style="font-size:180%;">'''WebUI Old'''</span> | ||
| − | <div class="mw-collapsible-content">{{Template: | + | <div class="mw-collapsible-content">{{Template:PTZ_Tour_WebUI_Old}}</div> |
</div> | </div> | ||
<div class="toccolours mw-collapsible mw-collapsed"> | <div class="toccolours mw-collapsible mw-collapsed"> | ||
[[File:Icon_for_type_WebUI_New.png|250px]]<span style="font-size:180%;">'''WebUI New'''</span> | [[File:Icon_for_type_WebUI_New.png|250px]]<span style="font-size:180%;">'''WebUI New'''</span> | ||
| − | <div class="mw-collapsible-content">{{Template: | + | <div class="mw-collapsible-content">{{Template:PTZ_Tour_WebUI_New}}</div> |
</div> | </div> | ||
<div class="toccolours mw-collapsible mw-collapsed"> | <div class="toccolours mw-collapsible mw-collapsed"> | ||
[[File:Icon_for_type_SmartPSS.png|250px]]<span style="font-size:180%;">'''SmartPSS'''</span> | [[File:Icon_for_type_SmartPSS.png|250px]]<span style="font-size:180%;">'''SmartPSS'''</span> | ||
| − | <div class="mw-collapsible-content">{{Template: | + | <div class="mw-collapsible-content">{{Template:PTZ_Tour_SmartPSS}}</div> |
</div> | </div> | ||
<div class="toccolours mw-collapsible mw-collapsed"> | <div class="toccolours mw-collapsible mw-collapsed"> | ||
| − | [[File:Icon_for_type_DSS_Express_S.png|250px]]<span style="font-size:180%;">'''DSS Express | + | [[File:Icon_for_type_DSS_Express_S.png|250px]]<span style="font-size:180%;">'''DSS Express'''</span> |
| − | <div class="mw-collapsible-content">{{Template: | + | <div class="mw-collapsible-content">{{Template:PTZ_Tour_DSS_Express}}</div> |
</div> | </div> | ||
<div class="toccolours mw-collapsible mw-collapsed"> | <div class="toccolours mw-collapsible mw-collapsed"> | ||
[[File:iDMSS_Plus_Icon2.jpg|150px]]<span style="font-size:180%;">'''Mobile:iDMSS Plus & gDMSS Plus '''</span> | [[File:iDMSS_Plus_Icon2.jpg|150px]]<span style="font-size:180%;">'''Mobile:iDMSS Plus & gDMSS Plus '''</span> | ||
| − | <div class="mw-collapsible-content">{{Template: | + | <div class="mw-collapsible-content">{{Template:PTZ_Tour_MobileUI_DMSS}}</div> |
</div> | </div> | ||
Latest revision as of 22:42, 1 April 2021
Tour
Description
Tour allows the PTZ camera to move and cycle between established Preset locations
Instructions
How to Setup Tour
Prerequisites
- Dahua Network PTZ
- PTZ Presets created - How To Setup PTZ Presets
Video Instructions
Step by Step Instructions
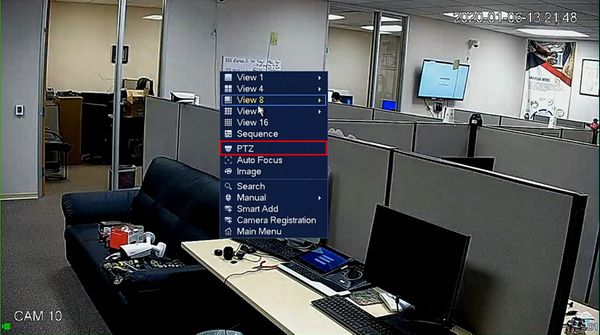
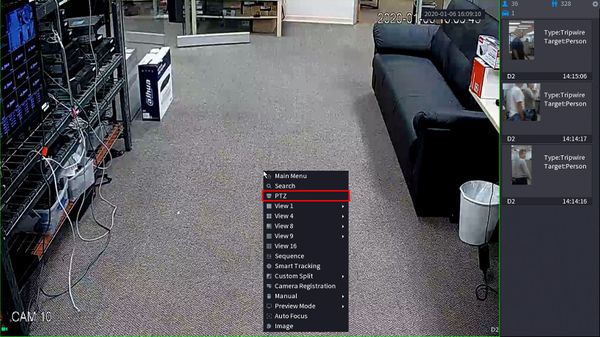
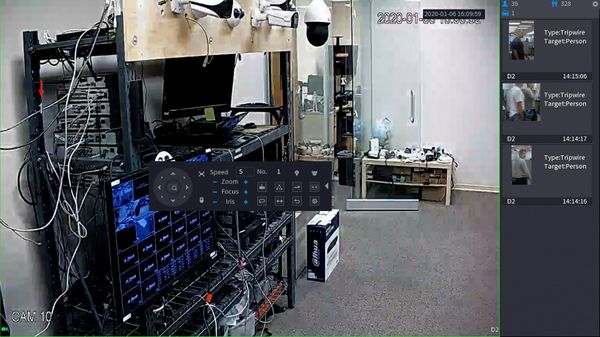
1. From Live View right click to open the Menu
Click PTZ
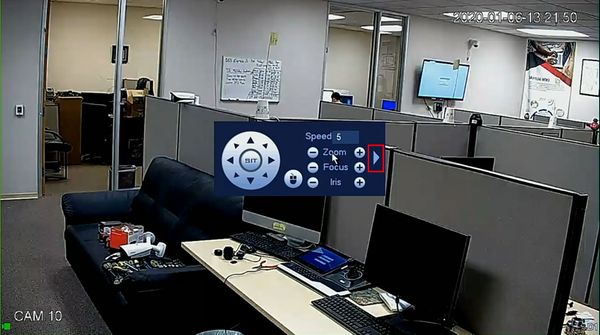
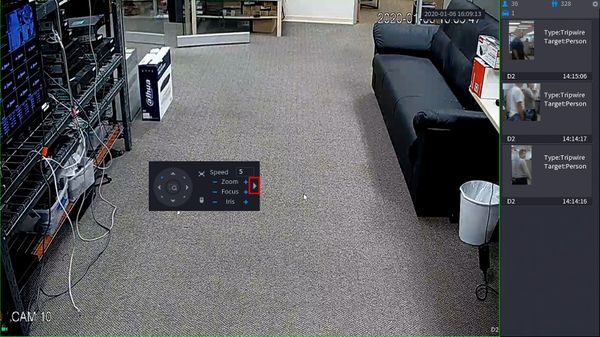
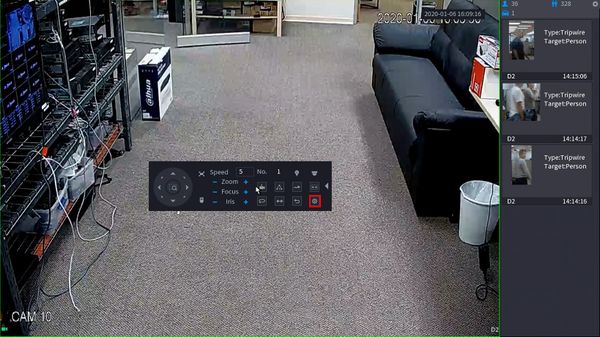
2. Click the arrow to expand the PTZ menu
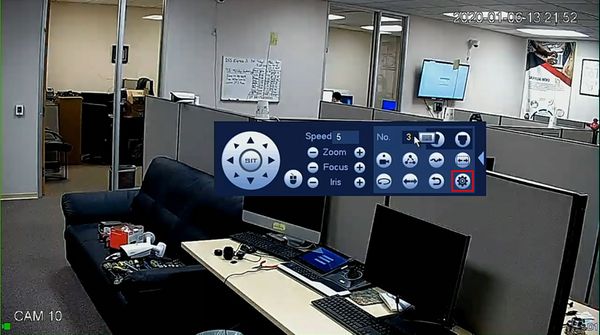
3. Click the gear icon to open the settings
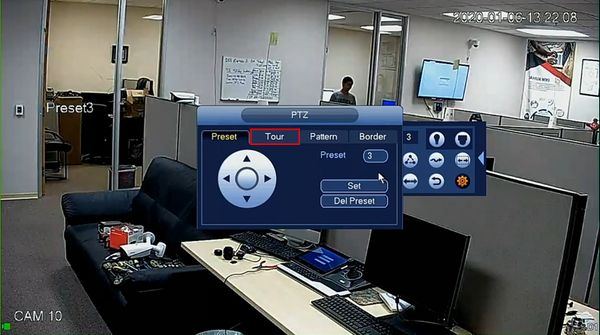
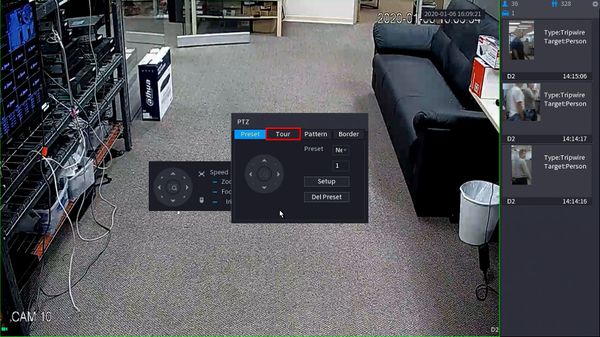
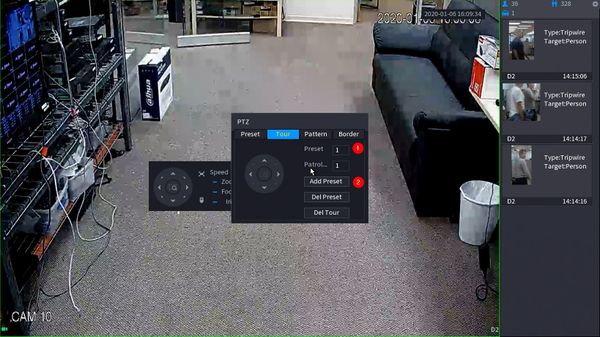
4. Click the Tour tab
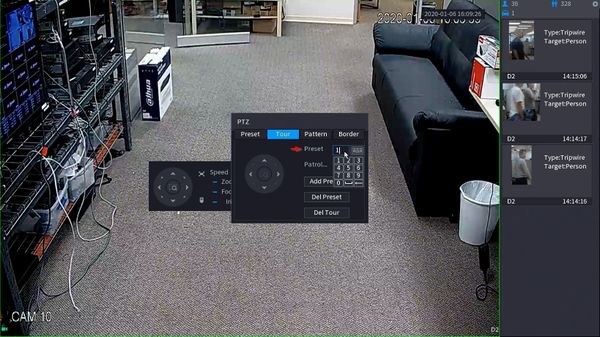
5. To begin adding steps to the Tour
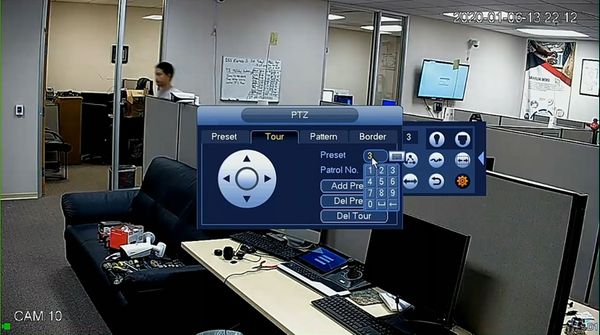
Click inside the Preset field
Use the interface to select the Preset #
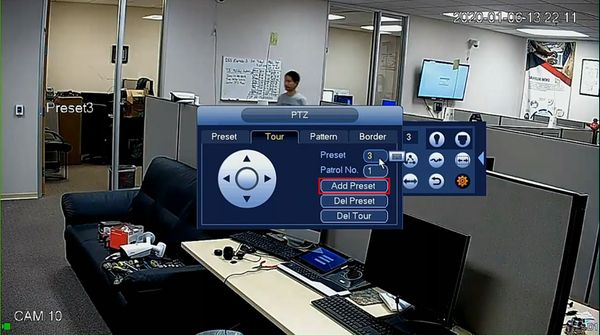
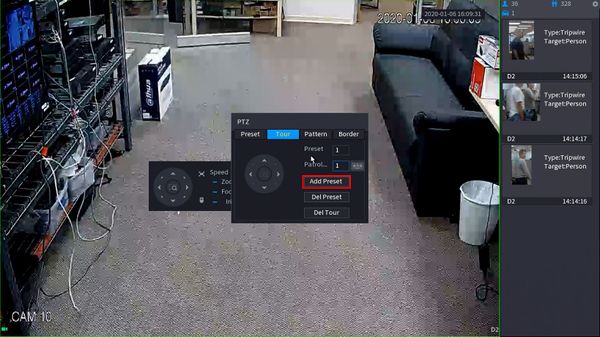
Then click Add Preset
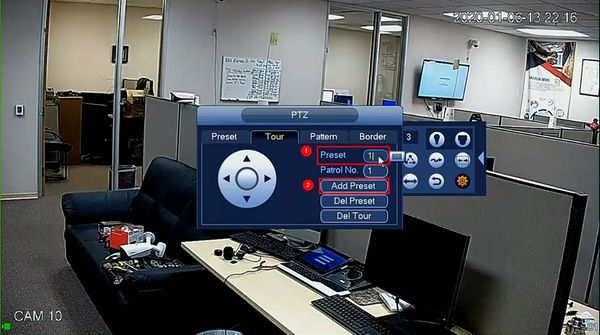
6. Repeat this process for every step you wish to add to the Tour
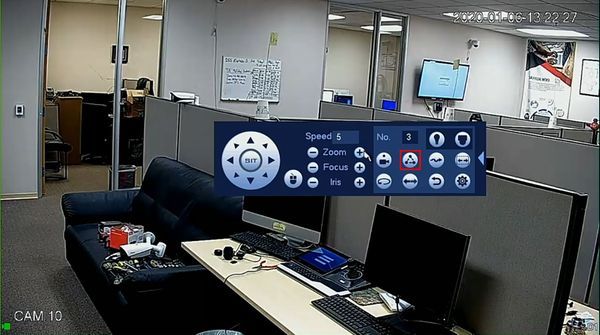
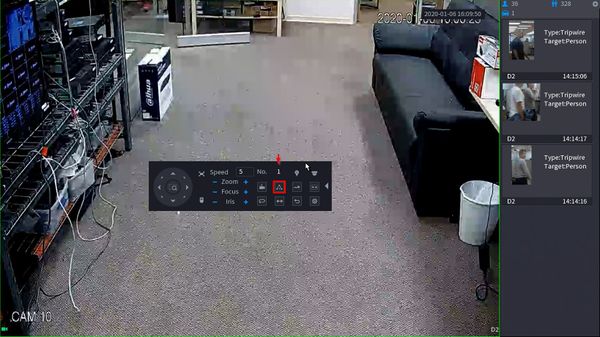
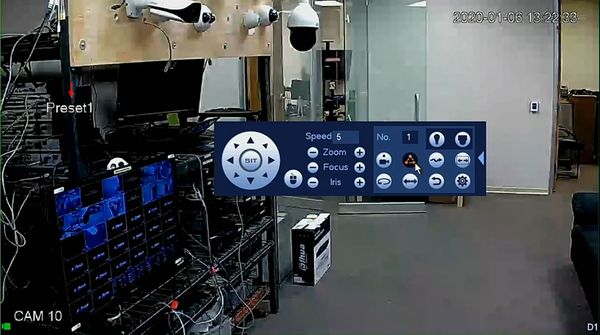
7. To run the created Tour
Click the Tour icon
8. Click in the No. field to select the Tour number
9. The Tour will begin and display the current status/preset position
How to Setup Tour
Prerequisites
- Dahua Network PTZ
- PTZ Presets created - How To Setup PTZ Presets
Video Instructions
Step by Step Instructions
1. From Live View right click to open the Menu
Select PTZ
2. Click the arrow to expand the PTZ menu
3. Click the gear icon to open the settings
4. Click the Tour tab
5. To begin adding steps to the Tour
Click inside the Preset field
Use the interface to select the Preset #
Then click Add Preset
6. Repeat this process for every step you wish to add to the Tour
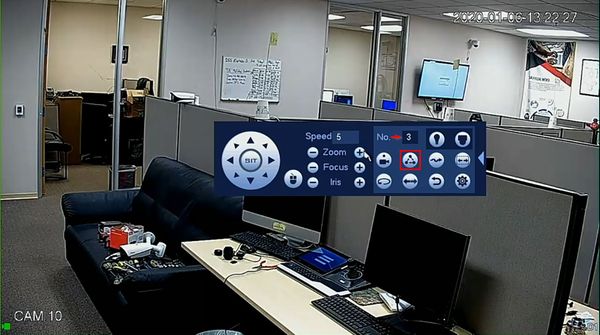
7. To run the created Tour
Click in the No. field to select the Tour number
Click the Tour icon
8. The Tour will begin and display the current status/preset position
How to Setup Tour
Prerequisites
- Dahua Network PTZ
- Internet Explorer
- IP Address of Network PTZ
- PTZ Presets created - How To Setup PTZ Presets
Video Instructions
Step by Step Instructions
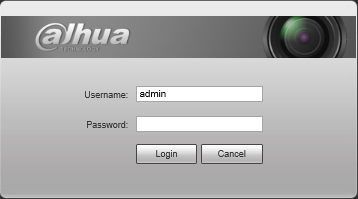
1. Login to your IP PTZ camera via Internet Explorer.
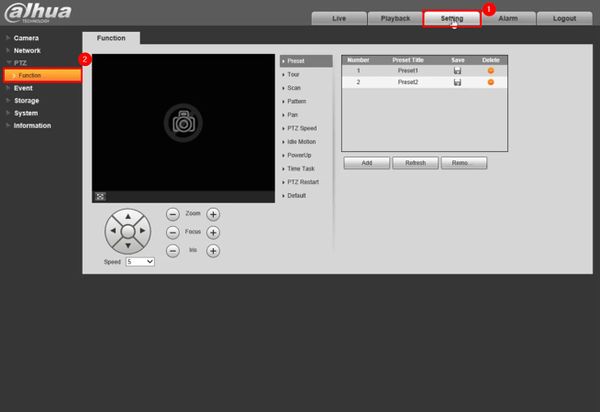
2. Click Setting
Then under PTZ, click Function
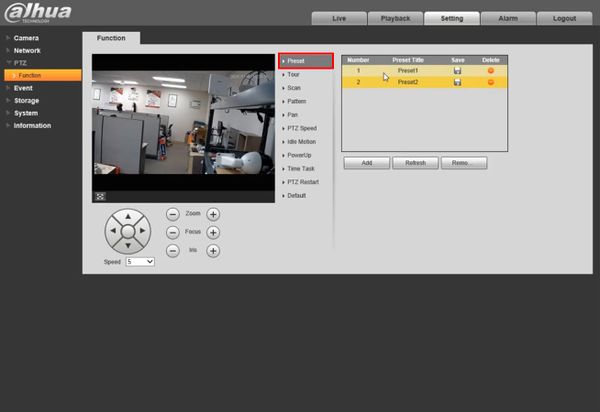
3. Click Preset
Confirm presets have been created and appear in the list. Creating a tour requires starting by creating presets for the camera
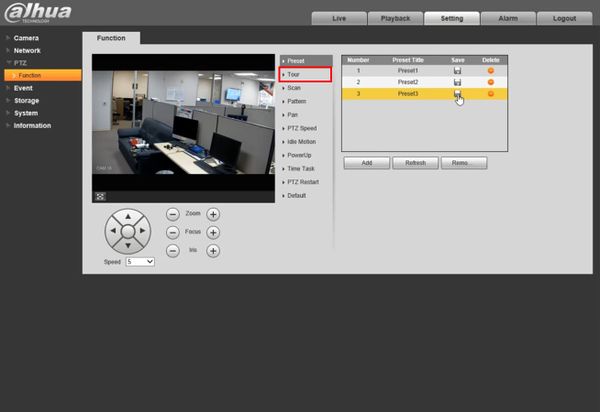
4. Click Tour
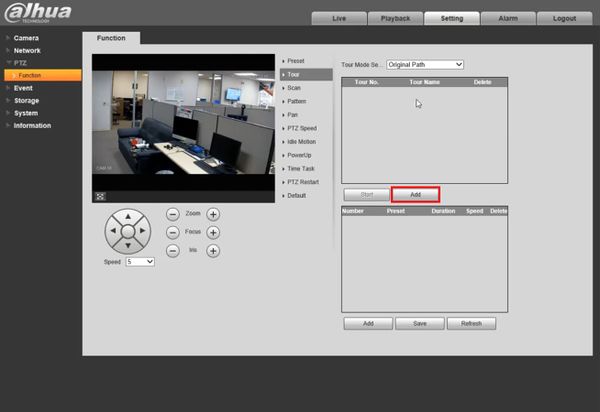
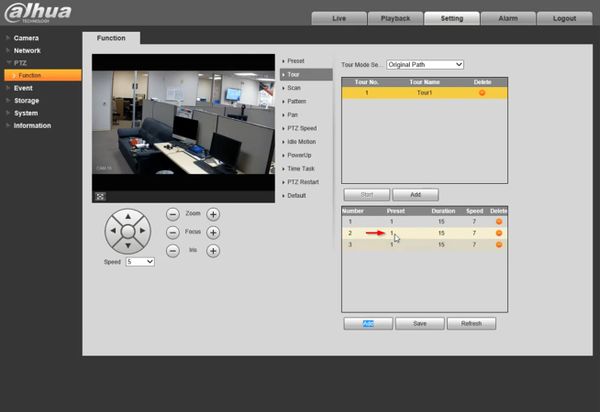
5. Click Add to create a new Tour
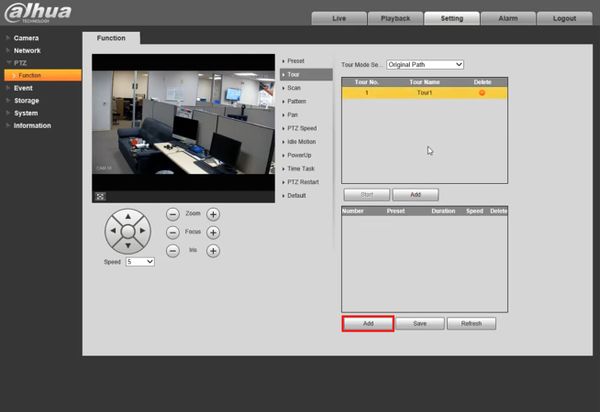
6. Click Add to begin adding steps to the tour. Add as many steps as required
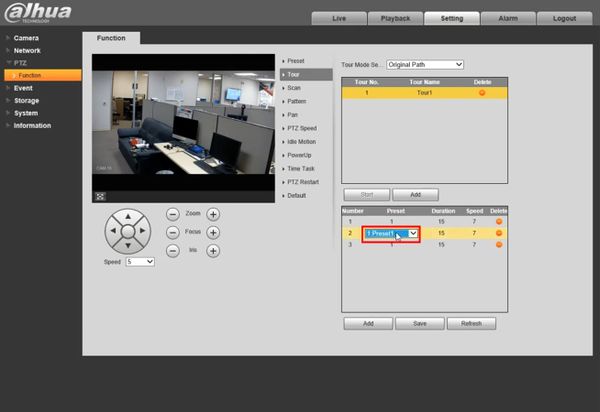
7. Click inside the field under the Preset column to edit
Use the drop-down box to select the Preset
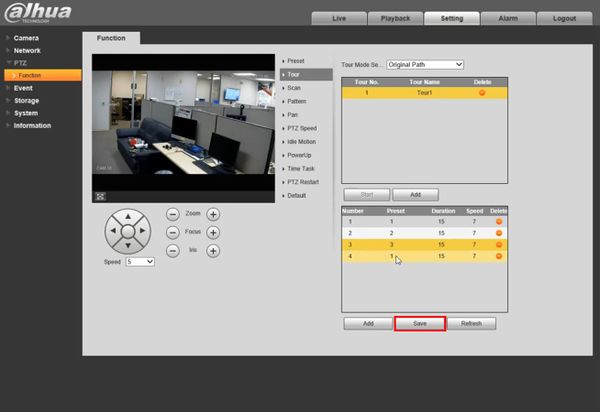
The same adjustments can be made for Duration and Speed for each step to configure the tour as desired
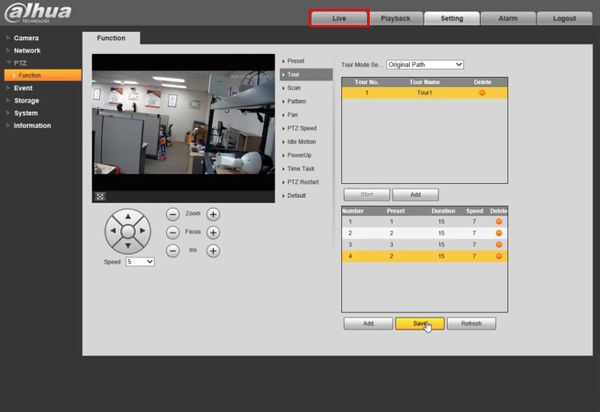
8. Click Save
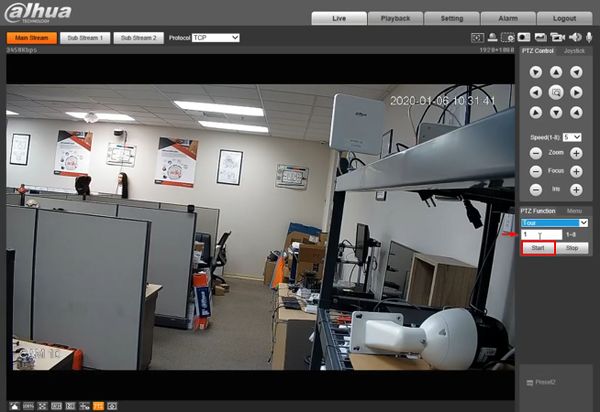
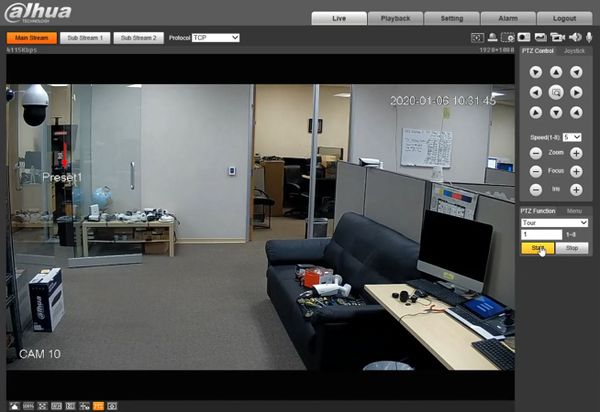
9. To test the created Tour
Click Live
10. Use the dropdown box under PTZFunction to select Tour
11. Enter the Tour #
Click Start to begin the Tour
12. The Tour will begin and display the current status/preset position
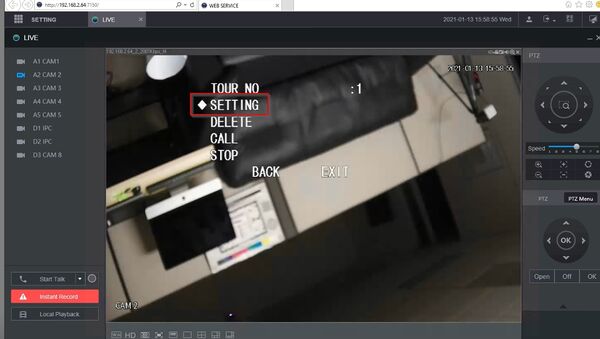
How to Setup Tour in Camera OSD
These instructions will show how to set up a Tour for a HDCVI PTZ camera connected to a Dahua XVR through the WebUI of the XVR by bringing up the OSD (On Screen Display) of the PTZ camera directly for configuration.
Prerequisites
- Dahua HDCVI PTZ and XVR
- PTZ Presets created - How To Setup PTZ Presets
Step by Step Instructions
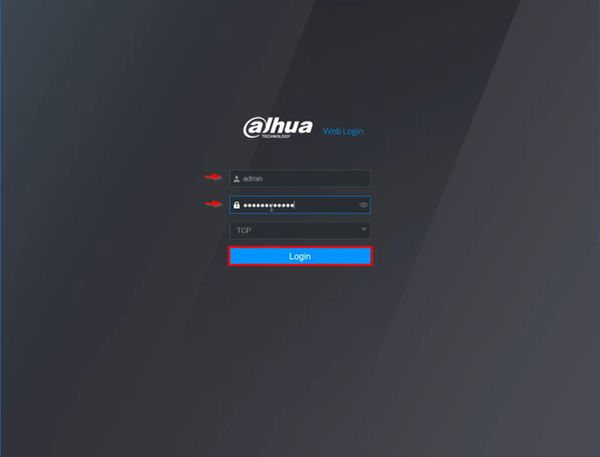
1. Enter the IP of the XVR into a browser
At the Web Login
Enter the Username and Password
Click Login
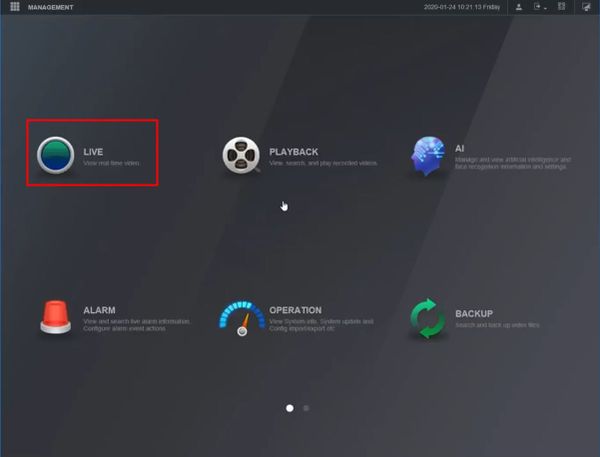
2. Click Live
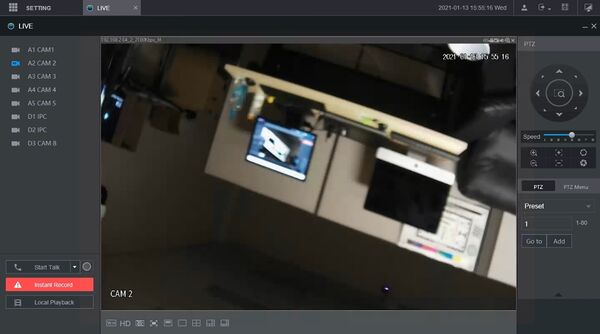
3. Left click the camera from the channel list on the left side of the screen to load it into live view
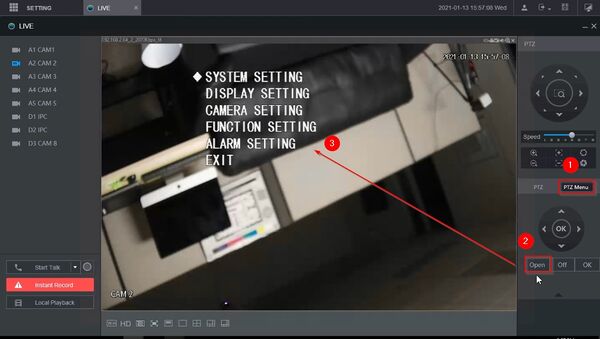
4. To open the Camera's OSD - On Screen Display
Click PTZ Menu
Click Open
OSD will appear on screen
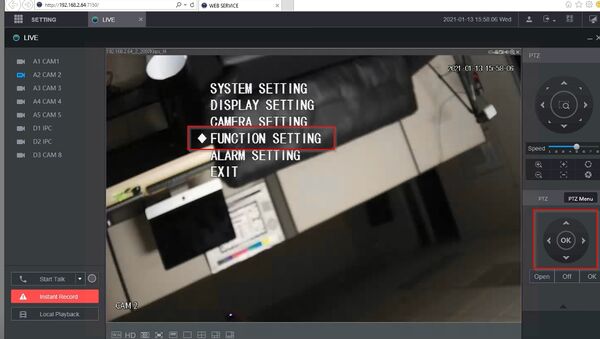
5. Use the navigation wheel / arrows to move between menu options. Clicking OK will select the menu option
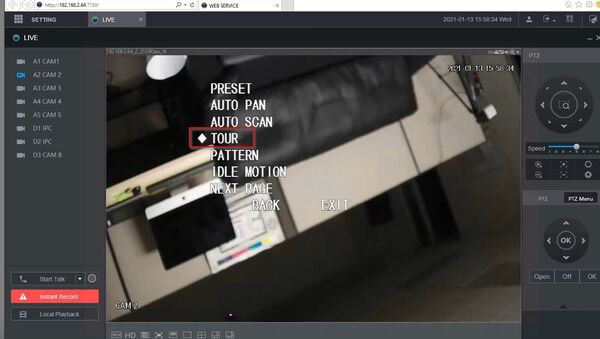
To create a Tour:
Select Function Setting
Select Tour
Select a Tour number to edit, for example 1
Select Setting
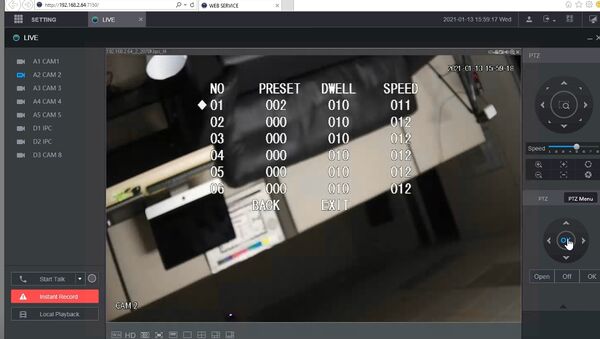
The Tour information will be displayed
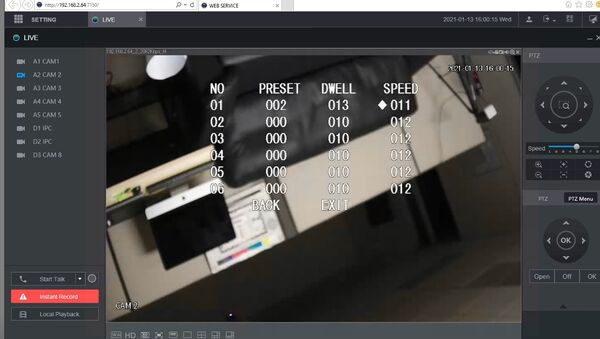
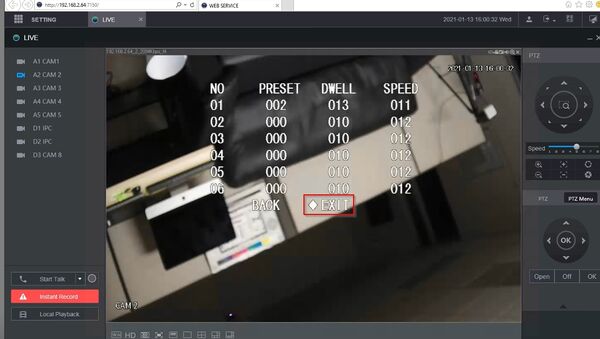
Click OK to select a step of the Tour, then change the Preset , Dwell , and Speed settings as desired for each step
Select Exit to exit the menu
How to Setup Tour through XVR
Prerequisites
- Dahua PTZ
- PTZ Presets created - How To Setup PTZ Presets
Video Instructions
Step by Step Instructions
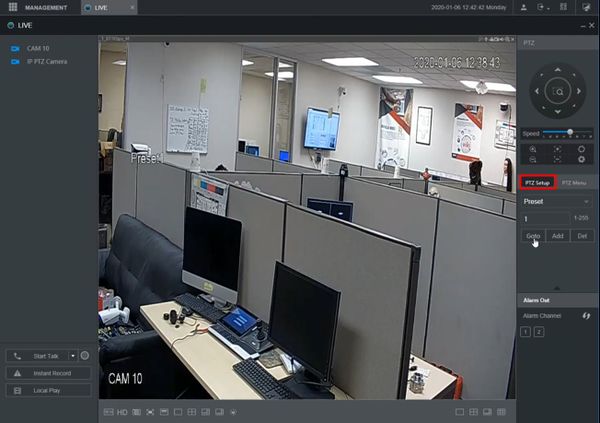
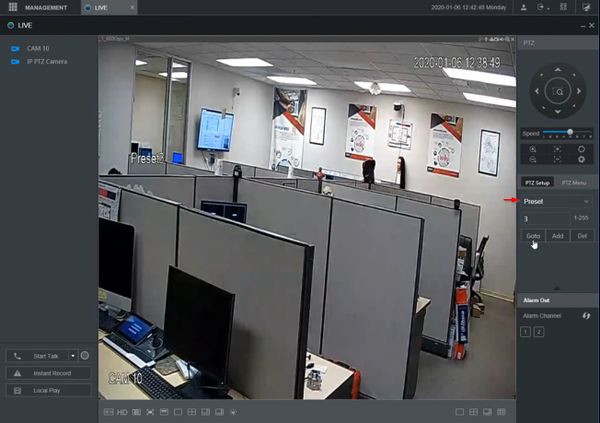
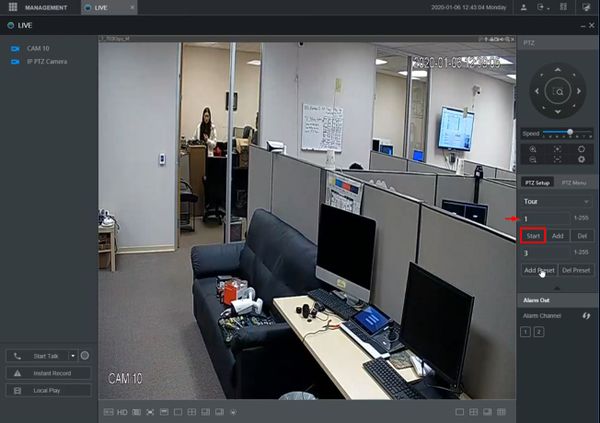
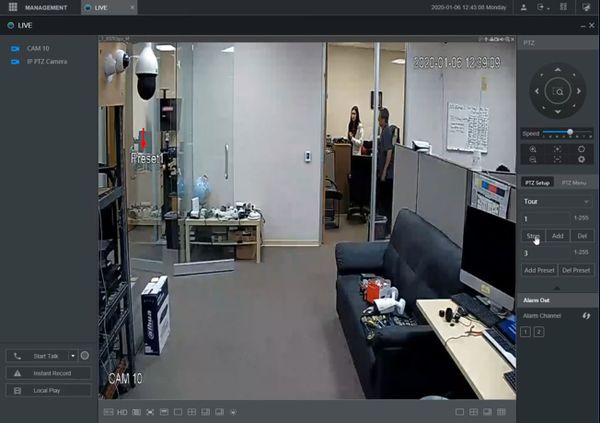
1. From Live View
Click PTZ Setup on the right side of the screen
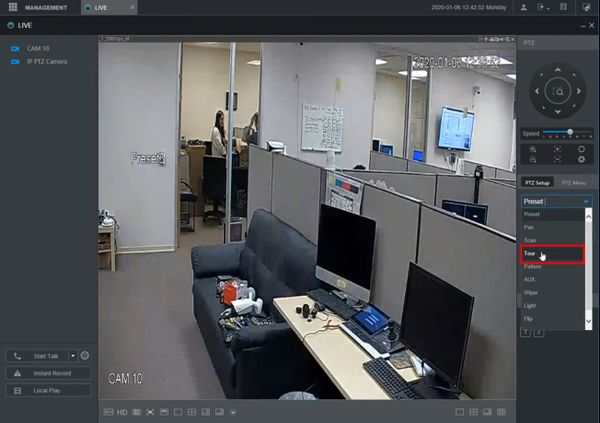
2. Use the dropdown box to select Tour
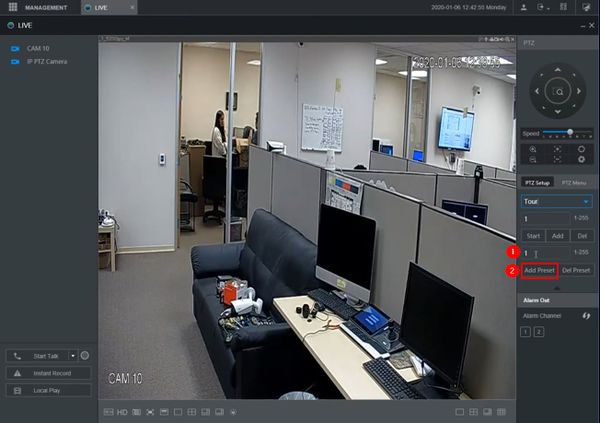
3. To add steps to the Tour
- Enter the Preset #
- Click Add Preset
Repeat this procedure for every step you wish to add to the Tour
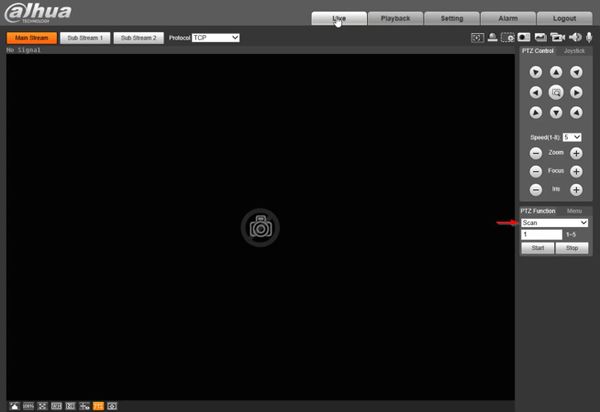
4. To test the created Tour
- Enter the Tour #
- Click Start
5. The Tour will begin and display the current preset/position
How to Setup Tour
Prerequisites
- Dahua Network PTZ
- SmartPSS
- PTZ camera added to SmartPSS
- PTZ Presets created - How To Setup PTZ Presets
Video Instructions
Step by Step Instructions
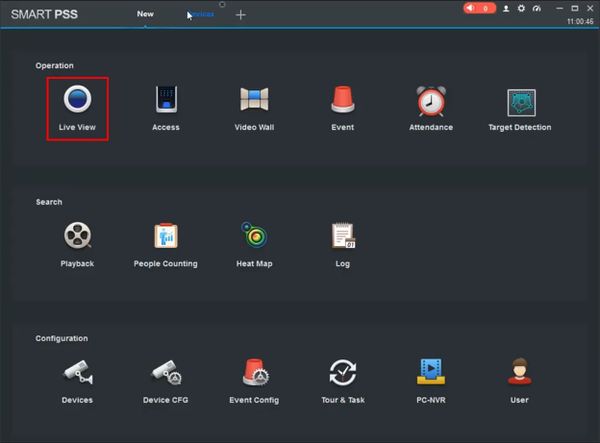
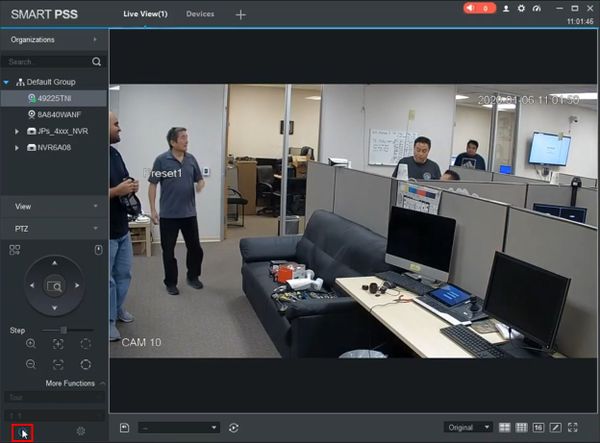
1. From the Main Page of SmartPSS
Click Live View
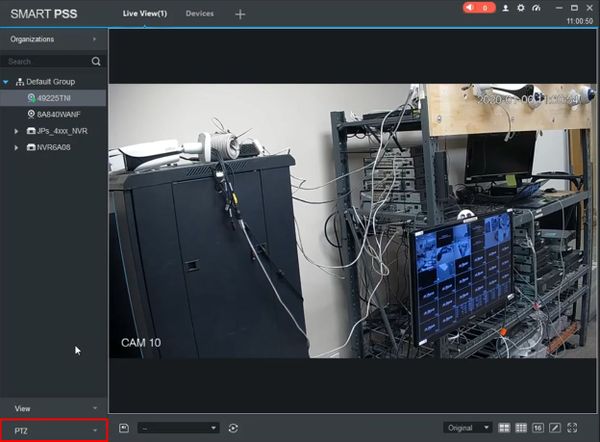
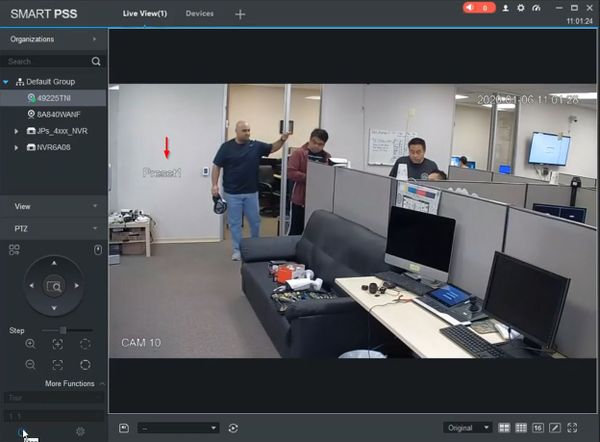
2. Click to expand the PTZ section on the left side of the screen
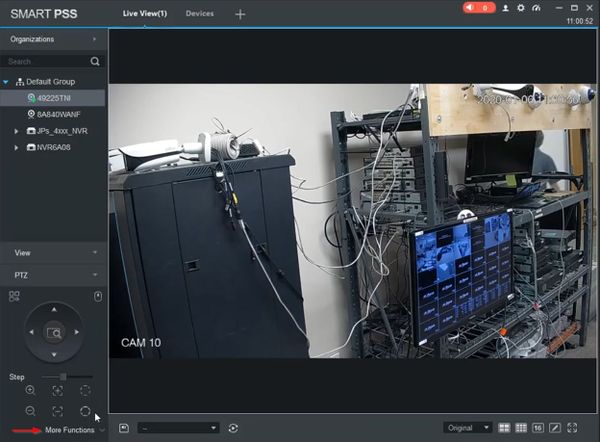
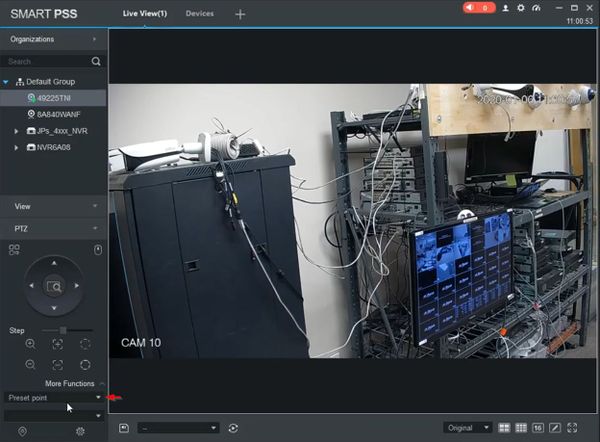
3. Click More Functions
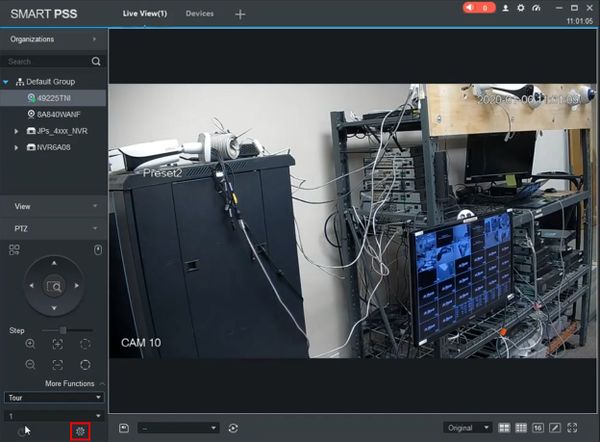
4. Use the dropdown box to select Tour
Click the gear icon to configure the parameters of the Tour
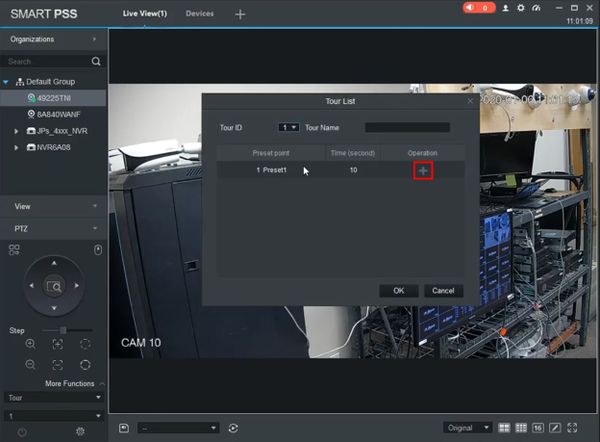
5. The Tour List window will appear
The steps of the tour will be listed
Click the + to add steps to the Tour
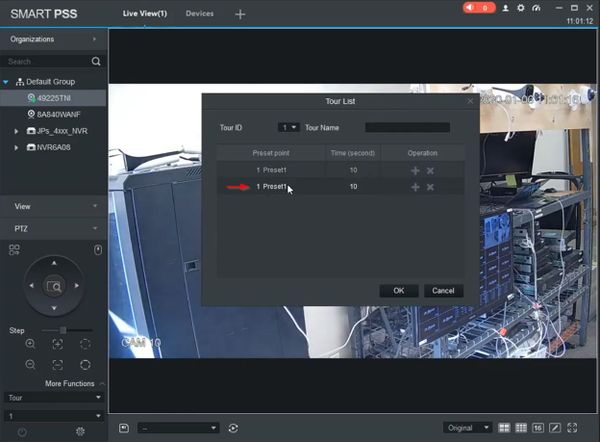
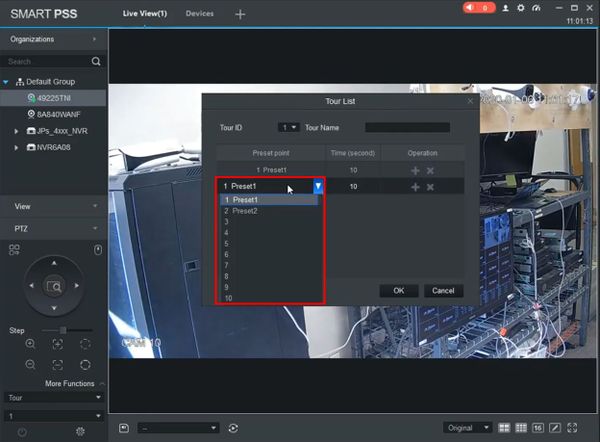
6. Click inside the fields to edit the parameters, such as Preset point
A dropdown box will appear
The Time parameter can be adjusted the same way
Continue to add steps to the Tour and configure the parameters as desired
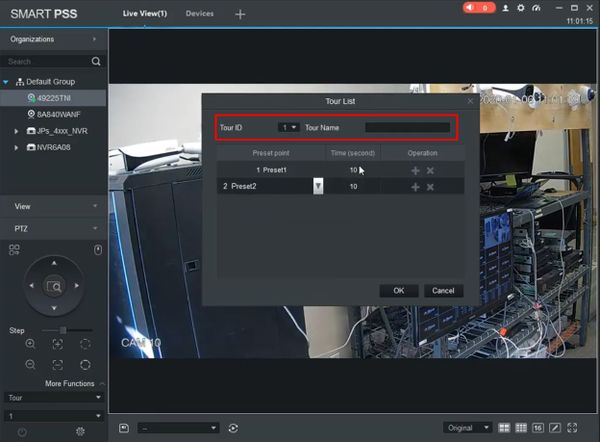
7. Use the top of the window to set the Tour ID and Tour Name
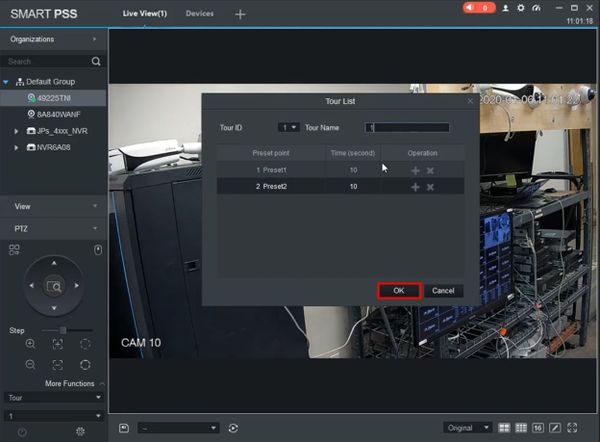
8. Click OK to save
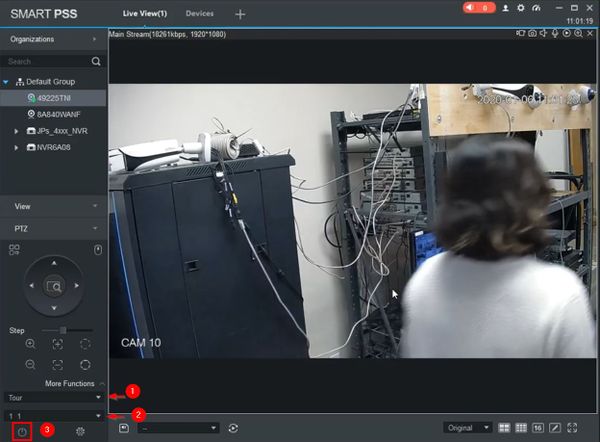
9. To run the created Tour
- Use the dropdown box to select Tour
- Select the Tour #
- Click Start to begin the Tour
10. The Tour will begin and display the current status/preset position
11. Click again to stop the Tour
How to Setup Tour
Prerequisites
- Dahua Network PTZ
- PTZ Presets created - How To Setup PTZ Presets
- DSS Express S
- PTZ Camera added to DSS Express S
Video Instructions
Step by Step Instructions
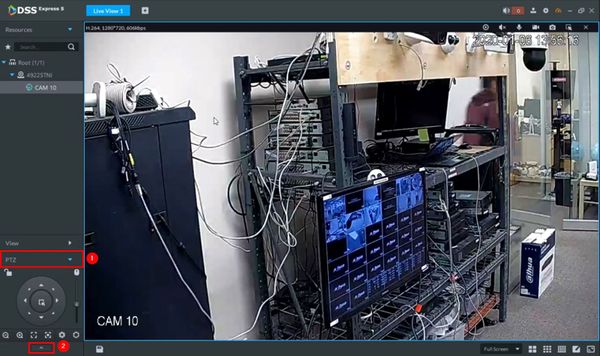
1. From Live View
Click to expand the PTZ section on the left side of the screen
Click the Arrow to open advanced settings
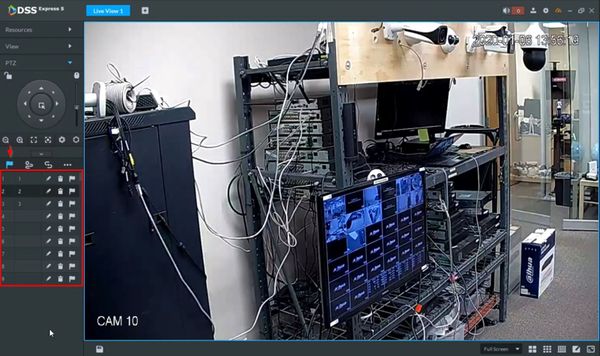
2. The preset will be displayed under the Flag icon
Confirm the presets have been created and appear in this list
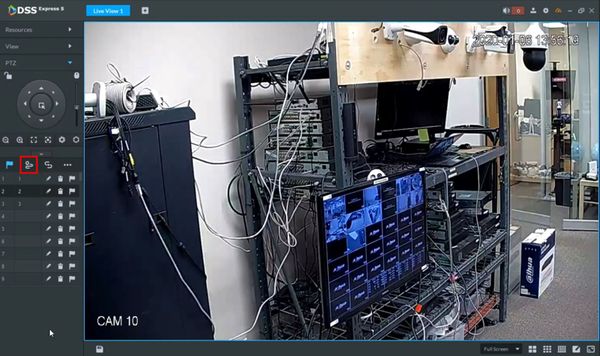
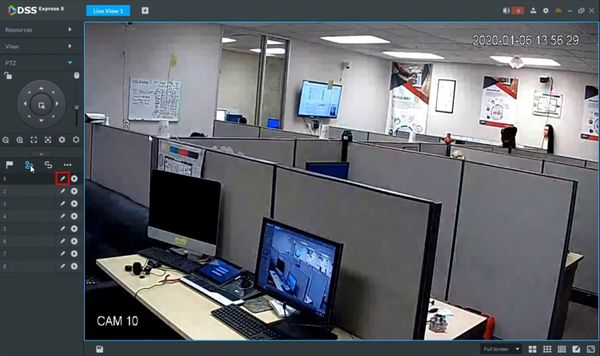
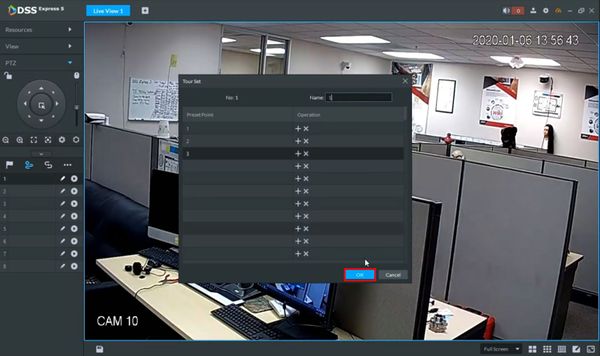
3. Click the Tour icon
4. To create a new Tour click the Pencil icon
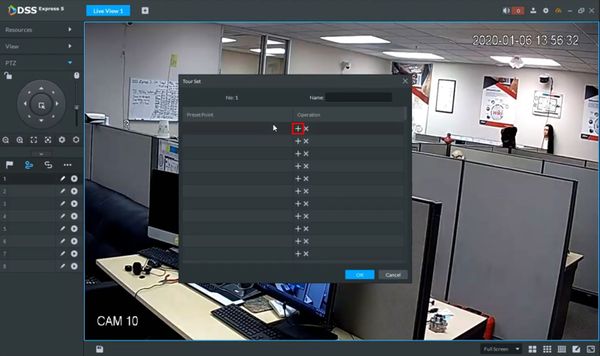
5. To add a step to the tour click the +
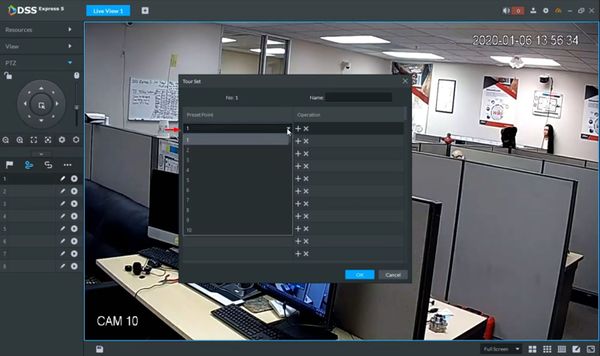
6. Use the dropdown box that appears to select the Preset Point
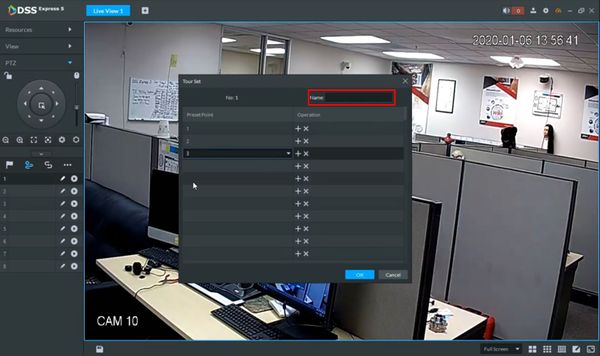
7. Enter a Name for the Tour
8. Click OK
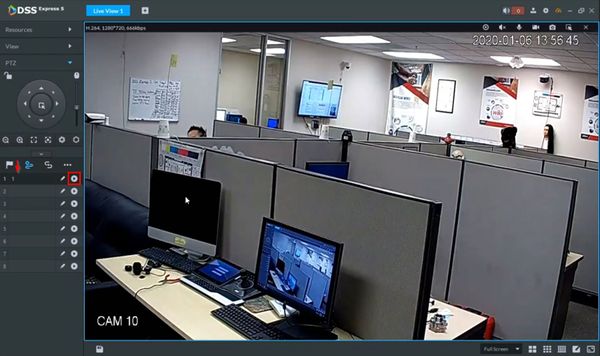
9. To run the created Tour click the Start Tour icon next to the Tour in the list
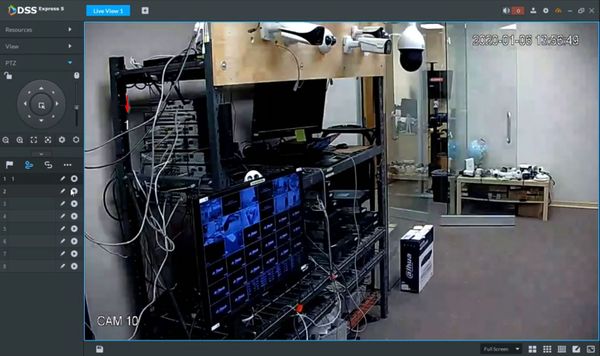
10. The Tour will begin and display the current status/preset position
11. Click the Stop Tour icon to stop the tour
