Difference between revisions of "Thermal/Temperature Monitoring/Physical Setup"
| (6 intermediate revisions by the same user not shown) | |||
| Line 1: | Line 1: | ||
=Temperature Monitoring Solution Physical Setup= | =Temperature Monitoring Solution Physical Setup= | ||
| − | [[File: | + | [[File:temp_monitoring_diagram.png|center|450px]] |
| + | |||
==Description== | ==Description== | ||
| − | + | This guide will show the proper physical arrangement/setup of the devices for the [[Thermal/Temperature Monitoring|Temperature Monitoring Solution]] | |
| − | + | ==Video Instructions== | |
<embedvideo service="youtube">https://youtu.be/_zOjthHmU60</embedvideo> | <embedvideo service="youtube">https://youtu.be/_zOjthHmU60</embedvideo> | ||
| − | + | ==Step by Step Instructions== | |
====Mounting Adapter Plates==== | ====Mounting Adapter Plates==== | ||
The mounting brackets/plates must be installed to both the camera and black body device | The mounting brackets/plates must be installed to both the camera and black body device | ||
| Line 41: | Line 42: | ||
File:Temperature_Monitoring_-_Black_body_temp.jpg|Allow the device to warm up to 35.0 C | File:Temperature_Monitoring_-_Black_body_temp.jpg|Allow the device to warm up to 35.0 C | ||
</gallery> | </gallery> | ||
| + | |||
| + | ===Next Step=== | ||
| + | Physical setup is now complete you can continue with setup and programming: | ||
| + | |||
| + | If the camera is plugged into an NVR, follow the [[Thermal/Temperature Monitoring/NVR Setup|steps to set up Thermal Monitoring solution with camera connected to NVR]] | ||
| + | |||
| + | If the camera is connected to the LAN, follow the [[Thermal/Temperature Monitoring/Stand Alone Camera Setup|steps to set up Thermal Monitoring solution with stand alone camera]] | ||
Latest revision as of 18:56, 18 May 2020
Contents
Temperature Monitoring Solution Physical Setup

Description
This guide will show the proper physical arrangement/setup of the devices for the Temperature Monitoring Solution
Video Instructions
Step by Step Instructions
Mounting Adapter Plates
The mounting brackets/plates must be installed to both the camera and black body device
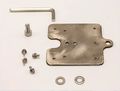
RQW026-00 Brackets
Black body bracket installation
Thermal camera bracket installation


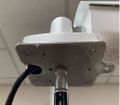
To attach the tripod:
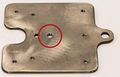
Use the center hole to screw into tripod
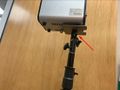
Tripod installed


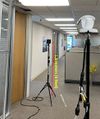
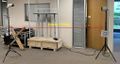
Suggested Physical Layout
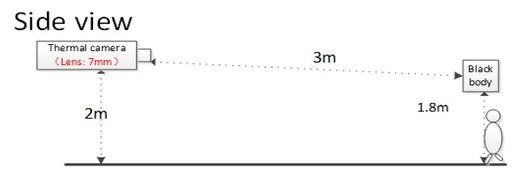
Side view diagram
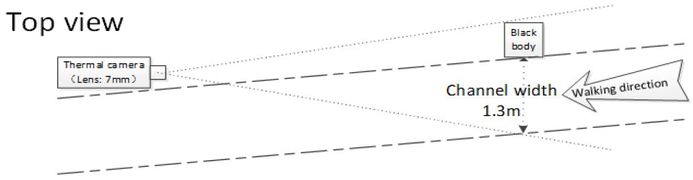
Top view diagram


Camera height: 2m (6.56 ft)
Black body height: 1.8m (5.9 ft)
Minimum distance between both: 3m (9 ft)
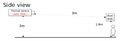
Side view diagram
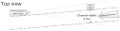
Top view diagram


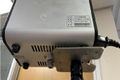
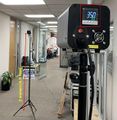
JQ-D70Z Black body Setup
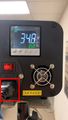
Plug in the power and turn on

Allow the device to warm up to 35.0 C


Next Step
Physical setup is now complete you can continue with setup and programming:
If the camera is plugged into an NVR, follow the steps to set up Thermal Monitoring solution with camera connected to NVR
If the camera is connected to the LAN, follow the steps to set up Thermal Monitoring solution with stand alone camera