Difference between revisions of "Thermal/DHI-ASI7213X-T1/Instructions/Add To NVR5216 16P I"
(→Step by Step Instructions) |
|||
| (8 intermediate revisions by 2 users not shown) | |||
| Line 5: | Line 5: | ||
==Prerequisites== | ==Prerequisites== | ||
* DHI-ASI7213X-T1 set up and configured on network | * DHI-ASI7213X-T1 set up and configured on network | ||
| − | * DHI-NVR5216-16P-I with [https://dahuawiki.com/Thermal/DHI-NVR5216-16P-I_Firmware_Guide#Thermal_Solution_Firmware_for_DHI-ASI7213X-T1| latest firmware V4.000.10BE000. | + | * DHI-NVR5216-16P-I with [https://dahuawiki.com/Thermal/DHI-NVR5216-16P-I_Firmware_Guide#Thermal_Solution_Firmware_for_DHI-ASI7213X-T1| latest firmware V4.000.10BE000.1.R.20200528] |
==Video Instructions== | ==Video Instructions== | ||
| Line 11: | Line 11: | ||
==Step by Step Instructions== | ==Step by Step Instructions== | ||
| + | ===Add DHI-ASI7213X-T1 to NVR=== | ||
| + | 1. Enter the IP address of the NVR into Internet Explorer | ||
| − | + | Enter the username and password | |
| − | [[File:Dahua_Thermal_Solution_Add_DHI_ASI7213X_T1_to_NVR5216_16P_I_-_2.jpg]] | + | Click Login |
| + | |||
| + | [[File:Dahua_Thermal_Solution_Add_DHI_ASI7213X_T1_to_NVR5216_16P_I_-_1.jpg|800px]] | ||
| + | |||
| + | 2. Click Management | ||
| + | |||
| + | [[File:Dahua_Thermal_Solution_Add_DHI_ASI7213X_T1_to_NVR5216_16P_I_-_2.jpg|800px]] | ||
| + | |||
| + | 3. Select Camera | ||
| + | |||
| + | [[File:Dahua_Thermal_Solution_Add_DHI_ASI7213X_T1_to_NVR5216_16P_I_-_3.jpg|800px]] | ||
| + | |||
| + | 4. Click Manual Add | ||
| + | |||
| + | [[File:Dahua_Thermal_Solution_Add_DHI_ASI7213X_T1_to_NVR5216_16P_I_-_4.jpg|800px]] | ||
| + | |||
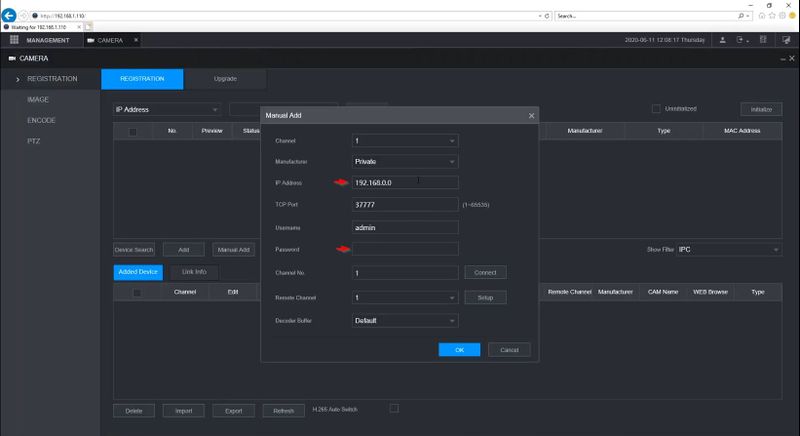
| + | 5. Enter the IP Address of the device | ||
| + | |||
| + | Enter the admin password | ||
| + | |||
| + | [[File:Dahua_Thermal_Solution_Add_DHI_ASI7213X_T1_to_NVR5216_16P_I_-_5.jpg|800px]] | ||
| + | |||
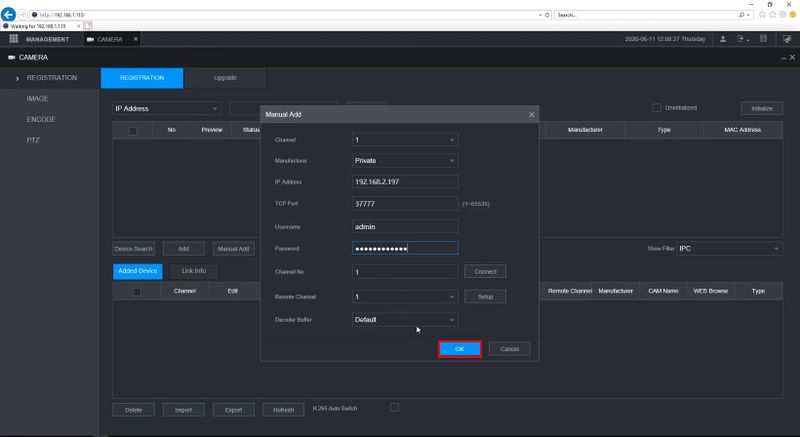
| + | Click OK | ||
| + | |||
| + | [[File:Dahua_Thermal_Solution_Add_DHI_ASI7213X_T1_to_NVR5216_16P_I_-_6.jpg|800px]] | ||
| + | |||
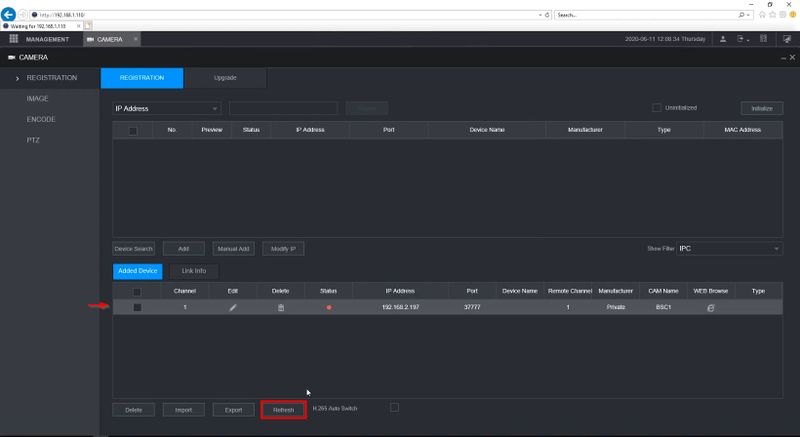
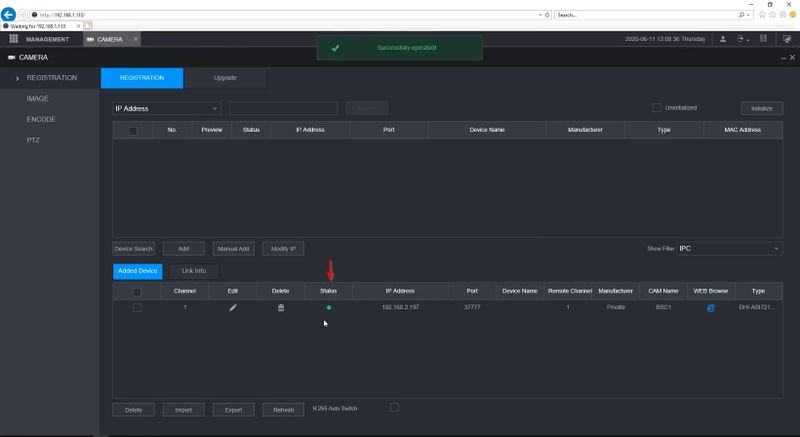
| + | The device will appear in the list | ||
| + | |||
| + | Click Refresh until the Status shows Green / Connected | ||
| + | |||
| + | [[File:Dahua_Thermal_Solution_Add_DHI_ASI7213X_T1_to_NVR5216_16P_I_-_7.jpg|800px]] | ||
| + | |||
| + | [[File:Dahua_Thermal_Solution_Add_DHI_ASI7213X_T1_to_NVR5216_16P_I_-_8.jpg|800px]] | ||
| + | |||
| + | ===Configure Storage=== | ||
| + | The NVR Storage settings must be configured for the channel the DHI-ASI7213X-T1 is added as. | ||
| + | |||
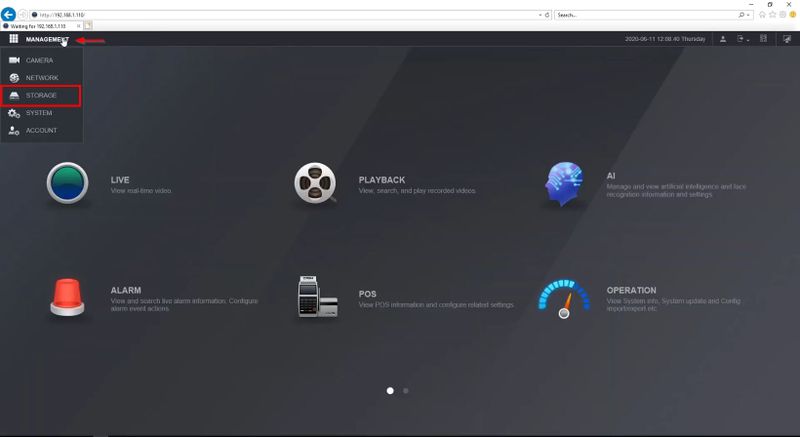
| + | From the Main Menu click Management > Storage | ||
| + | |||
| + | [[File:Dahua_Thermal_Solution_Add_DHI_ASI7213X_T1_to_NVR5216_16P_I_-_9.jpg|800px]] | ||
| + | |||
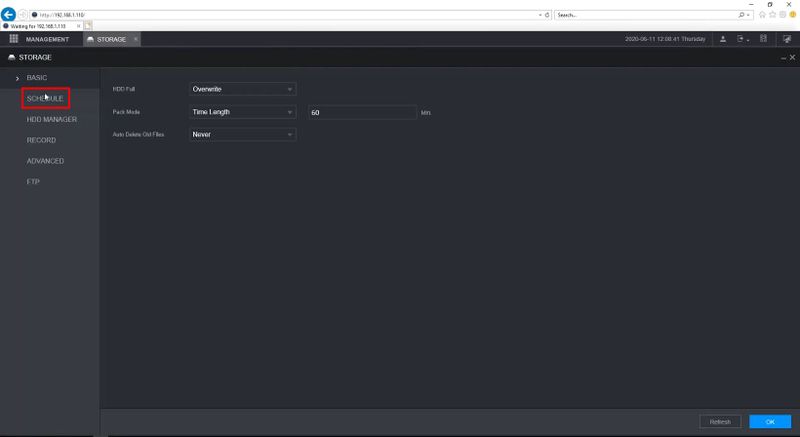
| + | Click Schedule | ||
| + | |||
| + | [[File:Dahua_Thermal_Solution_Add_DHI_ASI7213X_T1_to_NVR5216_16P_I_-_10.jpg|800px]] | ||
| + | |||
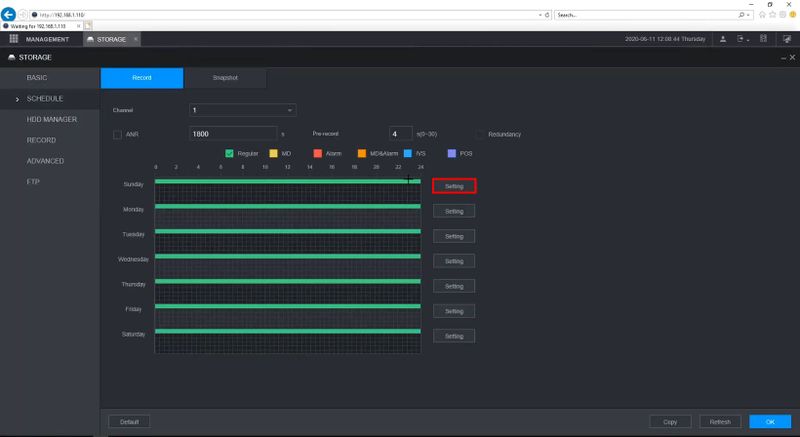
| + | Use the dropdown box to select the channel the device is added to | ||
| + | |||
| + | Click Setting | ||
| + | |||
| + | [[File:Dahua_Thermal_Solution_Add_DHI_ASI7213X_T1_to_NVR5216_16P_I_-_11.jpg|800px]] | ||
| + | |||
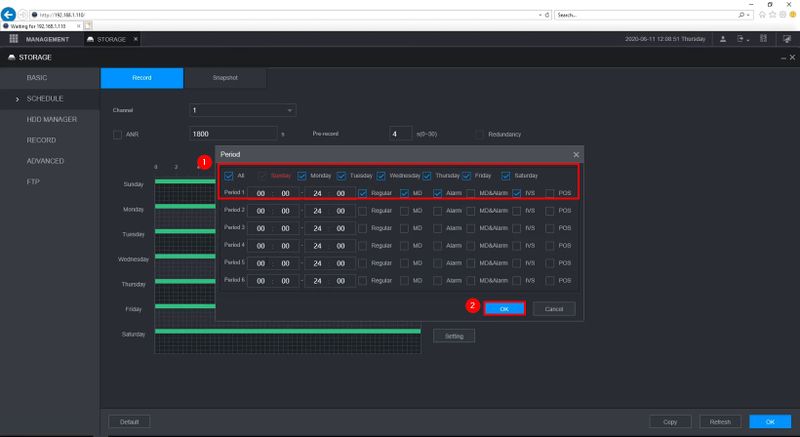
| + | Check to enable all days | ||
| + | |||
| + | Select the event types shown | ||
| + | |||
| + | Click OK | ||
| + | |||
| + | [[File:Dahua_Thermal_Solution_Add_DHI_ASI7213X_T1_to_NVR5216_16P_I_-_12.jpg|800px]] | ||
| + | |||
| + | Click OK to save | ||
| + | |||
| + | [[File:Dahua_Thermal_Solution_Add_DHI_ASI7213X_T1_to_NVR5216_16P_I_-_13.jpg|800px]] | ||
| + | |||
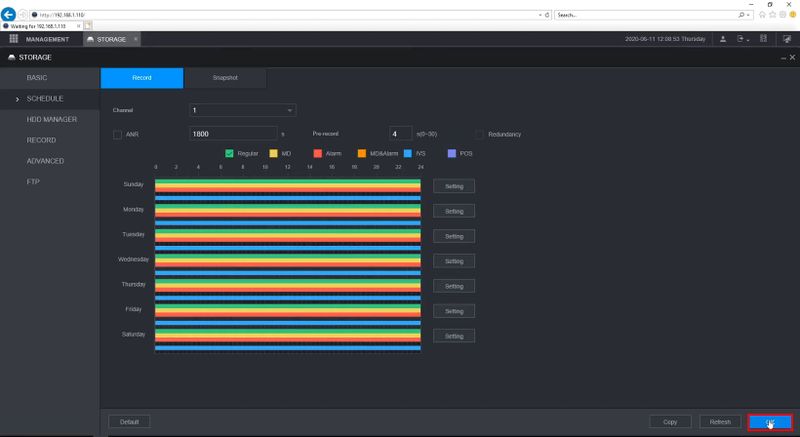
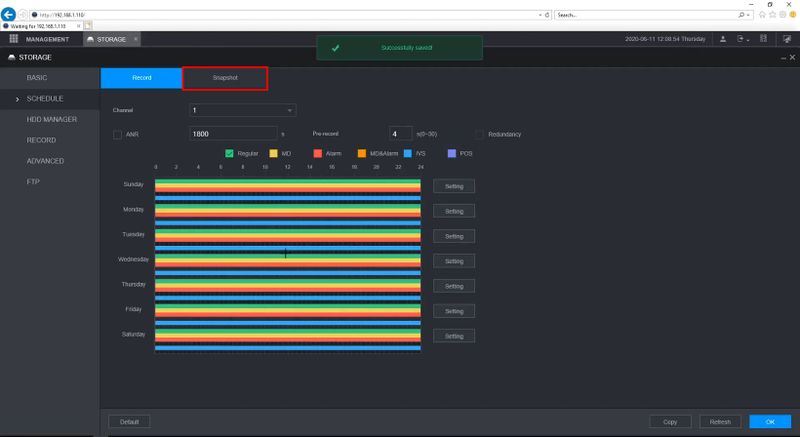
| + | Click Snapshot tab | ||
| + | |||
| + | [[File:Dahua_Thermal_Solution_Add_DHI_ASI7213X_T1_to_NVR5216_16P_I_-_14.jpg|800px]] | ||
| + | |||
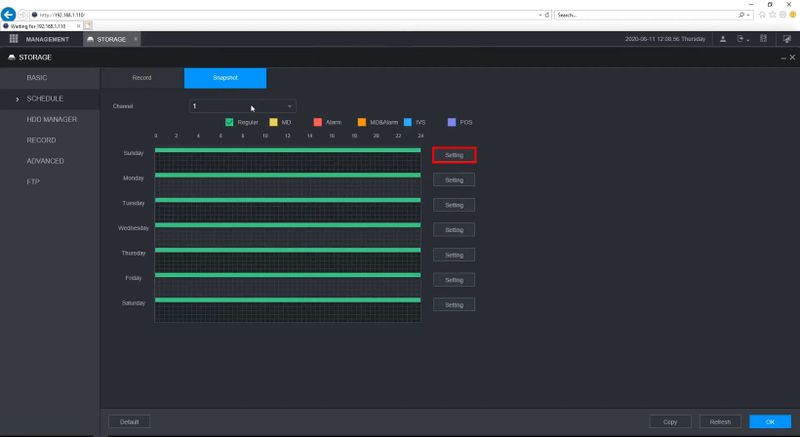
| + | Click Setting | ||
| + | |||
| + | [[File:Dahua_Thermal_Solution_Add_DHI_ASI7213X_T1_to_NVR5216_16P_I_-_15.jpg|800px]] | ||
| + | |||
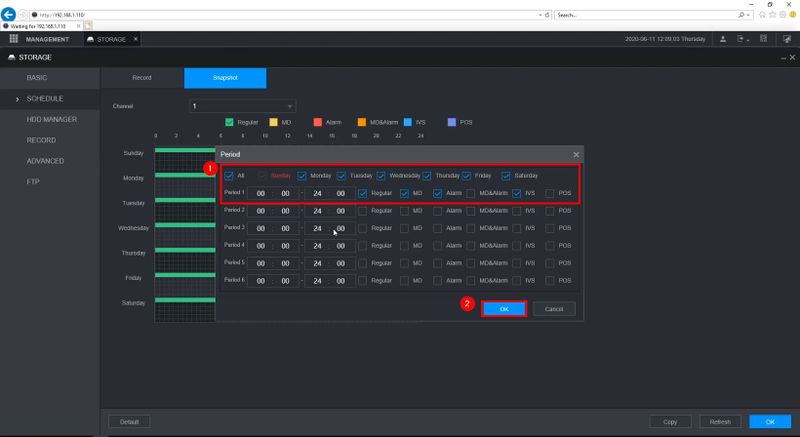
| + | Check to enable all days | ||
| + | |||
| + | Select the event types shown | ||
| + | |||
| + | Click OK | ||
| + | |||
| + | [[File:Dahua_Thermal_Solution_Add_DHI_ASI7213X_T1_to_NVR5216_16P_I_-_16.jpg|800px]] | ||
| + | |||
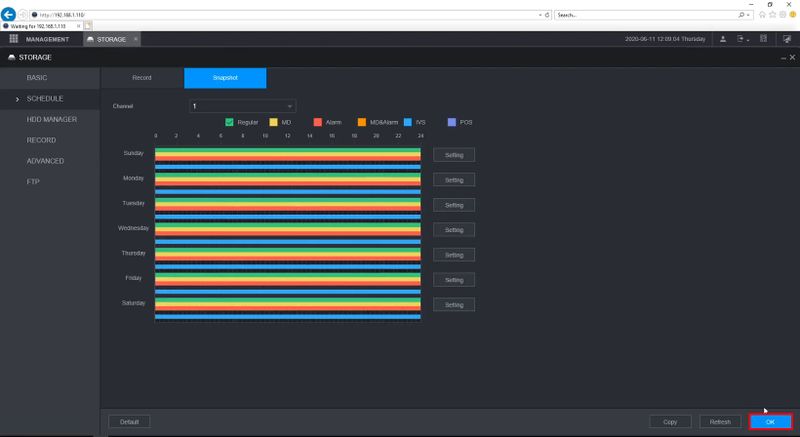
| + | Click OK to save | ||
| + | |||
| + | [[File:Dahua_Thermal_Solution_Add_DHI_ASI7213X_T1_to_NVR5216_16P_I_-_17.jpg|800px]] | ||
| + | |||
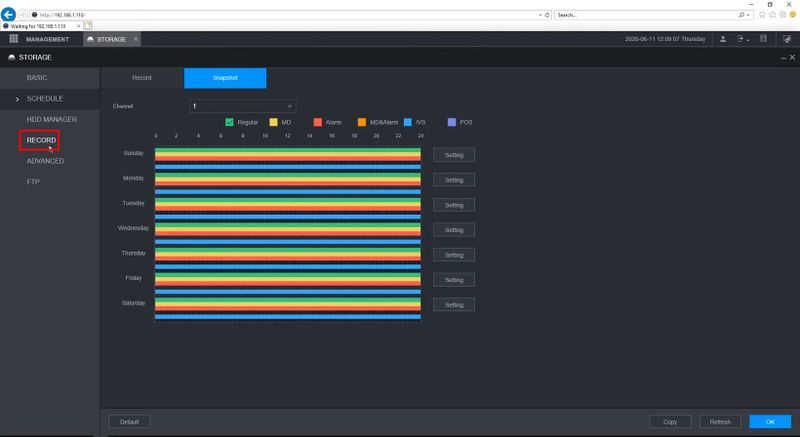
| + | Click Record | ||
| + | |||
| + | [[File:Dahua_Thermal_Solution_Add_DHI_ASI7213X_T1_to_NVR5216_16P_I_-_18.jpg|800px]] | ||
| + | |||
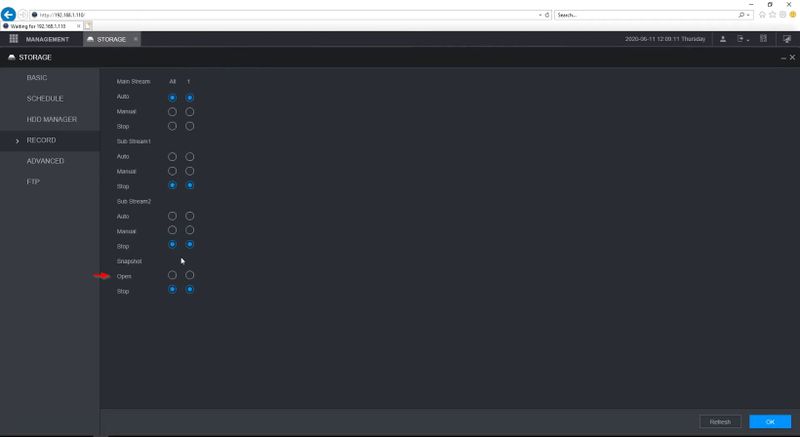
| + | Under Snapshot | ||
| + | |||
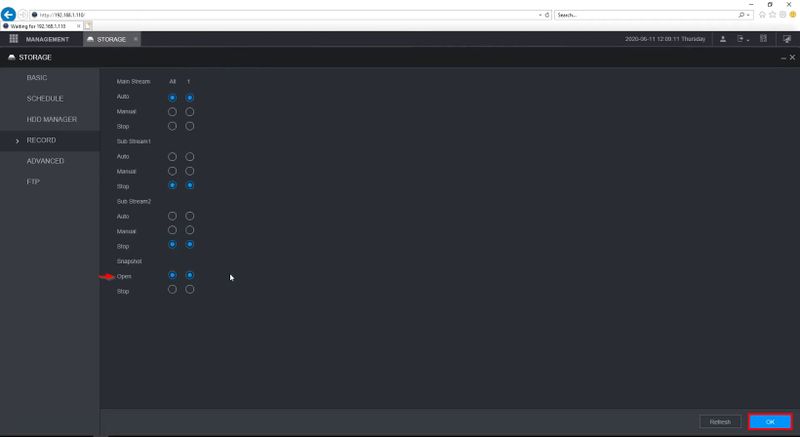
| + | Make sure Open is selected | ||
| + | |||
| + | [[File:Dahua_Thermal_Solution_Add_DHI_ASI7213X_T1_to_NVR5216_16P_I_-_19.jpg|800px]] | ||
| + | |||
| + | Click OK to save | ||
| + | |||
| + | [[File:Dahua_Thermal_Solution_Add_DHI_ASI7213X_T1_to_NVR5216_16P_I_-_20.jpg|800px]] | ||
| + | |||
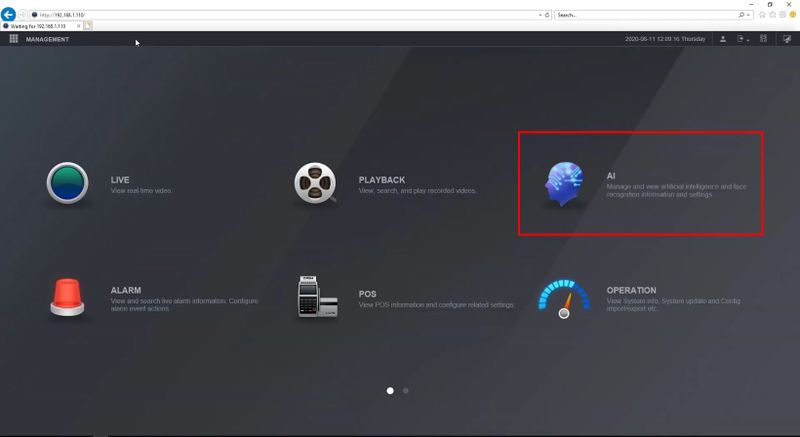
| + | ===Configure AI=== | ||
| + | 1. From the Main Menu | ||
| + | |||
| + | Click AI | ||
| + | |||
| + | [[File:Dahua_Thermal_Solution_Add_DHI_ASI7213X_T1_to_NVR5216_16P_I_-_21.jpg|800px]] | ||
| + | |||
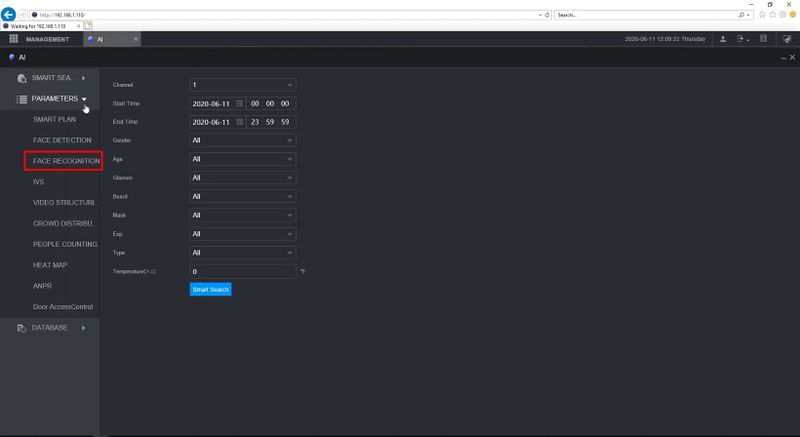
| + | 2. Click Parameters > Select the Highlighted Area | ||
| + | |||
| + | [[File:Dahua_Thermal_Solution_Add_DHI_ASI7213X_T1_to_NVR5216_16P_I_-_22.jpg|800px]] | ||
| + | |||
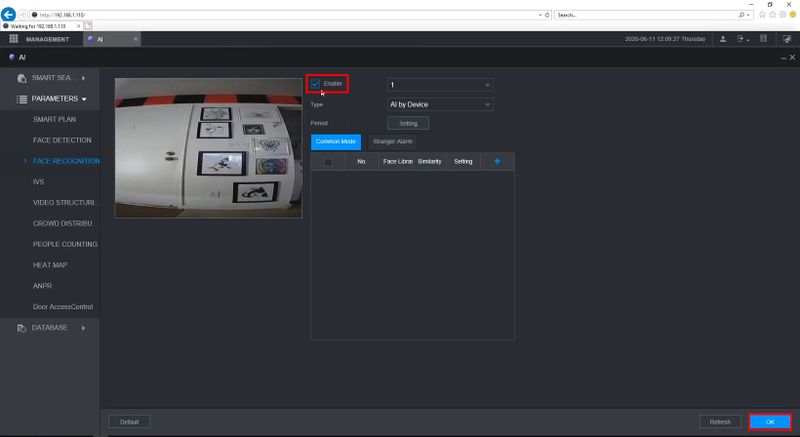
| + | 3. Check the box to enable | ||
| + | |||
| + | Click OK | ||
| + | |||
| + | [[File:Dahua_Thermal_Solution_Add_DHI_ASI7213X_T1_to_NVR5216_16P_I_-_23.jpg|800px]] | ||
| + | |||
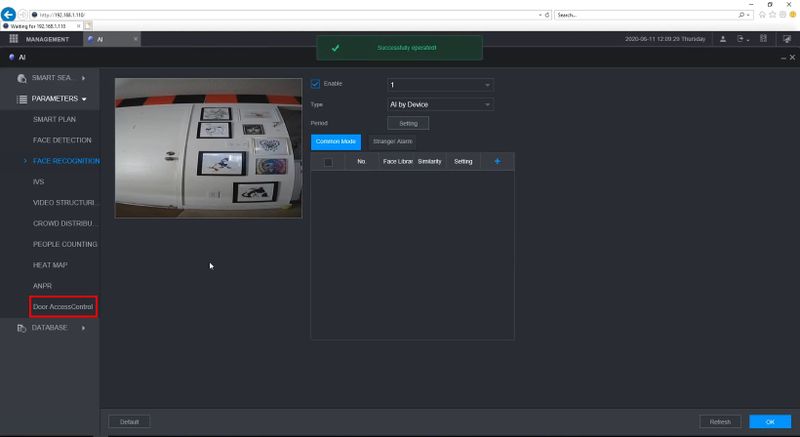
| + | 4. Click Door AccessControl | ||
| + | |||
| + | [[File:Dahua_Thermal_Solution_Add_DHI_ASI7213X_T1_to_NVR5216_16P_I_-_24.jpg|800px]] | ||
| + | |||
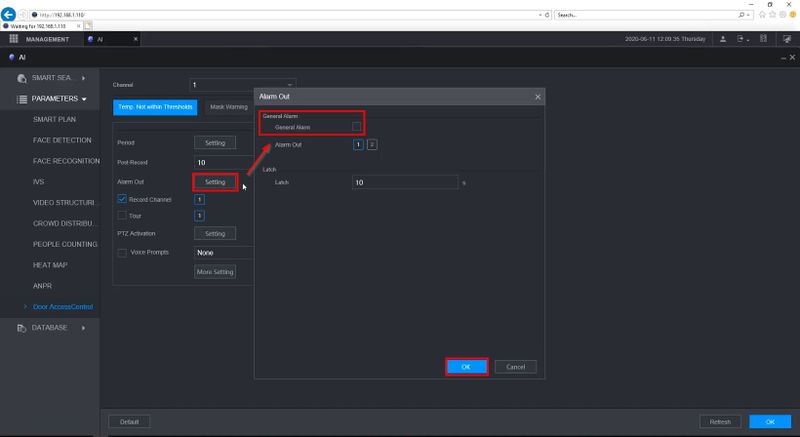
| + | This menu will display all options for configuring events from the DHI-ASI7213X-T1 | ||
| + | |||
| + | Click Setting | ||
| + | |||
| + | Enable General Alarm | ||
| + | |||
| + | [[File:Dahua_Thermal_Solution_Add_DHI_ASI7213X_T1_to_NVR5216_16P_I_-_25.jpg|800px]] | ||
| + | |||
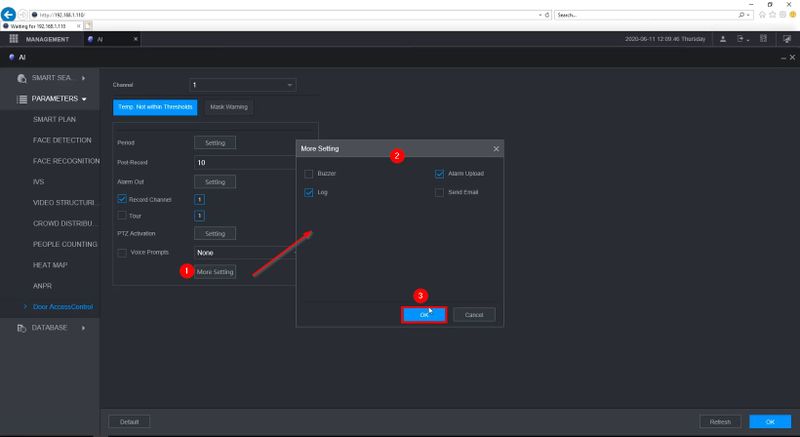
| + | Click More Setting | ||
| + | |||
| + | TO find options for Buzzer, Email Notifications, and Log | ||
| + | |||
| + | Click OK to save | ||
| + | |||
| + | [[File:Dahua_Thermal_Solution_Add_DHI_ASI7213X_T1_to_NVR5216_16P_I_-_26.jpg|800px]] | ||
Latest revision as of 17:07, 2 December 2022
Contents
Add DHI-ASI7213X-T1 to DHI-NVR5216-16P-I
Description
These instructions will show how to add the DHI-ASI7213X-T1 to the DHI-NVR5216-16P-I and setup the device for Live Preview - AI Mode
Prerequisites
- DHI-ASI7213X-T1 set up and configured on network
- DHI-NVR5216-16P-I with latest firmware V4.000.10BE000.1.R.20200528
Video Instructions
Step by Step Instructions
Add DHI-ASI7213X-T1 to NVR
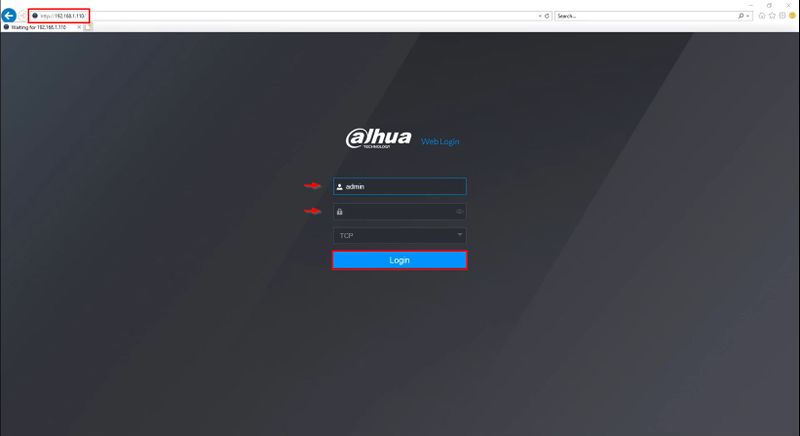
1. Enter the IP address of the NVR into Internet Explorer
Enter the username and password
Click Login
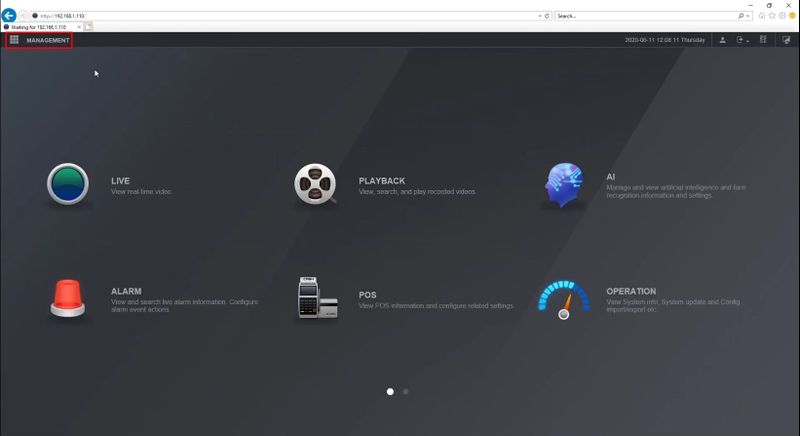
2. Click Management
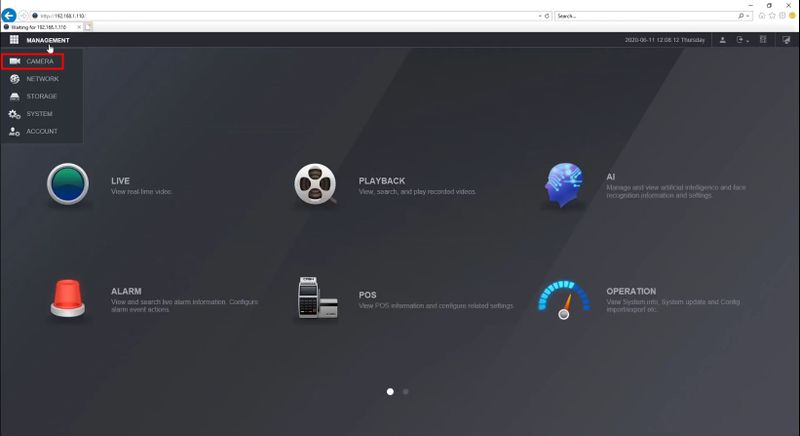
3. Select Camera
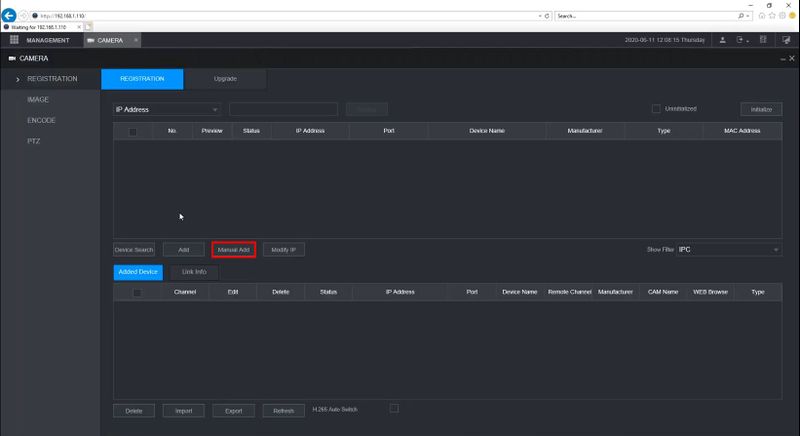
4. Click Manual Add
5. Enter the IP Address of the device
Enter the admin password
Click OK
The device will appear in the list
Click Refresh until the Status shows Green / Connected
Configure Storage
The NVR Storage settings must be configured for the channel the DHI-ASI7213X-T1 is added as.
From the Main Menu click Management > Storage
Click Schedule
Use the dropdown box to select the channel the device is added to
Click Setting
Check to enable all days
Select the event types shown
Click OK
Click OK to save
Click Snapshot tab
Click Setting
Check to enable all days
Select the event types shown
Click OK
Click OK to save
Click Record
Under Snapshot
Make sure Open is selected
Click OK to save
Configure AI
1. From the Main Menu
Click AI
2. Click Parameters > Select the Highlighted Area
3. Check the box to enable
Click OK
4. Click Door AccessControl
This menu will display all options for configuring events from the DHI-ASI7213X-T1
Click Setting
Enable General Alarm
Click More Setting
TO find options for Buzzer, Email Notifications, and Log
Click OK to save
