Difference between revisions of "DSS/V8/DSS Pro/Instruction/Add Device"
(→Step by Step Instructions) |
|||
| (10 intermediate revisions by the same user not shown) | |||
| Line 1: | Line 1: | ||
=Description= | =Description= | ||
This guide will show how to add a Dahua device to DSS Pro. | This guide will show how to add a Dahua device to DSS Pro. | ||
| − | |||
==Prerequisites== | ==Prerequisites== | ||
| Line 8: | Line 7: | ||
==Step by Step Instructions== | ==Step by Step Instructions== | ||
| + | |||
| + | 1.Login to DSS Pro Client and then go to Configurations > Device menu. | ||
| + | |||
| + | From Home Select the Configuration menu | ||
| + | |||
| + | [[File:DSS_Pro_Client_Home_Configurations.jpg|800px]] | ||
| + | |||
| + | 2. Click on '''Device'''. | ||
| + | |||
| + | [[File:DSS_Pro_Client_Configuration_Device.jpg|800px]] | ||
| + | |||
| + | 4. Click on '''Add'''. | ||
| + | |||
| + | [[File:DSS_Pro_Add_Device_-_1.jpg|800px]] | ||
| + | |||
| + | |||
| + | 5. Select the adding mode and then enter device information. In this example, we are using IP address mode. For P2P and Auto-register, it must be setup first from recorder or IP Camera. Click '''Add'''. | ||
| + | |||
| + | [[File:DSS_Pro_Add_Device_-_2.jpg|800px]] | ||
| + | |||
| + | [[File:DSS_Pro_Add_Device_-_3.jpg|800px]] | ||
| + | |||
| + | |||
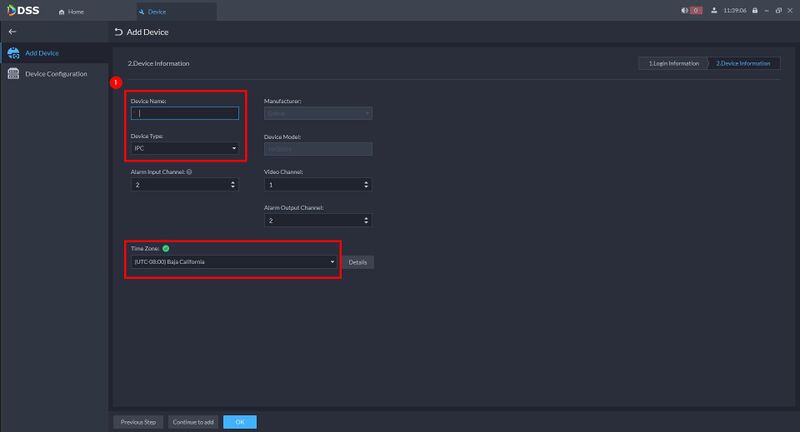
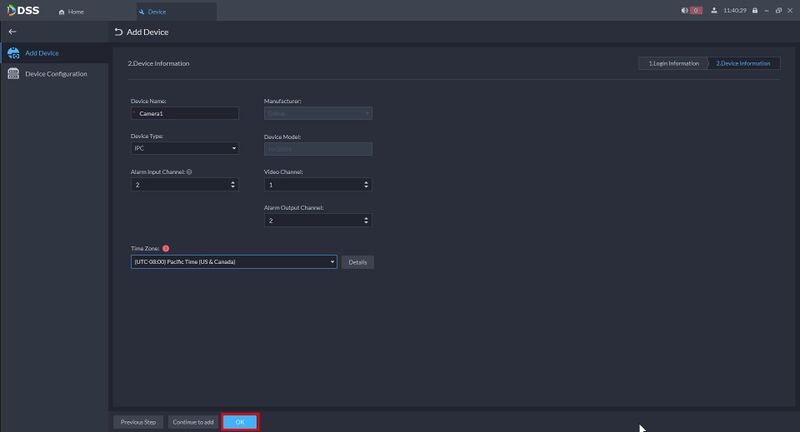
| + | 6. Enter Device Name, select Device Type, and use the dropdown box to select the Time Zone. Click '''OK'''. | ||
| + | |||
| + | |||
| + | [[File:DSS_Pro_Add_Device_-_4.jpg|800px]] | ||
| + | |||
| + | [[File:DSS_Pro_Add_Device_-_5.jpg|800px]] | ||
| + | |||
| + | '''The device is now added to DSS. | ||
| + | ''' | ||
| + | |||
| + | [[File:DSS_Pro_Add_Device_-_6.jpg|800px]] | ||
| + | |||
| + | |||
| + | [[DSS/V8/DSS_Pro#Instructions|'''> Return to DSS Pro instructions''']] | ||
| + | |||
| + | |||
| + | ===Troubleshooting Tips=== | ||
| + | |||
| + | In the event that your device added but can't see any cameras added to the software, please follow this following steps. | ||
| + | |||
| + | 1. Click on the Edit button on your device. | ||
| + | |||
| + | [[File:DSS_Pro_Channel_Features_Selection_-_1.jpg|800px]] | ||
| + | |||
| + | 2. Go to '''Video Channels'''. And then click on '''Get Info'''. | ||
| + | |||
| + | You can also use the dropdown box under Features to manually select the device features | ||
| + | |||
| + | [[File:DSS_Pro_Channel_Features_Selection_-_2.jpg|800px]] | ||
| + | |||
| + | 3. The software will refresh the connection to the device and retrieve the camera channels that added to recorder. Once populated, click '''OK'''. | ||
| + | |||
| + | |||
| + | |||
| + | [[DSS/V8/DSS_Pro#Instructions|'''> Return to DSS Pro instructions''']] | ||
Latest revision as of 22:28, 3 August 2021
Description
This guide will show how to add a Dahua device to DSS Pro.
Prerequisites
- DSS Pro V8 Server and Client
- Dahua Device connected to the network
Step by Step Instructions
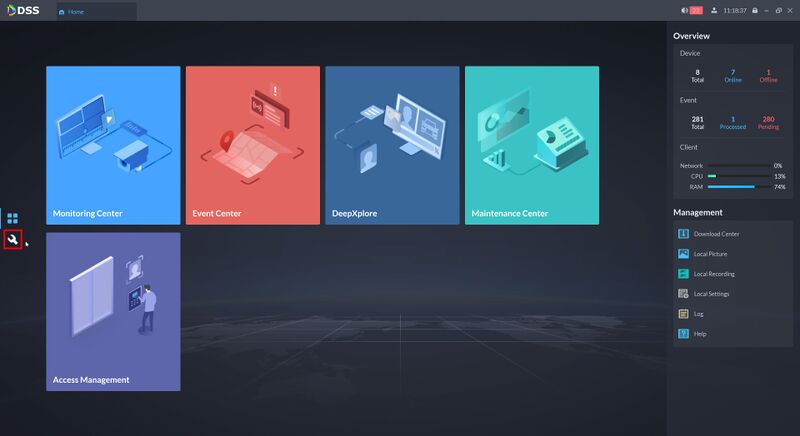
1.Login to DSS Pro Client and then go to Configurations > Device menu.
From Home Select the Configuration menu
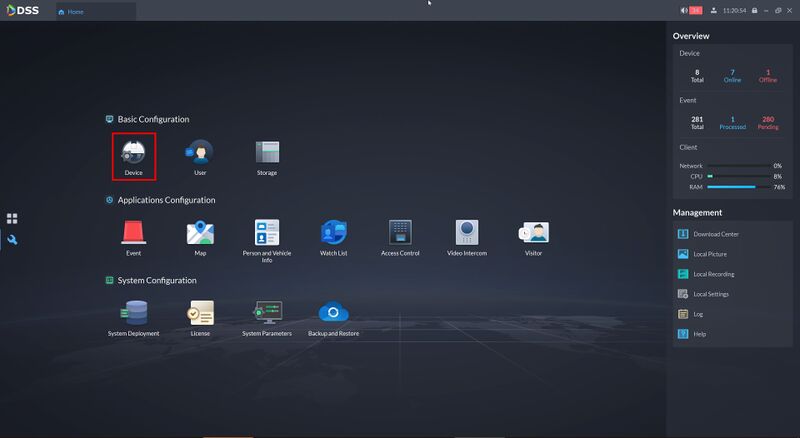
2. Click on Device.
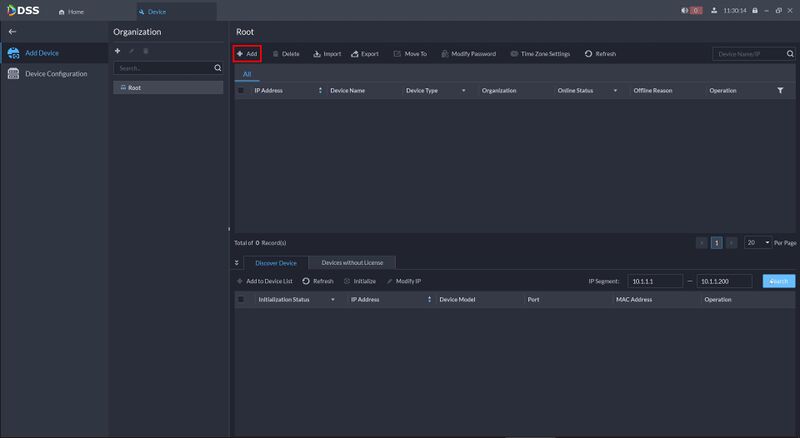
4. Click on Add.
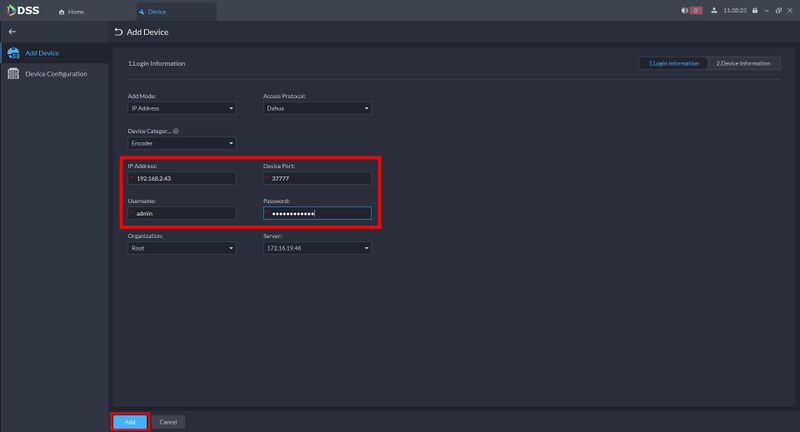
5. Select the adding mode and then enter device information. In this example, we are using IP address mode. For P2P and Auto-register, it must be setup first from recorder or IP Camera. Click Add.
6. Enter Device Name, select Device Type, and use the dropdown box to select the Time Zone. Click OK.
The device is now added to DSS.
> Return to DSS Pro instructions
Troubleshooting Tips
In the event that your device added but can't see any cameras added to the software, please follow this following steps.
1. Click on the Edit button on your device.
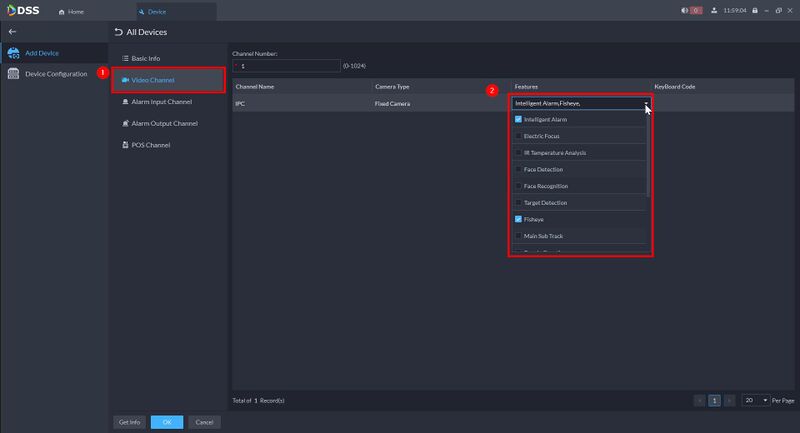
2. Go to Video Channels. And then click on Get Info.
You can also use the dropdown box under Features to manually select the device features
3. The software will refresh the connection to the device and retrieve the camera channels that added to recorder. Once populated, click OK.
