Difference between revisions of "Remote Access/Easy4IP View Device"
| Line 1: | Line 1: | ||
==How to View Device Using Easy4IP== | ==How to View Device Using Easy4IP== | ||
===Description=== | ===Description=== | ||
| − | The Easy4IP smartphone app features live viewing for devices supporting the p2p function. Once p2p is enabled on a device connected to the internet, and the [Remote_Access/Easy4IP_Add_Device|device is added] to the Easy4IP smartphone app, then viewing is a breeze. | + | The Easy4IP smartphone app features live viewing for devices supporting the p2p function. Once p2p is enabled on a device connected to the internet, and the [[Remote_Access/Easy4IP_Add_Device|device is added]] to the Easy4IP smartphone app, then viewing is a breeze. |
===Prerequisites=== | ===Prerequisites=== | ||
- Device with p2p function enabled through Easy4IP | - Device with p2p function enabled through Easy4IP | ||
| − | - Device added to Easy4IP app | + | - Device [[Remote_Access/Easy4IP_Add_Device|added to Easy4IP app]] |
- Internet connection on both devices | - Internet connection on both devices | ||
===Video Instructions=== | ===Video Instructions=== | ||
<embedvideo service="youtube">https://www.youtube.com/watch?v=uquc4SByqRI</embedvideo> | <embedvideo service="youtube">https://www.youtube.com/watch?v=uquc4SByqRI</embedvideo> | ||
===Step by Step Instructions=== | ===Step by Step Instructions=== | ||
| − | 1. | + | 1. Launch the Easy4ip app on your smart phone |
[[File:e4ipviewdevice001.jpg|500x500px]] | [[File:e4ipviewdevice001.jpg|500x500px]] | ||
| + | |||
| + | 2. Make sure the Live tab at the bottom of the screen is selected. Now Select your device, and then the channel on it. For this example we will be using a NVR54A16-16P-4KS2 recorder which has multiple channels, you can see these by swiping right to left or by using the drop down menu. Once you have found your device and channel then select the camera you want to view. | ||
[[File:e4ipviewdevice002.jpg|500x500px]] | [[File:e4ipviewdevice002.jpg|500x500px]] | ||
| + | |||
| + | 3. The video feed should now show up on the screen. | ||
[[File:e4ipviewdevice003.jpg|500x500px]] | [[File:e4ipviewdevice003.jpg|500x500px]] | ||
| + | |||
| + | 4. If you want to view full screen then make sure you have auto rotate set to on in your phones settings. | ||
[[File:e4ipviewdevice004.jpg|500x500px]] | [[File:e4ipviewdevice004.jpg|500x500px]] | ||
| + | |||
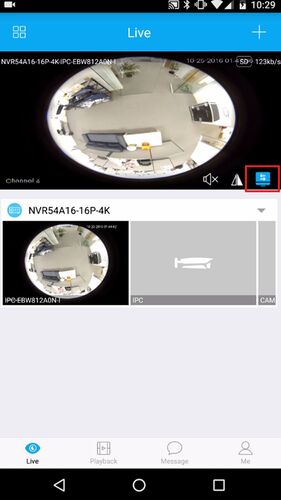
| + | 5. Now select the icon in the right corner of the video stream. The icon to the left is to flip the cameras orientation. | ||
[[File:e4ipviewdevice005.jpg|500x500px]] | [[File:e4ipviewdevice005.jpg|500x500px]] | ||
| + | |||
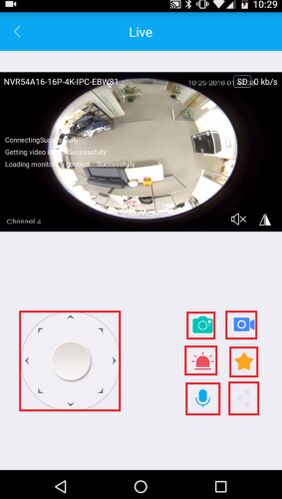
| + | 6. This screen is to control the functions of your device, like PTZ controls, Screenshot, Manual Recording, Alarm output, Favorites list, Audio transmission, and Sharing. | ||
[[File:e4ipviewdevice006.jpg|500x500px]] | [[File:e4ipviewdevice006.jpg|500x500px]] | ||
| + | |||
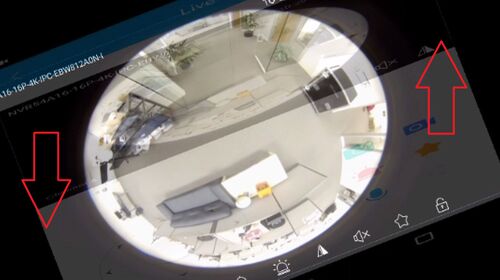
| + | 7. In this menu rotate your smartphone to landscape for full screen view. | ||
[[File:e4ipviewdevice007.jpg|500x500px]] | [[File:e4ipviewdevice007.jpg|500x500px]] | ||
| + | |||
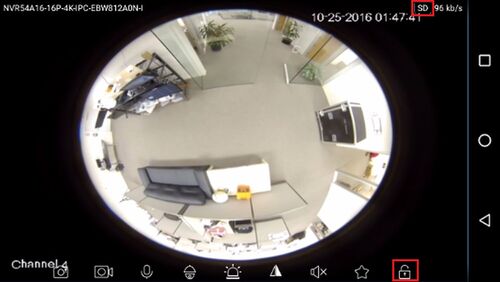
| + | 8. The SD icon in the top right corner is used to switch to HD (high definition) and back to SD (standard definition). The lock in the lower right corner is for locking full screen rotation. | ||
[[File:e4ipviewdevice008.jpg|500x500px]] | [[File:e4ipviewdevice008.jpg|500x500px]] | ||
| − | |||
| − | |||
| − | |||
| − | |||
| − | |||
| − | |||
Revision as of 19:58, 24 October 2016
Contents
How to View Device Using Easy4IP
Description
The Easy4IP smartphone app features live viewing for devices supporting the p2p function. Once p2p is enabled on a device connected to the internet, and the device is added to the Easy4IP smartphone app, then viewing is a breeze.
Prerequisites
- Device with p2p function enabled through Easy4IP - Device added to Easy4IP app - Internet connection on both devices
Video Instructions
Step by Step Instructions
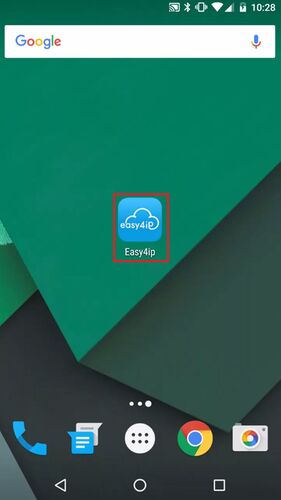
1. Launch the Easy4ip app on your smart phone
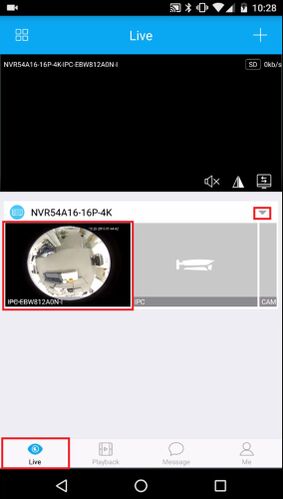
2. Make sure the Live tab at the bottom of the screen is selected. Now Select your device, and then the channel on it. For this example we will be using a NVR54A16-16P-4KS2 recorder which has multiple channels, you can see these by swiping right to left or by using the drop down menu. Once you have found your device and channel then select the camera you want to view.
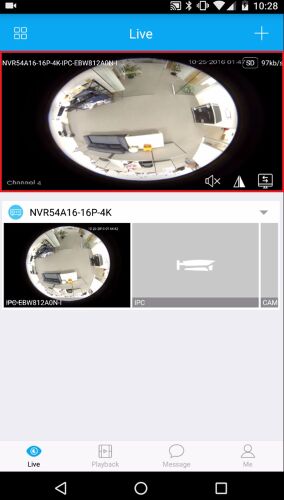
3. The video feed should now show up on the screen.
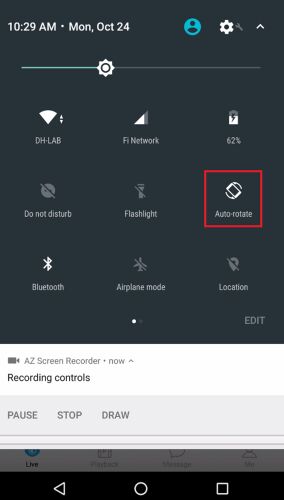
4. If you want to view full screen then make sure you have auto rotate set to on in your phones settings.
5. Now select the icon in the right corner of the video stream. The icon to the left is to flip the cameras orientation.
6. This screen is to control the functions of your device, like PTZ controls, Screenshot, Manual Recording, Alarm output, Favorites list, Audio transmission, and Sharing.
7. In this menu rotate your smartphone to landscape for full screen view.
8. The SD icon in the top right corner is used to switch to HD (high definition) and back to SD (standard definition). The lock in the lower right corner is for locking full screen rotation.
