Difference between revisions of "Template:PTZ Pattern WebUI Old"
| Line 9: | Line 9: | ||
<embedvideo service="youtube">https://youtu.be/MoDXfCKPpz8</embedvideo> | <embedvideo service="youtube">https://youtu.be/MoDXfCKPpz8</embedvideo> | ||
===Step by Step Instructions=== | ===Step by Step Instructions=== | ||
| − | 1. | + | 1. Log into the camera's web interface |
| + | |||
| + | Click Setting | ||
[[File:PTZPattern_-_WebUI_Old_-_1.jpg|600px]] | [[File:PTZPattern_-_WebUI_Old_-_1.jpg|600px]] | ||
| + | |||
| + | 2. Under PTZ | ||
| + | |||
| + | Click Function | ||
[[File:PTZPattern_-_WebUI_Old_-_2.jpg|600px]] | [[File:PTZPattern_-_WebUI_Old_-_2.jpg|600px]] | ||
| + | |||
| + | 3. Click Pattern | ||
[[File:PTZPattern_-_WebUI_Old_-_3.jpg|600px]] | [[File:PTZPattern_-_WebUI_Old_-_3.jpg|600px]] | ||
| + | |||
| + | 4. Use the dropdown box to select the Pattern Number | ||
| + | |||
| + | Click Setup | ||
[[File:PTZPattern_-_WebUI_Old_-_4.jpg|600px]] | [[File:PTZPattern_-_WebUI_Old_-_4.jpg|600px]] | ||
| + | |||
| + | 5. Click Start Rec to begin recording the pattern | ||
[[File:PTZPattern_-_WebUI_Old_-_5.jpg|600px]] | [[File:PTZPattern_-_WebUI_Old_-_5.jpg|600px]] | ||
| + | |||
| + | 6. Use the on screen PTZ controls to move the camera as desired to create the pattern | ||
| + | |||
| + | An on screen indicator will appear to show the Pattern Setup status. | ||
| + | |||
| + | The on screen indicator will show the current status of the setup as a percentage. | ||
| + | |||
| + | 100% will be the maximum pattern length that can be created | ||
[[File:PTZPattern_-_WebUI_Old_-_6.jpg|600px]] | [[File:PTZPattern_-_WebUI_Old_-_6.jpg|600px]] | ||
| + | |||
| + | 7. Click Stop Rec to end recording the pattern | ||
[[File:PTZPattern_-_WebUI_Old_-_7.jpg|600px]] | [[File:PTZPattern_-_WebUI_Old_-_7.jpg|600px]] | ||
| + | |||
| + | 8. To run the created Pattern | ||
| + | |||
| + | Click Live | ||
[[File:PTZPattern_-_WebUI_Old_-_8.jpg|600px]] | [[File:PTZPattern_-_WebUI_Old_-_8.jpg|600px]] | ||
| + | |||
| + | 9. Under PTZ Function | ||
| + | |||
| + | Use the dropdown box to select Pattern | ||
[[File:PTZPattern_-_WebUI_Old_-_9.jpg|600px]] | [[File:PTZPattern_-_WebUI_Old_-_9.jpg|600px]] | ||
| + | |||
| + | 10. Enter the Pattern number | ||
[[File:PTZPattern_-_WebUI_Old_-_10.jpg|600px]] | [[File:PTZPattern_-_WebUI_Old_-_10.jpg|600px]] | ||
| + | 11. Click Start | ||
| + | |||
| + | The pattern will begin and display the current status | ||
| + | |||
| + | Click Stop to stop the pattern function | ||
[[File:PTZPattern_-_WebUI_Old_-_11.jpg|600px]] | [[File:PTZPattern_-_WebUI_Old_-_11.jpg|600px]] | ||
Revision as of 17:55, 9 January 2020
Contents
How to Setup Pattern
Description
Pattern allows the PTZ camera to move according to a created movement Pattern
This guide will show how to create and run a Pattern using the WebUI (Old)
Prerequisites
- Dahua Network PTZ
Video Instructions
Step by Step Instructions
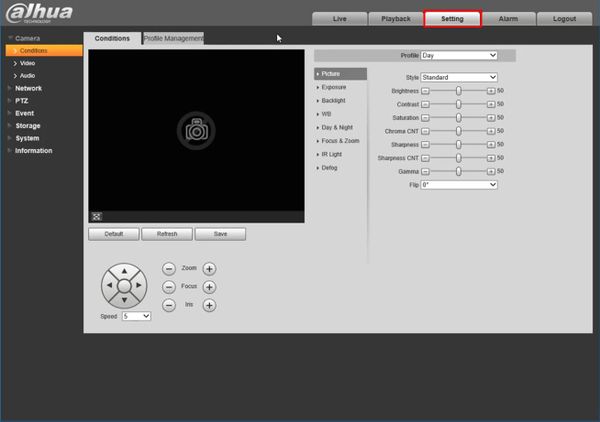
1. Log into the camera's web interface
Click Setting
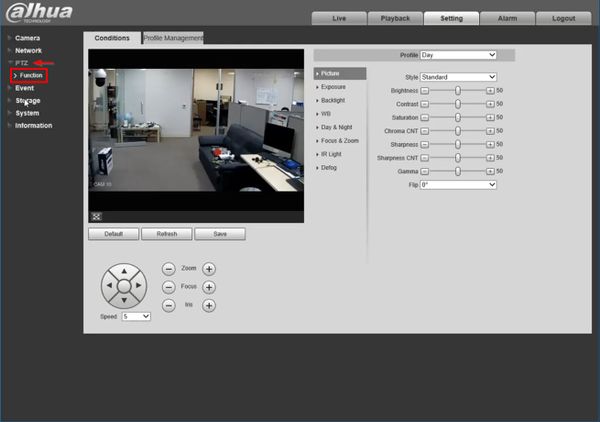
2. Under PTZ
Click Function
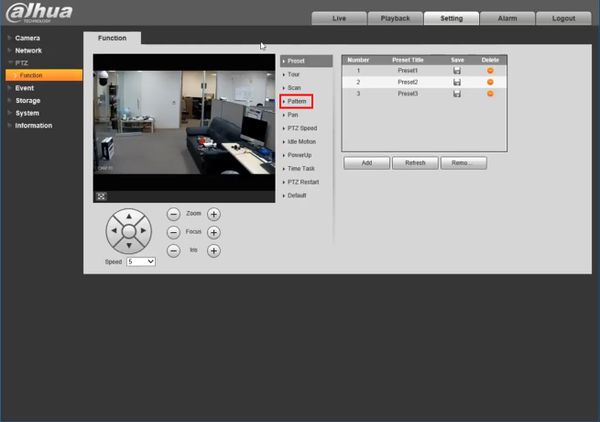
3. Click Pattern
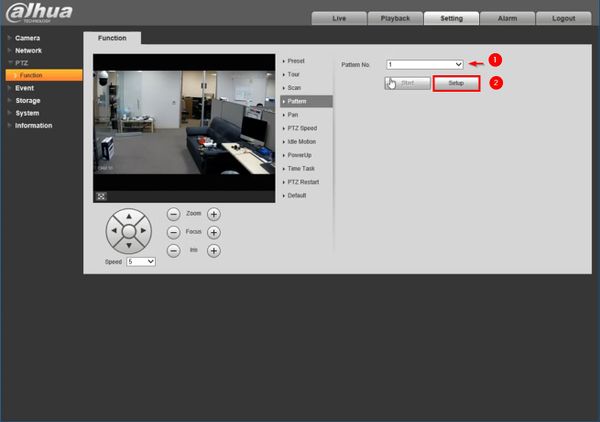
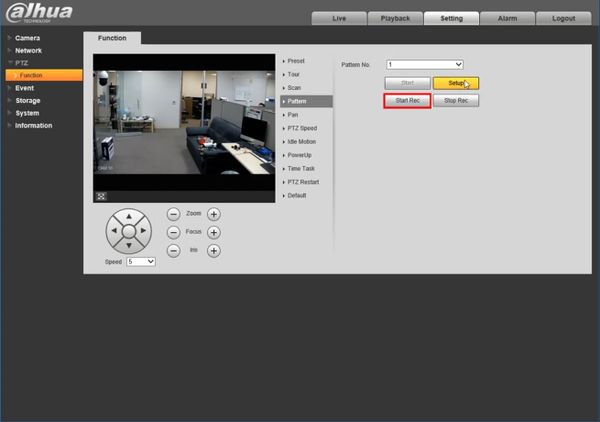
4. Use the dropdown box to select the Pattern Number
Click Setup
5. Click Start Rec to begin recording the pattern
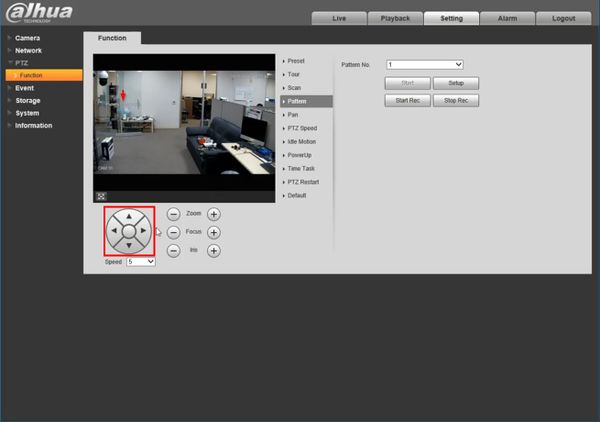
6. Use the on screen PTZ controls to move the camera as desired to create the pattern
An on screen indicator will appear to show the Pattern Setup status.
The on screen indicator will show the current status of the setup as a percentage.
100% will be the maximum pattern length that can be created
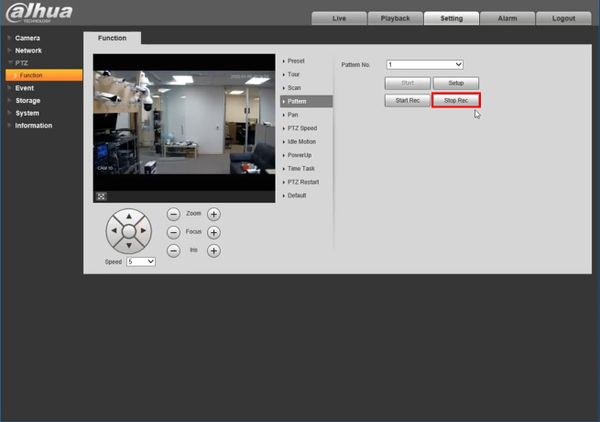
7. Click Stop Rec to end recording the pattern
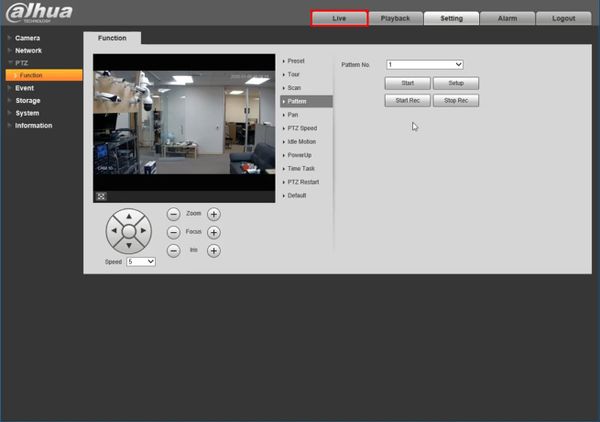
8. To run the created Pattern
Click Live
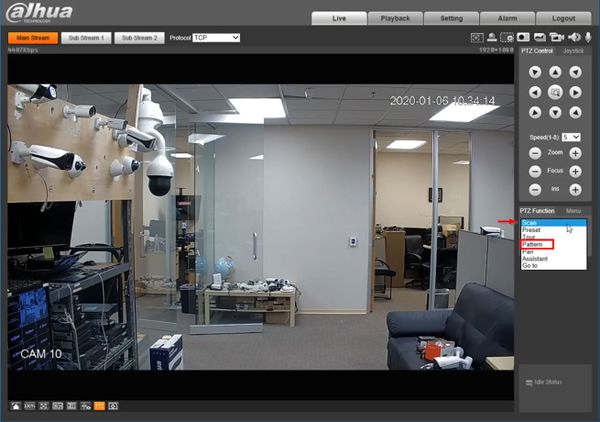
9. Under PTZ Function
Use the dropdown box to select Pattern
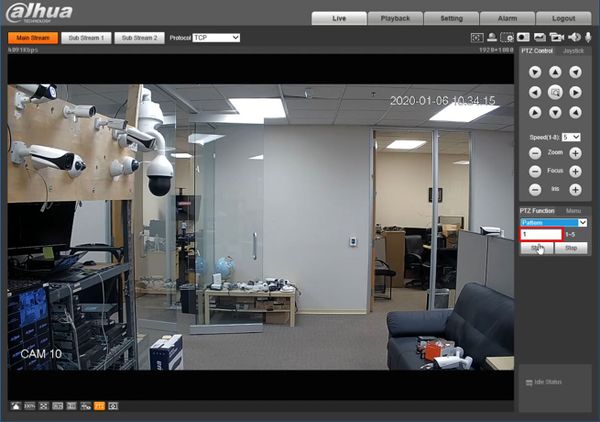
10. Enter the Pattern number
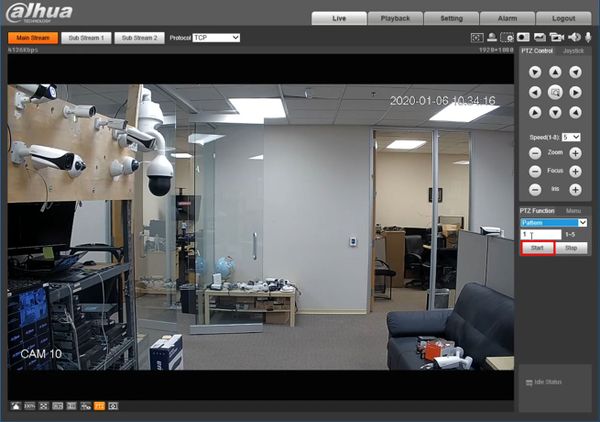
11. Click Start
The pattern will begin and display the current status
