Notice: Firmware Links Under Maintenance We are currently undergoing maintenance on all firmware links. If any links are inaccessible, please email or contact Tech Support for the firmware. We appreciate your patience during the maintenance, thank you for your understanding.
Difference between revisions of "Thermal/TPC BF5421 T/Instructions/DSS Express/Add TPC BF5421 T to DSS Express"
| Line 1: | Line 1: | ||
=Add TPC-BF5421-T to DSS-Express= | =Add TPC-BF5421-T to DSS-Express= | ||
==Description== | ==Description== | ||
| + | These instructions will show how to add TPC-BF5421-T to DSS Express | ||
==Prerequisites== | ==Prerequisites== | ||
| − | + | * TPC-BF5421-T - initialized, connected to network | |
| + | * DSS Express installed | ||
==Video Instructions== | ==Video Instructions== | ||
<embedvideo service="youtube">https://youtu.be/KPadHd99qUc</embedvideo> | <embedvideo service="youtube">https://youtu.be/KPadHd99qUc</embedvideo> | ||
==Step by Step Instructions== | ==Step by Step Instructions== | ||
| − | 1. | + | ===Configure DSS Express Storage=== |
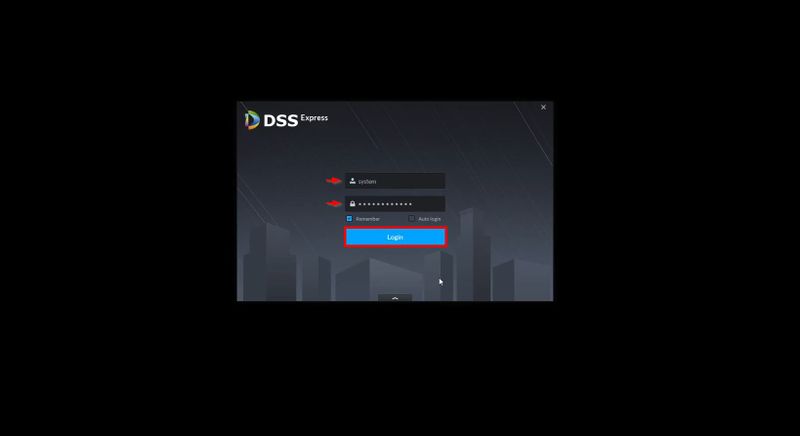
| − | + | 1. Launch DSS Express | |
| + | Enter the username/password | ||
| + | |||
| + | Click '''Login''' | ||
[[File:Add_TPC-BF5421-T_to_DSS-Express_-_1.jpg|800x800px]] | [[File:Add_TPC-BF5421-T_to_DSS-Express_-_1.jpg|800x800px]] | ||
| + | |||
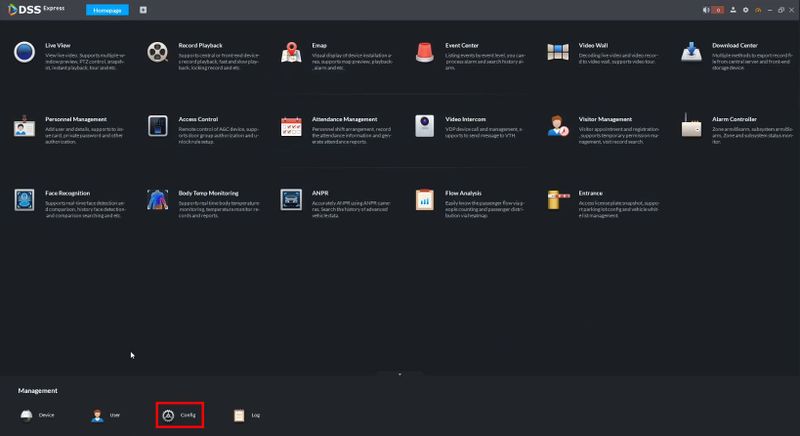
| + | 2. Click '''Config''' | ||
[[File:Add_TPC-BF5421-T_to_DSS-Express_-_2.jpg|800x800px]] | [[File:Add_TPC-BF5421-T_to_DSS-Express_-_2.jpg|800x800px]] | ||
| + | |||
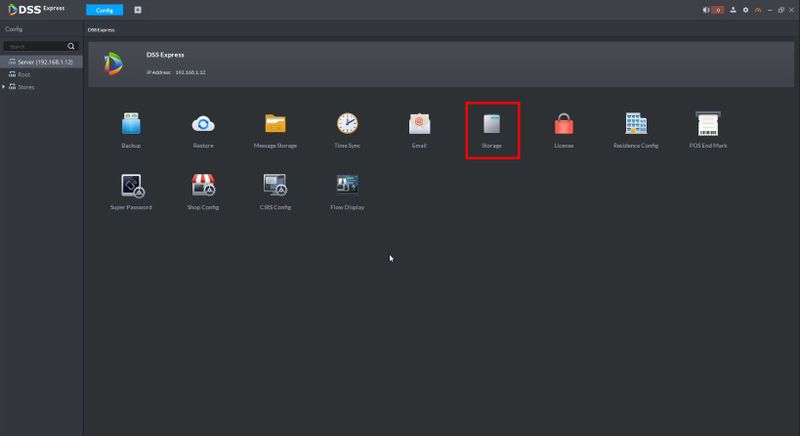
| + | 3. Click '''Storage''' | ||
[[File:Add_TPC-BF5421-T_to_DSS-Express_-_3.jpg|800x800px]] | [[File:Add_TPC-BF5421-T_to_DSS-Express_-_3.jpg|800x800px]] | ||
| + | |||
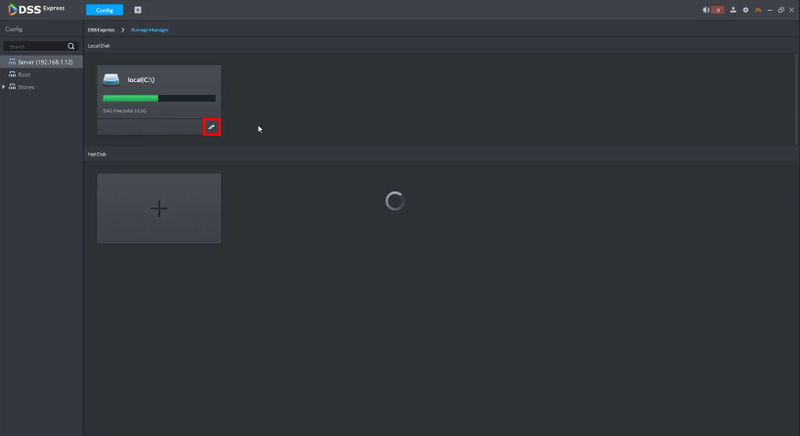
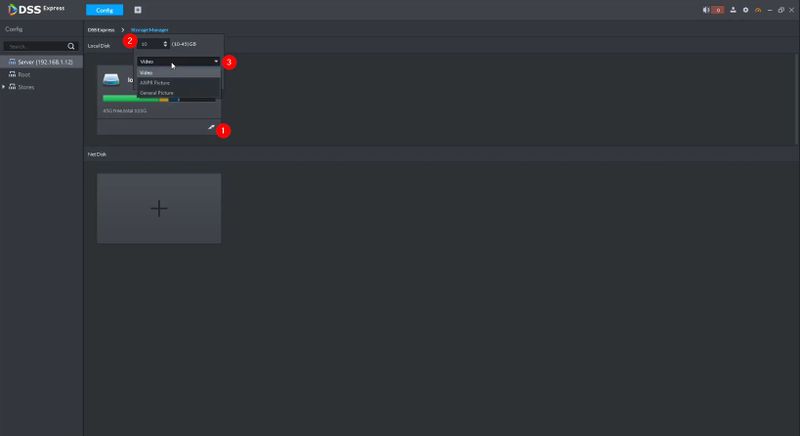
| + | 4. The menu will show available local disks. | ||
| + | |||
| + | Click the edit icon in the disk you wish to use to begin creating a partition | ||
[[File:Add_TPC-BF5421-T_to_DSS-Express_-_4.jpg|800x800px]] | [[File:Add_TPC-BF5421-T_to_DSS-Express_-_4.jpg|800x800px]] | ||
| + | |||
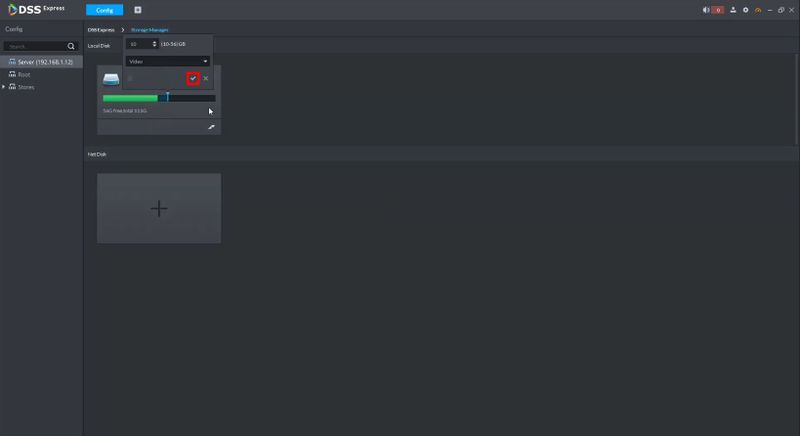
| + | 5. Use the dropdown box to select Video as type | ||
| + | |||
| + | Click the check to save | ||
[[File:Add_TPC-BF5421-T_to_DSS-Express_-_5.jpg|800x800px]] | [[File:Add_TPC-BF5421-T_to_DSS-Express_-_5.jpg|800x800px]] | ||
| + | |||
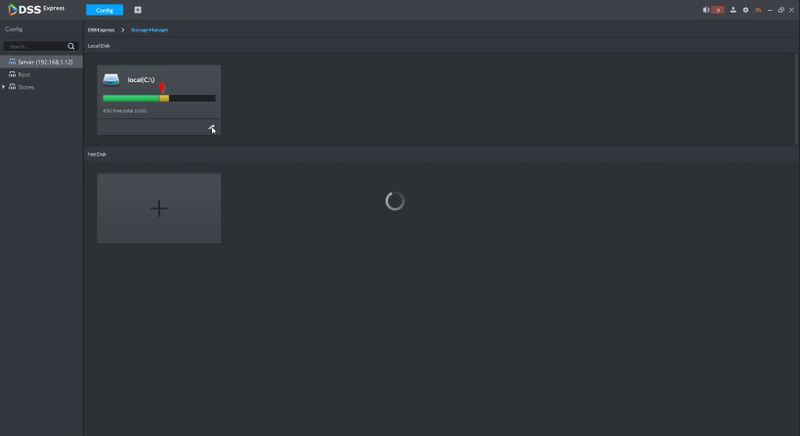
| + | The partition will be created | ||
[[File:Add_TPC-BF5421-T_to_DSS-Express_-_6.jpg|800x800px]] | [[File:Add_TPC-BF5421-T_to_DSS-Express_-_6.jpg|800x800px]] | ||
| + | |||
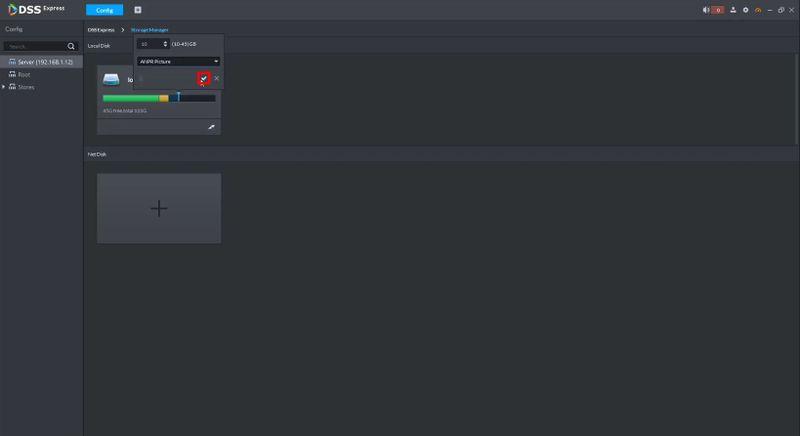
| + | Repeat the process to create another partition, this time using the dropdown box to select ANPR picture | ||
[[File:Add_TPC-BF5421-T_to_DSS-Express_-_7.jpg|800x800px]] | [[File:Add_TPC-BF5421-T_to_DSS-Express_-_7.jpg|800x800px]] | ||
| + | |||
| + | Click the check to save | ||
[[File:Add_TPC-BF5421-T_to_DSS-Express_-_8.jpg|800x800px]] | [[File:Add_TPC-BF5421-T_to_DSS-Express_-_8.jpg|800x800px]] | ||
| + | |||
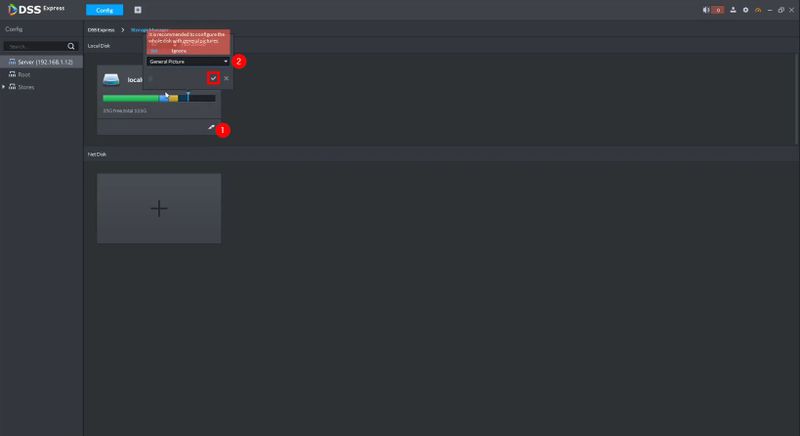
| + | Repeat the process to create another partition, this time using the dropdown box to select General Picture | ||
[[File:Add_TPC-BF5421-T_to_DSS-Express_-_9.jpg|800x800px]] | [[File:Add_TPC-BF5421-T_to_DSS-Express_-_9.jpg|800x800px]] | ||
| + | |||
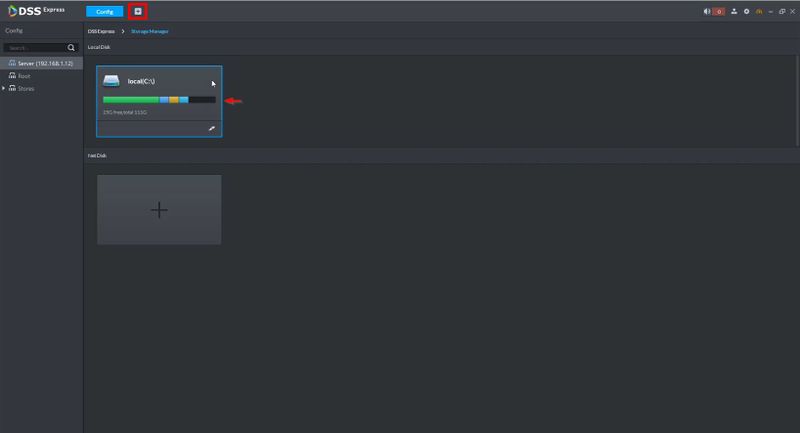
| + | With all partitions created | ||
| + | |||
| + | Click the + to return to the Main Menu | ||
[[File:Add_TPC-BF5421-T_to_DSS-Express_-_10.jpg|800x800px]] | [[File:Add_TPC-BF5421-T_to_DSS-Express_-_10.jpg|800x800px]] | ||
| + | |||
| + | ===Add Camera to DSS Express=== | ||
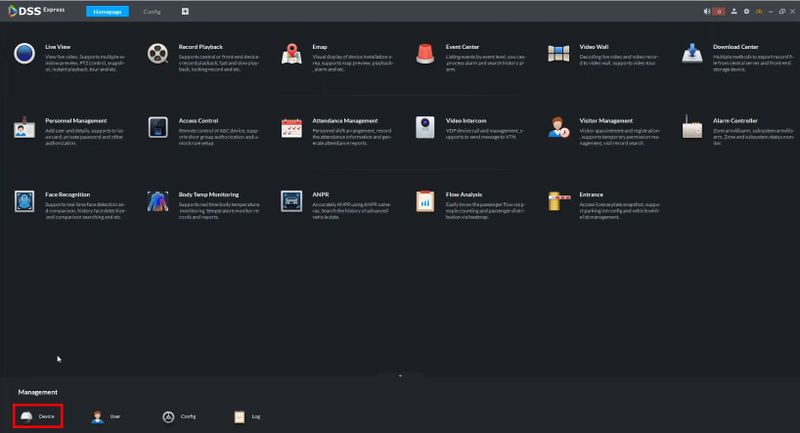
| + | 1. Click '''Device''' | ||
[[File:Add_TPC-BF5421-T_to_DSS-Express_-_11.jpg|800x800px]] | [[File:Add_TPC-BF5421-T_to_DSS-Express_-_11.jpg|800x800px]] | ||
| + | |||
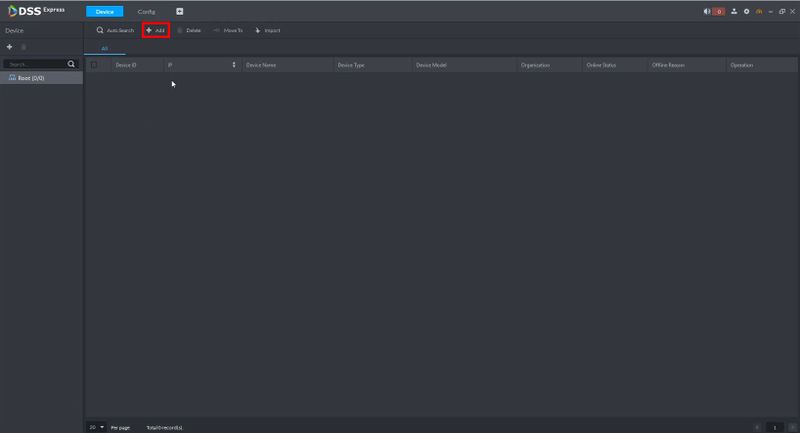
| + | 2. Click +Add | ||
[[File:Add_TPC-BF5421-T_to_DSS-Express_-_12.jpg|800x800px]] | [[File:Add_TPC-BF5421-T_to_DSS-Express_-_12.jpg|800x800px]] | ||
| + | |||
| + | 3. Enter the device information: | ||
| + | |||
| + | * Device Name - name for device in DSS Express | ||
| + | * IP Address - IP address of camera | ||
| + | * Username/password - username/password of camera | ||
| + | |||
| + | Click '''Add''' | ||
[[File:Add_TPC-BF5421-T_to_DSS-Express_-_13.jpg|800x800px]] | [[File:Add_TPC-BF5421-T_to_DSS-Express_-_13.jpg|800x800px]] | ||
Revision as of 16:50, 1 July 2020
Contents
Add TPC-BF5421-T to DSS-Express
Description
These instructions will show how to add TPC-BF5421-T to DSS Express
Prerequisites
- TPC-BF5421-T - initialized, connected to network
- DSS Express installed
Video Instructions
Step by Step Instructions
Configure DSS Express Storage
1. Launch DSS Express
Enter the username/password
Click Login
2. Click Config
3. Click Storage
4. The menu will show available local disks.
Click the edit icon in the disk you wish to use to begin creating a partition
5. Use the dropdown box to select Video as type
Click the check to save
The partition will be created
Repeat the process to create another partition, this time using the dropdown box to select ANPR picture
Click the check to save
Repeat the process to create another partition, this time using the dropdown box to select General Picture
With all partitions created
Click the + to return to the Main Menu
Add Camera to DSS Express
1. Click Device
2. Click +Add
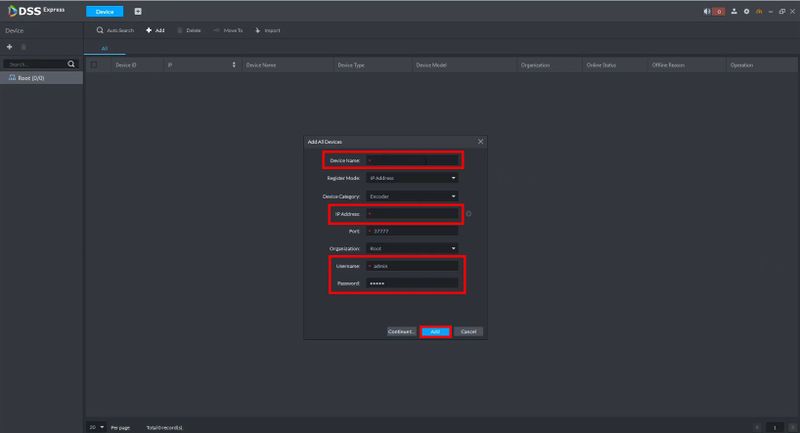
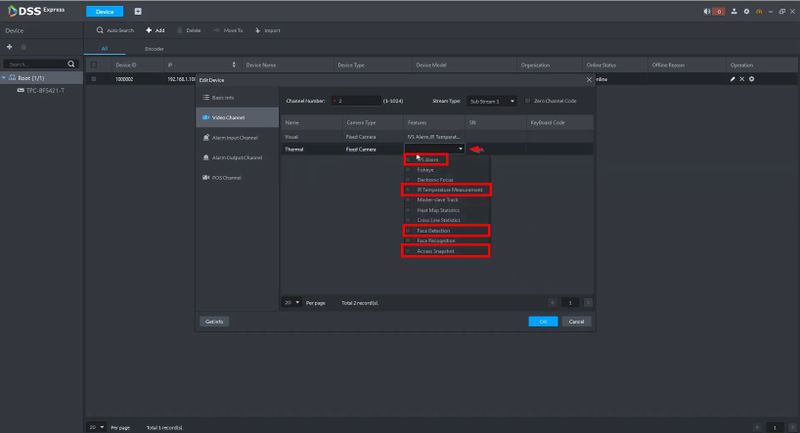
3. Enter the device information:
- Device Name - name for device in DSS Express
- IP Address - IP address of camera
- Username/password - username/password of camera
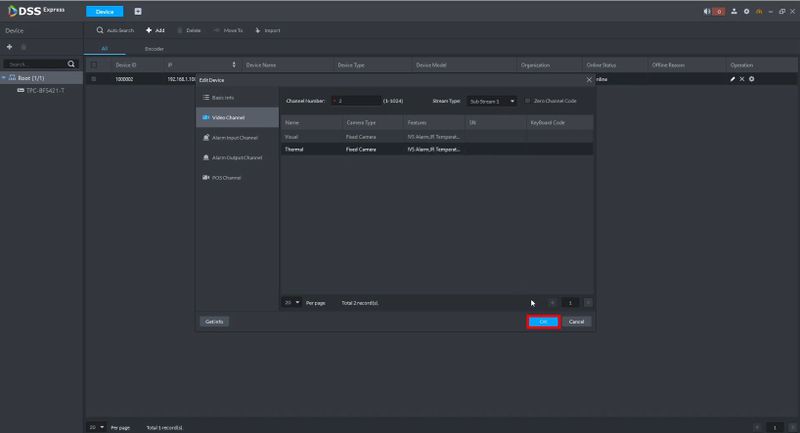
Click Add
