Difference between revisions of "Template:Alarm Out SystemUI OldGUI"
(Created page with " ==Prerequisites== ==Video Instructions== <embedvideo service="youtube">https://youtu.be/BjkCe8DW0Pw</embedvideo> ==Step by Step Instructions==") |
|||
| Line 4: | Line 4: | ||
<embedvideo service="youtube">https://youtu.be/BjkCe8DW0Pw</embedvideo> | <embedvideo service="youtube">https://youtu.be/BjkCe8DW0Pw</embedvideo> | ||
==Step by Step Instructions== | ==Step by Step Instructions== | ||
| + | '''Brief Description:''' We will be setting up an Alarm Buzzer/Strobe light to the alarm output of our Recorder. It will be triggered by a Camera's Motion Detection Event. | ||
| + | |||
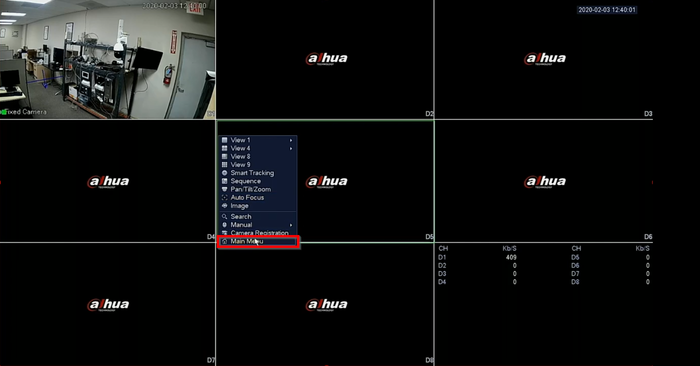
| + | 1.Go to Main Menu | ||
| + | |||
| + | [[File:Alarm Out-1.png|700px]] | ||
| + | |||
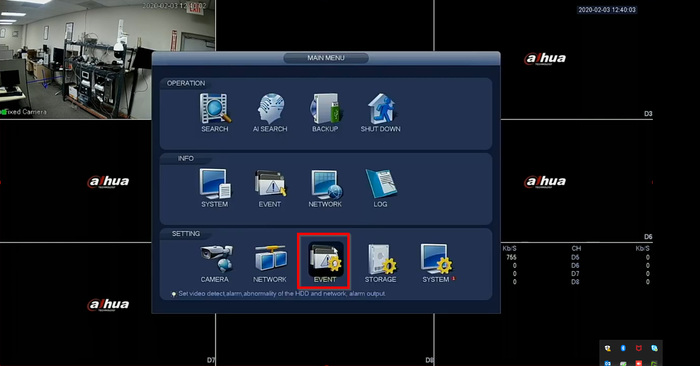
| + | 2. Click on Events | ||
| + | |||
| + | [[File:Alarm Out-2.png|700px]] | ||
| + | |||
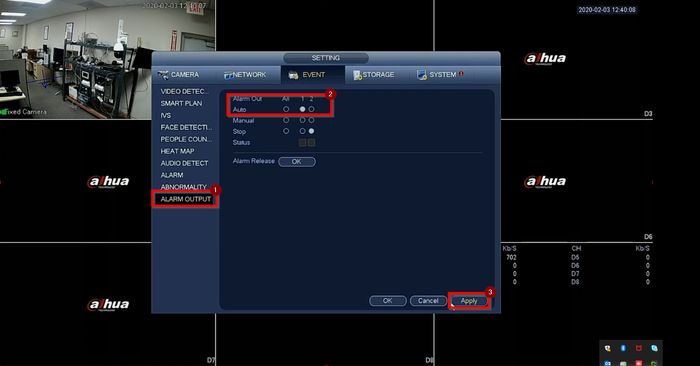
| + | 3. On "Alarm Output" we select the relay our Buzzer is connected to. In this case Relay 1. Click on Apply and then Ok to save. | ||
| + | |||
| + | [[File:Alarm Out-3.png|700px]] | ||
| + | |||
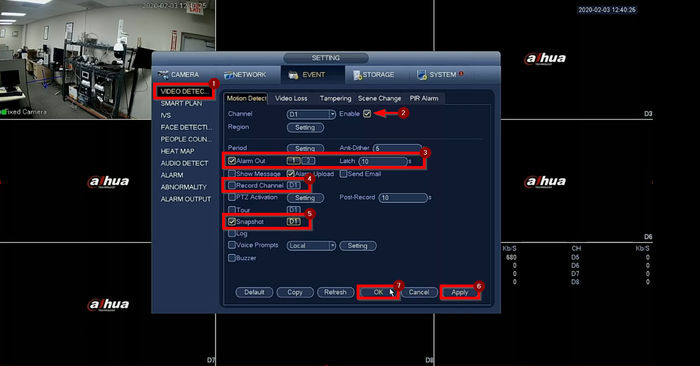
| + | 4. Next select "Video Detection" on the left and check the Enable box. <br /> | ||
| + | - Check Alarm Out and select the relay the buzzer is connected to <br /> | ||
| + | - Check Record Channel and the channel you want to record to when the event it tripped <br /> | ||
| + | - Check Snapshot if you'd like to store snapshots | ||
| + | |||
| + | Click on Apply and Ok to save | ||
| + | |||
| + | [[File:Alarm Out-4.png|700px]] | ||
| + | |||
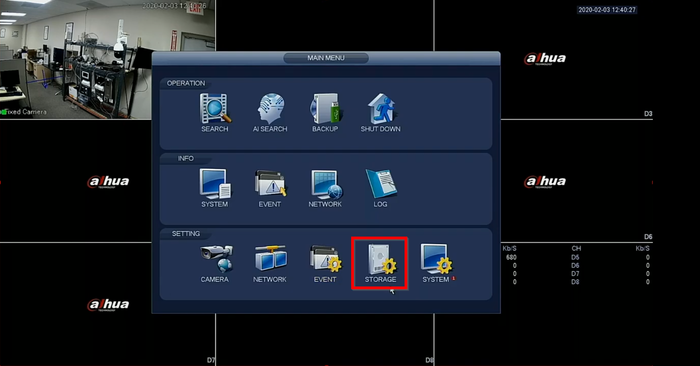
| + | 5. Got back to the main menu and select Storage | ||
| + | |||
| + | [[File:Alarm Out-5.png|700px]] | ||
| + | |||
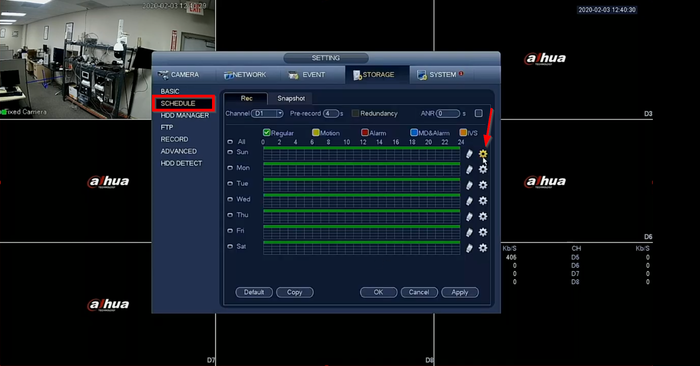
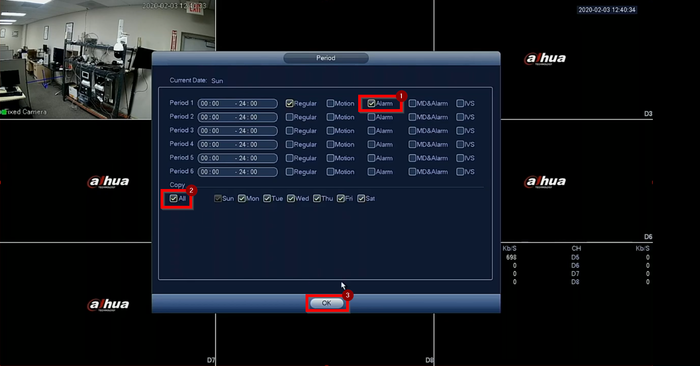
| + | 6. Select Schedule on the left menu and click on the "settings" icon. On the pop up menu check "Alarm" and "All" for all days of the week. Hit OK to go back | ||
| + | |||
| + | [[File:Alarm Out-6.png|700px]] | ||
| + | [[File:Alarm Out-7.png|700px]] | ||
| + | |||
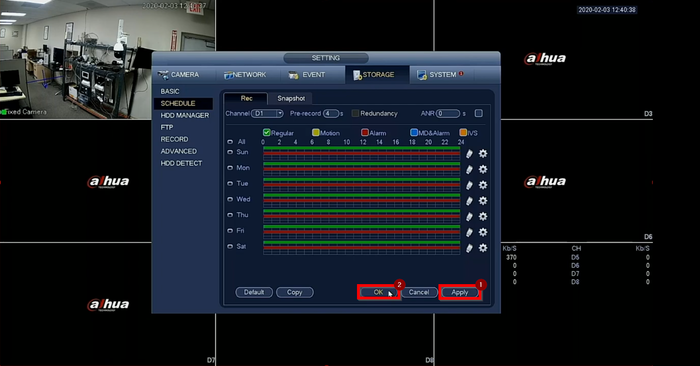
| + | 7. Click on Apply and Ok to save | ||
| + | |||
| + | [[File:Alarm Out-8.png|700px]] | ||
Latest revision as of 18:53, 5 February 2020
Prerequisites
Video Instructions
Step by Step Instructions
Brief Description: We will be setting up an Alarm Buzzer/Strobe light to the alarm output of our Recorder. It will be triggered by a Camera's Motion Detection Event.
1.Go to Main Menu
2. Click on Events
3. On "Alarm Output" we select the relay our Buzzer is connected to. In this case Relay 1. Click on Apply and then Ok to save.
4. Next select "Video Detection" on the left and check the Enable box.
- Check Alarm Out and select the relay the buzzer is connected to
- Check Record Channel and the channel you want to record to when the event it tripped
- Check Snapshot if you'd like to store snapshots
Click on Apply and Ok to save
5. Got back to the main menu and select Storage
6. Select Schedule on the left menu and click on the "settings" icon. On the pop up menu check "Alarm" and "All" for all days of the week. Hit OK to go back
7. Click on Apply and Ok to save
