Difference between revisions of "Doorbell/DB11/Add DB11 To Dahua Recorder"
(→Instructions) |
|||
| (One intermediate revision by one other user not shown) | |||
| Line 1: | Line 1: | ||
=Add DB11 To Dahua Recorder= | =Add DB11 To Dahua Recorder= | ||
==Description== | ==Description== | ||
| − | These instructions will show you how to add a DB11 to a Dahua recorder | + | These instructions will show you how to add a DB11 to a Dahua recorder |
==Prerequisites== | ==Prerequisites== | ||
*DB11 | *DB11 | ||
| − | *Dahua NVR | + | *Dahua NVR or XVR on the same network as the DB11 |
*[[Doorbell/DB11/Initial_Setup|Completed Initial Setup of DB11]] | *[[Doorbell/DB11/Initial_Setup|Completed Initial Setup of DB11]] | ||
| + | ==Not Working Functions== | ||
| + | *No ONVIF | ||
| + | *No 3rd Party Support for 3rd Party VMS, Recorders, or Video Intercom devices | ||
| + | *No RTSP URL | ||
| + | *No PIR Recording | ||
| + | *No Calls to SmartPSS | ||
| + | *No Calls to Dahua Recorder | ||
| + | *Not compatible with Dahua Video Intercom devices | ||
| − | ==Instructions== | + | ==Step by Step Instructions== |
| − | + | 1. Open the Main Menu of the Dahua Recorder. | |
| − | + | <br>Select '''Camera''' | |
| − | |||
| − | |||
| − | + | [[File:AddDB11ToNVR1.png|1000px]] | |
| − | [[File: | ||
| − | |||
| − | |||
| − | < | + | 2. Click on '''Camera List''' on the left. |
| − | + | <br>Then click on the '''Camera List''' tab at the top. | |
| − | < | + | <br>Click on '''Search Device'''. |
| − | < | + | <br>Find the DB11 in the top list and check the box next to it. |
| + | <br>Then click on '''Add''' | ||
| − | + | [[File:AddDB11ToNVR2.png|1000px]] | |
| − | [[File: | ||
| − | |||
| − | |||
| − | < | + | 3. Click on the Pencil icon, in the '''Edit''' column, for the DB11 |
| − | [[File: | + | |
| − | + | [[File:AddDB11ToNVR3.png|1000px]] | |
| − | + | ||
| + | 4. Enter the DB11's login credentials next to '''Username''' and '''Password'''. | ||
| + | <br>Then click on '''OK''' | ||
| + | |||
| + | [[File:AddDB11ToNVR4.png|500px]] | ||
| + | |||
| + | 5. Once the recorder connects to the DB11, the colored circle in the '''Status''' column will turn Green | ||
| + | |||
| + | [[File:AddDB11ToNVR5.png|1000px]] | ||
| + | |||
| + | 6. You will now be able to see the live view of the DB11 on your recorder | ||
| + | |||
| + | [[File:AddDB11ToNVR6.png|1000px]] | ||
Latest revision as of 21:25, 9 April 2024
Contents
Add DB11 To Dahua Recorder
Description
These instructions will show you how to add a DB11 to a Dahua recorder
Prerequisites
- DB11
- Dahua NVR or XVR on the same network as the DB11
- Completed Initial Setup of DB11
Not Working Functions
- No ONVIF
- No 3rd Party Support for 3rd Party VMS, Recorders, or Video Intercom devices
- No RTSP URL
- No PIR Recording
- No Calls to SmartPSS
- No Calls to Dahua Recorder
- Not compatible with Dahua Video Intercom devices
Step by Step Instructions
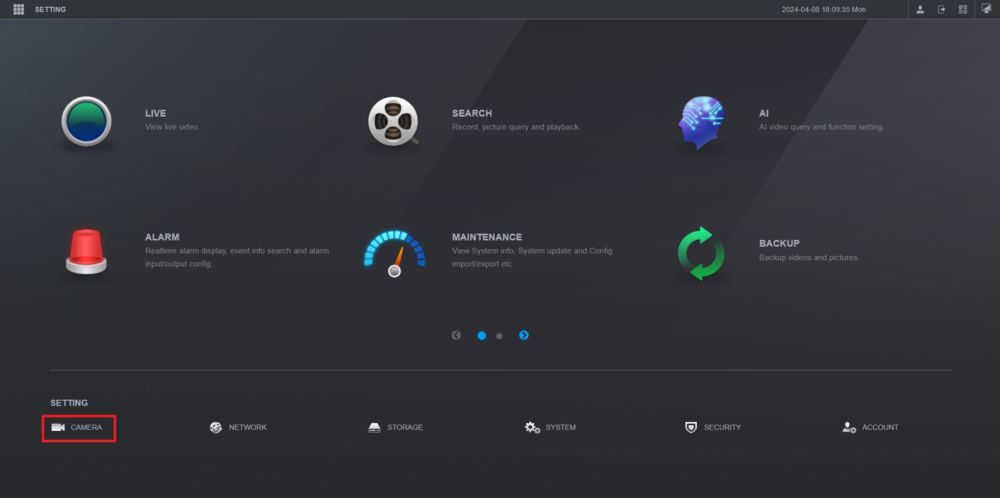
1. Open the Main Menu of the Dahua Recorder.
Select Camera
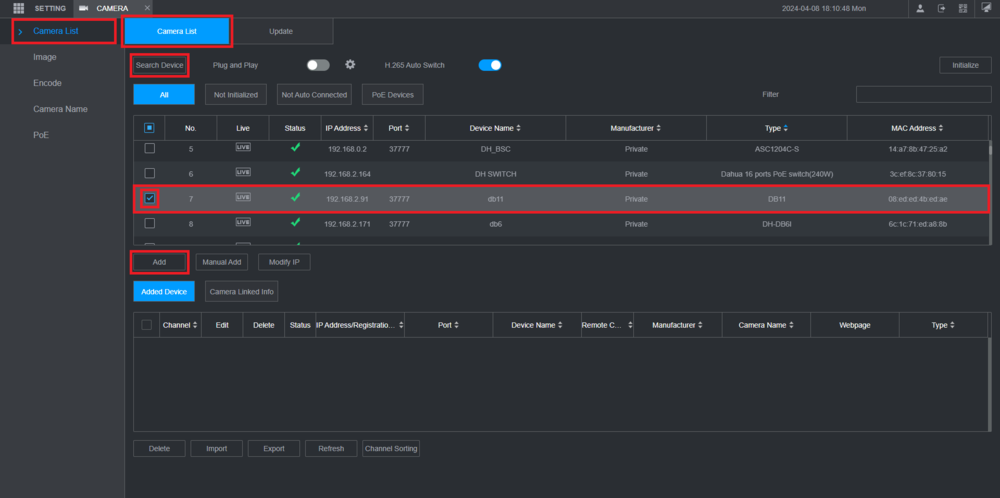
2. Click on Camera List on the left.
Then click on the Camera List tab at the top.
Click on Search Device.
Find the DB11 in the top list and check the box next to it.
Then click on Add
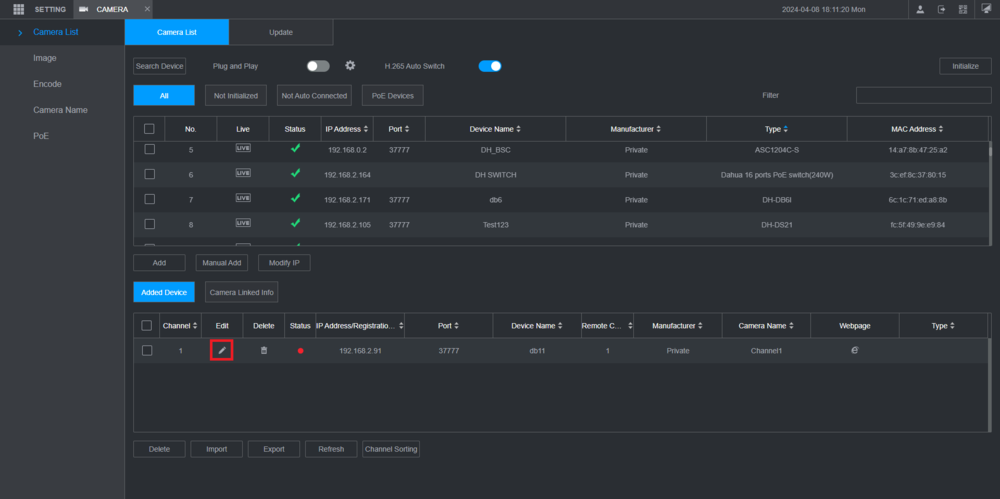
3. Click on the Pencil icon, in the Edit column, for the DB11
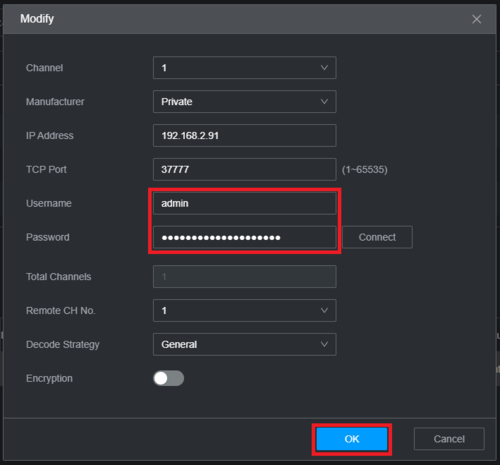
4. Enter the DB11's login credentials next to Username and Password.
Then click on OK
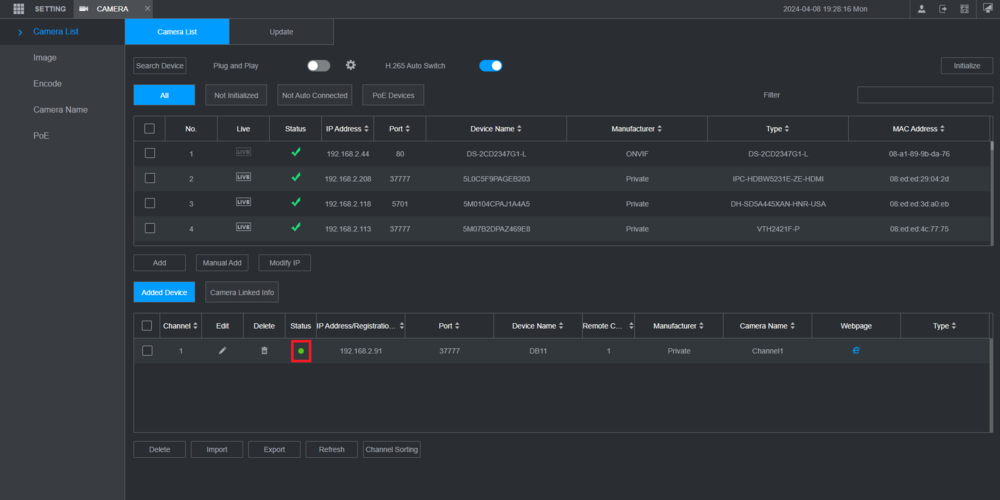
5. Once the recorder connects to the DB11, the colored circle in the Status column will turn Green
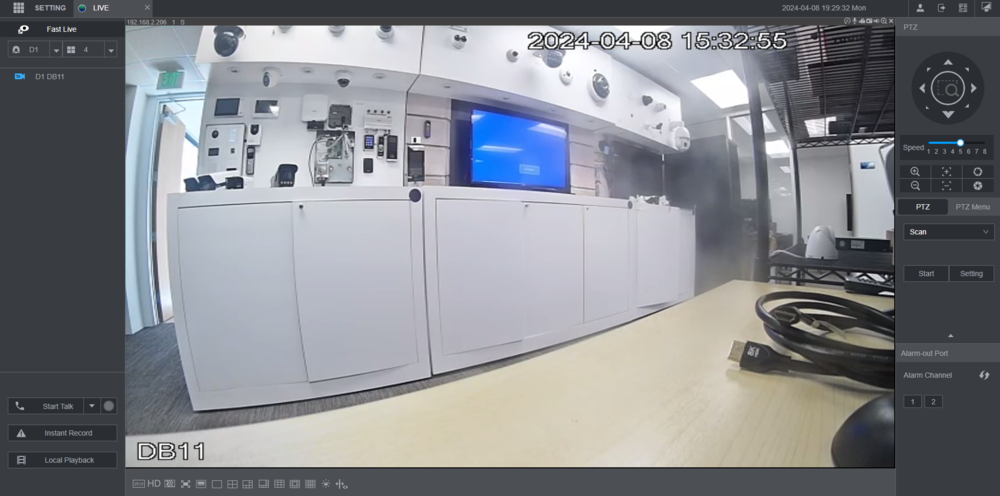
6. You will now be able to see the live view of the DB11 on your recorder
