Difference between revisions of "Record/Basic/Audio"
| (One intermediate revision by one other user not shown) | |||
| Line 5: | Line 5: | ||
==Physical Setup Instructions== | ==Physical Setup Instructions== | ||
<div class="toccolours mw-collapsible mw-collapsed"> | <div class="toccolours mw-collapsible mw-collapsed"> | ||
| − | [[File: | + | [[File:AudioRecordingPhysicalSetup1.jpg|250px]]<span style="font-size:180%;">'''Microphone'''</span> |
<div class="mw-collapsible-content">{{Template:Audio_Record_Physical_Setup}}</div> | <div class="mw-collapsible-content">{{Template:Audio_Record_Physical_Setup}}</div> | ||
</div> | </div> | ||
| Line 36: | Line 36: | ||
<div class="toccolours mw-collapsible mw-collapsed"> | <div class="toccolours mw-collapsible mw-collapsed"> | ||
| − | [[File:Icon_for_type_DSS_Express_S.png|250px]]<span style="font-size:180%;">'''DSS Express | + | [[File:Icon_for_type_DSS_Express_S.png|250px]]<span style="font-size:180%;">'''DSS Express'''</span> |
<div class="mw-collapsible-content">{{Template:Audio_Record_DSS_Express}}</div> | <div class="mw-collapsible-content">{{Template:Audio_Record_DSS_Express}}</div> | ||
</div> | </div> | ||
Latest revision as of 22:43, 1 April 2021
Contents
- 1 Audio Record
- 1.1 Description
- 1.2 Physical Setup Instructions
- 1.3 Prerequisites
- 1.4 Overview
- 1.5 Step by Step Instructions
- 1.6 Instructions
- 1.7 Description
- 1.8 Prerequisites
- 1.9 Video Instructions
- 1.10 Prerequisites
- 1.11 Video Instructions
- 1.12 Step by Step Instructions
- 1.13 Prerequisites
- 1.14 Video Instructions
- 1.15 Step by Step Instructions
- 1.16 Prerequisites
- 1.17 Video Instructions
- 1.18 Step by Step Instructions
- 1.19 Prerequisites
- 1.20 Video Instructions
- 1.21 Step by Step Instructions
- 1.22 NOTICE
- 1.23 Prerequisites
- 1.24 Video Instructions
- 1.25 Step by Step Instructions
Audio Record
Description
Enable Audio Recording of Dahua Cameras
Physical Setup Instructions
Prerequisites
- Dahua Camera with Audio Input
- Powered Microphone (In this guide we use the Dahua HAP200 Hi-fidelity Pickup)
- RCA Cable
- Power Supply for the Microphone (Check the Microphone's Spec Sheet for exact Power Supply)
Overview
Step by Step Instructions
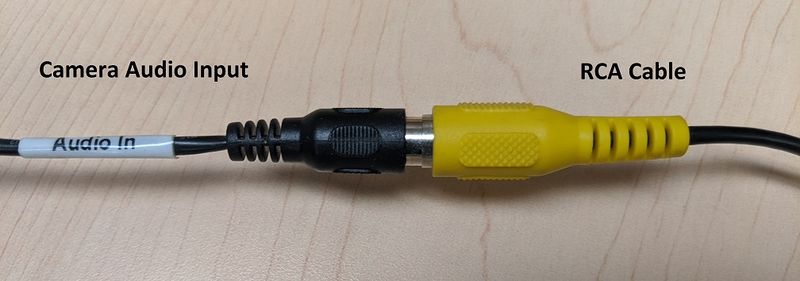
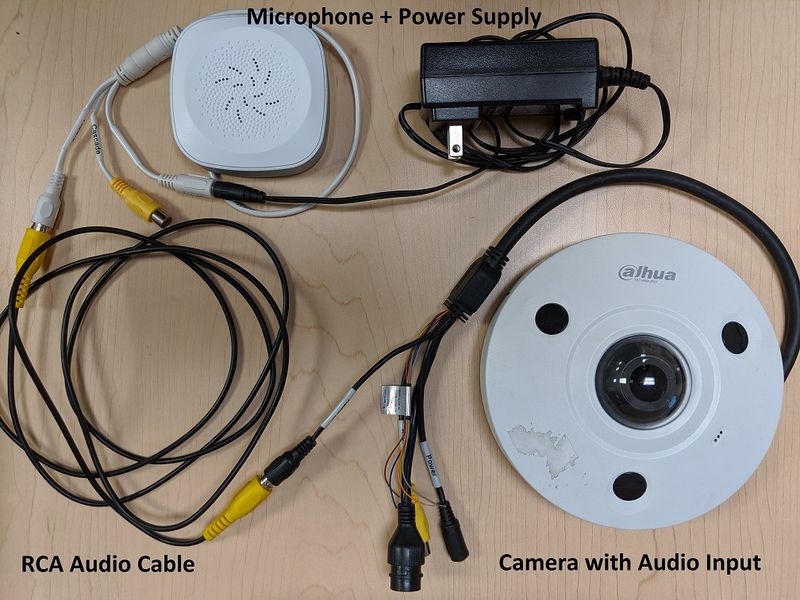
1. Connect one end of the RCA cable to the "Audio In" port on the Camera's wire harness/pigtail
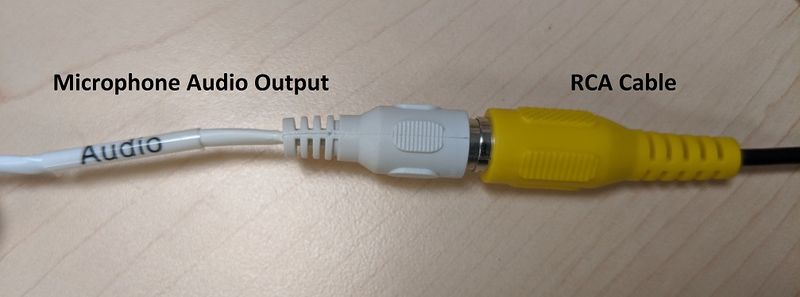
2. Connect the other end of the RCA cable to the "Audio" output port on the Powered Microphone's wire harness/pigtail
3. Connect the Power Supply to the "Power" connection on the Powered Microphone's wire harness/pigtail
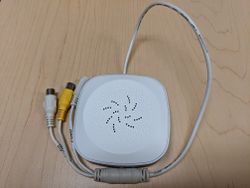
4. When you have finished, it should look similiar to this setup:
Instructions
Description
Record Audio in addition to video.
Prerequisites
- Camera with internal Microphone or RCA audio input, or DVR with RCA audio inputs
- External powered RCA Microphone
- NVR, DVR, or Camera with SD card
Video Instructions
Step by Step Instructions
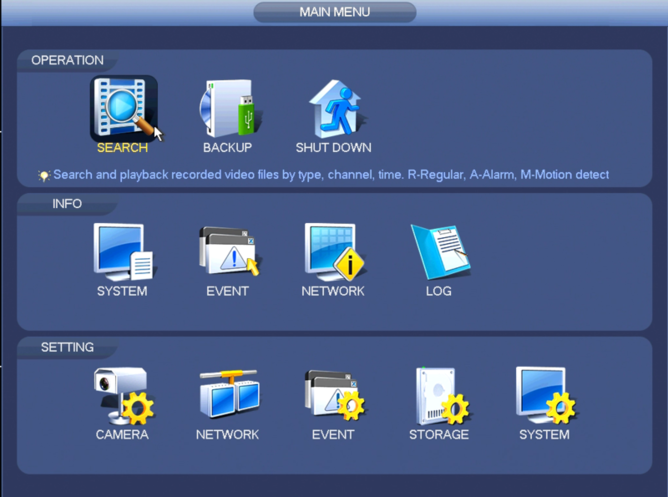
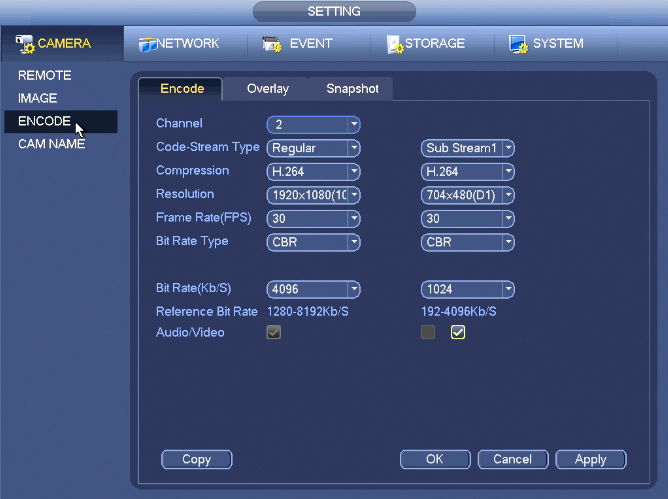
1. From the Main Menu, go to Setting->Camera->Encode
2. Click the box for, "Audio/Video"
3. Click, "Apply" and then, "OK"Prerequisites
- Dahua Camera with Audio Input
- Dahua Recorder with the New GUI, connected to a TV or Monitor
Video Instructions
Step by Step Instructions
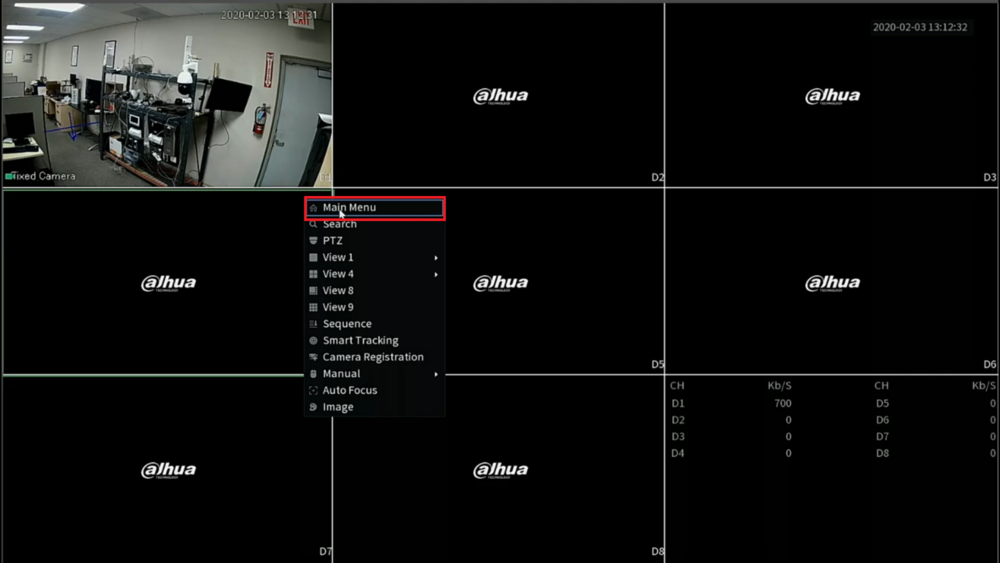
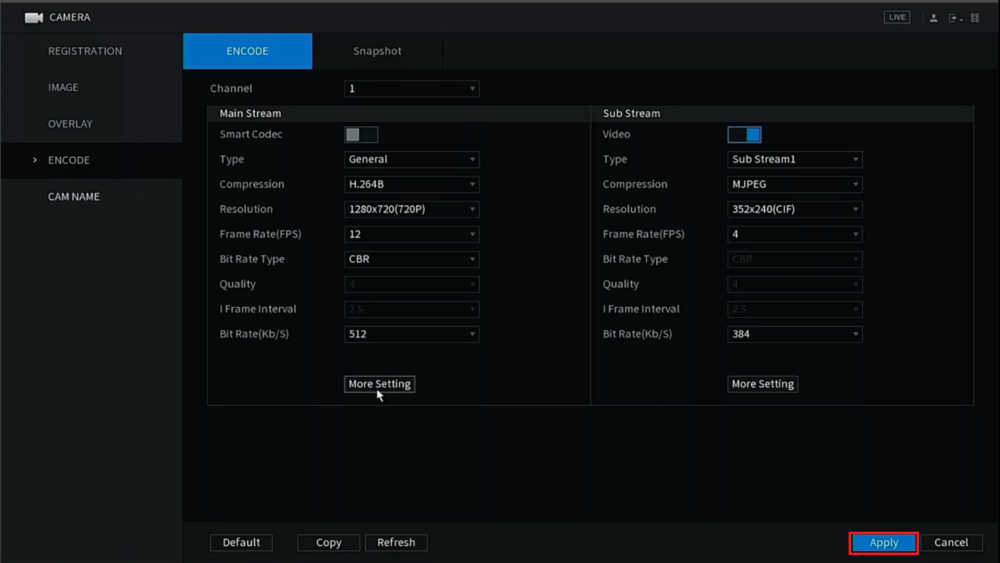
1. Right click on the Live View and select "Main Menu"
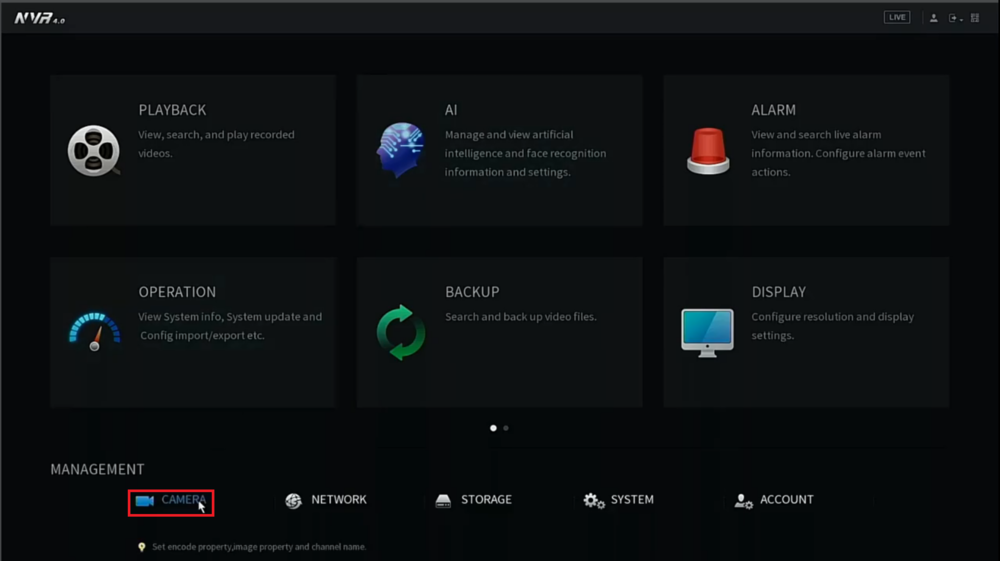
2. Select "Camera" at the bottom
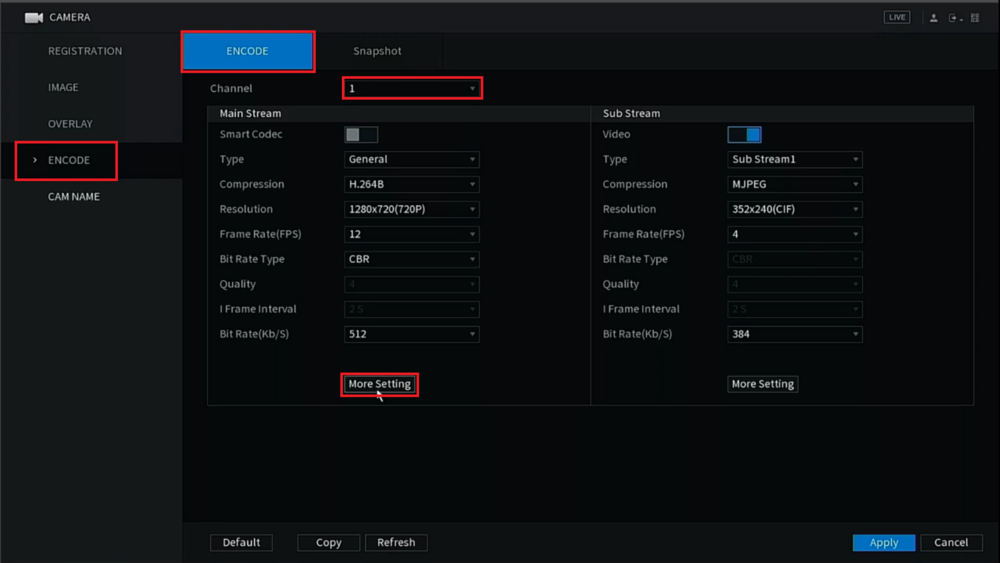
3. Select "Encode" on the left and then select the "Encode" tab at the top.
Then select the channel the camera with audio is on next to "Channel".
Select "More Setting" under the Main Stream section
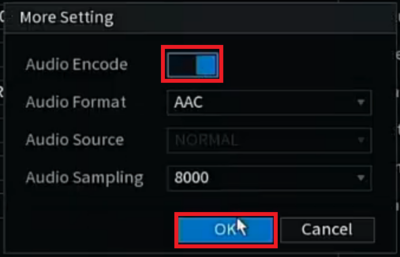
4. Enable "Audio Encode" and then select "OK"
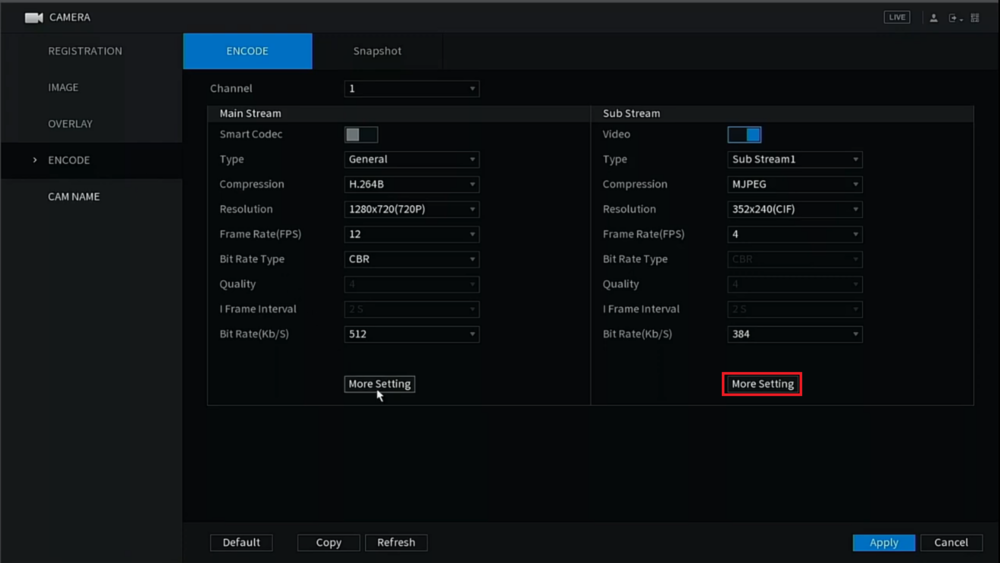
5. Select "More Setting" under the Sub Stream section
6. Enable "Audio Encode" and then select "OK"
7. Select "Apply" at the bottom to save the settings
Prerequisites
- Dahua Camera with Audio Input
- Dahua Recorder with the Old Web GUI
- A Computer connected to the same network as the Dahua Recorder
Video Instructions
Step by Step Instructions
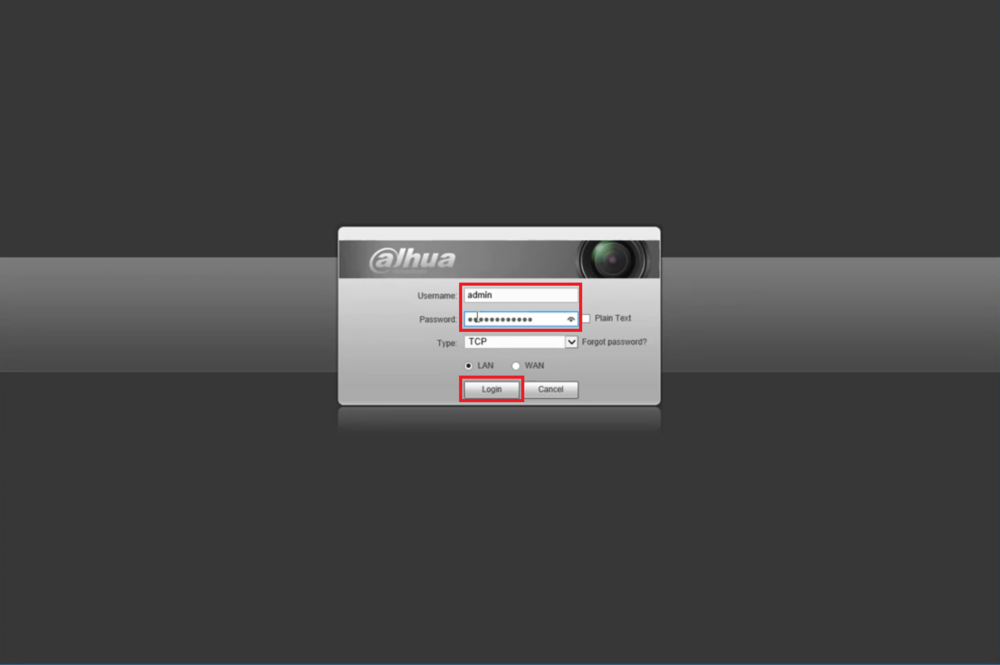
1. Navigate to the web interface of the Dahua Recorder
Type in the username and password in the appropriate fields.
Select the "Login" button
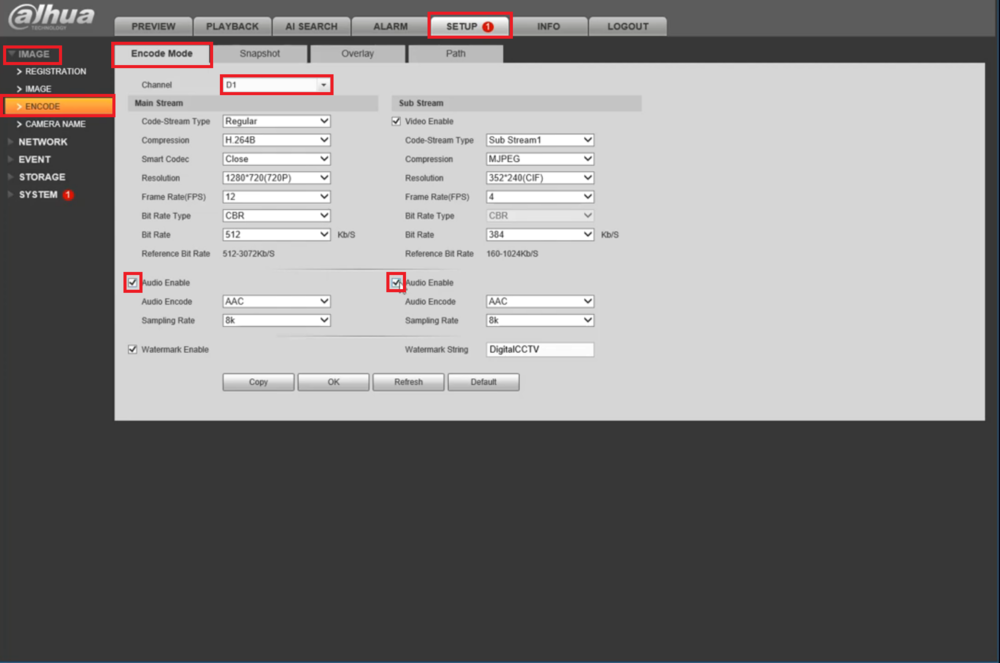
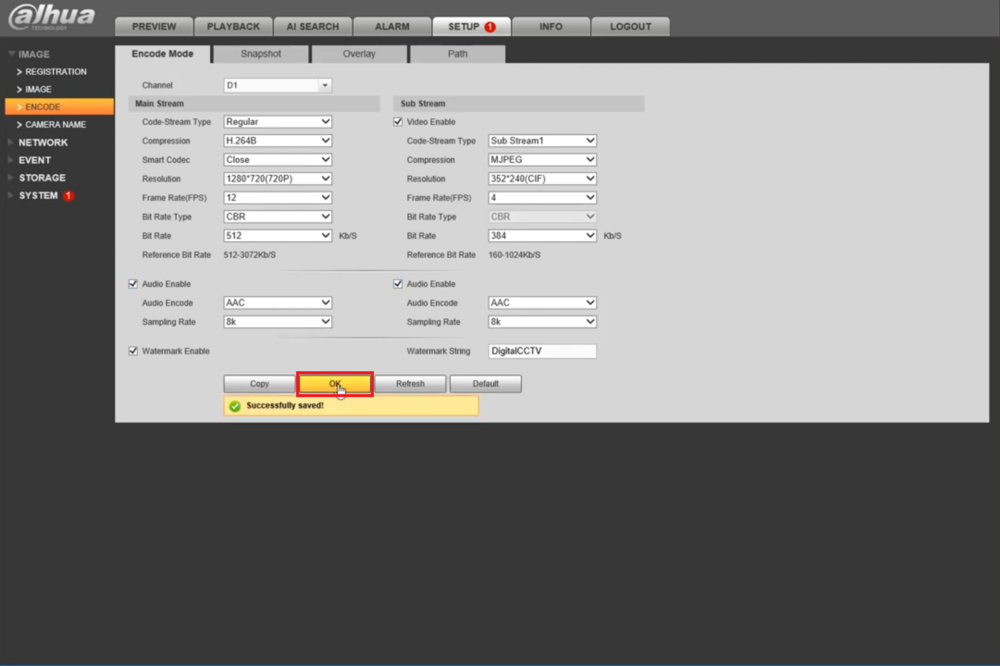
2. Select "Setup" at the top
Then select "Image" on the left and "Encode" below that.
Select the "Encode Mode" tab at the top.
Then select the channel the camera with audio is on next to "Channel".
Check the boxes next to "Audio Enable" under both the Main Stream and the Sub Stream sections
3. Select "OK" at the bottom.
It should display "Successfully saved!" when it saves your changes
Prerequisites
- Dahua Camera with Audio Input
- Dahua Recorder with the New Web GUI
- A Computer connected to the same network as the Dahua Recorder
Video Instructions
Step by Step Instructions
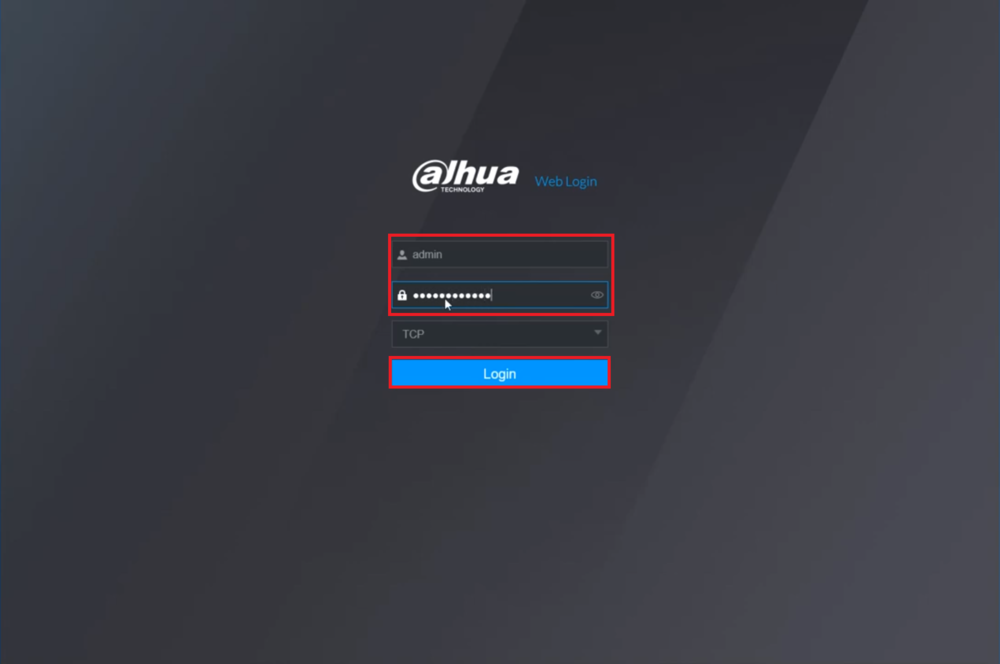
1. Navigate to the web interface of the Dahua Recorder
Type in the username and password in the appropriate fields.
Select the "Login" button
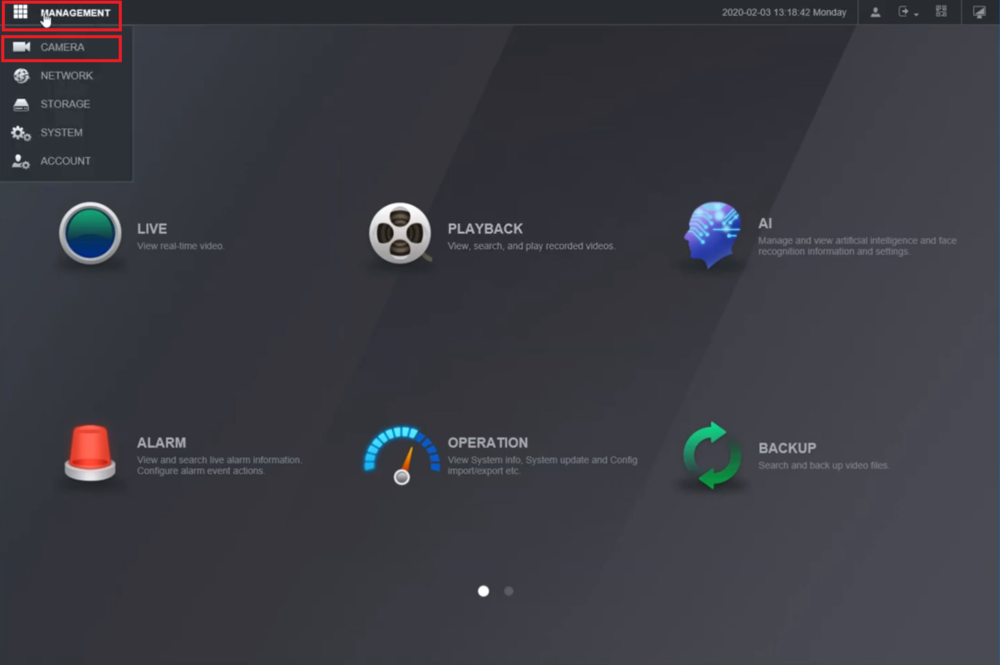
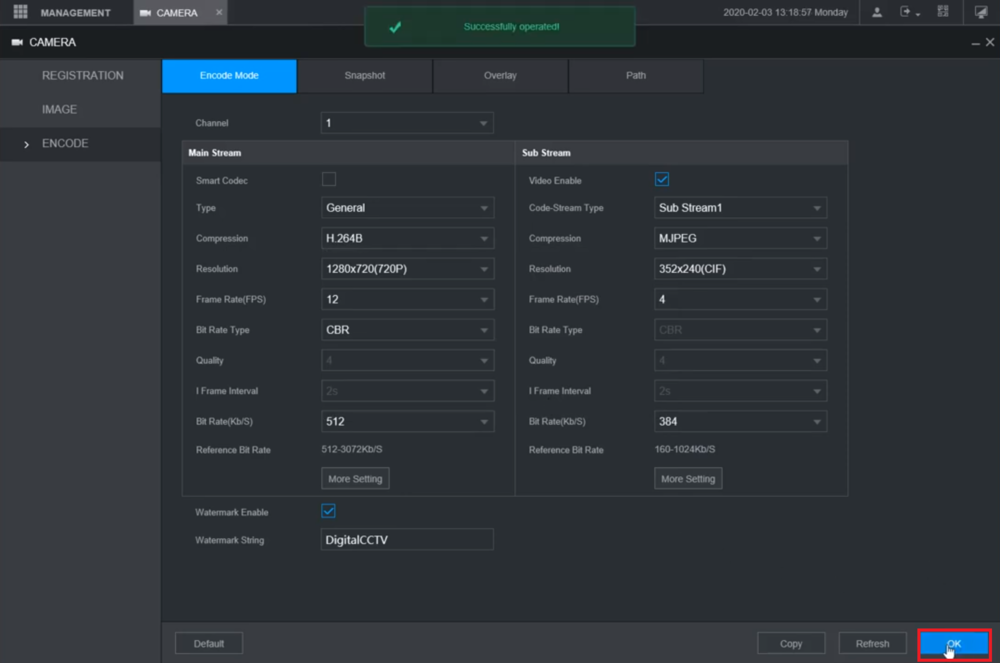
2. Select "Management" at the top and then "Camera" in the drop-down menu
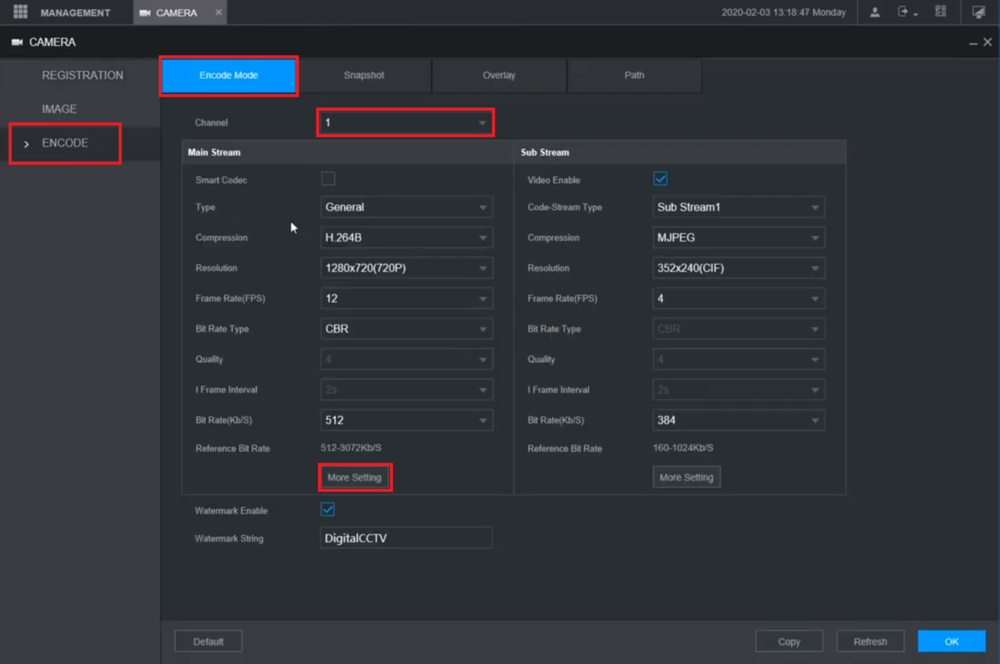
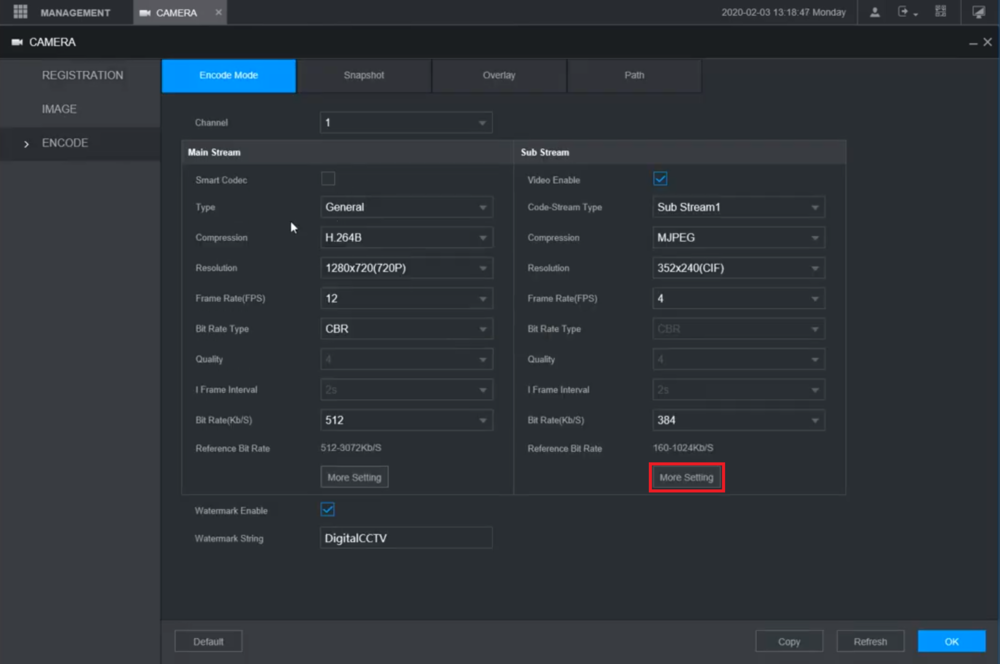
3. Select "Encode" on the left and then select the "Encode Mode" tab at the top.
Then select the channel the camera with audio is on next to "Channel".
Select "More Setting" under the Main Stream section
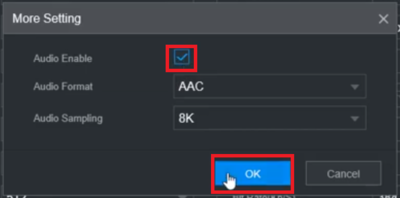
4. Check the box next to "Audio Enable" and then select "OK"
5. Select "More Setting" under the Sub Stream section
6. Check the box next to "Audio Enable" and then select "OK"
7. Select "OK" at the bottom to save the settings.
You should see "Successfully operated!" at the top when the changes are saved
Prerequisites
- Dahua Camera with Audio Input
- Dahua Recorder
- A Computer connected to the same network as the Dahua Recorder
Video Instructions
Step by Step Instructions
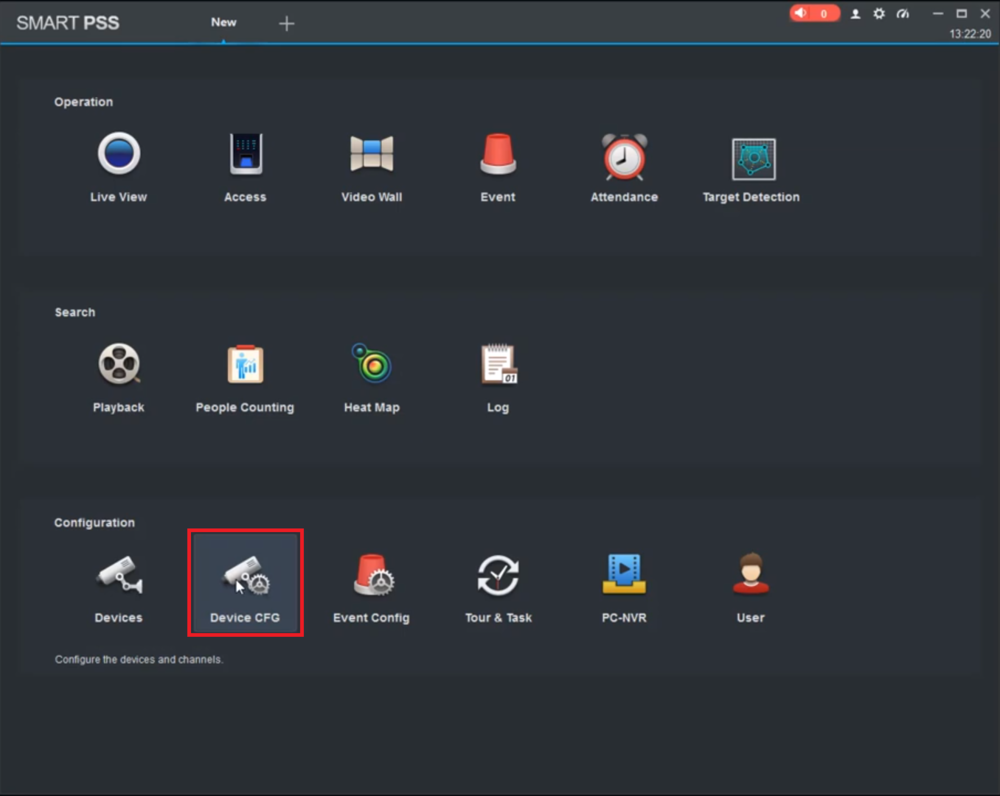
1. From the Main Menu, select "Device CFG"
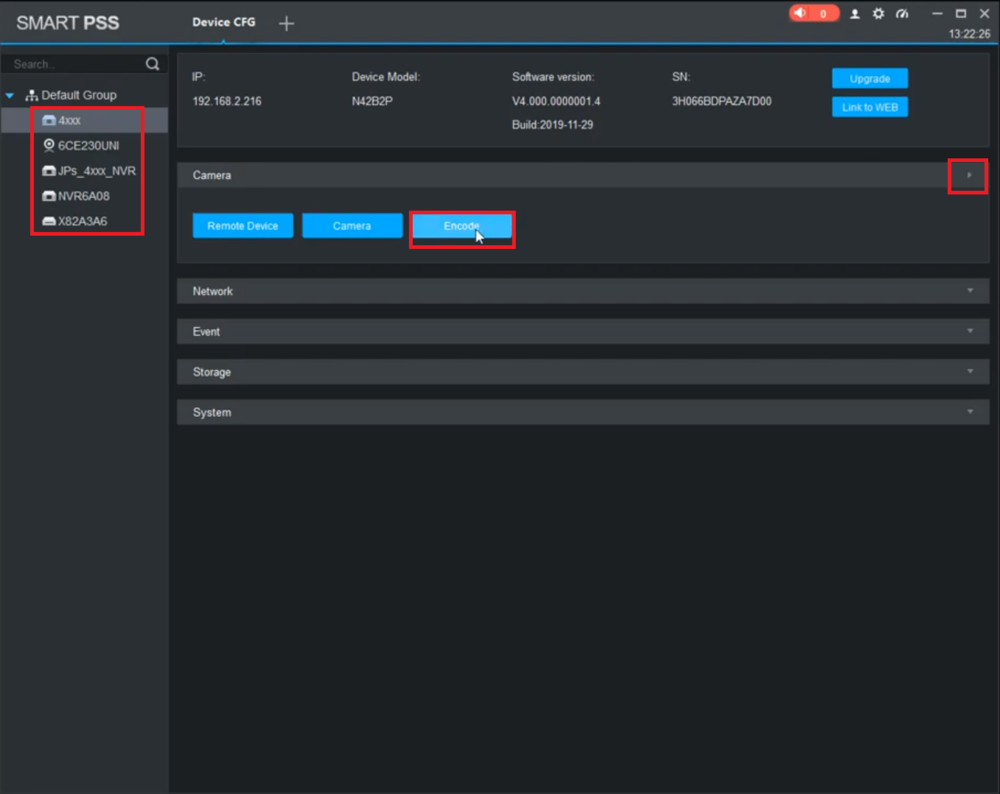
2. Select the recorder from the list on the left.
Click on the arrow to the right of "Camera" to expand the Camera section.
Select "Encode"
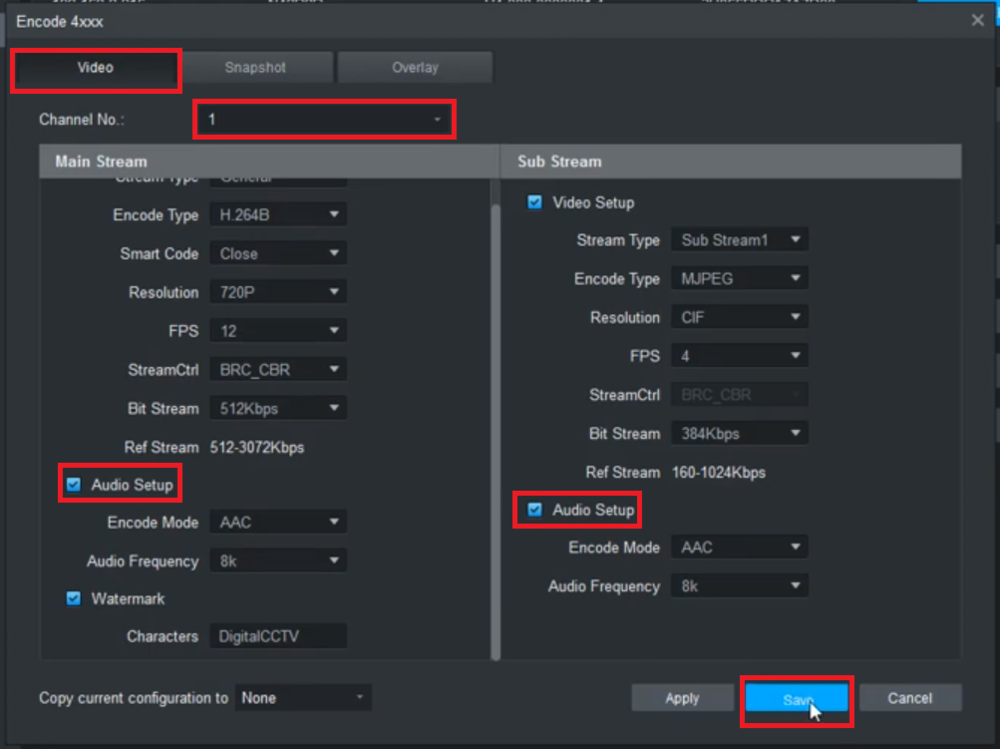
3. Select the "Video" tab at the top.
Then select the channel the camera with audio is on next to "Channel".
Check the box next to "Audio Setup" in the Main Stream section on the left.
Check the box next to "Audio Setup" in the Sub Stream section on the right.
Select "Save" at the bottom
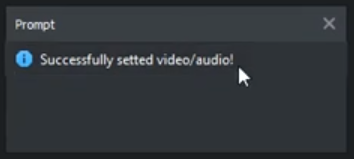
4. You will see the mesagge"Successfully setted video/audio!" when the changes are saved successfully
![]() Mobile:iDMSS Plus & gDMSS Plus
Mobile:iDMSS Plus & gDMSS Plus
NOTICE
Notice of Discontinuation of iDMSS and gDMSS
Prerequisites
- Dahua Camera with Audio Input
- Dahua Recorder
- A Mobile Device with iDMSS or gDMSS installed on it, with the recorder added to it
Video Instructions
Step by Step Instructions
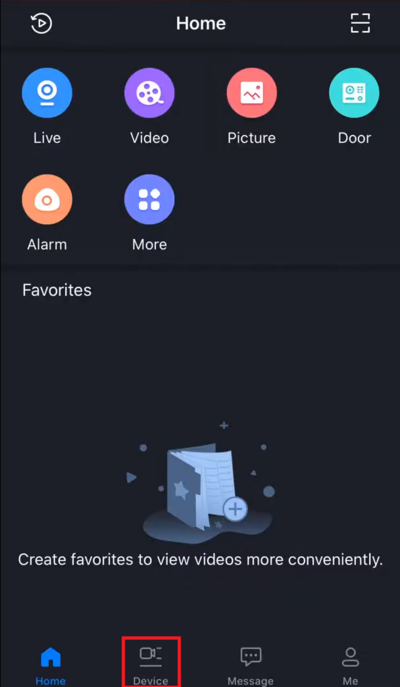
1. From the Home Screen, select "Device" at the bottom
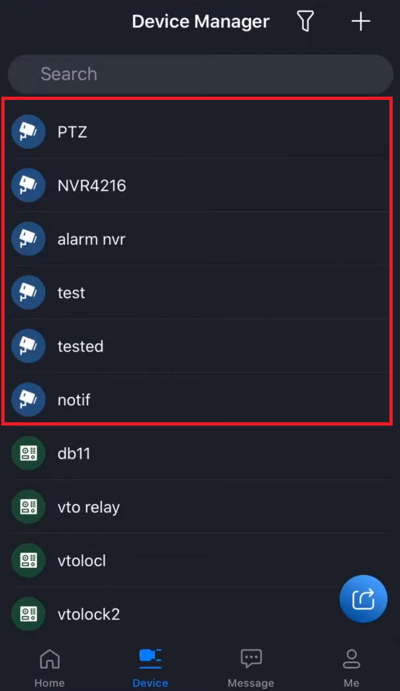
2. Select the recorder from the list
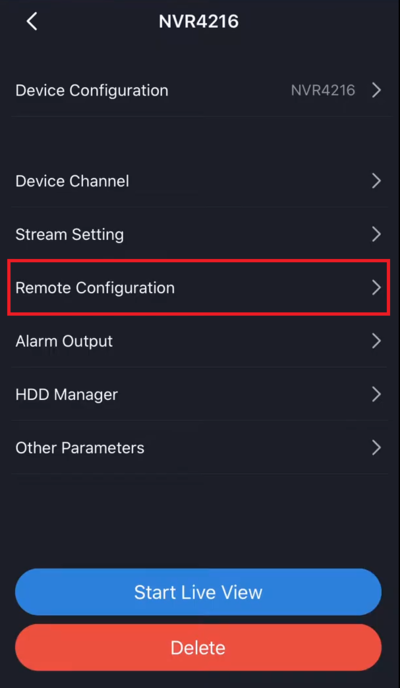
3. Select "Remote Configuration"
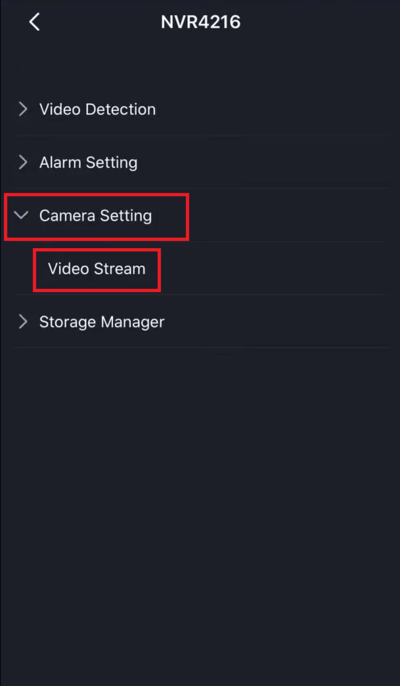
4. Select "Camera Setting" and then "Video Stream" under that
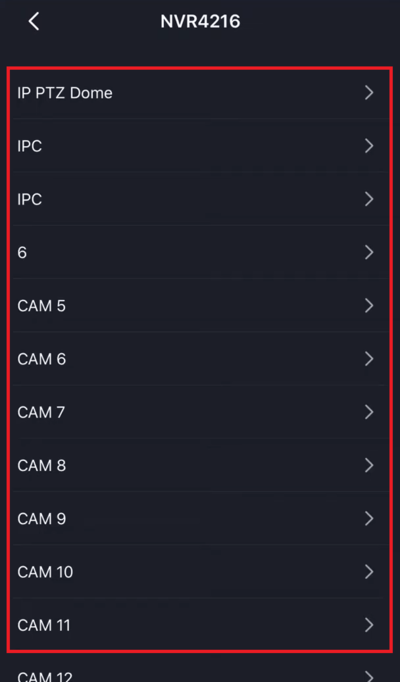
5. Select the camera with audio input from the list
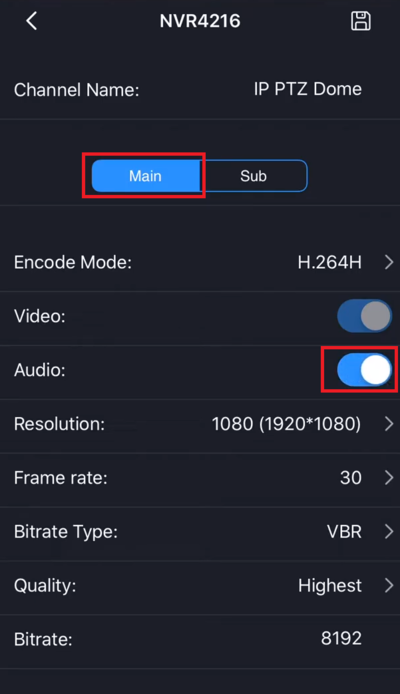
6. Select "Main" on the toggle at the top to switch to the Main Stream.
Then enable the switch next to "Audio"
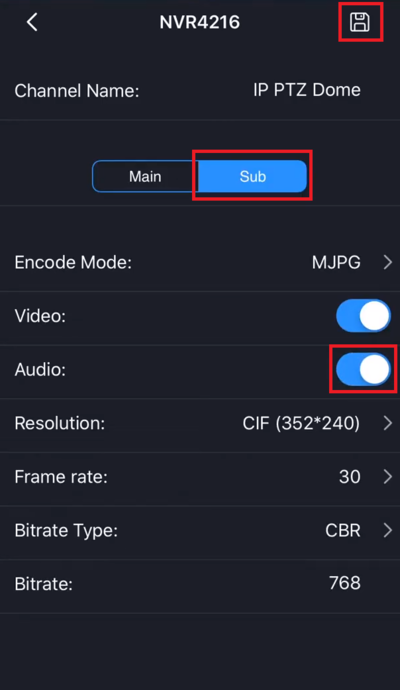
7. Select "Sub" on the toggle at the top to switch to the Sub Stream.
Then enable the switch next to "Audio".
Select the Floppy Disk icon at the top right to save the settings
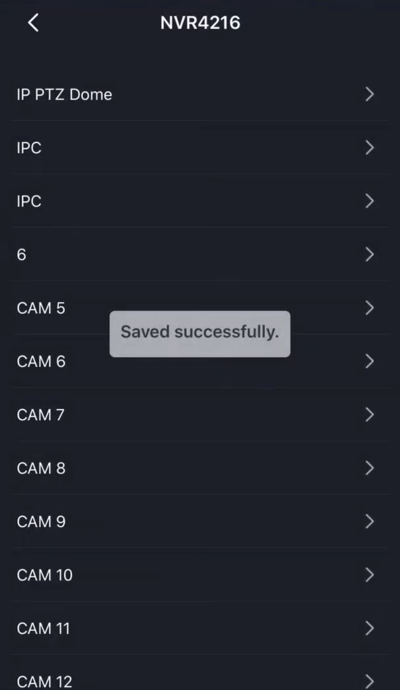
8. Once the settings have been pushed it will display "Saved successfully."
