Difference between revisions of "Accessories/Keyboard/DH-NKB1000/Firmware Update"
(→Step by Step Instructions) |
|||
| (8 intermediate revisions by 3 users not shown) | |||
| Line 5: | Line 5: | ||
==Prerequisites== | ==Prerequisites== | ||
| − | * Dahua | + | * Dahua ConfigTool. Version 5.0 or higher |
https://dahuawiki.com/ConfigTool | https://dahuawiki.com/ConfigTool | ||
| − | *Current Firmware | + | *Current NKB1000 Firmware: |
| + | {{Template:General_NKB1000}} | ||
| − | + | ==Step by Step Instructions== | |
| − | + | 1. After downloading both the firmware for NKB1000 and the latest ConfigTool, install the Dahua ConfigTool to your local machine. | |
| + | |||
| + | 2. Connect the NKB to the same LAN as your computer via Ethernet cable. | ||
| + | |||
| + | 3. Connect the power cable to the NKB. Wait for the device to power up fully. | ||
| − | + | 4. By default, the NKB is set to DHCP. | |
| + | |||
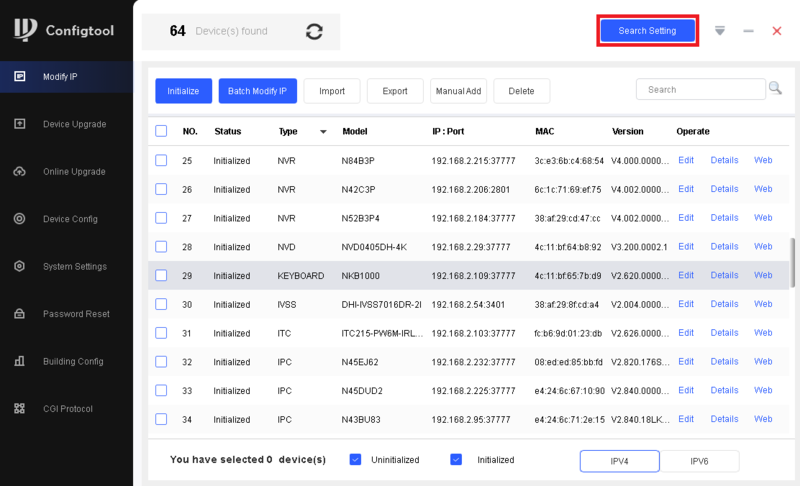
| + | 5. Open ConfigTool and click on '''Search Setting''' at the top | ||
| + | |||
| + | [[file:NKB1000ConfigToolFirmwareUpgrade1.png|800px]] | ||
| + | |||
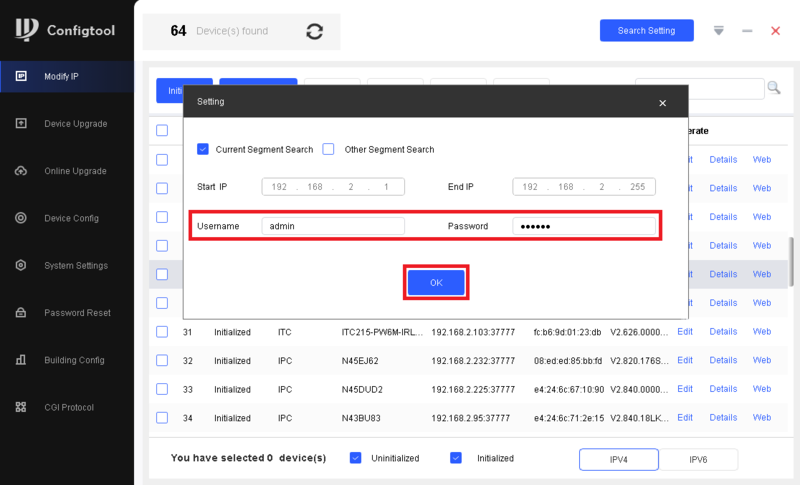
| + | 6. Enter "admin" in the '''Username''' field and the NKB1000's password in the '''Password''' field. (By deafult the password of the NKB is "888888".) | ||
| + | <br>Then click on '''OK''' | ||
| + | |||
| + | [[file:NKB1000ConfigToolFirmwareUpgrade2.png|800px]] | ||
| + | |||
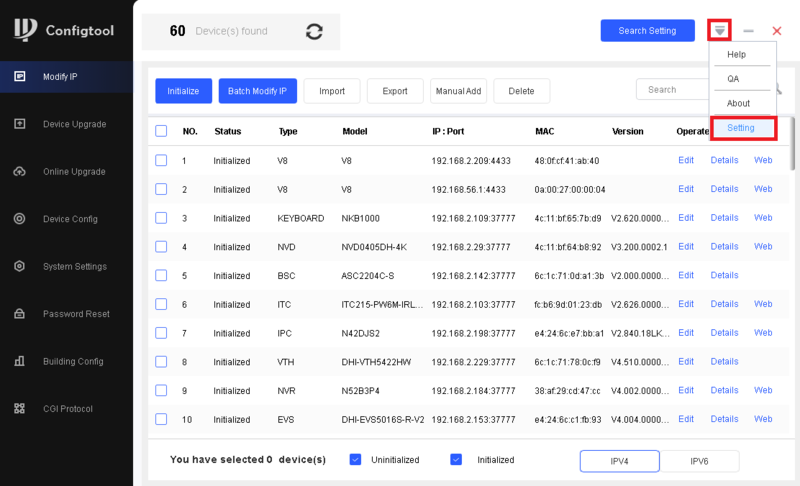
| + | 7. Click on the Down Arrow at the top right. | ||
| + | <br>Then click on '''Setting''' from the drop-down | ||
| + | |||
| + | [[file:NKB1000ConfigToolFirmwareUpgrade3.png|800px]] | ||
| + | |||
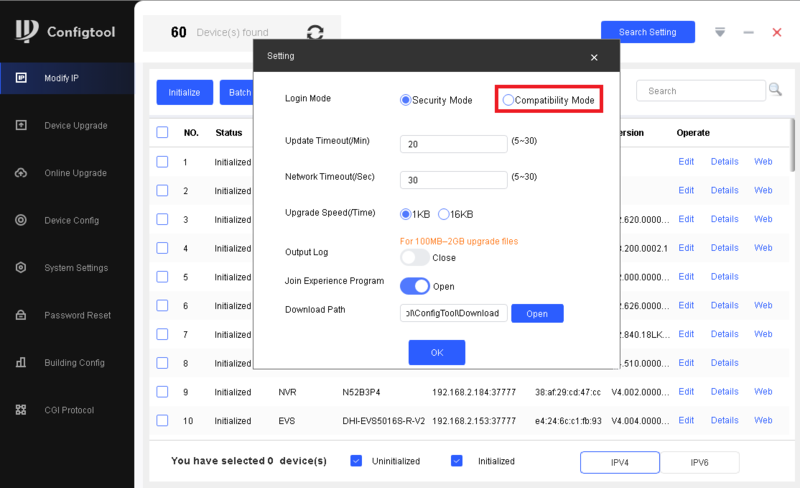
| + | 8. Enable '''Compatability Mode''' | ||
| + | |||
| + | [[file:NKB1000ConfigToolFirmwareUpgrade4.png|800px]] | ||
| − | + | 9. Click on '''OK''' | |
| + | [[file:NKB1000ConfigToolFirmwareUpgrade5.png|800px]] | ||
| + | 10. Click on '''OK''' | ||
| − | + | [[file:NKB1000ConfigToolFirmwareUpgrade6.png|800px]] | |
| − | + | 11. Select '''Device Upgrade''' on the left. | |
| − | + | <br>Find the NKB1000 in the list and click the '''Upgrade File Path''' Folder icon next to it | |
| − | + | [[file:NKB1000ConfigToolFirmwareUpgrade7.png|800px]] | |
| − | |||
| − | |||
| − | |||
| − | |||
| − | + | 12. Browse the computer's file system to find the NKB1000 firmware. | |
| − | < | + | <br>Select the file and click '''Open''' |
| − | + | [[file:NKB1000ConfigToolFirmwareUpgrade8.png|800px]] | |
| − | |||
| − | [[ | ||
| − | + | 13. Click the '''Operate''' Up Arrow icon next to the NKB1000 in the list. | |
| − | + | <br>The upgrade process will start and you will see a progress bar as it installs | |
| − | |||
| − | + | [[file:NKB1000ConfigToolFirmwareUpgrade9.png|800px]] | |
| − | [[ | ||
| − | + | 14. When the firmware upgarde is sucessfully completed you will see a Green Check Mark | |
| − | |||
| − | + | [[file:NKB1000ConfigToolFirmwareUpgrade10.png|800px]] | |
| − | [[ | ||
Latest revision as of 21:44, 21 June 2023
Contents
NKB1000 Firmware Update Instructions
Description
These instructions will show you how to update the firmware on a NKB1000 device.
Prerequisites
- Dahua ConfigTool. Version 5.0 or higher
https://dahuawiki.com/ConfigTool
- Current NKB1000 Firmware:
Step by Step Instructions
1. After downloading both the firmware for NKB1000 and the latest ConfigTool, install the Dahua ConfigTool to your local machine.
2. Connect the NKB to the same LAN as your computer via Ethernet cable.
3. Connect the power cable to the NKB. Wait for the device to power up fully.
4. By default, the NKB is set to DHCP.
5. Open ConfigTool and click on Search Setting at the top
6. Enter "admin" in the Username field and the NKB1000's password in the Password field. (By deafult the password of the NKB is "888888".)
Then click on OK
7. Click on the Down Arrow at the top right.
Then click on Setting from the drop-down
8. Enable Compatability Mode
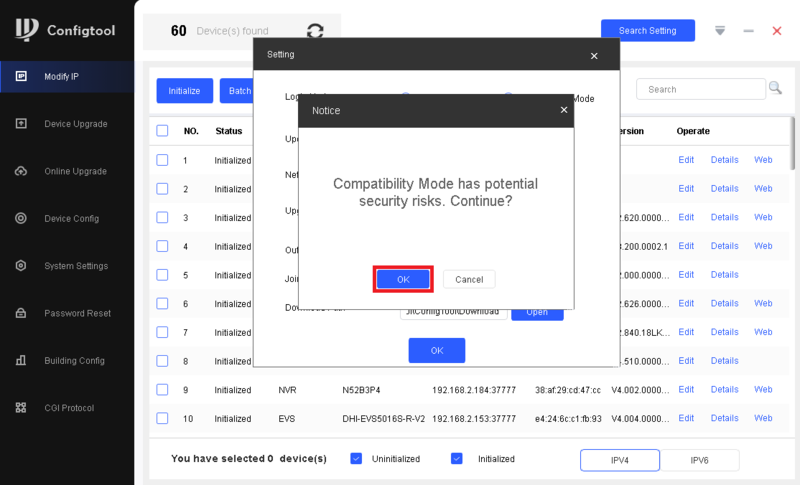
9. Click on OK
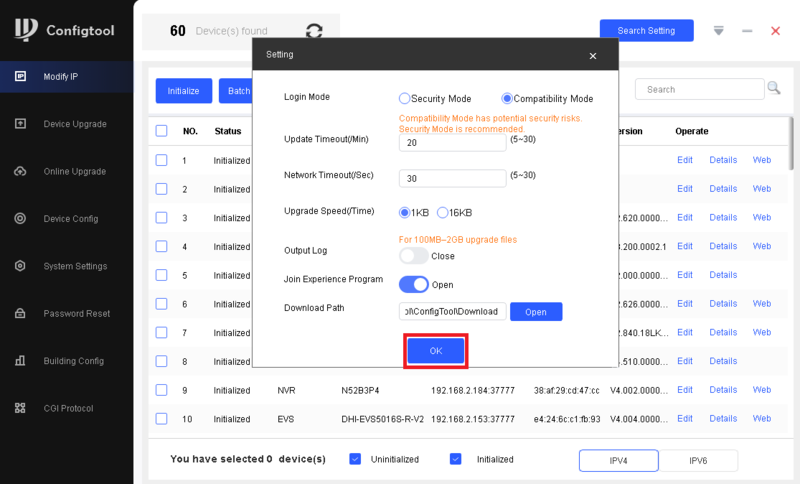
10. Click on OK
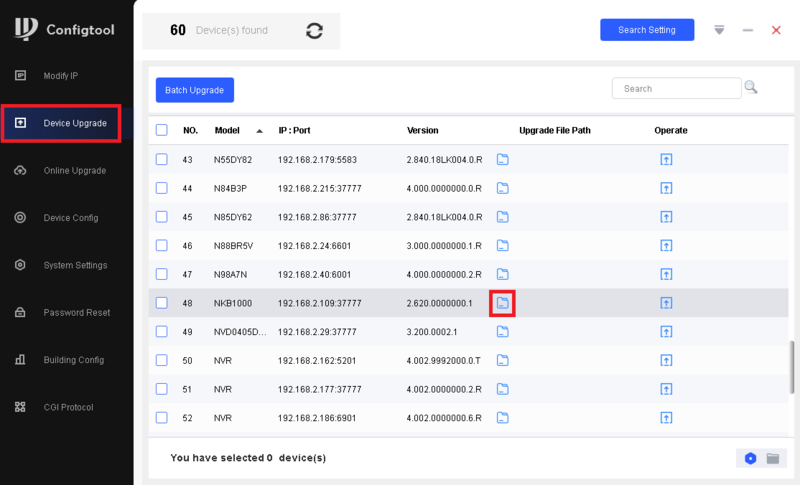
11. Select Device Upgrade on the left.
Find the NKB1000 in the list and click the Upgrade File Path Folder icon next to it
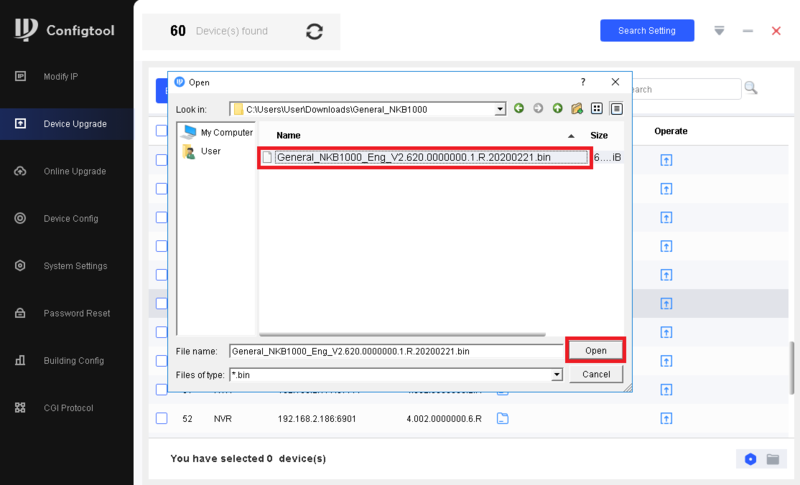
12. Browse the computer's file system to find the NKB1000 firmware.
Select the file and click Open
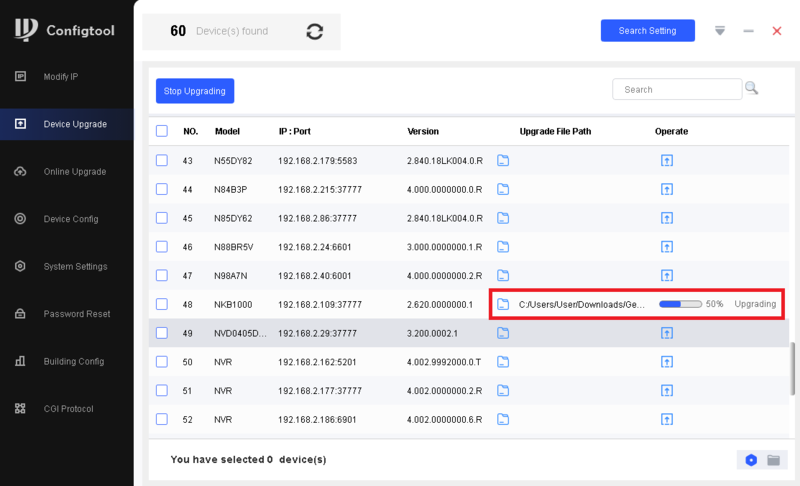
13. Click the Operate Up Arrow icon next to the NKB1000 in the list.
The upgrade process will start and you will see a progress bar as it installs
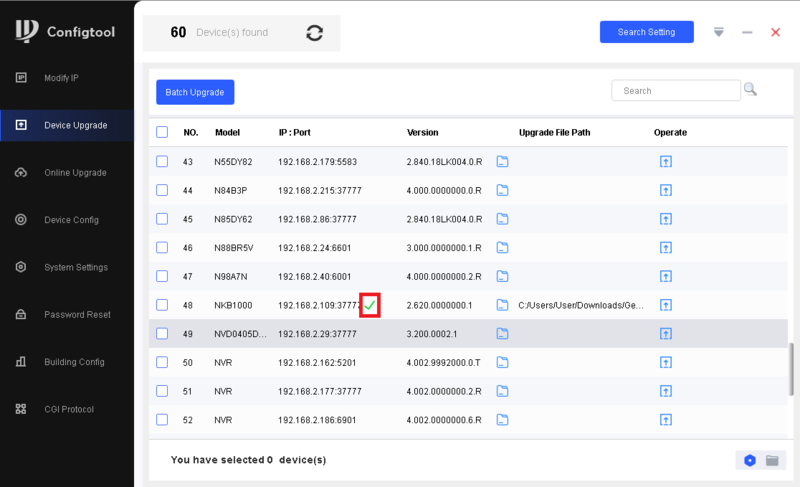
14. When the firmware upgarde is sucessfully completed you will see a Green Check Mark
