Difference between revisions of "Parking Lot Entrance Management"
(→License Plate Recognition) |
(→LPR Search - Vehicle History) |
||
| Line 360: | Line 360: | ||
====LPR Search - Vehicle History==== | ====LPR Search - Vehicle History==== | ||
| − | |||
| − | |||
* Click on [[File:Info_query.png]] the Entrance interface. | * Click on [[File:Info_query.png]] the Entrance interface. | ||
Revision as of 21:28, 19 March 2021
| DSS - Entrance & Parking Management | ||
|---|---|---|
| Set Up LPR Camera | Set Up and Configure Entrance & Parking Lot in DSS |
Playback |
| Setup LPR Camera > How To Setup LPR Camera |
Add a privacy mask to obscure a portion of the video > Setup parameters for Parking Lot and Entrance |
Review events in DSS > How to Review LPR in DSS |
Contents
Description
DSS can manage multiple parking lot entrances and can work with multiple ANPR cameras setup at entry and exit points.
DSS can accurately determine how many vehicles are in a parking lot based on the number of entry and exit points.
You can also setup the number of parking spots for each parking lot.
Prerequisites
- Dahua ANPR Camera
- Dahua NVR
- DSS
- Computer for configuration
Instructions
| Configure LPR Camera | |||||
|---|---|---|---|---|---|
| Set up and configure the LPR camera for plate detection > How To Setup and Configure LPR Camera |
| Add LPR Camera to DSS | |||||
|---|---|---|---|---|---|
| > Add LPR Camera via DSS Client | > Add LPR Camera via DSS Manager Portal | ||||
| Add NVR to DSS | |||||
|---|---|---|---|---|---|
| > Add NVR via DSS Client | > Add NVR via DSS Manager Portal | ||||
| Configure Alarm Settings | |||||
|---|---|---|---|---|---|
| Set up and configure the Parking Lot settings in DSS Client > How To Setup and Configure Alarm Scheme |
| Configure Parking Lot Settings | |||||
|---|---|---|---|---|---|
| Set up and configure the Parking Lot settings in DSS Client > How To Setup and Configure Parking Lot |
| Configure Vehicle Management Settings | |||||
|---|---|---|---|---|---|
| Set up and configure the Vehicle Management settings in DSS Client > How To Setup and Configure Vehicle Management |
- Please make sure ANPR device is fully configured before adding including complete initialization, config, and modify IP etc.
- The camera should also be added to the DSS before beginning these steps -
Once the ANPR camera(s) are set up and configured correctly and then added to the DSS server, you can proceed with the following steps for setup
Configure DSS Pro
Adding ANPR Camera (Manager Portal)
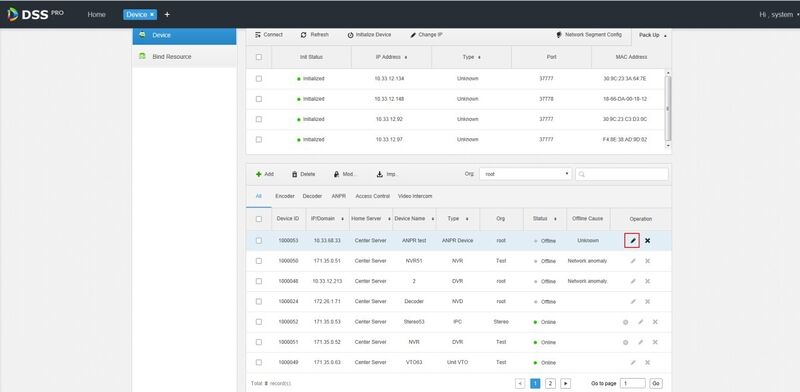
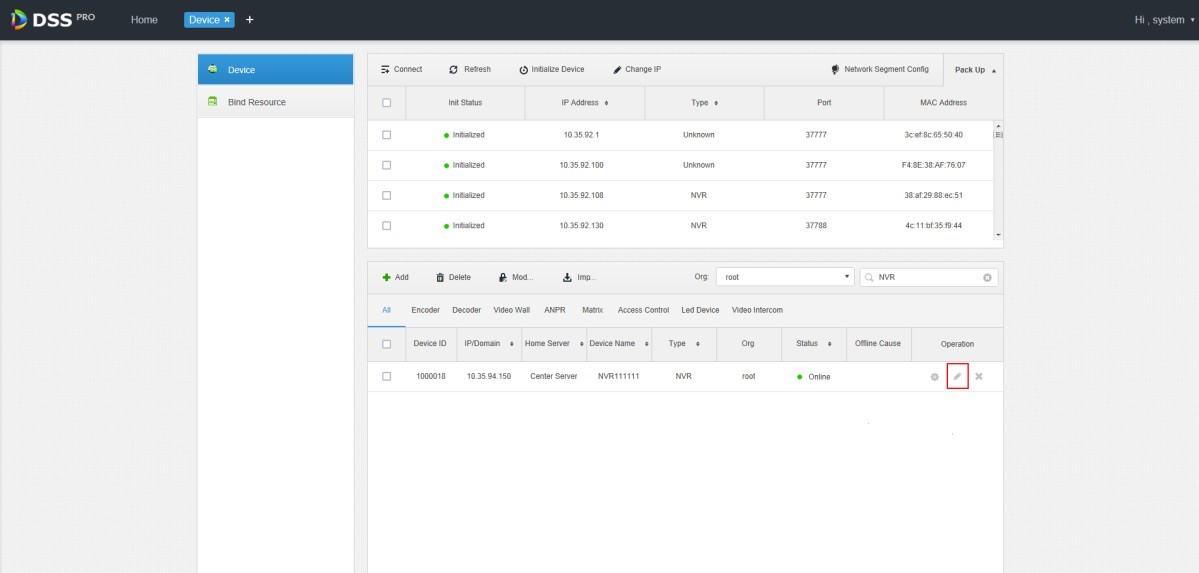
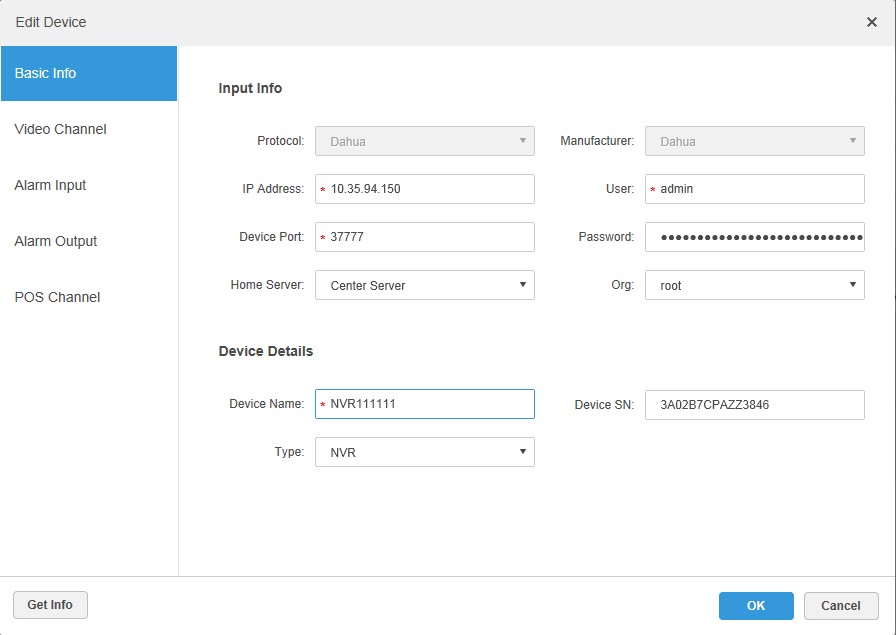
1. On the Device interface of Web, click (Pencil) of added ANPR device.
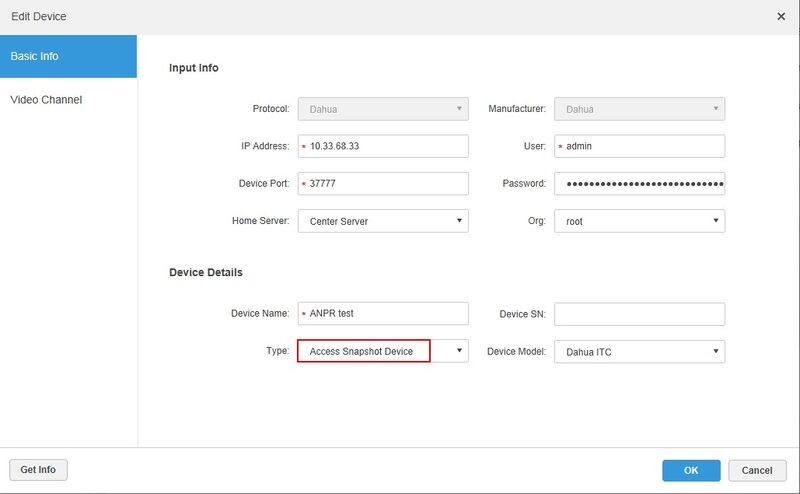
2. Set type as Access Snapshot Device.
3. Click OK and complete config.
3. If there is camera installed at the entrance to view entrance panoramic picture, support binding ANPR and video camera.
License plate recognition can view real-time video image. You can view video of bound camera.
- Click Bind Resource tab on the interface of Device.
The system displays the interface of Bind Resource.
- Click Add + - top left of screen
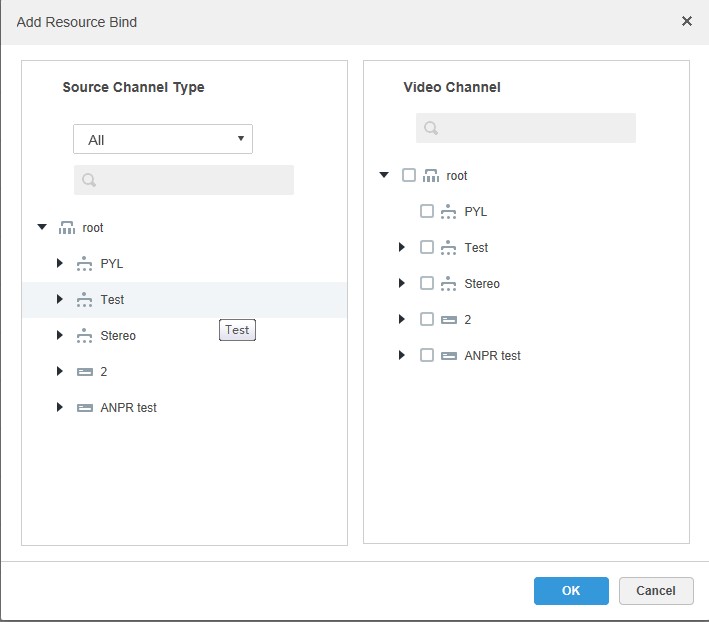
The system displays the interface of Add Resource Bind.
- Select ANPR from the list of Source Channel Type, and select video camera from the list of Video Channel. - Click OK and complete config
Adding ANPR Camera (DSS Client)
Adding NVR (Manager Portal)
NVR is used to connect ANPR and DSS Pro, and realize data transmission.
• Please make sure NVR is fully configured before adding. For example, modify IP address, add remote device. • NVR device category is Encoder.
1. Add encoder NVR
2. Modify device capacity set.
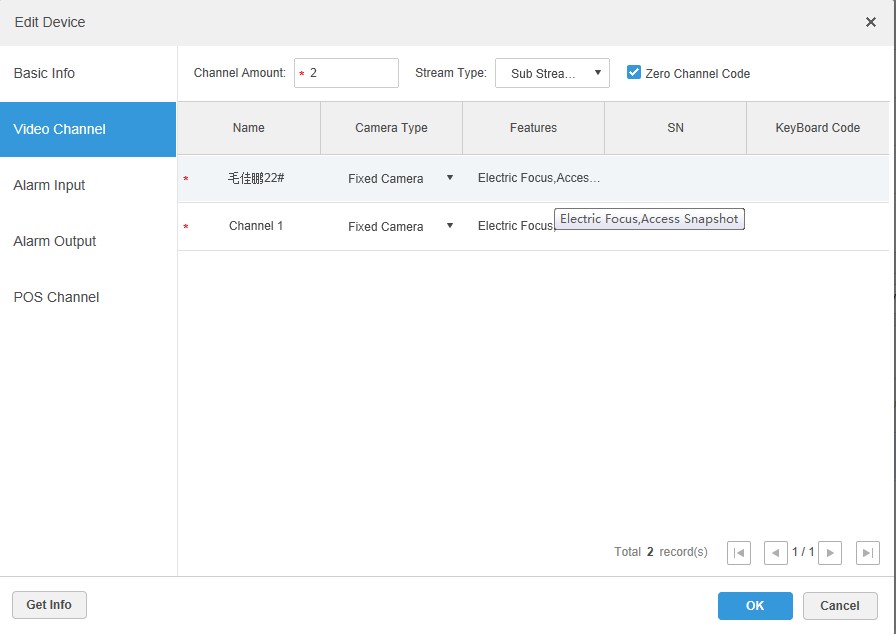
3. Click of added NVR on the Device interface on Web.
The system displays the interface of Edit Device.
Click the tab of Video Channel, set features as Access Snapshot. The feature of all the bound ANPR device channel is set as Access Snapshot.
Click OK and complete config.
Adding NVR (DSS Client)
Configure Alarm Scheme
Alarms that can be configured are explained below:
| Alarm Type | Description |
|---|---|
| License Plate Snapshot | When ANPR device recognizes license plate, it will be reported to DSS Pro by NVR, alarm is triggered on DSS Pro, and extract video before and after license plate recognition happens from NVR, save it on the server installed on DSS Pro. Default record time is 20s, 10s before and 10s after alarm is triggered. |
| Restricted List Alarm | Mark some plate number as blacklist vehicle, compare the plate number reported by ANPR device with the plate number of blacklist vehicle. It will trigger alarm if it is the plate number of blacklist vehicle. |
| Parking Overtime |
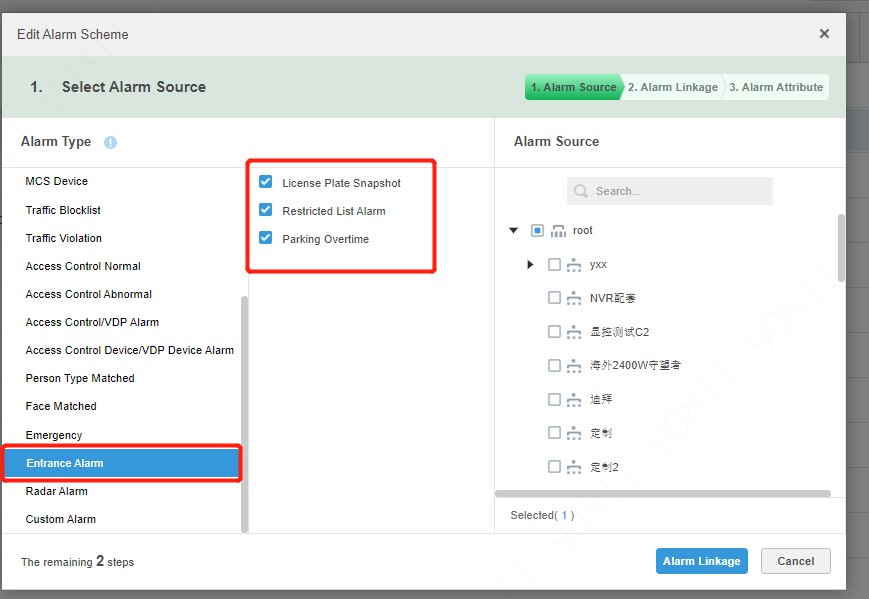
- Select the alarm type as Entrance Alarm
Then check [License Plate Snapshot] and [Restricted List Alarm] and [Parking Overtime].
- Choose the alarm source, select the camera you need to bind.
- Click Alarm Linkage
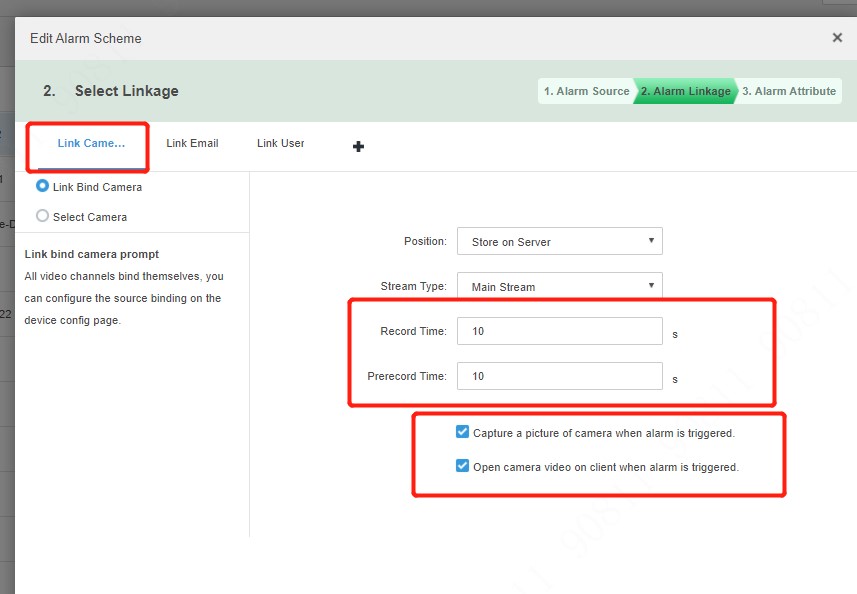
- Click + choose Link Cameras select the camera you want to link.
- Set the record time and prerecord time.
- Then check to enable the alarm functions
Enable these two functions, when the alarm is triggered, it will open the camera video on client and capture a picture
- Click Link User
- Select the user you want to link.
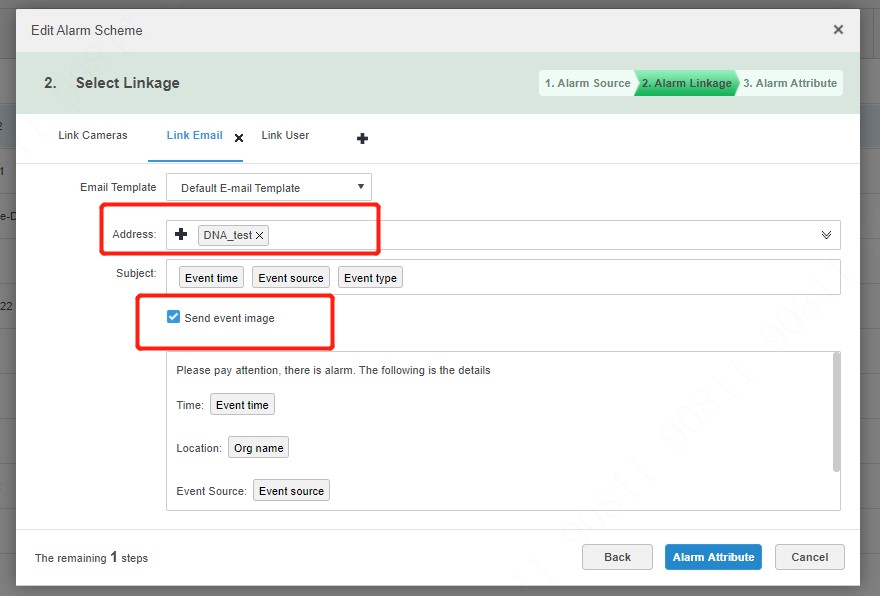
- Click + , then choose Link Email
- Select the email template and address.
- Check Send event image - when the alarm is triggered, it will send capture a picture in the email.
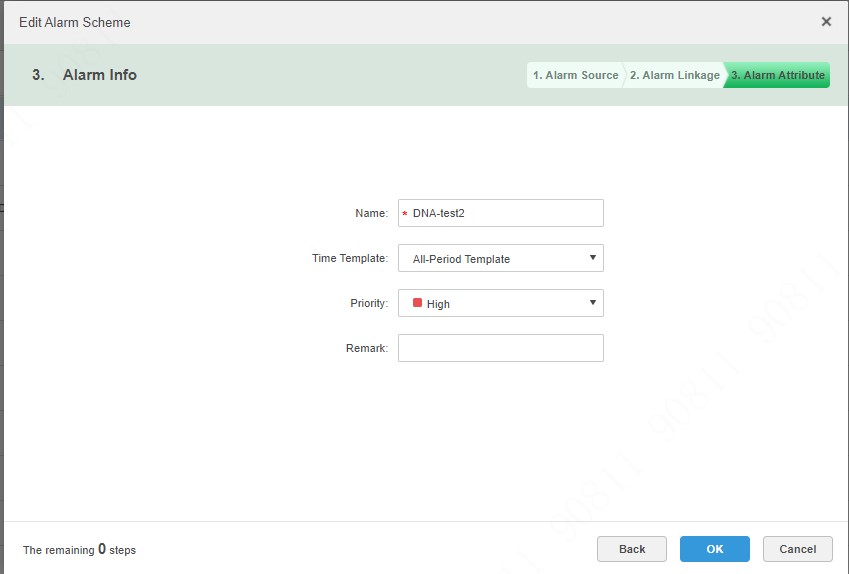
- Click Alarm Attribute
- Edit the alarm name.
- Choose the priority as High.
- Click OK.
Configure Parking Lot
Generally one parking lot is considered as an area. Parking lot config includes setting parking space quantity, the release situation and other information. Bind the ANPR device channel and use it to recognize vehicles.
- Log into DSS Client
- Click + and select Entrance on the Homepage interface. The system displays the interface of Entrance.
- Click
 .The system will display the interface of Parking Lot Config.
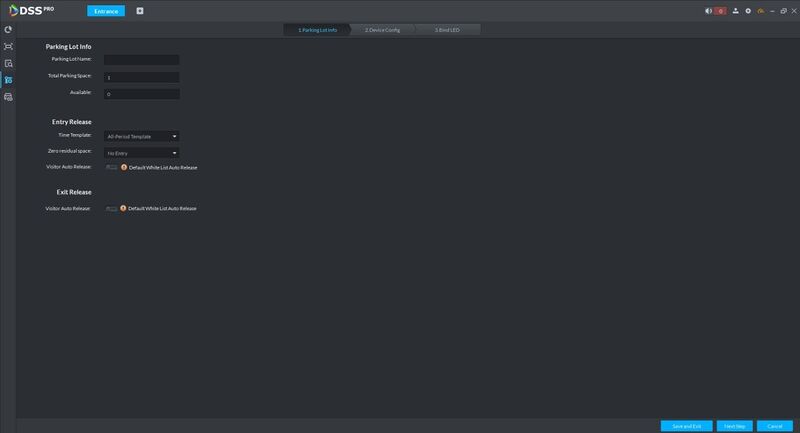
 - Configure the Parking Lot as desired:
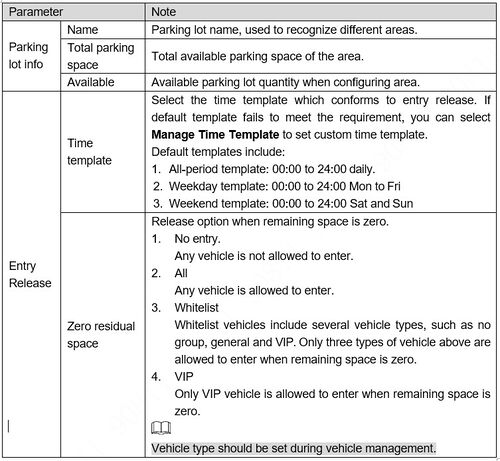
Parking Lot Information
> Enter Parking Lot Name
> Enter Total Parking Space #
> Enter Available # - The current available parking lot quantity during setup
Entry Release
> Time Template - The schedule the Entry Release will perform, you can create custom templates if required
> Zero residual space - The release option when Remaining Space is 0
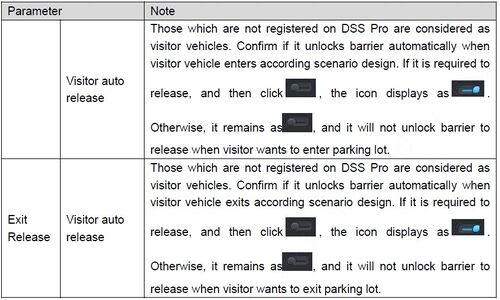
> Visitor Auto Release - Toggle to enable. Vehicles not registered on DSS are considered visitor vehicles.
Exit Release
Full explanation of Parking Lot configuration settings. Please review and adjust as your scenario applies:
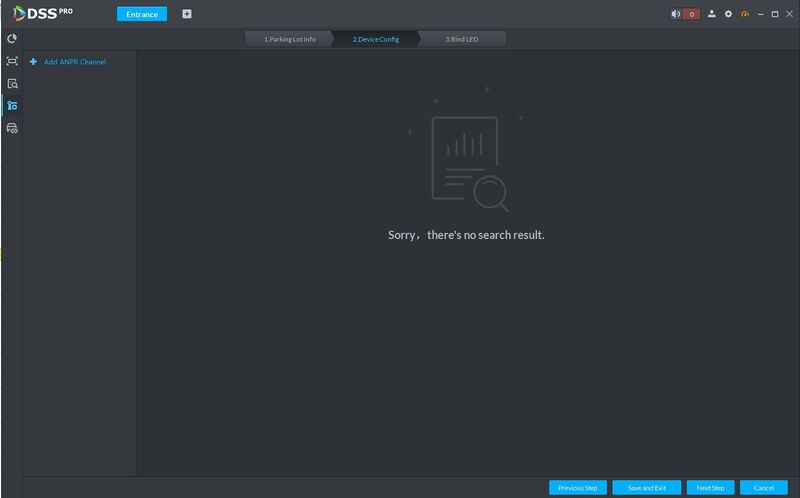
After setting up the Parking lot as desired click Next
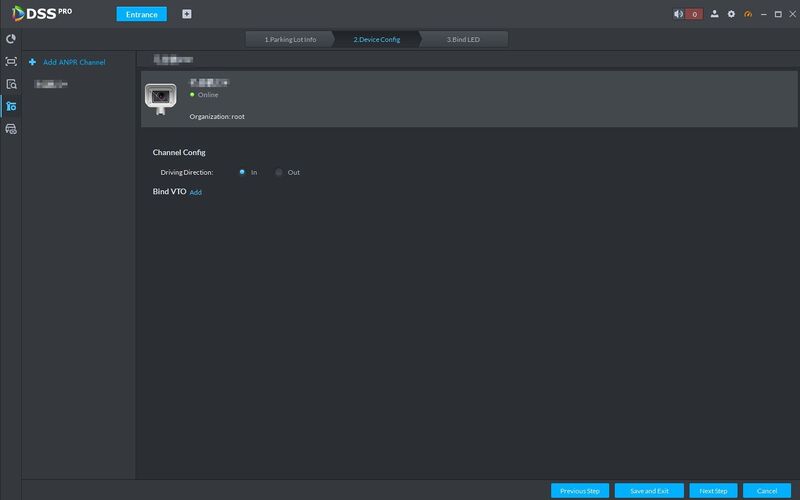
The system displays the interface of Device Config
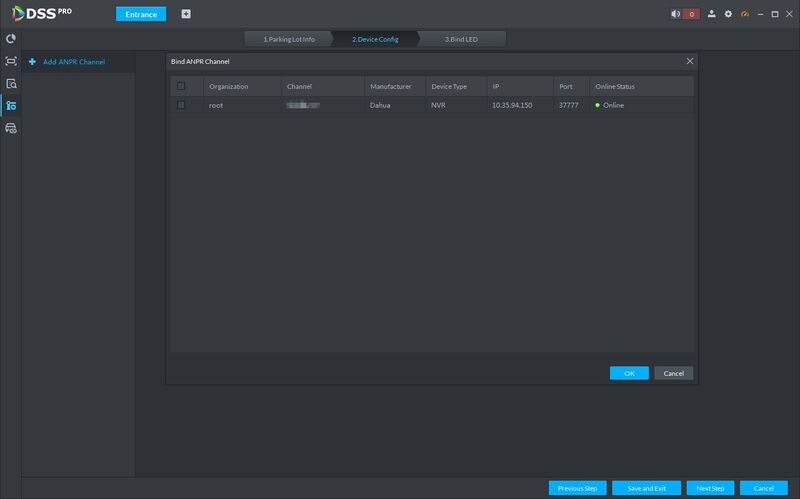
Click Add ANPR Channel and you can select all the ANPR devices deployed - check the box next to the device in the list
Click OK
The system displays the information of added ANPR device
- Select ANPR device from device list in sequence, and set corresponding driving direction.
The default driving direction is In.
Click Save and Exit
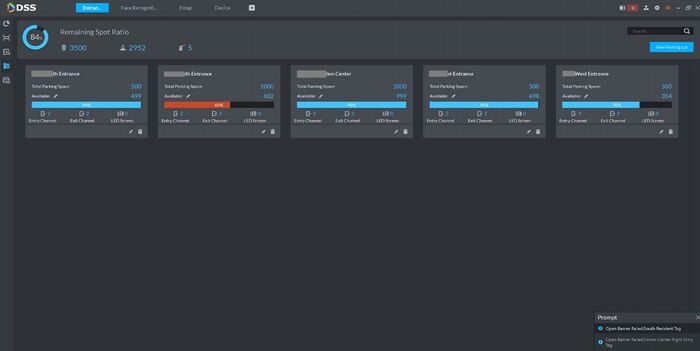
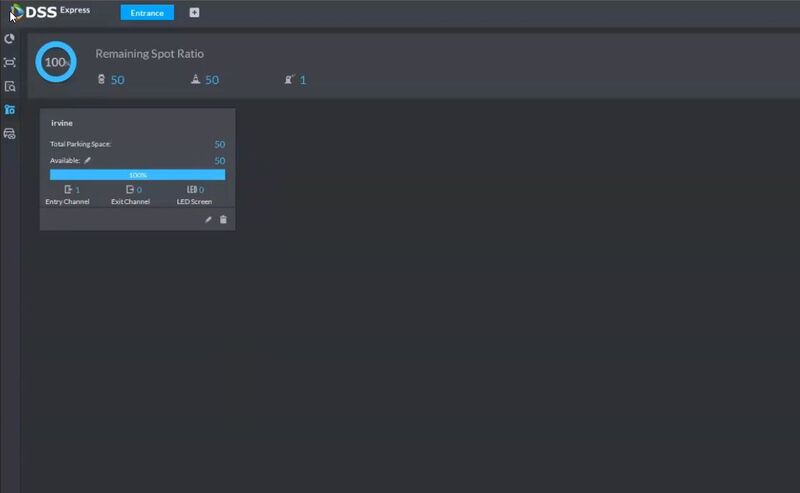
Parking Lot will be displayed once setup is complete:
Vehicle Management
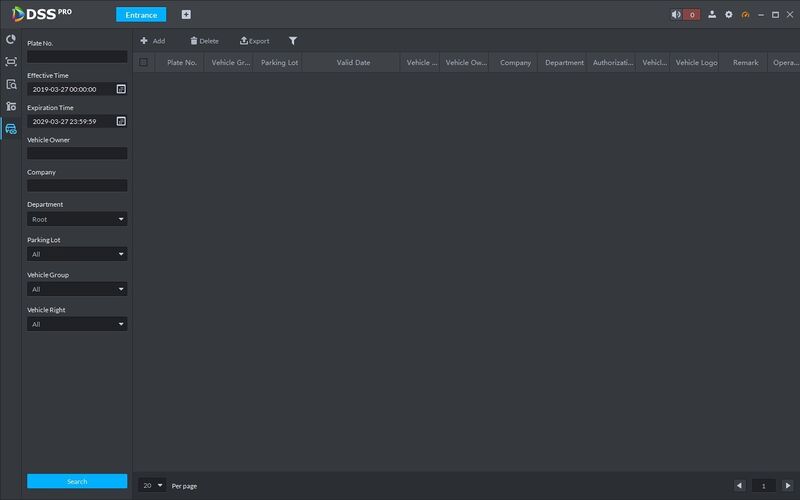
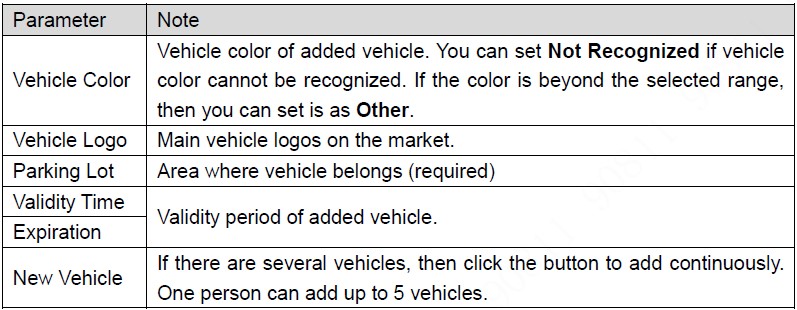
Vehicle info management includes vehicle type, department, related personnel and release ANPR, which are used as judgment basis to confirm if the vehicle can enter an area. Vehicle management can synchronize added vehicle info from personnel management.
The system displays the interface of Vehicle Management.
- Click Add.
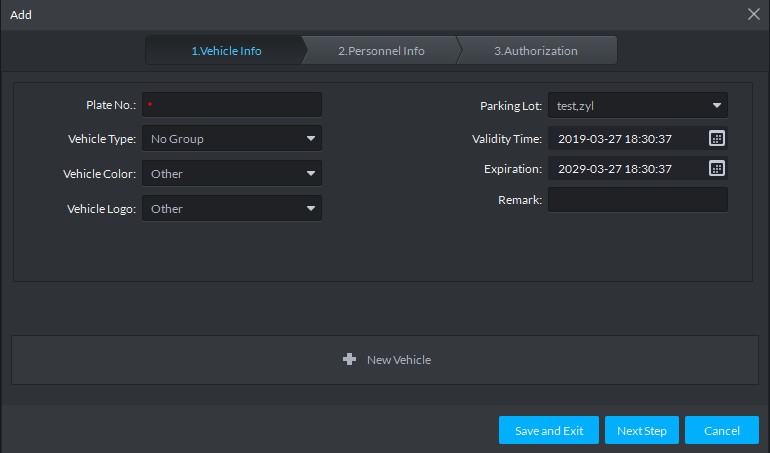
The system displays the interface of Add.
Click the tab of Vehicle Info and add vehicle info, click Next and the system display the interface of Personnel Info
Set vehicle related personnel info, click Next.
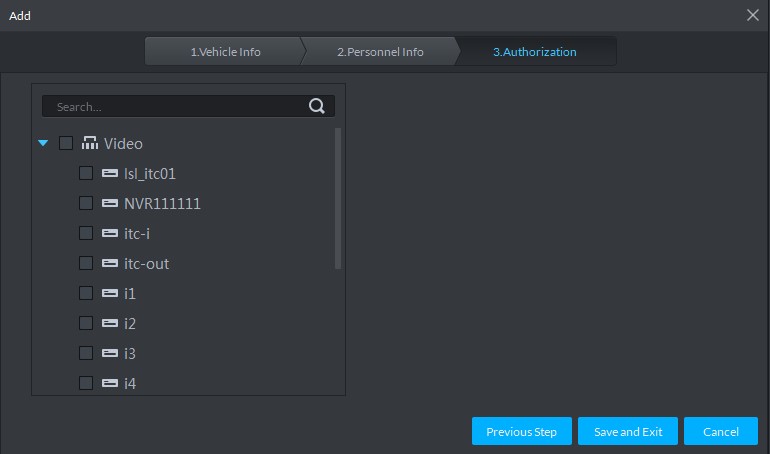
The system displays the Authorization interface.
Select all the ANPR devices that allow entrance and exit of the parking lot, click Save and Exit.
Synchronize vehicle info to corresponding ANPR device, make sure the ANPR device can make judgment if it has to release the vehicle even if ANPR device is disconnected to DSS Pro.
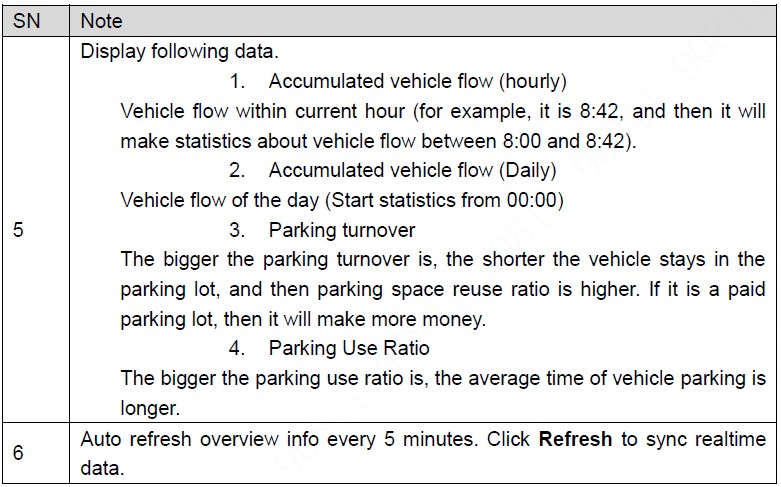
Overview
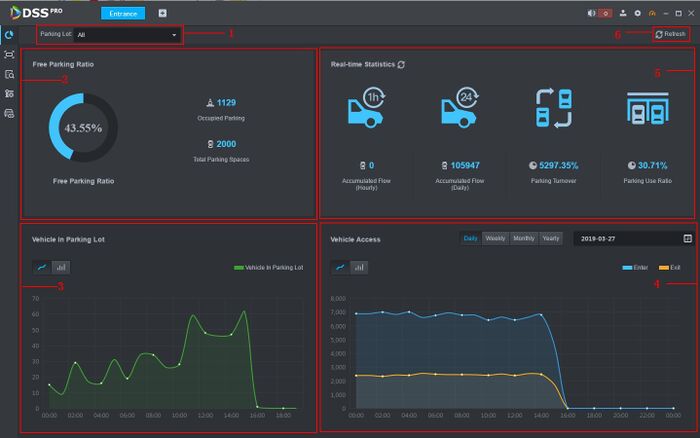
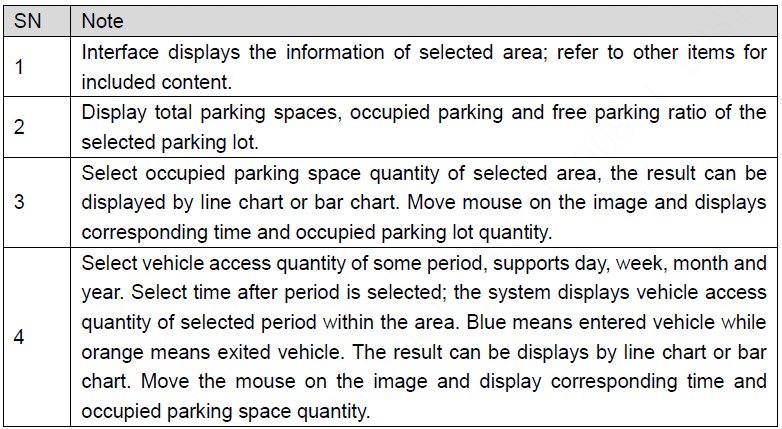
View the free parking ratio of current parking area; make statistics over realtime quantiy and on-site vehicle quantity, view quantity of entrance and exit vehicle within some period.
Click ![]() on the Entrance interface. The system displays the interface of Overview.
on the Entrance interface. The system displays the interface of Overview.
Explanation of Overview interface:
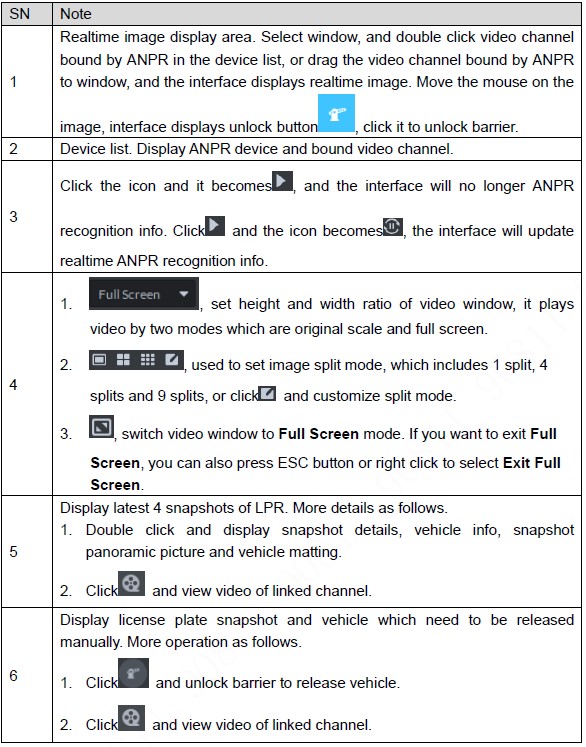
License Plate Recognition
Click ![]() on the Entrance interface. The system displays the interface of License Plate Recognition.
on the Entrance interface. The system displays the interface of License Plate Recognition.
Interface explained:
There are Three options to search/review Entrance/Parking lot LPR events:
- Vehicle Access - review a list of vehicle history of entry/exit
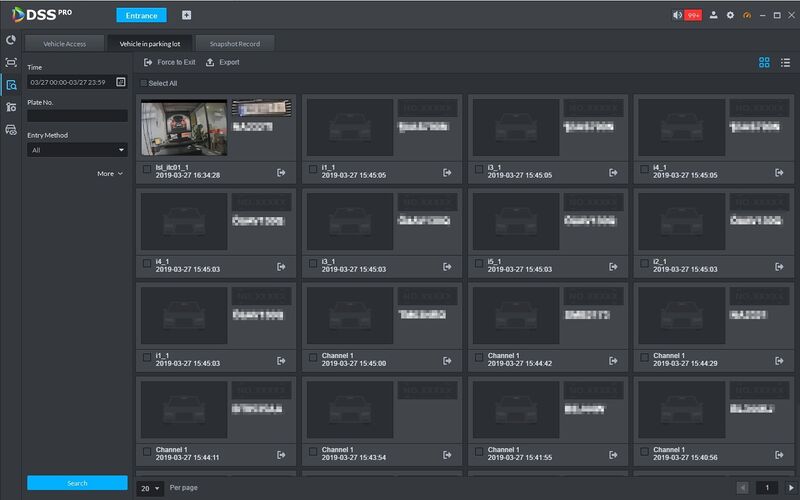
- Vehicle in Parking Lot - search for vehicles currently in the parking lot
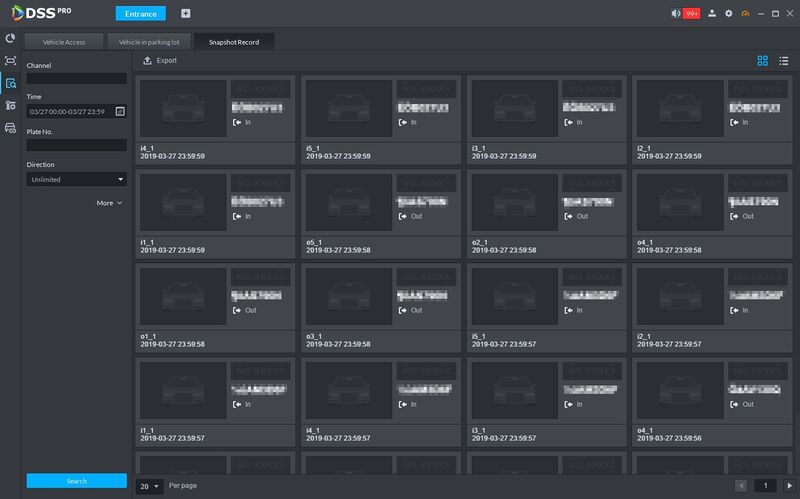
- Snapshot Record - review recorded Plate information by Time, Plate No., or Direction
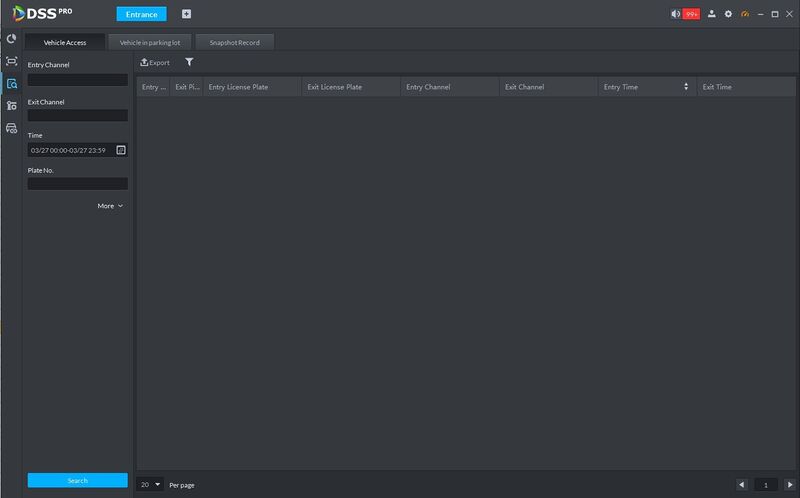
LPR Search - Vehicle History
The system displays the interface of Info Query.
Search vehicle in and out information.
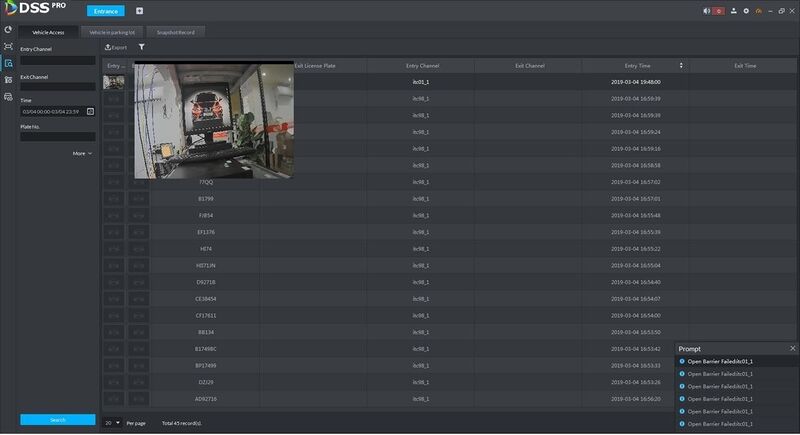
Click the tab of Vehicle Access.
The system displays the interface of Vehicle Access.
Set search condition, click Search
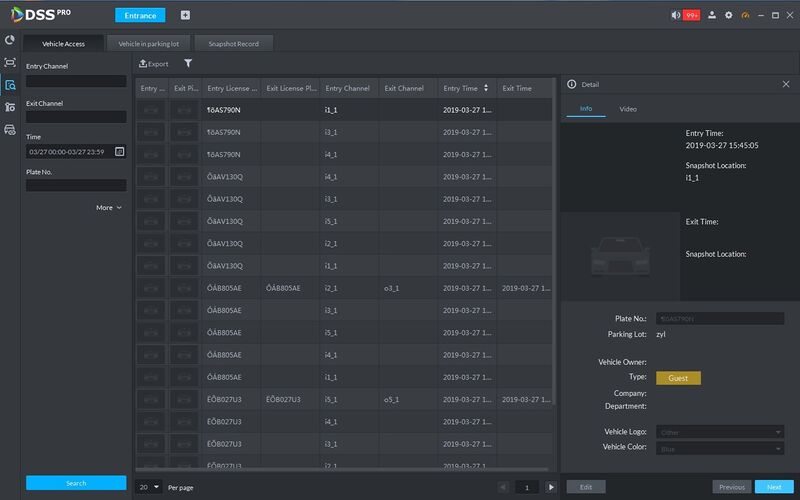
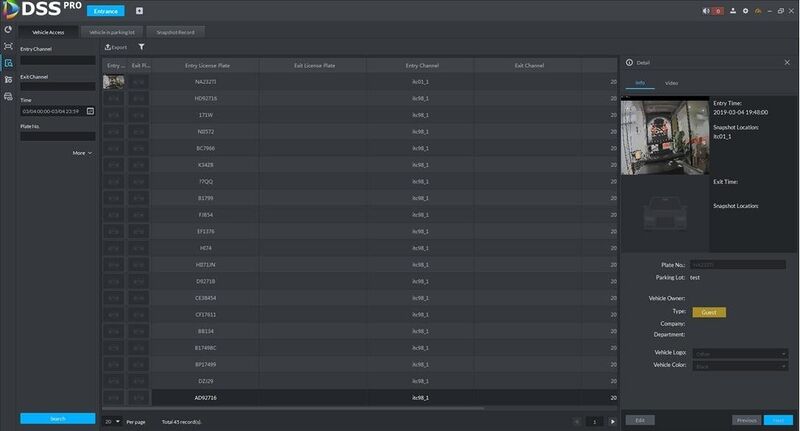
Search results will appear
> Move the mouse to the recorded entry picture or exit picture, and the system will display a bigger picture
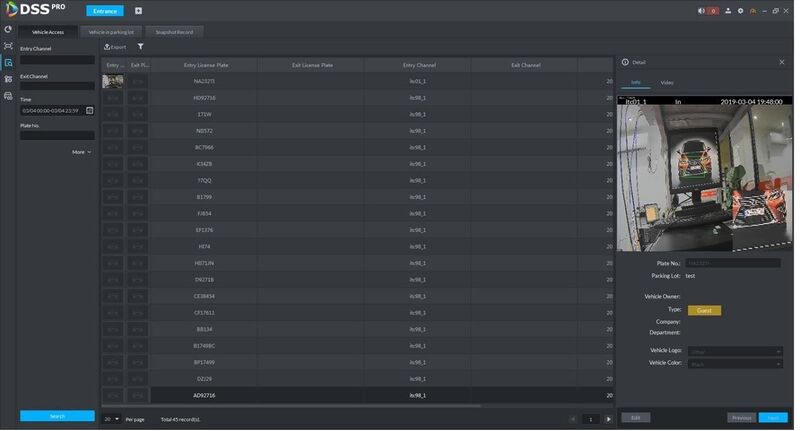
> Double click the record, and detailed info is displayed on the right of interface. Double click the picture in the Info to display a big picture. Drag the green box and the big picture will be displayed in the lower right corner.
Click Edit to modify vehicle info, click OK to save config.
Click Video to view linked video.
LPR Search - Vehicle in Parking Lot
Search for vehicles that are currently on site in the Parking lot
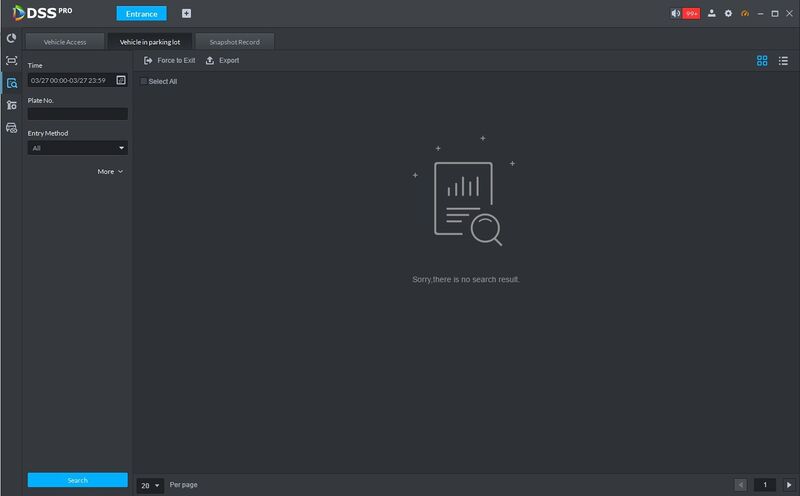
Click the tab of Vehicle in parking lot.
The system displays the interface of Vehicle in Parking Lot.
Set search condition, Click Search.
3) Related operations of vehicle in and out are as follows.
If the vehicle is confirmed not to be in the area, then click to select information (several items supported), click Force to Exit or , make sure the vehicle exits by Pro. Export information. Click Export and export all the information of on-site vehicles that can be searched. Set info display item. Click and select display item. Click view mode ( ) or list mode ( ) to select different display mode.
LPR Search - Snapshot Record
- Click the tab of Snapshot Record.
- Set search condition, click Search
